Introduction
In today’s digital age, voice assistants have become a common feature on smartphones, and Samsung’s Bixby is one such popular voice assistant. While Bixby offers a range of functionalities and conveniences, some users may find it unnecessary or prefer using other voice assistants available on their devices. If you’re wondering how to delete or disable Bixby on your Samsung phone, you’ve come to the right place.
In this article, we will guide you through the process of uninstalling and disabling various Bixby components. Whether you want to remove Bixby Voice entirely or simply disable specific features, we’ll provide step-by-step instructions to help you customize your Bixby experience to suit your preferences.
It’s important to note that the methods to delete or disable Bixby may vary slightly depending on the model and software version of your Samsung device. However, the general steps provided in this guide should apply to most Samsung smartphones.
So, if you’re ready to take control of your device and bid farewell to Bixby, let’s dive into the various methods you can use to delete or disable Bixby on your Samsung phone.
Uninstalling Bixby Voice
If you want to completely remove Bixby Voice from your Samsung device, the first step is to uninstall the Bixby Voice app. Here’s how:
- Go to your device’s Settings by swiping down from the top of the screen and tapping the gear-shaped icon.
- Scroll down and select the Apps option.
- In the Apps menu, tap the three-dot menu icon in the top right corner of the screen.
- From the dropdown menu, select Show system apps.
- Scroll down and find the Bixby Voice app. Tap on it to open its details.
- Tap on the Uninstall button and confirm the action when prompted.
- Once the uninstallation is complete, Bixby Voice will be removed from your device.
Note that uninstalling Bixby Voice will not remove other Bixby components or features. If you want to disable Bixby Home or other Bixby functionalities, you’ll need to follow the specific steps for each feature.
It’s worth mentioning that some Samsung models may not allow you to uninstall Bixby Voice completely. In such cases, you can still disable it to prevent it from running and minimize its presence on your device.
Now that you know how to uninstall Bixby Voice, you can proceed to the next sections where we’ll guide you through disabling other Bixby components.
Disabling Bixby Home
Bixby Home is a feature that provides personalized information and quick access to various apps and services on your Samsung device. If you find Bixby Home intrusive or prefer not to use it, you can easily disable it. Follow these steps:
- Swipe right on your device’s home screen to access Bixby Home.
- In the top-right corner of the Bixby Home screen, you’ll see three vertical dots. Tap on them to open the menu.
- From the menu, select Settings.
- In the Bixby Home settings, you’ll find a toggle switch next to “Bixby Home.” Tap on the switch to disable Bixby Home.
Once disabled, Bixby Home will no longer appear when you swipe right on your home screen. If you ever decide to enable it again, simply follow the same steps and toggle the switch back on.
Disabling Bixby Home allows you to customize your home screen and remove any unwanted clutter. You can now enjoy a cleaner and more personalized user experience on your Samsung device.
With Bixby Voice uninstalled and Bixby Home disabled, you’ve taken significant steps towards removing Bixby from your device. However, there are still a few more components to address. In the following sections, we’ll guide you through disabling Bixby Routines, Bixby Reminders, Bixby Vision, and the Bixby Key, if applicable to your device.
Removing Bixby Routines
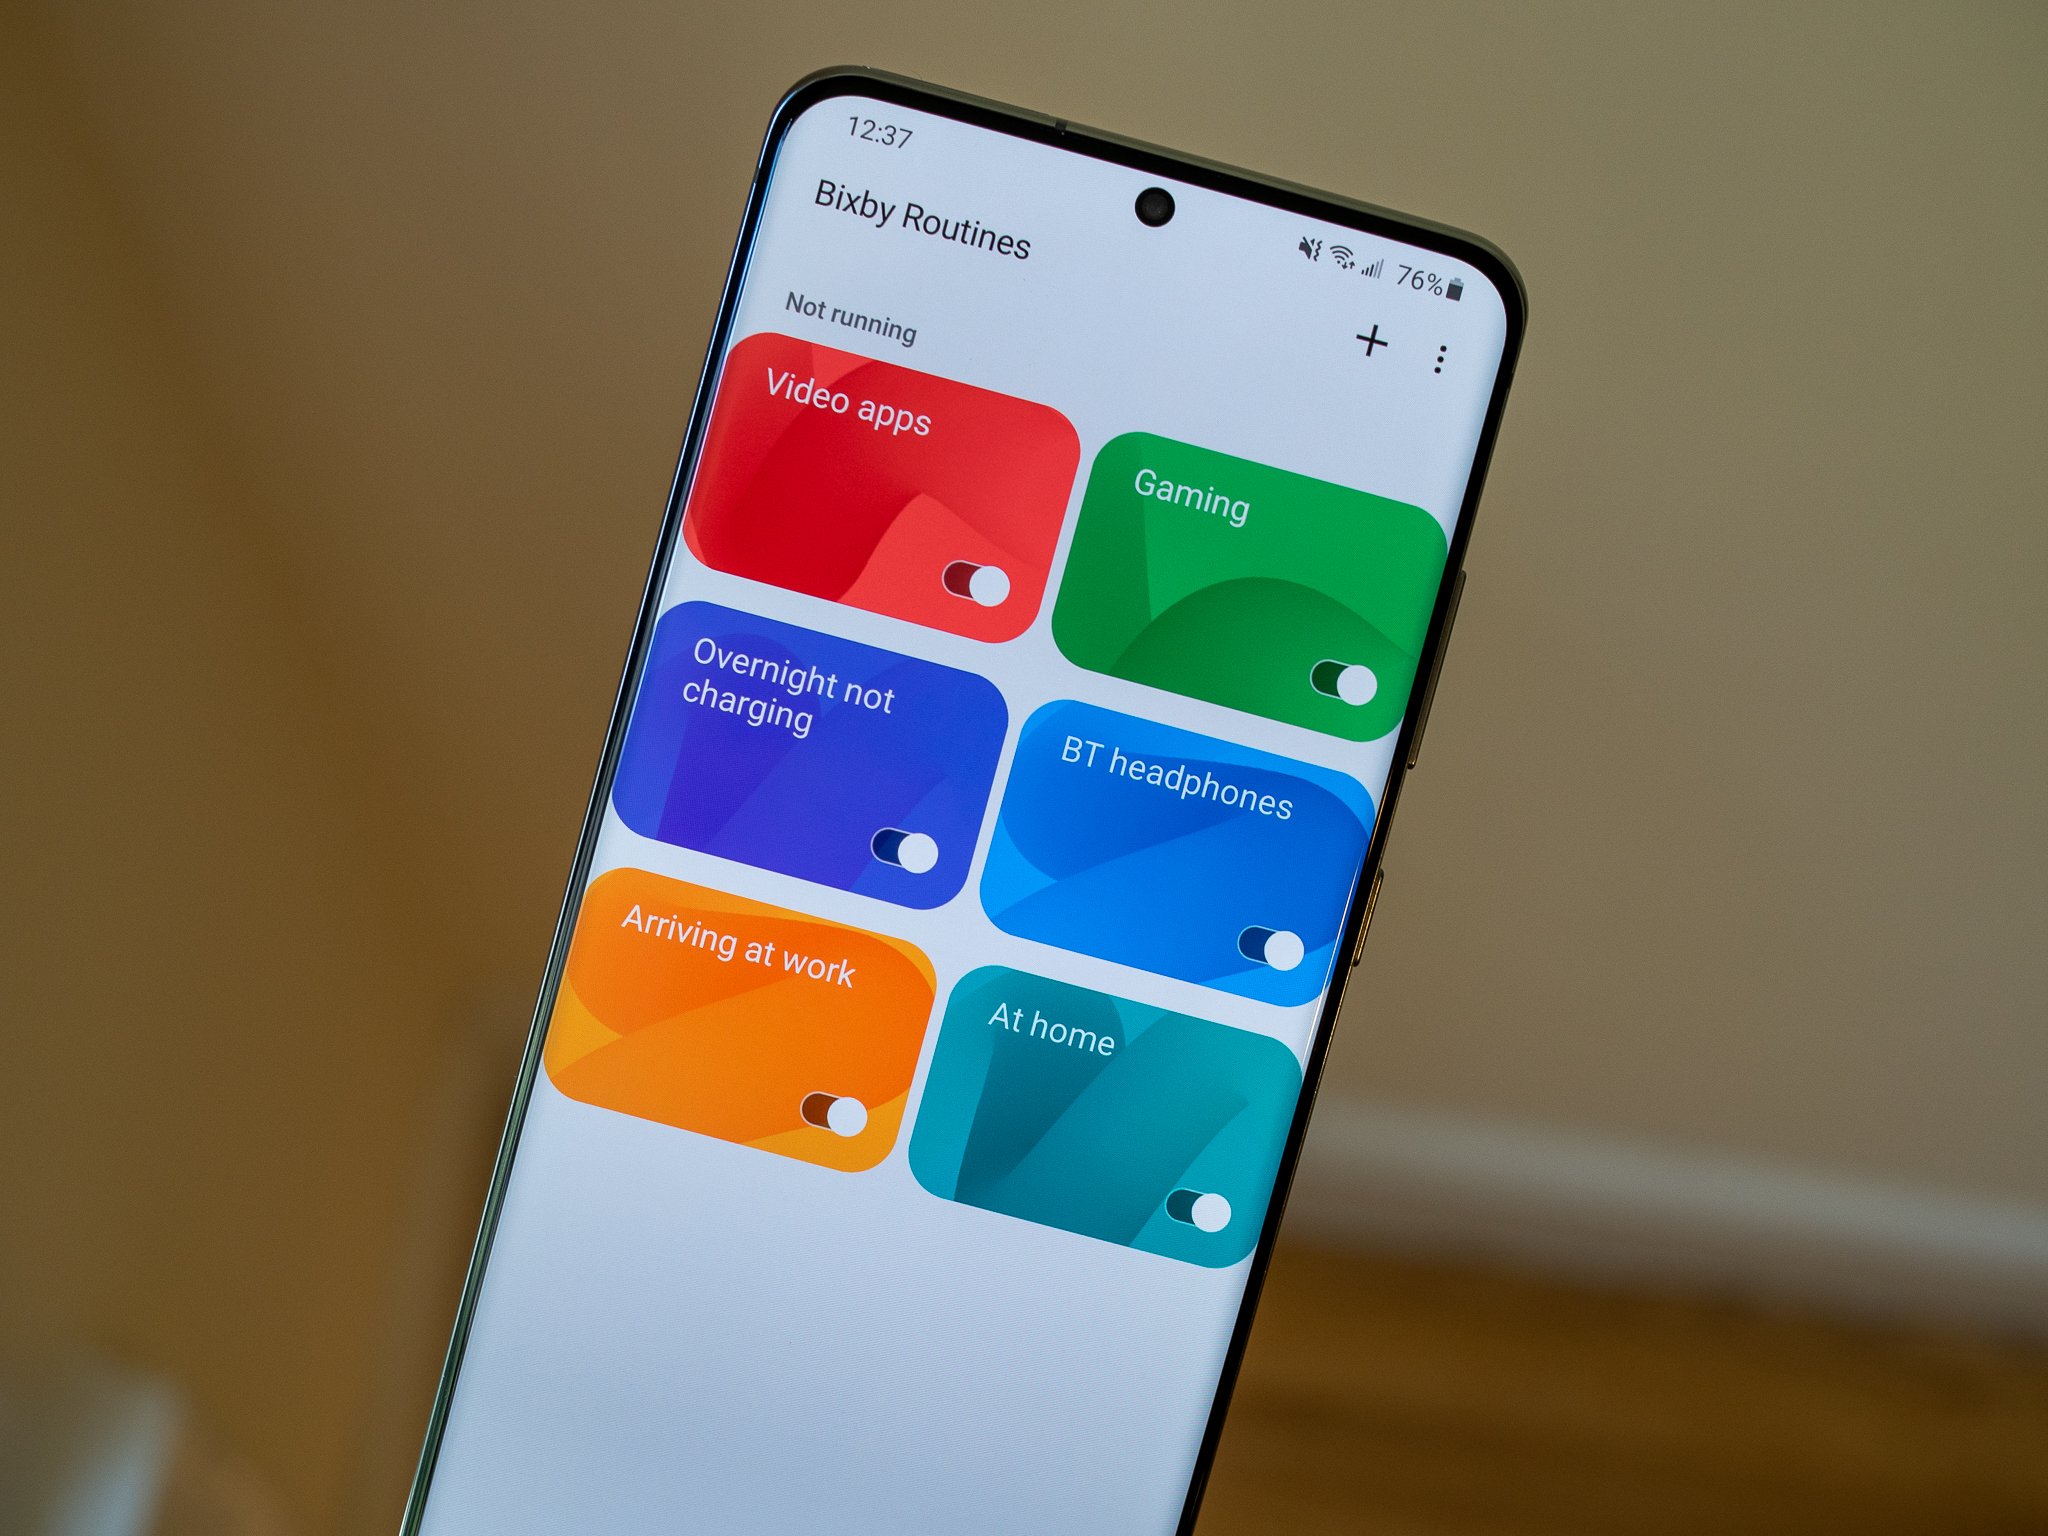
Bixby Routines is a feature that allows your Samsung device to automatically perform certain actions and customize settings based on your habits and routines. If you don’t use Bixby Routines or find it unnecessary, you can remove it from your device. Here’s how:
- Open the Bixby Routines app on your device. You can access it by swiping down from the top of the screen and tapping the gear-shaped icon to open Settings. Then, scroll down and select Advanced features. From there, tap on Bixby Routines.
- In the Bixby Routines menu, you’ll find a list of routines that are currently set up on your device. Find the routine you want to remove and tap on it.
- Within the routine’s settings, look for the three-dot menu icon in the top-right corner of the screen. Tap on it to open the options menu.
- From the options menu, select Delete Routine.
- Confirm the deletion when prompted.
By removing Bixby Routines, you can declutter your device and have more control over manually managing the settings and actions on your Samsung phone.
It’s important to note that removing Bixby Routines will not affect other aspects of Bixby’s functionality or features on your device. If you want to disable Bixby Reminders, Bixby Vision, or the Bixby Key, continue reading the next sections to find out how.
With Bixby Voice uninstalled, Bixby Home disabled, and Bixby Routines removed, you’re well on your way to customizing your Samsung device to your liking. In the following sections, we’ll guide you through disabling Bixby Reminders, Bixby Vision, and the Bixby Key, if applicable to your device.
Turning off Bixby Reminders
Bixby Reminders is a feature that allows you to set reminders and receive notifications on your Samsung device. If you don’t use Bixby Reminders or prefer to use a different reminder app, you can easily turn it off. Here’s how:
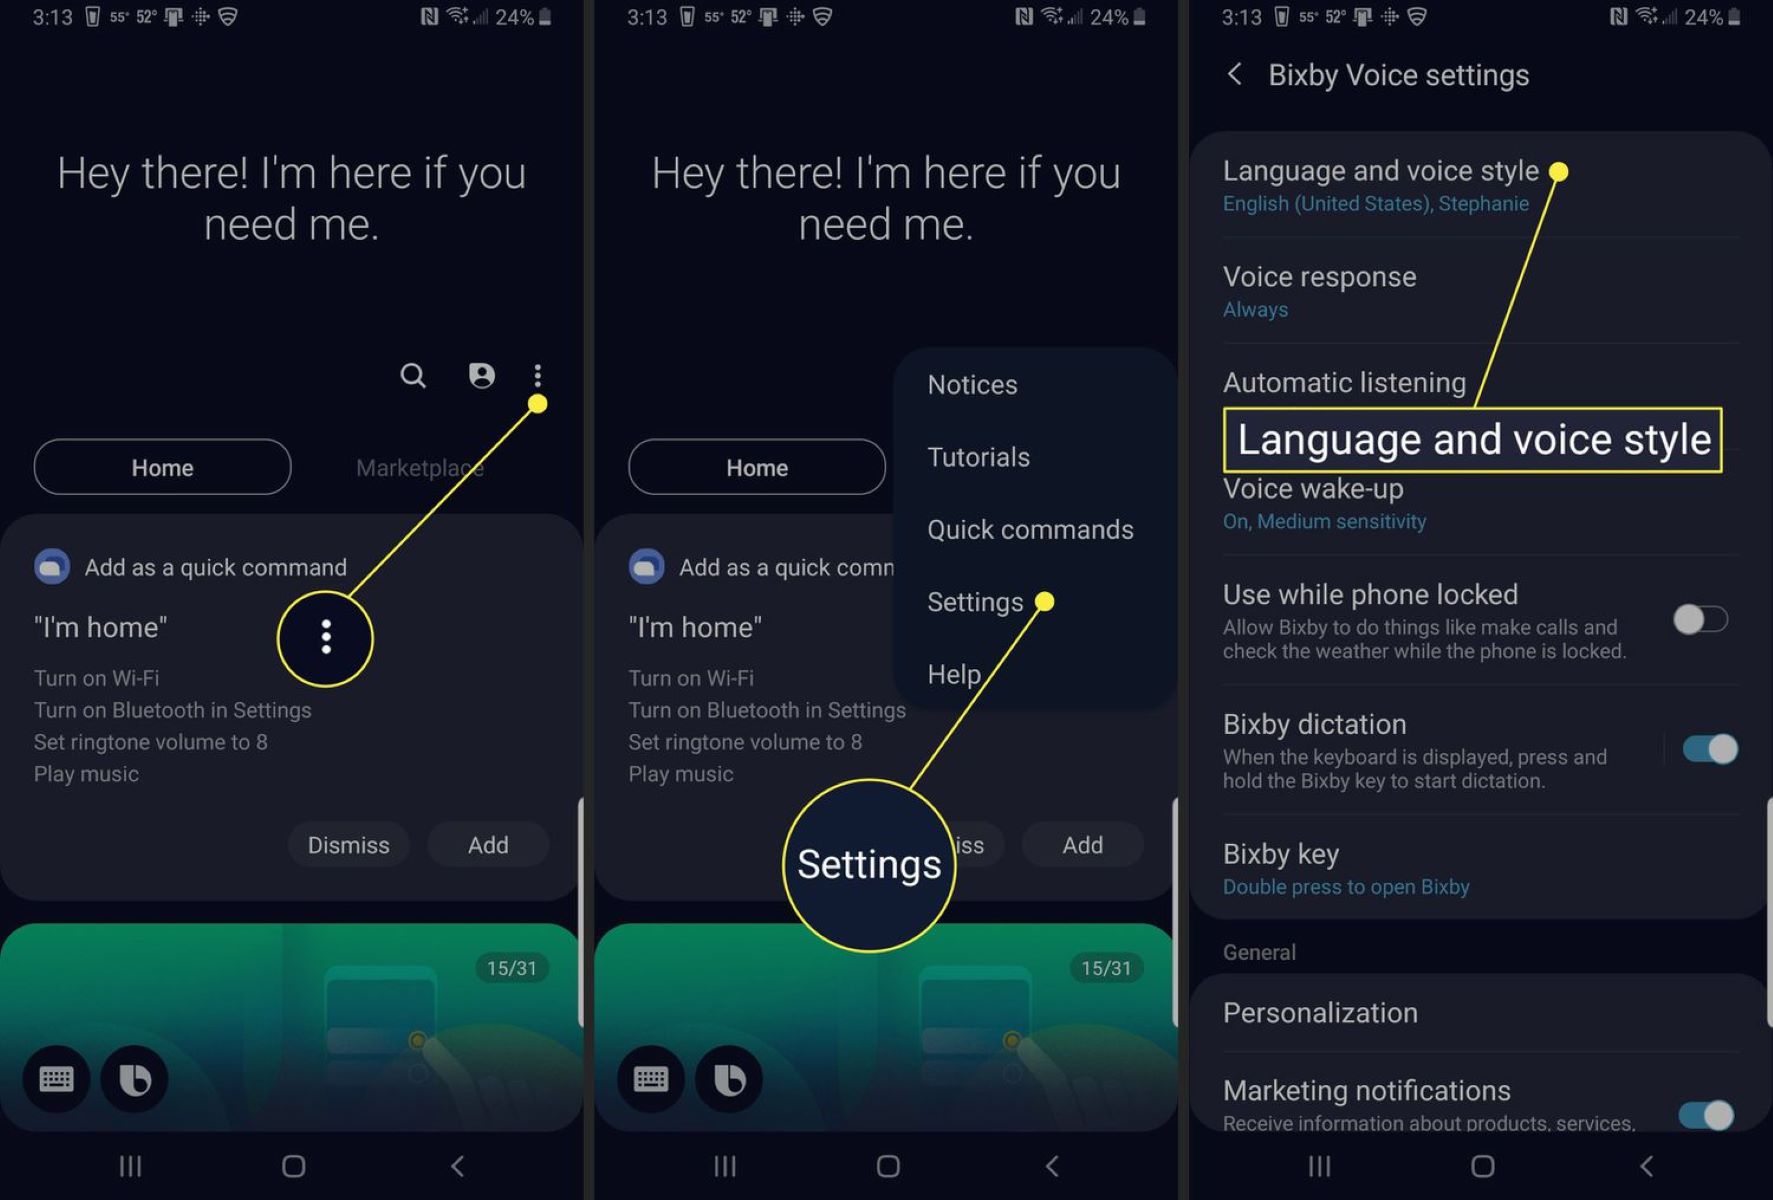
- Open the Bixby app on your device. You can usually find it by swiping right on your home screen or by accessing the app drawer.
- In the Bixby app, tap on the three vertical dots in the top-right corner of the screen to open the menu.
- From the menu, select Settings.
- In the Bixby Settings, scroll down and find the section labeled “Notifications.” Tap on it to access the notification settings.
- Within the notifications settings, you’ll find an option for Bixby Reminders. Toggle the switch next to it to turn off Bixby Reminders.
Once Bixby Reminders is turned off, you won’t receive any more reminders or notifications from Bixby. You can use an alternative app of your choice to manage your reminders.
Disabling Bixby Reminders allows you to streamline your notification experience and use a reminder app that suits your preferences. With Bixby Voice uninstalled, Bixby Home disabled, Bixby Routines removed, and Bixby Reminders turned off, you’re making great progress in customizing your Samsung device.
In the next section, we’ll guide you through getting rid of Bixby Vision, another component of Bixby that you may want to disable.
Getting rid of Bixby Vision
Bixby Vision is a feature that uses your device’s camera to provide augmented reality (AR) experiences and to assist you with image recognition, translation, and shopping. If you don’t find Bixby Vision useful or prefer not to use it, you can remove it from your device. Here’s how:
- Open the Camera app on your Samsung device.
- Swipe left to access Bixby Vision.
- In the Bixby Vision screen, look for the gear-shaped settings icon in the top-right corner. Tap on it to open the Bixby Vision settings.
- Within the Bixby Vision settings, you’ll find an option to disable Bixby Vision. Toggle the switch next to it to turn off Bixby Vision.
Once Bixby Vision is disabled, you won’t be able to access its features through the Camera app. This can help declutter your camera interface and streamline your photography experience.
It’s important to note that disabling Bixby Vision doesn’t remove the AR-related features from your device entirely. Some AR features may still be accessible through other apps or settings on your Samsung device.
With Bixby Voice uninstalled, Bixby Home disabled, Bixby Routines removed, Bixby Reminders turned off, and Bixby Vision disabled, you’re making significant progress in customizing your Samsung device to your liking.
In the next section, we’ll guide you through disabling the Bixby Key, if applicable to your device. Keep reading to learn how.
Disabling Bixby Key
Many Samsung devices come with a physical Bixby key that is dedicated to launching Bixby Voice when pressed. If you don’t use Bixby Voice or prefer to repurpose the Bixby key for other functions, you can disable it. Here’s how:
- Go to your device’s Settings by swiping down from the top of the screen and tapping the gear-shaped icon.
- Scroll down and select the Advanced features option.
- In the Advanced features menu, you’ll find an option labeled Bixby key. Tap on it to access the Bixby key settings.
- Within the Bixby key settings, you’ll see two options: Press once and Press twice. To disable the Bixby key, select the option Press once.
- A list of available actions will be displayed. Choose the option None to disable the Bixby key functionality.
Once the Bixby key is disabled, pressing it will no longer launch Bixby Voice. Instead, you can assign a different action or function to the Bixby key, depending on your device’s capabilities and available options.
Disabling the Bixby key allows you to reclaim the physical button’s functionality and customize it to better suit your needs.
With Bixby Voice uninstalled, Bixby Home disabled, Bixby Routines removed, Bixby Reminders turned off, Bixby Vision disabled, and the Bixby key deactivated, you’re well on your way to removing Bixby from your Samsung device.
In the final section, we’ll discuss clearing Bixby data and cache, which can help clean up any residual traces of Bixby on your device.
Clearing Bixby Data and Cache
To ensure a thorough removal of Bixby from your Samsung device, you may want to clear the Bixby data and cache. This will delete any remaining Bixby-related files and data that may be stored on your device. Here’s how you can clear Bixby data and cache:
- Go to your device’s Settings by swiping down from the top of the screen and tapping the gear-shaped icon.
- Scroll down and select the Apps option.
- In the Apps menu, locate and tap on Bixby Voice.
- Once you’re on the Bixby Voice details page, you’ll see options to Force Stop, Disable, and Storage. Tap on the Storage option.
- In the Storage settings, you’ll find the Clear Data and Clear Cache buttons. Tap on each of these buttons to delete the Bixby data and cache from your device.
- Confirm the action when prompted.
Clearing the Bixby data and cache helps ensure that all traces of Bixby are removed from your device, providing a clean slate for your personalized Android experience.
With Bixby Voice uninstalled, Bixby Home disabled, Bixby Routines removed, Bixby Reminders turned off, Bixby Vision disabled, the Bixby key deactivated, and the Bixby data and cache cleared, you have successfully taken the necessary steps to remove Bixby from your Samsung device.
It’s important to note that the steps provided may vary slightly depending on the model and software version of your Samsung device. However, the general steps should apply to most devices.
Congratulations! You’ve now reclaimed control over your device and personalized it to meet your preferences. Enjoy your Samsung device without the presence of Bixby.
Conclusion
Removing or disabling Bixby from your Samsung device can be a great way to personalize your user experience and streamline your device’s functionality. By following the steps outlined in this guide, you have learned how to uninstall Bixby Voice, disable Bixby Home, remove Bixby Routines, turn off Bixby Reminders, get rid of Bixby Vision, disable the Bixby key, and clear Bixby data and cache.
With these adjustments, you have taken control of your device and removed any unwanted Bixby components. Whether you found Bixby unnecessary, preferred using alternative voice assistants, or simply wanted a cleaner interface, you have successfully customized your Samsung device to meet your unique needs and preferences.
Remember that the steps provided in this guide may vary slightly depending on your device model and software version. It’s always a good idea to consult your device’s user manual or visit the Samsung support website for more specific instructions.
Enjoy your device without the presence of Bixby, and make the most out of your Samsung smartphone on your own terms!