Check for Updates
One of the most common reasons for Google Chrome not responding is outdated software. Ensuring that your browser is up to date is crucial for optimal performance. Here's how you can check for updates and keep your Chrome browser running smoothly:
-
Open Chrome Settings: Start by launching Google Chrome and clicking on the three-dot menu icon in the top-right corner of the browser window. From the dropdown menu, select "Settings."
-
Access the About Chrome Section: In the Settings menu, scroll down and click on "About Chrome" located in the left-hand sidebar. This will prompt Chrome to check for updates automatically.
-
Update Chrome: If there are any pending updates, Chrome will begin downloading and installing them. It's essential to keep the browser open during this process to ensure that the updates are successfully applied.
-
Relaunch Chrome: Once the updates have been installed, Chrome will prompt you to relaunch the browser to apply the changes. Click on the "Relaunch" button to complete the update process.
By regularly checking for and installing updates, you can ensure that your Chrome browser remains secure, stable, and responsive. This simple yet effective maintenance task can prevent many common issues related to browser performance and compatibility.
Keeping your browser updated not only improves its functionality but also enhances its security features, protecting you from potential vulnerabilities. Therefore, making it a habit to check for updates regularly can save you from the frustration of dealing with a non-responsive browser and provide a seamless browsing experience.
Clear Browsing Data
Clearing browsing data is a fundamental maintenance task that can significantly improve the performance and responsiveness of Google Chrome. Over time, the browser accumulates temporary files, cookies, cached images, and other browsing history data, which can contribute to sluggishness and unresponsiveness. By regularly clearing this data, you can ensure that Chrome operates efficiently and smoothly. Here's how you can clear your browsing data in Google Chrome:
-
Access Chrome Settings: Begin by clicking on the three-dot menu icon in the top-right corner of the browser window and selecting "Settings" from the dropdown menu.
-
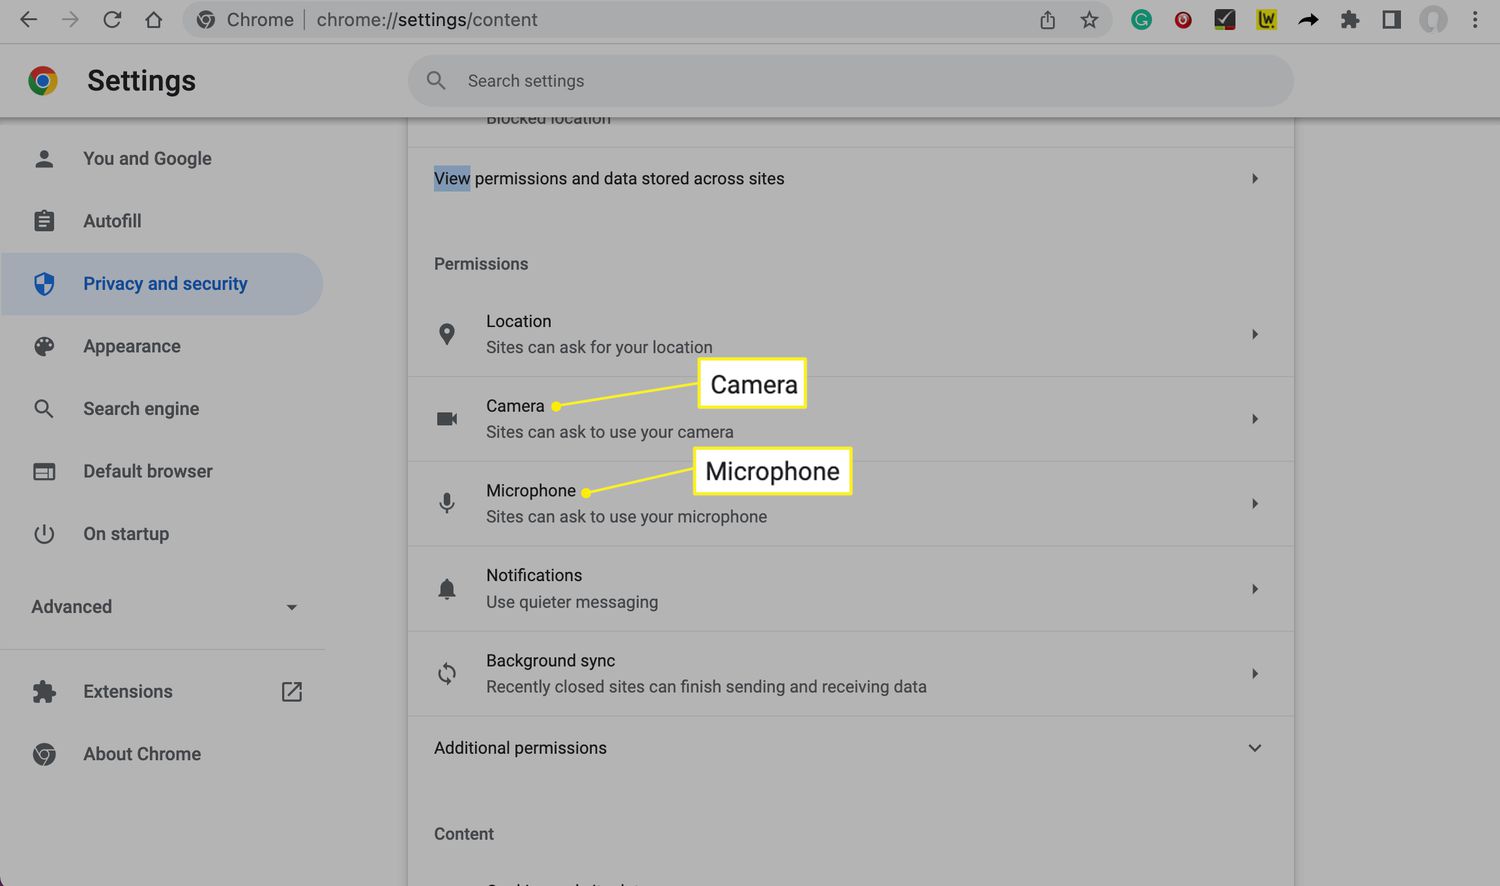
Navigate to Privacy and Security: In the Settings menu, scroll down and click on "Privacy and Security" located in the left-hand sidebar.
-
Choose Clear Browsing Data: Under the "Privacy and Security" section, select "Clear browsing data." This will open a new tab where you can customize the data you want to clear.
-
Select Data to Clear: You can choose the time range for which you want to clear the data, such as the past hour, day, week, or all time. Additionally, you can select the types of data to clear, including browsing history, cookies and other site data, cached images and files, and more.
-
Clear Data: Once you have selected the desired options, click on the "Clear data" button to initiate the process. Chrome will then proceed to remove the selected browsing data from your browser.
By clearing browsing data, you can free up valuable disk space and remove potentially corrupted or outdated files that may be hindering Chrome's responsiveness. This process also helps in resolving issues related to slow page loading and unresponsive tabs, ultimately leading to a smoother browsing experience.
Regularly clearing browsing data is essential for maintaining the overall health of your browser. It not only improves performance but also enhances privacy and security by removing traces of your online activity. By incorporating this simple yet effective maintenance task into your routine, you can ensure that Google Chrome remains responsive and efficient, allowing you to navigate the web seamlessly.
Disable Extensions
Google Chrome's extensive library of extensions offers users a myriad of functionalities, from productivity tools to entertainment add-ons. However, an accumulation of extensions can sometimes lead to browser performance issues, causing Chrome to become unresponsive. When faced with this situation, disabling extensions can be a practical troubleshooting step to identify and resolve the underlying problem.
To disable extensions in Google Chrome, follow these steps:
-
Access the Extensions Menu: Begin by clicking on the three-dot menu icon in the top-right corner of the browser window. From the dropdown menu, hover over "More tools" and select "Extensions." This will open the Extensions page, displaying a list of all installed extensions.
-
Disable Individual Extensions: On the Extensions page, you will see a list of all the extensions currently installed in Chrome. To disable an extension, simply toggle off the switch located next to the respective extension. This action temporarily deactivates the extension without uninstalling it, allowing you to observe the browser's performance without its influence.
-
Test Chrome's Responsiveness: After disabling the extensions, navigate through various websites and perform typical browsing activities to assess whether Chrome's responsiveness has improved. By systematically enabling and disabling extensions, you can pinpoint the specific extension(s) causing the performance issue.
-
Remove or Update Problematic Extensions: If you identify a particular extension that significantly impacts Chrome's responsiveness, consider removing it altogether. Alternatively, check for updates for the problematic extension, as outdated versions can sometimes lead to compatibility issues and performance degradation.
Disabling extensions serves as an effective method to troubleshoot unresponsive behavior in Google Chrome. It allows users to isolate potential causes and gradually reintroduce extensions to identify the ones impacting browser performance. Additionally, this process provides insight into the necessity and impact of each extension, enabling users to streamline their browsing experience by retaining only essential and beneficial add-ons.
By periodically reviewing and managing extensions, users can maintain a responsive and efficient browsing environment in Google Chrome. This proactive approach ensures that the browser's functionality remains optimized, allowing users to leverage the benefits of extensions without compromising performance.
Reset Chrome Settings
Resetting Chrome settings can serve as a powerful solution when the browser becomes unresponsive or exhibits erratic behavior. This process effectively restores Chrome to its default state, eliminating potential configuration issues, corrupted settings, or conflicting preferences that may be hindering its performance. By initiating a reset, users can effectively troubleshoot and resolve persistent responsiveness issues in Google Chrome.
To reset Chrome settings, follow these steps:
-
Access Chrome Settings: Begin by clicking on the three-dot menu icon in the top-right corner of the browser window and selecting "Settings" from the dropdown menu.
-
Navigate to Advanced Settings: In the Settings menu, scroll down and click on "Advanced" to reveal additional configuration options.
-
Locate and Reset Settings: Within the Advanced settings, scroll down to find the "Reset and clean up" section. Here, you will find the "Restore settings to their original defaults" option.
-
Initiate Reset: Click on "Restore settings to their original defaults" to proceed with the reset process. A confirmation dialog will appear, outlining the changes that will occur as a result of the reset.
-
Confirm Reset: To confirm the reset, click on the "Reset settings" button. Chrome will then proceed to reset its settings to the default state.
By resetting Chrome settings, users can effectively address underlying issues that may be causing unresponsiveness. This action clears out potentially problematic configurations, preferences, and customizations, allowing the browser to return to a stable and responsive state.
It's important to note that initiating a reset will result in the loss of certain customizations, such as homepage settings, search engine preferences, and pinned tabs. However, bookmarks, history, and saved passwords will remain unaffected by the reset.
After completing the reset, users should observe Chrome's behavior to determine if the responsiveness issues have been resolved. This process serves as a valuable troubleshooting step, particularly when unresponsive behavior persists despite other attempted solutions.
Incorporating the reset Chrome settings procedure into the troubleshooting process can effectively restore the browser's functionality, providing users with a reliable and responsive browsing experience. Additionally, periodic resets can serve as a proactive maintenance measure, ensuring that Chrome remains optimized and free from persistent performance issues.
Run a Malware Scan
In the digital landscape, malware poses a significant threat to the performance and security of web browsers, including Google Chrome. When Chrome exhibits unresponsive behavior, it's essential to consider the possibility of malware infiltration, as malicious software can disrupt browser functionality and compromise user privacy. Running a malware scan presents a crucial step in identifying and mitigating potential security threats, thereby restoring Chrome to a responsive and secure state.
To initiate a malware scan in Google Chrome, users can leverage the built-in security features of the browser in conjunction with reputable antivirus software. Here's a comprehensive approach to running a malware scan and safeguarding Chrome from potential security risks:
-
Utilize Chrome's Built-in Security Features: Google Chrome offers a range of security features designed to protect users from malicious content and potential threats. Users can enable the Safe Browsing feature, which provides warnings about potentially harmful websites and downloads. To activate Safe Browsing, access Chrome Settings, navigate to the Privacy and Security section, and ensure that the "Safe Browsing" option is enabled.
-
Leverage Reputable Antivirus Software: In addition to Chrome's native security capabilities, users can bolster their defenses by utilizing reputable antivirus software. Installing and regularly updating antivirus programs can help detect and eliminate malware that may be affecting Chrome's responsiveness. Users should ensure that their antivirus software is configured to perform comprehensive scans of the system, including web browser files and extensions.
-
Perform a Full System Scan: Once the antivirus software is in place, initiate a full system scan to thoroughly examine all files, programs, and browser components for potential malware. This comprehensive scan can identify and eliminate any malicious software that may be impacting Chrome's performance and responsiveness.
-
Address Detected Threats: In the event that the malware scan identifies potential threats, users should follow the recommended actions provided by the antivirus software to address and remove the detected malware. This may involve quarantining, deleting, or taking other necessary measures to neutralize the security risks.
By conducting a thorough malware scan, users can fortify Chrome against potential security vulnerabilities and address unresponsive behavior attributed to malware interference. This proactive approach not only safeguards the browser and the user's data but also contributes to a more reliable and responsive browsing experience.
Incorporating regular malware scans into the maintenance routine for Google Chrome is essential for preserving the browser's performance and security. By remaining vigilant and proactive in detecting and mitigating potential security threats, users can ensure that Chrome operates optimally, providing a secure and responsive platform for their online activities.
Reinstall Chrome
When all troubleshooting efforts fail to restore the responsiveness of Google Chrome, reinstalling the browser can serve as the ultimate solution to address persistent issues. Reinstalling Chrome involves removing the existing installation and then downloading and installing the latest version of the browser. This process effectively eliminates any underlying software corruption or configuration issues that may be causing unresponsiveness, providing users with a clean and fresh installation of Chrome.
To reinstall Google Chrome, follow these comprehensive steps:
-
Uninstall Chrome: Begin by uninstalling the existing installation of Google Chrome from your computer. On Windows, this can be done by accessing the Control Panel, navigating to "Programs" and then "Programs and Features," and selecting Google Chrome from the list of installed programs. Click on "Uninstall" and follow the on-screen prompts to remove Chrome from your system. On macOS, simply drag the Chrome application from the Applications folder to the Trash.
-
Clear Remaining Files: After uninstalling Chrome, it's essential to remove any remaining files and folders associated with the browser. This includes clearing out the user data directory, which contains settings, bookmarks, and other user-specific data. On Windows, the user data directory is typically located at "C:\Users\YourUsername\AppData\Local\Google\Chrome." Deleting this folder ensures a clean slate for the reinstallation. On macOS, navigate to "~/Library/Application Support/Google/Chrome" and remove the Chrome folder.
-
Download and Install Chrome: Once the previous installation and associated files have been removed, proceed to download the latest version of Google Chrome from the official website. After downloading the installation file, run the setup process to install Chrome on your system.
-
Restore User Data: If you had previously synced your Chrome data with your Google account, signing in after reinstalling Chrome will automatically restore your bookmarks, history, and other settings. If not, you can manually import any backed-up user data or settings to personalize your browsing experience.
Reinstalling Chrome provides a comprehensive reset, effectively addressing persistent unresponsiveness and performance issues. This process ensures that users start with a clean and optimized installation of the browser, free from any lingering software conflicts or corruption.
By following the steps outlined above, users can confidently reinstall Google Chrome, providing a fresh start and a responsive browsing experience. This approach serves as a definitive solution when other troubleshooting methods have proven ineffective, allowing users to enjoy the full capabilities of Chrome without the hindrance of unresponsiveness.