Introduction
When it comes to browsing the web, convenience and security are often at odds. One of the most common features that exemplifies this trade-off is the password manager in web browsers. While it can be incredibly convenient to have your passwords saved and auto-filled for various websites, it also raises concerns about security and privacy. Firefox, a popular web browser known for its robust features and user-friendly interface, offers a built-in password manager that prompts users to save their login credentials for future use. However, some users may find this feature intrusive or may prefer to manage their passwords in a different way.
In this article, we will explore how to stop Firefox from asking to save passwords. Whether you're looking to disable the password manager altogether, clear saved passwords for specific websites, or utilize private browsing mode for enhanced privacy, we've got you covered. By understanding the options available within Firefox, you can tailor your browsing experience to align with your preferences and security considerations. Let's dive into the various methods for taking control of your password management in Firefox.
Disable Password Manager
If you're looking to take control of your password management in Firefox, disabling the built-in password manager is a straightforward option. By turning off this feature, you can prevent Firefox from prompting you to save passwords for various websites. This can be particularly useful if you prefer to use a dedicated password manager or if you simply want to manage your login credentials manually.
To disable the password manager in Firefox, follow these simple steps:
-
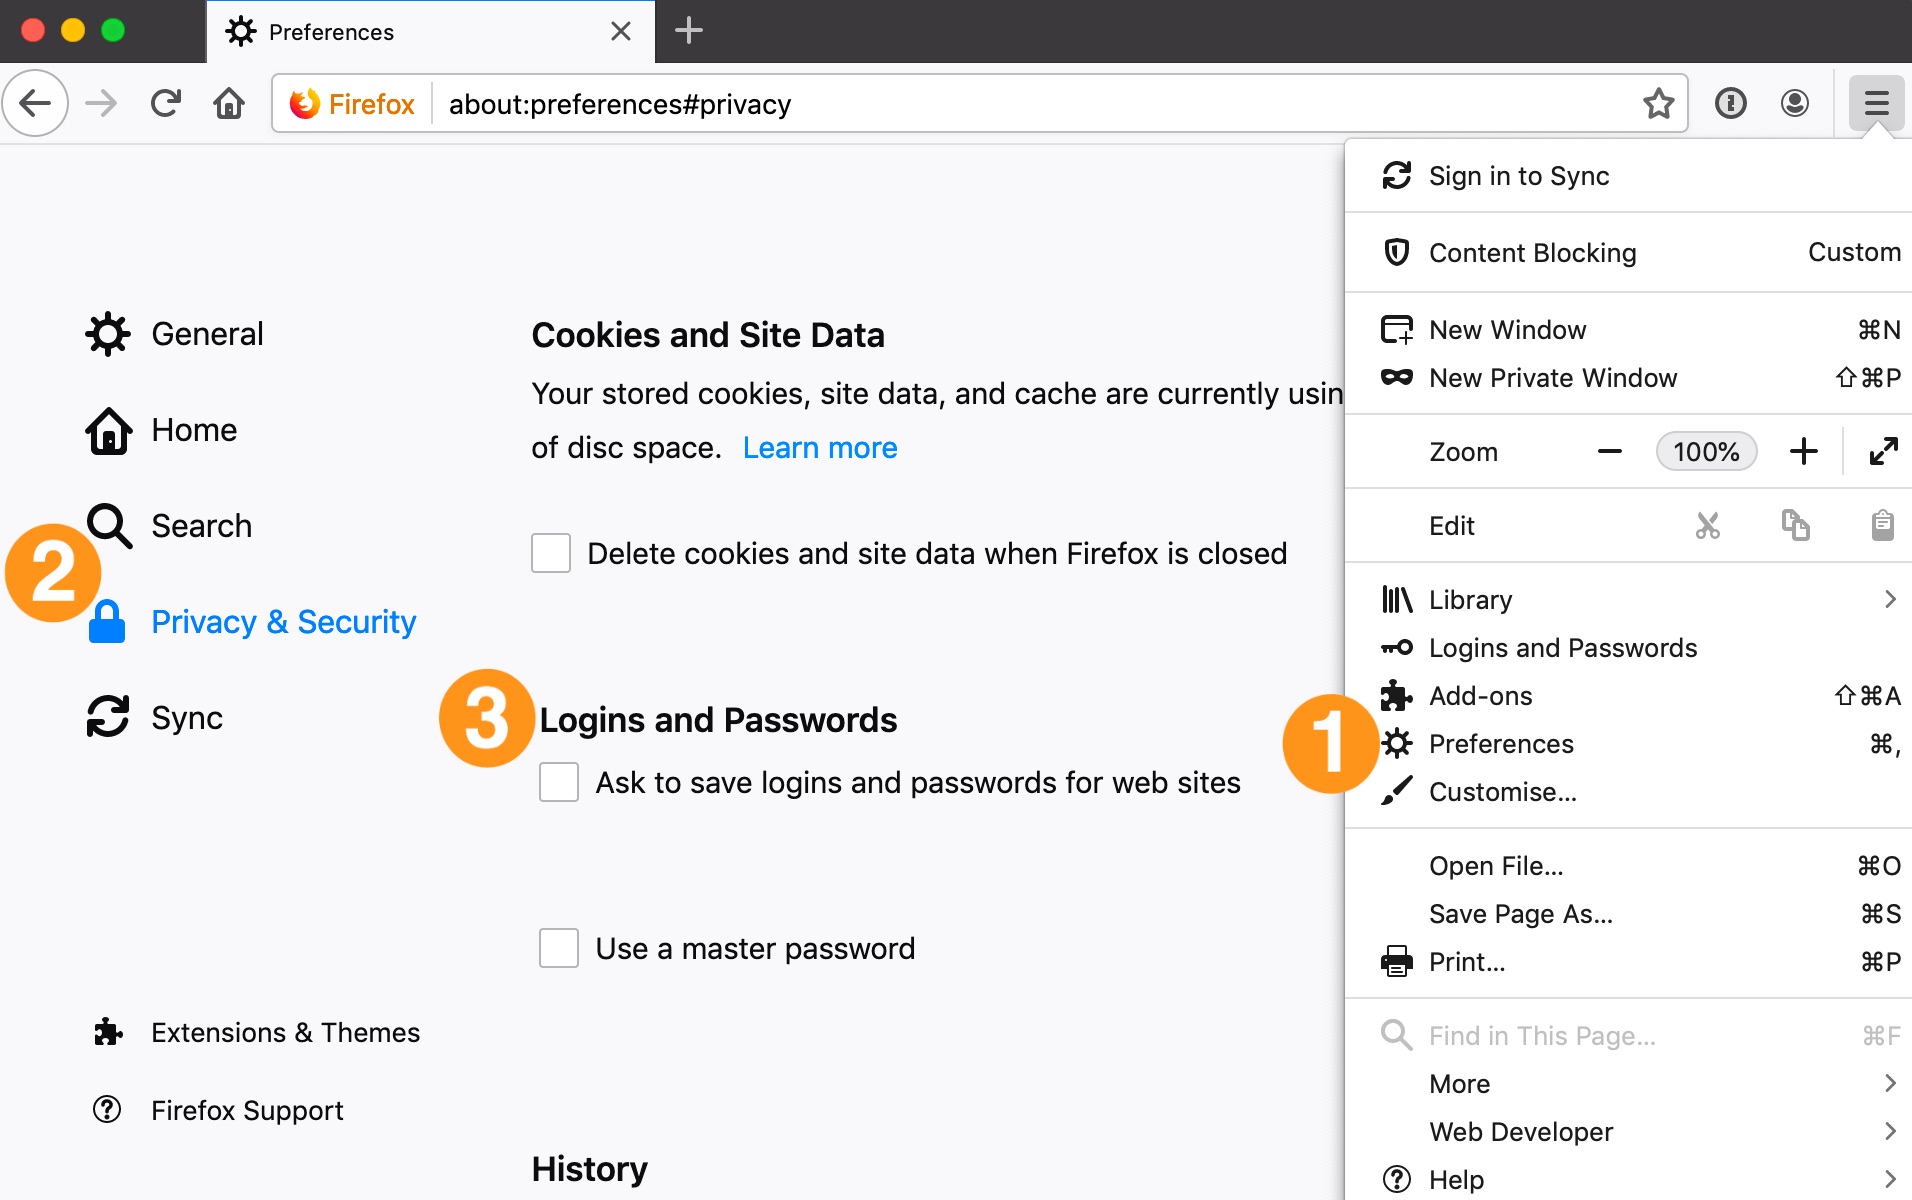
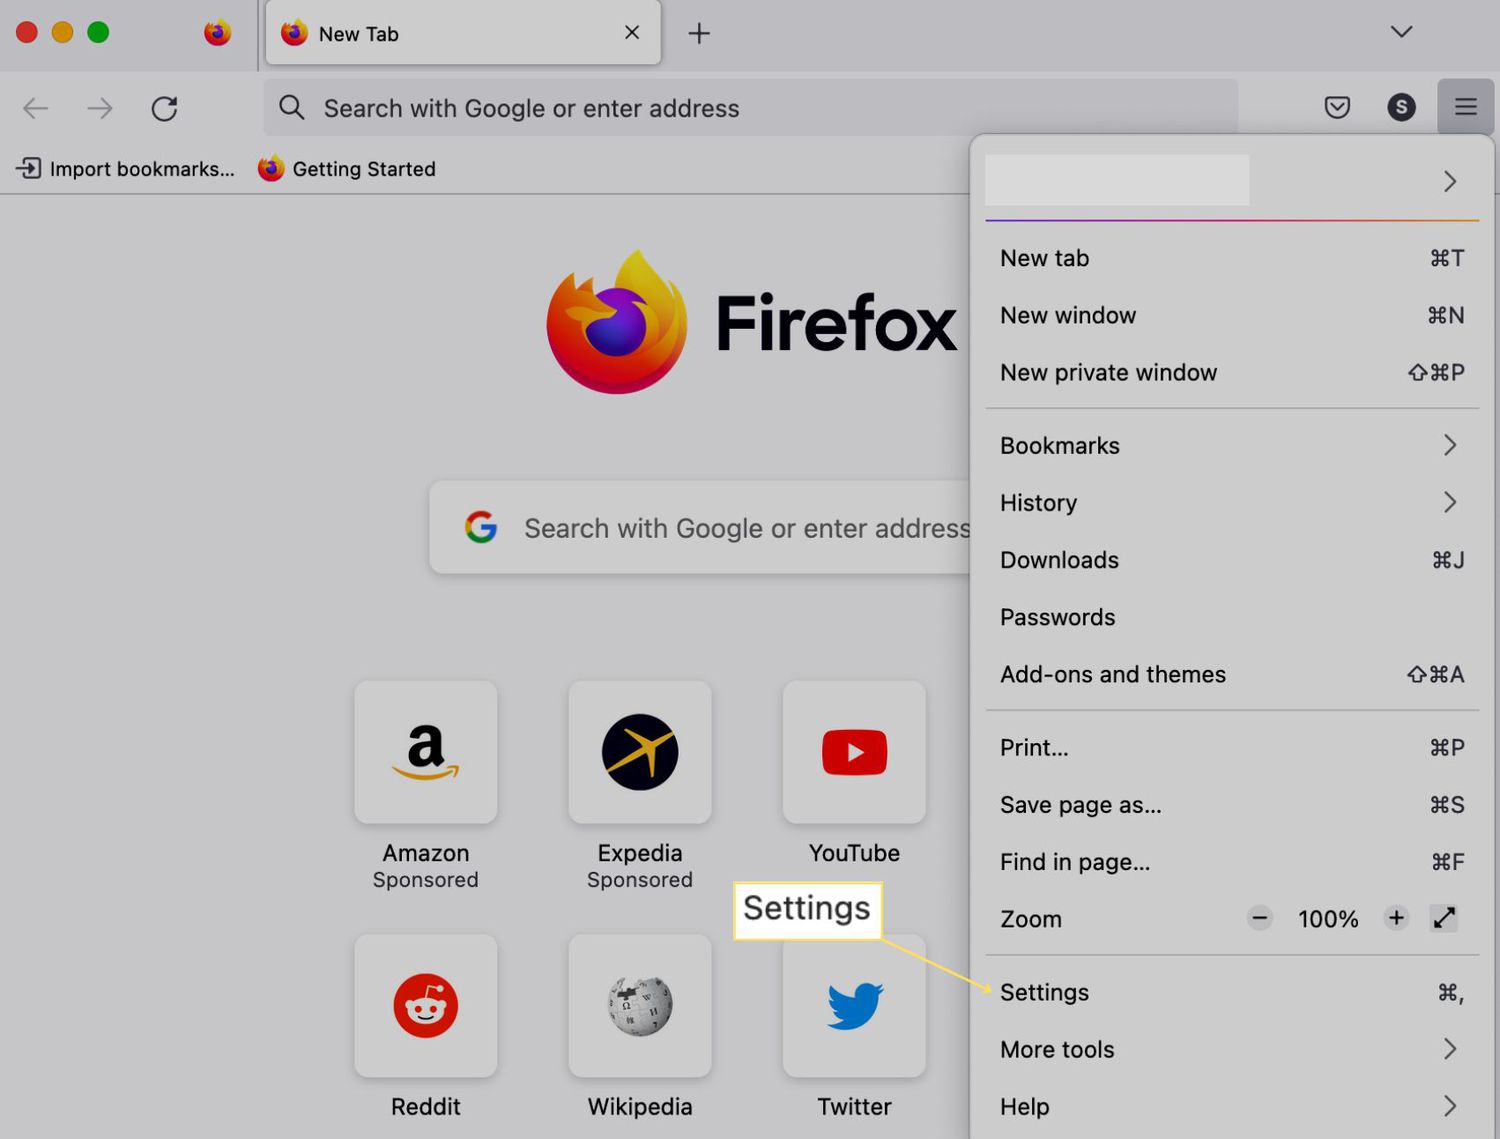
Open Firefox Preferences: Start by launching Firefox and accessing the browser's menu. From there, select "Preferences" to open the settings panel.
-
Navigate to Privacy & Security: Within the Preferences panel, locate and click on "Privacy & Security" in the left-hand navigation menu. This will bring up a range of privacy and security settings for Firefox.
-
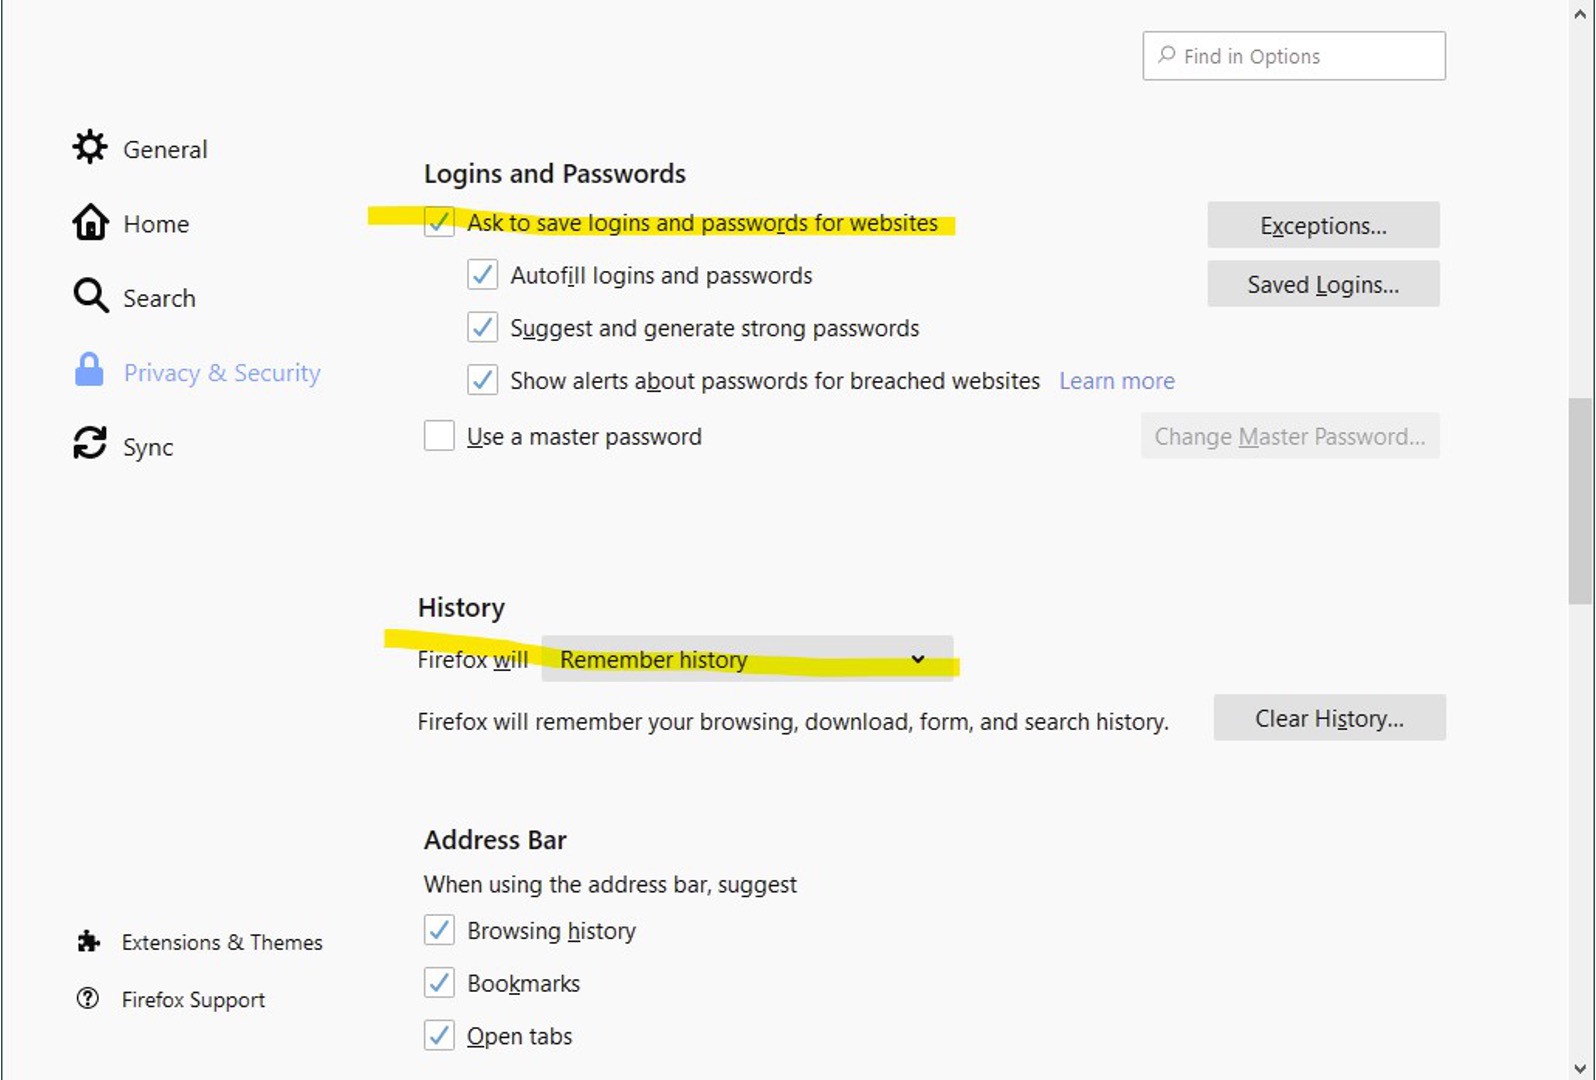
Locate the Logins and Passwords Section: Scroll down within the Privacy & Security settings until you find the "Logins and Passwords" section. This is where you can manage the behavior of the password manager.
-
Disable the Offer to Save Logins and Passwords: Within the Logins and Passwords section, you'll find an option labeled "Ask to save logins and passwords for websites." Simply uncheck this box to disable the prompt for saving passwords.
-
Optional: Clear Saved Logins: If you've already saved passwords for various websites and want to remove them, you can click on the "Saved Logins" option within the Logins and Passwords section. From there, you can review and delete any saved logins as needed.
By following these steps, you can effectively disable the password manager in Firefox and take control of how your login credentials are managed. Whether you prefer to rely on a third-party password manager or manually enter your passwords when needed, this approach allows you to customize your browsing experience to align with your preferences and security practices.
Clear Saved Passwords
In the digital age, managing passwords is a critical aspect of maintaining online security. While web browsers offer the convenience of saving and auto-filling passwords, there are instances where users may need to clear saved passwords for various reasons. Whether it's to remove outdated credentials, enhance security, or address privacy concerns, Firefox provides a straightforward method for clearing saved passwords.
To clear saved passwords in Firefox, follow these steps:
-
Access Firefox Preferences: Begin by launching Firefox and accessing the browser's menu. From there, select "Preferences" to open the settings panel.
-
Navigate to Privacy & Security: Within the Preferences panel, locate and click on "Privacy & Security" in the left-hand navigation menu. This will bring up a range of privacy and security settings for Firefox.
-
Locate the Logins and Passwords Section: Scroll down within the Privacy & Security settings until you find the "Logins and Passwords" section. This is where you can manage the behavior of the password manager.
-
Clear Saved Logins: Within the Logins and Passwords section, click on the "Saved Logins" option. This will display a list of websites for which you have saved passwords. You can select individual entries or use the "Remove All" option to clear all saved logins.
By following these steps, you can effectively clear saved passwords in Firefox, ensuring that outdated or unwanted credentials are removed from the browser's storage. This can be particularly useful if you've changed passwords for various websites and want to ensure that the correct credentials are being used for auto-fill purposes.
Additionally, clearing saved passwords can contribute to enhanced security and privacy practices. By regularly reviewing and managing saved logins, you can mitigate the risk of unauthorized access to your accounts and maintain better control over your online identity.
In summary, the ability to clear saved passwords in Firefox empowers users to maintain a clean and secure password management environment. By leveraging this feature, individuals can proactively manage their login credentials and align their browsing practices with their security and privacy preferences.
Use Private Browsing Mode
In addition to managing saved passwords and adjusting the behavior of the password manager, Firefox offers a powerful privacy feature known as Private Browsing Mode. This mode, also commonly referred to as "Incognito" in other browsers, enables users to browse the web without the browser storing their history, cookies, site data, or any information entered in forms. By utilizing Private Browsing Mode, individuals can enhance their privacy and security while exploring the internet.
To activate Private Browsing Mode in Firefox, follow these simple steps:
-
Open a New Private Window: Start by launching Firefox and accessing the browser's menu. From there, select "New Private Window" to initiate a new browsing session in Private Mode. Alternatively, you can use the keyboard shortcut
Ctrl + Shift + P(Windows/Linux) orCommand + Shift + P(Mac) to open a new private window directly. -
Browse Anonymously: Once in Private Browsing Mode, Firefox will clearly indicate that you are browsing privately. Any websites visited, search history, and form data entered during this session will not be saved by the browser. This can be particularly useful when accessing sensitive information or conducting research that you prefer not to be associated with your regular browsing history.
-
Enhanced Privacy and Security: Private Browsing Mode provides an added layer of privacy and security by preventing the storage of browsing history and other data. This can be beneficial when using shared computers or public networks, as it reduces the risk of leaving behind traces of your online activities.
-
Customize Privacy Settings: While in Private Browsing Mode, you can still customize certain privacy settings within Firefox to align with your preferences. This includes options to block trackers, prevent websites from accessing your location, and manage cookie behavior for the current session.
By leveraging Private Browsing Mode, users can explore the web with a heightened sense of privacy and security. Whether you're conducting sensitive research, accessing personal accounts on shared devices, or simply seeking to minimize your digital footprint, Private Browsing Mode offers a valuable tool for controlling your online presence.
In summary, Private Browsing Mode in Firefox empowers users to browse the web without leaving behind a trail of browsing history and site data. By incorporating this feature into your browsing habits, you can take proactive steps to safeguard your privacy and maintain greater control over your online activities.