Introduction
When it comes to browsing the web, Google Chrome stands out as one of the most popular and versatile web browsers. Its user-friendly interface and extensive range of features make it a top choice for individuals and businesses alike. One such feature that adds to its appeal is the ability to import certificates, which is particularly useful for ensuring secure connections to websites and web applications.
Importing a certificate into Chrome can be necessary for various reasons, such as accessing secure websites, connecting to secure networks, or using digital signatures. By adding a certificate to Chrome, users can establish trust with websites and servers, thereby enhancing security and enabling seamless interactions in the digital realm.
In this guide, we will delve into the process of importing a certificate into Chrome, providing step-by-step instructions to help you navigate through the settings and successfully add a certificate. Whether you are a seasoned Chrome user or just getting started, understanding how to import certificates can empower you to make the most of the browser's security features and expand your online capabilities.
So, without further ado, let's embark on this journey to explore the intricacies of managing certificates in Chrome and learn how to import them with ease. By the end of this guide, you will have the knowledge and confidence to import certificates into Chrome, bolstering your browsing experience and reinforcing the security of your online interactions.
Step 1: Accessing Chrome Settings
Accessing Chrome settings is the first step towards importing a certificate into the browser. Chrome offers a straightforward approach to accessing its settings, allowing users to customize various aspects of their browsing experience. Here's how you can navigate to the settings section:
-
Opening Chrome: Begin by launching the Google Chrome browser on your computer. You can do this by clicking on the Chrome icon in your desktop or taskbar, or by searching for Chrome in your applications and opening it from there.
-
Locating the Menu Icon: Once Chrome is open, look for the three vertical dots located at the top-right corner of the browser window. This icon represents the Chrome menu and serves as the gateway to accessing various browser settings and features.
-
Accessing the Settings Menu: Click on the menu icon to reveal a dropdown menu. From the options presented, select "Settings." This action will redirect you to the Chrome settings page, where you can explore and manage a wide range of browser configurations.
-
Navigating to Advanced Settings: Within the settings page, you may need to access the advanced settings to proceed with importing a certificate. To do this, scroll down to the bottom of the settings page and click on "Advanced" to unveil additional configuration options.
-
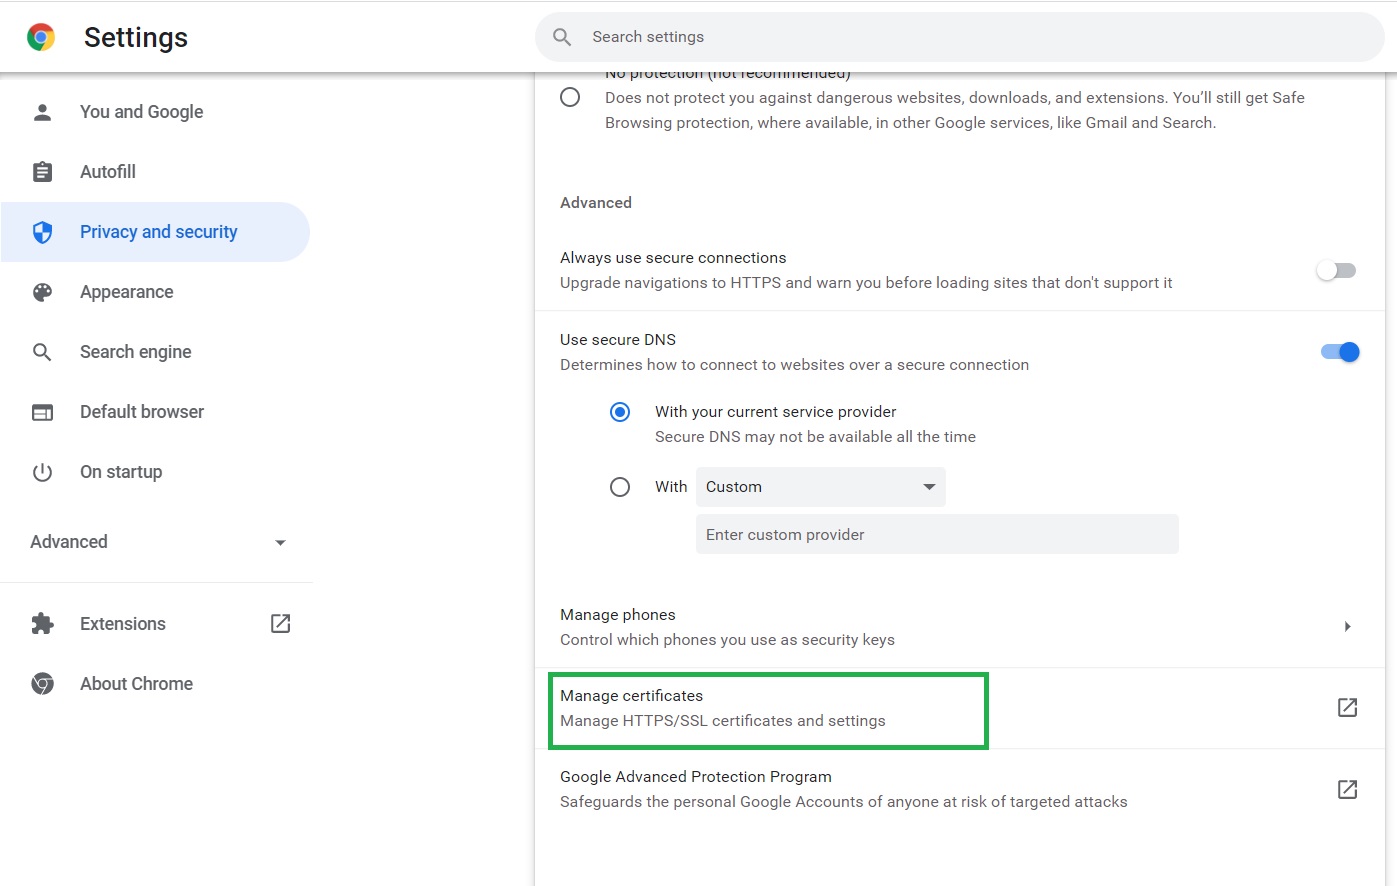
Locating the Security Section: Once in the advanced settings, look for the "Privacy and security" section. Here, you will find the option to manage site settings, including certificates, which is essential for the import process.
By following these steps, you can easily access the settings in Chrome, paving the way for the subsequent actions required to import a certificate. Navigating through the settings menu empowers users to take control of their browsing environment and make necessary adjustments to accommodate security measures such as certificate management.
With the settings accessible, you are now prepared to delve into the next steps of managing certificates within Chrome, setting the stage for the seamless importation of certificates to enhance your browsing security and capabilities.
Step 2: Managing Certificates
After accessing the advanced settings in Chrome, the next crucial step in the process of importing a certificate involves managing certificates within the browser. Chrome provides a dedicated interface for users to view, edit, and remove certificates, offering a comprehensive approach to certificate management. Here's a detailed exploration of managing certificates in Chrome:
-
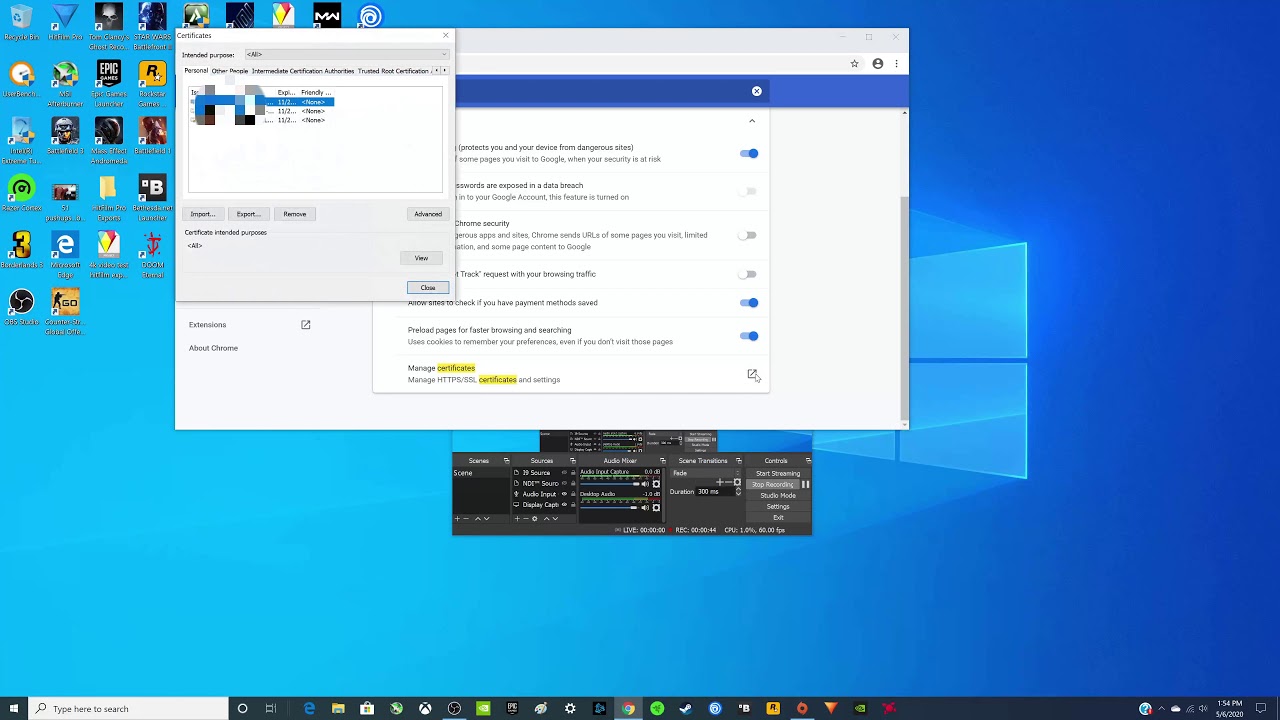
Accessing Certificate Management: Within the advanced settings of Chrome, locate the "Privacy and security" section and click on "Manage certificates." This action will open the Certificate Manager, which serves as the central hub for handling certificates associated with web security, encryption, and authentication.
-
Certificate Manager Interface: Upon entering the Certificate Manager, users are presented with a range of options and tabs, including "Personal," "Other People," "Intermediate Certification Authorities," and "Trusted Root Certification Authorities." Each tab corresponds to different types of certificates and their respective authorities, allowing users to navigate through the various categories based on their specific certificate management needs.
-
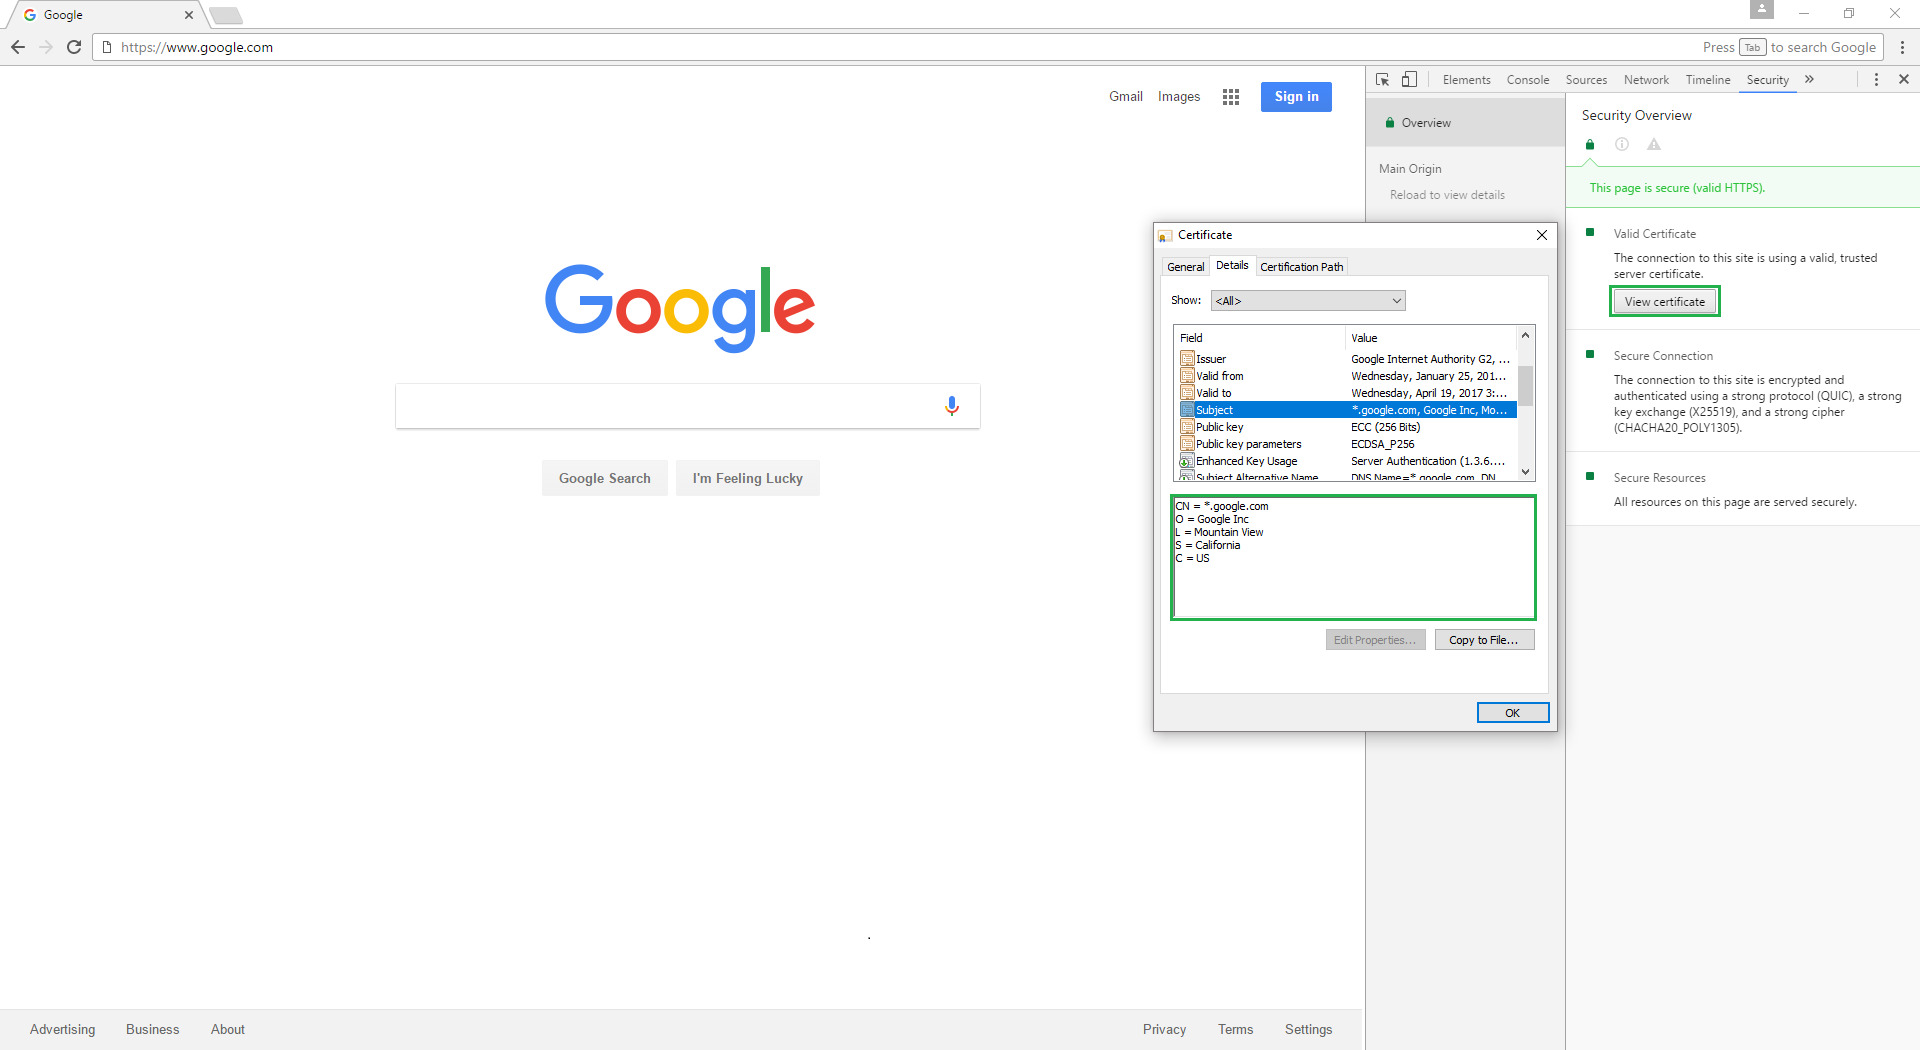
Viewing Certificate Details: Within the Certificate Manager, users can view detailed information about each certificate, including its purpose, expiration date, issuer, and associated domains or entities. This level of transparency enables users to make informed decisions when managing certificates and ensures that they have a clear understanding of the certificates present in their browsing environment.
-
Editing and Removing Certificates: Chrome empowers users to edit or remove certificates as needed. This functionality is particularly useful for updating certificate information, revoking outdated certificates, or addressing security concerns related to specific certificates. By providing the ability to modify and remove certificates, Chrome offers a flexible approach to certificate management, allowing users to maintain a secure and up-to-date browsing experience.
-
Importing Certificates from Files: While the focus of this guide is on importing certificates, it's worth noting that the Certificate Manager also supports the importation of certificates from files. This feature is valuable for users who possess certificate files obtained from trusted sources and need to add them to Chrome for secure interactions with websites, servers, or networks.
By understanding and navigating the Certificate Manager in Chrome, users can gain a comprehensive grasp of their certificate landscape and effectively manage certificates to uphold the security and integrity of their browsing activities. With the groundwork laid for certificate management, the subsequent step involves the actual process of importing a certificate into Chrome, which will be explored in the following section.
With the ability to manage certificates within Chrome, users are equipped to maintain a secure and reliable browsing environment, fostering trust and confidence in their online interactions.
Step 3: Importing a Certificate
Importing a certificate into Google Chrome is a pivotal step in establishing secure and trusted connections with websites, servers, and networks. Whether it's for accessing sensitive information, conducting secure transactions, or authenticating digital signatures, the process of importing a certificate is essential for fortifying the security of online interactions. Here's a comprehensive guide on how to import a certificate into Chrome:
-
Accessing the Import Interface: To initiate the import process, navigate to the Certificate Manager within Chrome's advanced settings. Once in the Certificate Manager, look for the option to import certificates. This action will open a dialog box or interface that allows users to specify the location of the certificate file they intend to import.
-
Locating the Certificate File: When prompted to import a certificate, users must specify the location of the certificate file on their local system. This file is typically obtained from a trusted source, such as a certificate authority or a secure network administrator. By selecting the appropriate certificate file, users can proceed with the importation process.
-
Verifying Certificate Details: Before finalizing the import, Chrome may display the details of the certificate file, including its issuer, expiration date, and associated domains or entities. This verification step is crucial for ensuring that the certificate being imported aligns with the user's expectations and security requirements.
-
Completing the Import Process: Once the certificate details are verified, users can proceed with the importation by confirming their intent to add the certificate to Chrome. This action effectively integrates the certificate into Chrome's certificate store, enabling the browser to recognize and trust the imported certificate for secure communications.
-
Confirmation and Validation: Upon successful importation, Chrome may provide a confirmation message or indication that the certificate has been added to the browser's trusted certificates. Users can further validate the presence of the imported certificate within the Certificate Manager, ensuring that it is properly integrated and ready for use in secure connections.
By following these steps, users can seamlessly import certificates into Chrome, bolstering the browser's security capabilities and establishing trust with relevant entities and websites. Importing certificates empowers users to navigate the digital landscape with confidence, knowing that their interactions are backed by secure and authenticated connections.
With the certificate successfully imported, users can proceed to leverage its capabilities for secure browsing, encrypted communications, and authenticated transactions, enhancing their overall online experience while prioritizing security and trust.
Step 4: Verifying the Imported Certificate
After importing a certificate into Google Chrome, it is essential to verify its presence and integrity to ensure that the browser recognizes and trusts the imported certificate for secure communications. The verification process serves as a critical checkpoint, allowing users to confirm that the imported certificate aligns with their security requirements and is ready for use in establishing secure connections with websites, servers, or networks.
Here's a detailed exploration of the verification process for imported certificates in Chrome:
-
Accessing the Certificate Manager: To begin the verification process, users can revisit the Certificate Manager within Chrome's advanced settings. By navigating back to the Certificate Manager interface, users can review the list of certificates present in the browser's certificate store, including the recently imported certificate.
-
Locating the Imported Certificate: Within the Certificate Manager, users can locate the imported certificate and verify its details, such as the issuer, expiration date, and associated domains or entities. This visual confirmation allows users to ensure that the correct certificate has been successfully integrated into Chrome's trusted certificates.
-
Validating Certificate Properties: Users can delve into the properties of the imported certificate to validate its key properties, such as the cryptographic algorithms used, the validity period, and the intended purposes for which the certificate can be utilized. This validation step ensures that the imported certificate aligns with the user's security expectations and is suitable for the intended secure connections.
-
Testing Secure Connections: To further verify the imported certificate, users can initiate secure connections with websites or servers that require the use of the imported certificate. By engaging in secure interactions, users can confirm that Chrome recognizes and utilizes the imported certificate for establishing secure and authenticated connections, thereby validating its functionality and trustworthiness.
-
Ensuring Trust and Security: The verification process culminates in ensuring that the imported certificate instills trust and confidence in the user's browsing experience. By confirming the presence and functionality of the imported certificate, users can navigate the digital landscape with the assurance that their interactions are backed by secure and authenticated connections, fostering a heightened sense of security and trust.
By meticulously verifying the imported certificate, users can solidify their confidence in Chrome's security capabilities and the integrity of their browsing activities. This verification process serves as a pivotal step in the lifecycle of imported certificates, ensuring that they seamlessly integrate into Chrome's security framework and contribute to a secure and reliable browsing experience.
With the imported certificate successfully verified, users can proceed with leveraging its capabilities for secure and encrypted communications, reinforcing their commitment to maintaining a secure and trusted online environment.
Conclusion
In conclusion, the ability to import certificates into Google Chrome serves as a fundamental aspect of bolstering the browser's security capabilities and establishing trust in online interactions. By navigating through the intricacies of Chrome's settings, managing certificates, and executing the importation process, users can fortify their browsing environment and enhance the security of their digital interactions.
The journey of importing a certificate into Chrome begins with accessing the browser's settings, where users can delve into advanced configurations and navigate to the Certificate Manager. This pivotal step sets the stage for managing certificates, allowing users to view, edit, remove, and import certificates as needed. The Certificate Manager serves as a central hub for users to gain transparency into their certificate landscape and make informed decisions regarding their security posture.
The importation process itself involves specifying the location of the certificate file, verifying its details, and seamlessly integrating it into Chrome's trusted certificates. This process empowers users to establish secure and authenticated connections with websites, servers, and networks, fostering a heightened sense of trust and confidence in their online activities.
Furthermore, the verification of the imported certificate solidifies users' confidence in Chrome's security framework, ensuring that the integrated certificate aligns with their security expectations and is ready for use in secure communications. By validating the presence and functionality of the imported certificate, users can navigate the digital landscape with the assurance that their interactions are backed by secure and authenticated connections, fostering a heightened sense of security and trust.
In essence, the process of importing certificates into Chrome encapsulates the browser's commitment to providing a secure and reliable platform for users to engage in online activities. By empowering users to manage and import certificates with ease, Chrome reinforces its position as a versatile and secure web browser, catering to the diverse security needs of individuals and businesses alike.
With the knowledge and confidence gained from this guide, users can harness the capabilities of imported certificates to navigate the digital realm with resilience, knowing that their interactions are underpinned by robust security measures and authenticated connections. As the digital landscape continues to evolve, the ability to import certificates into Chrome remains a cornerstone of fostering trust, security, and confidence in online interactions.