Introduction
Google Chrome is one of the most popular web browsers, known for its user-friendly interface and a wide range of extensions that enhance the browsing experience. One such extension that has gained popularity among Chrome users is "Add Website to Thumbnail." This extension allows users to customize the thumbnails of their frequently visited websites, adding a personal touch to their browsing experience.
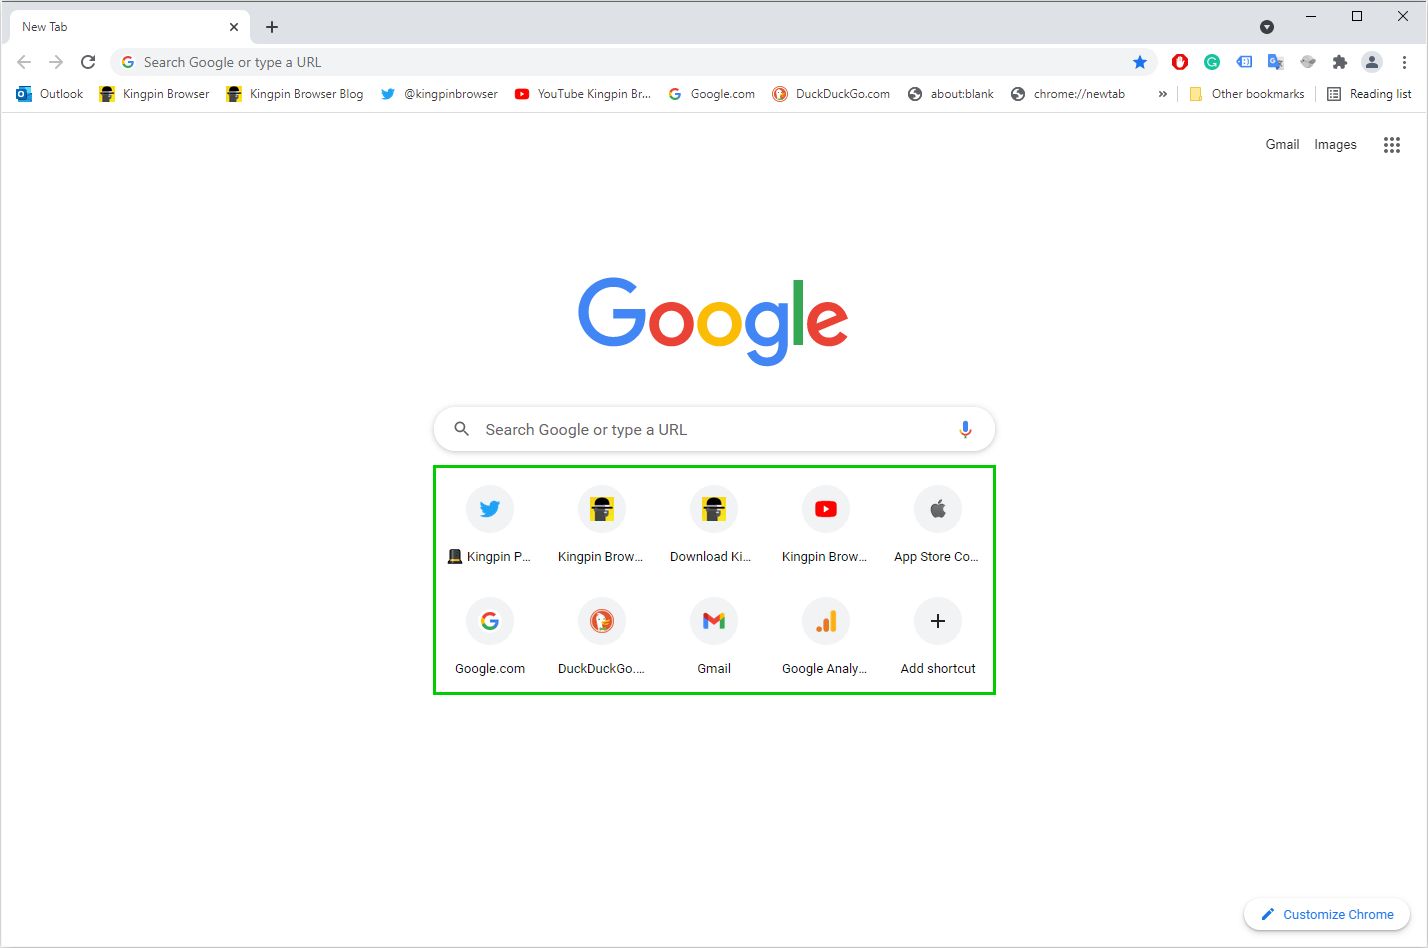
By adding a thumbnail to a website, users can easily identify and access their favorite sites directly from the new tab page. This not only adds a visual appeal to the browsing experience but also streamlines the process of navigating to frequently visited websites.
In this article, we will guide you through the process of adding a website to a thumbnail in Google Chrome using the "Add Website to Thumbnail" extension. Whether you want to personalize your new tab page or simply make it easier to access your go-to websites, this extension provides a simple and effective solution.
So, if you're ready to add a personal touch to your browsing experience and streamline your access to frequently visited websites, let's dive into the step-by-step process of using the "Add Website to Thumbnail" extension in Google Chrome.
Step 1: Install the "Add Website to Thumbnail" Extension
To begin customizing the thumbnails of your frequently visited websites in Google Chrome, the first step is to install the "Add Website to Thumbnail" extension. This extension is readily available in the Chrome Web Store, and the installation process is straightforward.
Here's a detailed guide to installing the "Add Website to Thumbnail" extension:
-
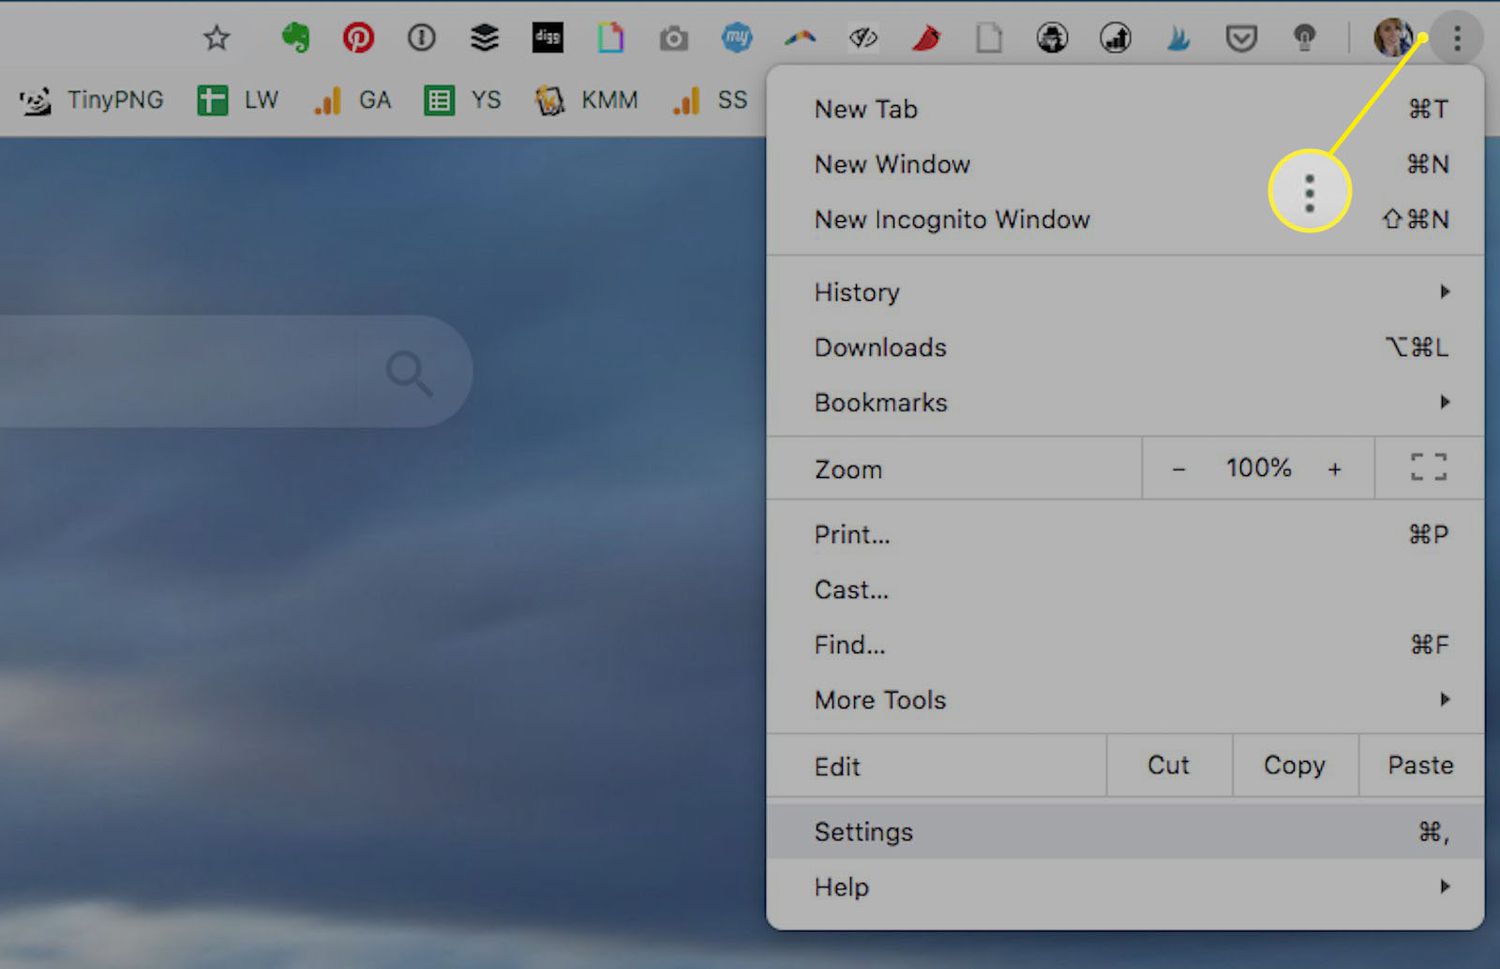
Open Google Chrome Web Store: Launch Google Chrome and navigate to the Chrome Web Store by clicking on the Apps icon in the bookmarks bar or by typing "chrome://extensions/" in the address bar and hitting Enter.
-
Search for the Extension: Once you're in the Chrome Web Store, use the search bar at the top left corner to search for "Add Website to Thumbnail." Alternatively, you can directly access the extension's page by visiting the following URL: Add Website to Thumbnail Extension
-
Add to Chrome: When you find the "Add Website to Thumbnail" extension, click on the "Add to Chrome" button located on the extension's page.
-
Confirmation Prompt: A confirmation dialog box will appear, asking for your permission to add the extension to Chrome. Click on "Add extension" to confirm and initiate the installation process.
-
Installation Complete: Once the installation is complete, you will see a notification confirming that the "Add Website to Thumbnail" extension has been added to Chrome.
By following these simple steps, you can successfully install the "Add Website to Thumbnail" extension in Google Chrome. After the installation is complete, you're ready to move on to the next step and start customizing the thumbnails of your favorite websites.
With the "Add Website to Thumbnail" extension now installed in your browser, you're one step closer to personalizing your new tab page and enhancing your browsing experience. Let's proceed to the next step and explore how to open the website you want to add to a thumbnail.
Now that the "Add Website to Thumbnail" extension is installed, let's move on to the next step and open the website you want to add to a thumbnail.
Step 2: Open the Website You Want to Add to Thumbnail
Once the "Add Website to Thumbnail" extension is successfully installed in your Google Chrome browser, the next step is to open the website that you want to add to a thumbnail. This step is crucial as it allows you to navigate to the specific website for which you wish to create a customized thumbnail on your new tab page.
Here's a detailed guide to opening the website you want to add to a thumbnail:
-
Launch Google Chrome: Begin by launching Google Chrome on your computer or device. You can do this by clicking on the Chrome icon in your desktop's taskbar or by searching for Google Chrome in your applications and opening it.
-
Navigate to the Website: Once Google Chrome is open, use the address bar at the top of the browser window to enter the URL of the website you want to add to a thumbnail. Alternatively, if the website is bookmarked, you can access it from the bookmarks bar or the bookmarks menu.
-
Visit the Website: Hit the "Enter" key on your keyboard or click on the arrow icon in the address bar to navigate to the website. This will load the webpage, allowing you to explore its content and ensure that you're on the specific page you want to add to a thumbnail.
-
Verify the Website: Take a moment to verify that you are on the correct website and that it is the page you want to represent with a customized thumbnail on your new tab page. This step ensures that the thumbnail accurately reflects the website you intend to customize for easy identification and access.
By following these steps, you can successfully open the website you want to add to a thumbnail using the "Add Website to Thumbnail" extension in Google Chrome. Once you have the website open in your browser, you're ready to proceed to the next step and learn how to click on the extension to initiate the thumbnail customization process.
With the website now open in your browser, you're one step closer to creating a personalized thumbnail for quick access to your favorite websites. Let's move on to the next step and explore how to click on the "Add Website to Thumbnail" extension to begin customizing the thumbnail.
Step 3: Click on the "Add Website to Thumbnail" Extension
After opening the website you want to add to a thumbnail, the next step is to click on the "Add Website to Thumbnail" extension to initiate the thumbnail customization process. This step is where the magic happens, allowing you to personalize the thumbnail and make it visually distinct on your new tab page.
Here's a detailed guide on clicking on the "Add Website to Thumbnail" extension:
-
Locate the Extension Icon: Look for the "Add Website to Thumbnail" extension icon, which typically appears in the top-right corner of the Chrome browser window, next to the address bar. The icon resembles a colorful square with a plus sign, indicating its function to add a website to a thumbnail.
-
Click on the Extension Icon: Once you've located the "Add Website to Thumbnail" extension icon, simply click on it to activate the customization interface. Upon clicking the icon, a small window or pop-up will appear, presenting options to customize the thumbnail for the current website.
-
Explore Customization Options: After clicking on the extension, you'll be presented with various customization options, such as selecting an image or screenshot to represent the website, adding a custom title, and adjusting the thumbnail layout. Take your time to explore these options and tailor the thumbnail to your preferences.
-
Preview the Thumbnail: As you make changes to the thumbnail using the customization options provided by the extension, you can preview the updated thumbnail in real-time. This allows you to see how the customized thumbnail will appear on your new tab page, ensuring that it accurately reflects the website and is visually appealing.
-
Fine-Tune the Customization: If needed, you can fine-tune the customization by adjusting the image, title, or layout until you are satisfied with the result. The goal is to create a visually engaging and easily recognizable thumbnail that represents the website in a personalized manner.
By following these steps, you can successfully click on the "Add Website to Thumbnail" extension and initiate the process of customizing the thumbnail for the website you have opened in your browser. Once you've tailored the thumbnail to your liking, you're ready to proceed to the next step and save the customized thumbnail for future access.
With the thumbnail customization process underway, you're one step closer to adding a personal touch to your new tab page and enhancing the visual appeal of your frequently visited websites. Let's move on to the next step and learn how to customize and save the thumbnail effectively.
Step 4: Customize the Thumbnail
Customizing the thumbnail is where you can truly make the website representation on your new tab page your own. The "Add Website to Thumbnail" extension offers a range of options to tailor the thumbnail to your preferences, ensuring that it stands out and accurately reflects the essence of the website. Let's delve into the detailed process of customizing the thumbnail:
-
Select an Image or Screenshot: The extension allows you to choose an image or screenshot to serve as the visual representation of the website. You can opt to use a screenshot of the website's homepage or select an image that best encapsulates the essence of the site. This feature enables you to personalize the thumbnail with a visually appealing and relevant image.
-
Add a Custom Title: In addition to the visual representation, you can add a custom title to the thumbnail. This title serves as a quick identifier, allowing you to label the website in a way that resonates with you. Whether it's a catchy phrase, a keyword, or a personalized label, the custom title adds a layer of personalization to the thumbnail.
-
Adjust the Thumbnail Layout: The extension provides options to adjust the layout of the thumbnail, allowing you to fine-tune its appearance. You can explore different layout configurations to find the one that best showcases the selected image and custom title. This flexibility ensures that the thumbnail aligns with your visual preferences.
-
Preview and Refine: As you make changes to the thumbnail, the extension offers a real-time preview, allowing you to see how the customized thumbnail will appear on your new tab page. This feature enables you to assess the visual impact of your customizations and make refinements as needed. The ability to preview and refine the thumbnail ensures that it accurately represents the website and meets your aesthetic standards.
-
Save the Customized Thumbnail: Once you are satisfied with the customizations, the final step is to save the customized thumbnail. The extension provides a straightforward option to save the personalized thumbnail, ensuring that it is set as the visual representation of the website on your new tab page.
By leveraging these customization options, you can create visually engaging and personalized thumbnails for your frequently visited websites. The ability to select an image, add a custom title, adjust the layout, and preview the changes empowers you to tailor the thumbnails to your liking, adding a personal touch to your browsing experience.
With the thumbnail now customized to your preferences, you're ready to proceed to the final step and save the personalized thumbnail for seamless access to the website from your new tab page.
Step 5: Save the Thumbnail
After customizing the thumbnail to your preferences, the final step is to save the personalized thumbnail, ensuring that it becomes the visual representation of the website on your new tab page. The process of saving the thumbnail is straightforward and allows you to seamlessly access your favorite websites with a personalized touch. Here's a detailed guide on how to save the customized thumbnail:
-
Confirm Customizations: Before saving the thumbnail, take a moment to review the customizations you've made, including the selected image or screenshot, the custom title, and the layout adjustments. Confirm that the thumbnail accurately reflects the website and aligns with your visual preferences.
-
Click on the Save Button: Within the customization interface provided by the "Add Website to Thumbnail" extension, look for the "Save" button or a similar option that indicates the action of preserving the customized thumbnail. Click on this button to initiate the saving process.
-
Confirmation Prompt: Upon clicking the "Save" button, you may encounter a confirmation prompt or notification indicating that the customized thumbnail has been successfully saved. This confirmation ensures that your personalized thumbnail is set to appear on your new tab page.
-
Verify the Saved Thumbnail: To ensure that the customized thumbnail has been saved accurately, open a new tab in your Google Chrome browser. Look for the thumbnail representing the website you customized, and verify that it reflects the customizations you made. This step allows you to confirm that the saved thumbnail aligns with your preferences.
-
Enjoy Personalized Access: With the customized thumbnail successfully saved, you can now enjoy personalized access to the website directly from your new tab page. The visually distinct thumbnail serves as a quick and engaging gateway to your favorite websites, streamlining your browsing experience.
By following these steps, you can effectively save the customized thumbnail, adding a personal touch to your new tab page and simplifying access to frequently visited websites. The ability to personalize the thumbnails of your favorite websites enhances the visual appeal of your browsing experience and allows for seamless navigation to the sites that matter most to you.
Conclusion
In conclusion, the "Add Website to Thumbnail" extension in Google Chrome offers a seamless and engaging way to personalize the new tab page by customizing the thumbnails of frequently visited websites. By following the step-by-step process outlined in this guide, users can add a personal touch to their browsing experience and streamline access to their favorite websites.
With the installation of the "Add Website to Thumbnail" extension, users gain the ability to transform the generic thumbnails on the new tab page into visually distinct representations of their preferred websites. This not only adds a touch of personalization but also enhances the overall aesthetic appeal of the browsing environment.
The process begins with the installation of the extension from the Chrome Web Store, followed by opening the website that the user wishes to add to a thumbnail. Clicking on the extension initiates the customization process, allowing users to select an image or screenshot, add a custom title, and adjust the layout to create a visually engaging thumbnail. The ability to preview and refine the customizations ensures that the thumbnail accurately reflects the essence of the website.
Once the customization is complete, users can save the personalized thumbnail, ensuring that it becomes the visual representation of the website on the new tab page. This personalized approach to organizing frequently visited websites not only adds a visual appeal to the browsing experience but also simplifies access to preferred sites.
By leveraging the "Add Website to Thumbnail" extension, users can infuse their browsing environment with a sense of individuality, making the new tab page a reflection of their browsing preferences and interests. The ability to visually identify and access favorite websites with a single glance enhances efficiency and adds a layer of personalization to the browsing journey.
In essence, the "Add Website to Thumbnail" extension empowers users to curate their browsing environment, transforming the new tab page into a visually engaging and personalized gateway to their most frequented websites. This level of customization not only enhances the browsing experience but also reflects the user's unique preferences, creating a more enjoyable and efficient interaction with the web.