Introduction
Screen recording on a Mac is a powerful tool for capturing and sharing visual content. Whether you want to create tutorials, demonstrate software functionality, or simply record a memorable moment on your screen, the ability to capture high-quality video is invaluable. However, when it comes to screen recording, many users encounter the challenge of including specific browser windows, such as Google Chrome, in their recordings. This can be particularly frustrating for those who rely on Chrome for browsing, research, or web-based presentations.
In this article, we will explore the process of adding Google Chrome to your screen recording on a Mac. By following a few simple steps, you can seamlessly integrate Chrome into your screen recordings, allowing you to capture web content, browser interactions, and more with ease. Whether you're a professional creating instructional videos or a casual user looking to share your browsing experiences, this guide will equip you with the knowledge to enhance your screen recordings with Google Chrome.
With the widespread use of Google Chrome as a preferred web browser for millions of users, the ability to include Chrome windows in screen recordings is a highly sought-after feature. By mastering this process, you can elevate the quality and versatility of your screen recordings, opening up new possibilities for content creation and sharing. So, let's dive into the steps and unlock the potential of integrating Google Chrome into your Mac screen recordings.
Step 1: Open QuickTime Player
To begin the process of adding Google Chrome to your screen recording on a Mac, the first step is to open QuickTime Player. This versatile application, known primarily for its video playback capabilities, also offers a built-in screen recording feature that can be easily accessed. QuickTime Player is a native Mac application, meaning it comes pre-installed on your device, making it readily available for use without the need for additional downloads or installations.
To open QuickTime Player, simply navigate to the "Applications" folder on your Mac and locate the QuickTime Player icon. Alternatively, you can use the Spotlight search feature by pressing Command + Space and typing "QuickTime Player" into the search bar. Once you've located the QuickTime Player application, click on the icon to launch the program.
Upon opening QuickTime Player, you will be greeted by a simple and intuitive interface, with a menu bar at the top of the screen and a clean, uncluttered window. From the menu bar, select "File" and then choose "New Screen Recording" from the dropdown menu. This action will initiate the screen recording feature within QuickTime Player, allowing you to proceed to the next steps in the process.
It's important to note that QuickTime Player's screen recording functionality offers a range of options, including the ability to record the entire screen or a specific portion of the screen. This flexibility allows you to tailor your screen recording to capture precisely what you need, whether it's a full-screen demonstration or a focused recording of a specific window or application.
By opening QuickTime Player and accessing the screen recording feature, you've taken the crucial first step towards integrating Google Chrome into your Mac screen recording. With the application now open and ready for screen recording, you're poised to move on to the next steps and seamlessly incorporate Google Chrome into your visual content.
Step 2: Start a New Screen Recording
With QuickTime Player open and the initial step completed, you are now ready to initiate a new screen recording. This process is straightforward and offers several options to customize your recording settings, ensuring that you capture the content exactly as you intend.
To start a new screen recording, navigate to the menu bar at the top of your screen and click on "File." From the dropdown menu, select "New Screen Recording." Upon selecting this option, a small recording window will appear on your screen, presenting you with additional recording settings and options.
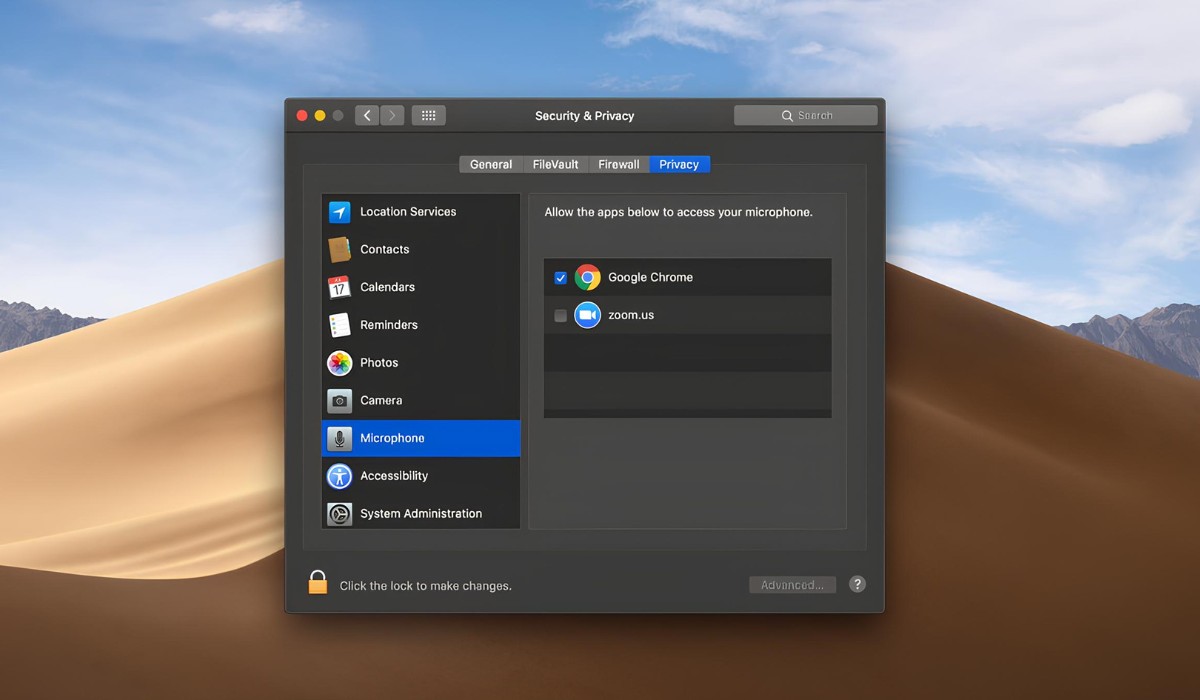
Within the recording window, you will notice a small white arrow next to the red record button. Clicking on this arrow reveals a menu of recording options, allowing you to customize your screen recording preferences. These options include choosing the microphone for audio input, selecting the quality of the recording, and deciding whether to show mouse clicks in the recording.
Before commencing the recording, it's essential to consider your preferences for audio input. If your screen recording requires audio, such as narration or capturing system sounds, you can select the appropriate microphone from the dropdown menu. This ensures that your recording captures clear and synchronized audio alongside the visual content.
Additionally, the recording quality can be adjusted to suit your specific needs. QuickTime Player offers several quality options, ranging from low to high definition, enabling you to tailor the recording to your desired level of clarity and detail. This flexibility ensures that your screen recording meets the standards of quality necessary for your intended use, whether it's professional presentations, educational content, or personal demonstrations.
Furthermore, the option to display mouse clicks in the recording can be toggled on or off, depending on your preference. This feature is particularly useful for instructional or tutorial content, as it visually highlights user interactions and navigational cues within the recording.
Once you have configured your recording settings according to your requirements, you are prepared to proceed to the next step. By customizing the recording options to align with your specific needs, you are poised to capture a screen recording that effectively communicates your intended message and visual content.
With the new screen recording settings in place, you are now equipped to move forward with the process of integrating Google Chrome into your Mac screen recording. The next steps will guide you through the seamless inclusion of Google Chrome, allowing you to capture web content, browser interactions, and more with precision and clarity.
Step 3: Select Google Chrome Window
After configuring the screen recording settings in QuickTime Player, the next crucial step is to select the Google Chrome window that you want to include in your recording. This process allows you to focus the screen recording on the specific content within Google Chrome, whether it's a webpage, web application, or any other browser-based activity.
To select the Google Chrome window for inclusion in your screen recording, follow these steps:
-
Navigate to Google Chrome: Switch to the Google Chrome application by clicking on its icon in the Dock or using the Command + Tab shortcut to cycle through open applications until you reach Google Chrome.
-
Open the Desired Content: Once in Google Chrome, navigate to the webpage or content that you wish to capture in your screen recording. This could be a website, web-based application, online presentation, or any other content accessible through the browser.
-
Return to QuickTime Player: After ensuring that the desired content is open in Google Chrome, return to QuickTime Player by clicking on its icon in the Dock or using the Command + Tab shortcut to switch back to the application.
-
Initiate Screen Recording: With QuickTime Player active, click on the recording window that appeared when you started the new screen recording. This will prompt a recording toolbar to appear, allowing you to commence the screen recording.
-
Select the Google Chrome Window: Within the recording toolbar, you will notice a small dropdown arrow next to the record button. Click on this arrow to reveal a menu of recording options. From this menu, select the option that allows you to choose the Google Chrome window for recording.
-
Choose the Desired Chrome Window: Upon selecting the Google Chrome window option, a dropdown menu will display all open windows and applications on your Mac. Locate and select the specific Google Chrome window that contains the content you wish to capture in your screen recording.
By following these steps, you can effectively select the Google Chrome window that you want to include in your screen recording. This targeted approach ensures that your recording focuses on the precise web content or browser interactions within Google Chrome, allowing you to capture and share visually engaging and informative recordings with ease.
Step 4: Begin Recording
With the Google Chrome window selected and all necessary preparations in place, you are now ready to commence the screen recording process in QuickTime Player. Initiating the recording not only captures the visual content within the selected Google Chrome window but also enables you to seamlessly integrate browser interactions, web-based activities, and dynamic content into your screen recording.
To begin the recording, follow these steps:
-
Commence the Recording: Within QuickTime Player, navigate to the recording window that appeared when you started the new screen recording. Click on the red record button to initiate the recording process. Upon clicking the record button, a countdown timer may appear, providing you with a brief moment to prepare before the recording officially begins.
-
Execute Browser Interactions: Once the recording is in progress, you have the freedom to engage with the selected Google Chrome window as you normally would. This includes navigating through webpages, interacting with web-based applications, scrolling through content, entering text, clicking on links, and performing any other browser-related activities that you wish to capture in your screen recording.
-
Capture Dynamic Content: The recording process allows you to capture dynamic content within Google Chrome, such as animations, videos, interactive elements, and real-time changes on webpages. Whether you're showcasing a web-based demonstration, highlighting specific online functionalities, or capturing the fluidity of web content, the screen recording effectively preserves the dynamic nature of the selected Google Chrome window.
-
Utilize Browser Features: Throughout the recording, take advantage of Google Chrome's features and functionalities to enhance the visual content being captured. This may include utilizing browser extensions, accessing developer tools, demonstrating browser settings, showcasing tab management, or utilizing any other browser-specific features that contribute to the overall content of the recording.
-
Conclude the Recording: Once you have captured the desired content within the Google Chrome window, you can conclude the recording by clicking on the stop button within the recording toolbar. This action finalizes the screen recording process, prompting QuickTime Player to save the recorded content for further editing, sharing, or playback.
By following these steps, you can effectively begin the screen recording process within QuickTime Player, capturing the selected Google Chrome window with precision and clarity. This seamless integration of Google Chrome into your screen recording empowers you to create visually engaging and informative content that effectively communicates web-based interactions, browser activities, and dynamic online content.
Step 5: Stop and Save Recording
Once you have captured the desired content within the Google Chrome window, it is essential to conclude the recording process and save the recorded content for further use. This final step in the screen recording process ensures that your visual content is preserved and ready for editing, sharing, or playback, allowing you to leverage the captured material for various purposes.
To stop and save the recording in QuickTime Player, follow these straightforward steps:
-
Stop the Recording: After capturing the intended content within the Google Chrome window, navigate to the recording toolbar within QuickTime Player. Click on the stop button, typically represented by a square icon, to halt the recording process. This action signifies the completion of the screen recording and prompts QuickTime Player to finalize the recorded content.
-
Save the Recording: Upon stopping the recording, QuickTime Player will automatically prompt you to save the recorded content. A dialog box will appear, allowing you to specify the file name, location, and format for the saved recording. Choose a descriptive and recognizable file name that aligns with the content captured in the recording, making it easier to identify and access the file in the future.
-
Select the Save Location: Determine the preferred location for saving the recording on your Mac. This could be a specific folder, the desktop, or any other directory that facilitates easy access to the recorded content. By selecting an appropriate save location, you streamline the process of locating and utilizing the recording for subsequent tasks.
-
Choose the File Format: QuickTime Player offers various file formats for saving screen recordings, including standard video formats such as MOV and MP4. Consider the intended use of the recording and select a compatible file format that aligns with your editing, sharing, or playback requirements. Additionally, you can choose the video quality settings to ensure the recording meets your desired standards.
-
Save the Recording: Once you have specified the file name, location, and format, click the "Save" button to save the recorded content. QuickTime Player will swiftly process the recording and generate the saved file according to your specified parameters.
By following these steps to stop and save the recording in QuickTime Player, you effectively conclude the screen recording process and preserve the captured content for future utilization. This seamless saving process ensures that your recorded material is readily accessible and primed for editing, sharing, or playback, empowering you to leverage the visual content captured within the Google Chrome window for a myriad of purposes.