Introduction
Google Photos is a popular cloud-based photo storage and sharing service that allows users to store and organize their photos and videos. One of the great features of Google Photos is the ability to create and share albums with friends, family, or colleagues. If someone has shared a photo album with you on Google Photos, you may want to download those shared photos to your device for offline access or for archiving purposes. In this article, we will guide you through the steps to download shared photos from Google Photos.
Downloading shared photos from Google Photos is a simple and straightforward process. It allows you to keep a copy of the shared photos on your computer or mobile device, so you can access them even when you are offline. Whether you’re using the Google Photos website or the mobile app, we will walk you through the steps to download and save those precious memories.
Before we delve into the step-by-step guides, make sure you have an active Google account and access to the shared album. If you haven’t signed in to your Google account, please do so before proceeding with the steps.
Step 1: Sign in to Google Photos
To begin the process of downloading shared photos from Google Photos, you first need to sign in to your Google account. Follow the steps below to sign in:
- Open your preferred web browser and go to the Google Photos website (https://photos.google.com).
- Click on the “Sign in” button located in the top right corner of the page.
- Enter your Google account email address and click “Next”.
- On the next page, enter your password and click “Next” to sign in to your Google account.
If you have two-factor authentication enabled for your Google account, you may be prompted to enter a verification code sent to your registered mobile device or email. Follow the on-screen instructions to complete the sign-in process.
Once you are signed in to your Google account, you will have access to your Google Photos library and the shared albums that have been shared with you. Proceed to the next step to locate the specific shared album containing the photos you wish to download.
Step 2: Locate the shared album
After signing in to your Google Photos account, the next step is to locate the shared album that contains the photos you want to download. Follow the steps below to find the shared album:
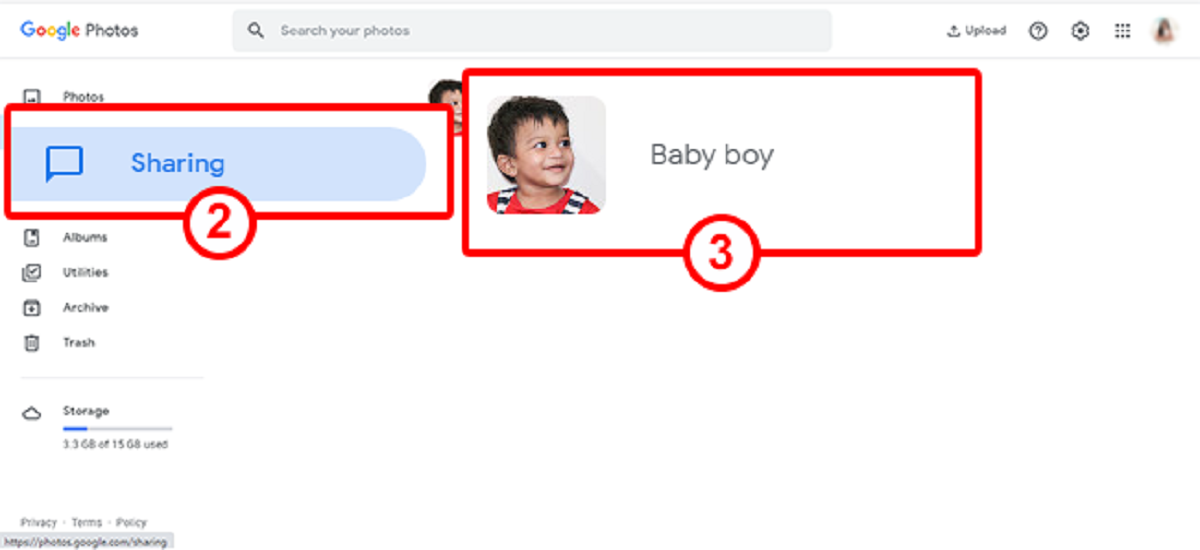
- On the Google Photos homepage, look for the “Albums” tab located on the left side of the screen. Click on it.
- Scroll through the list of albums to find the shared album you’re looking for. Shared albums are usually labeled with the name of the person who shared them.
- If you have a large number of albums, you may need to use the search bar at the top of the page to search for the specific album by name or person.
- Once you have located the shared album, click on it to open and access the photos within.
If you are using the Google Photos app on your mobile device, the process is similar. Open the app and tap on the “Albums” tab at the bottom of the screen. Scroll through your albums or use the search feature to find the shared album.
Now that you have found the shared album, you are ready to move on to the next step, where we will guide you on opening the shared album to view its contents.
Step 3: Open the shared album
Once you have located the shared album in Google Photos, it’s time to open and access the photos within. Here’s how you can do it:
- Click on the shared album that you want to open. It will take you to the album’s page, displaying all the photos that have been shared with you.
- On the album’s page, you can scroll through the photos to have a preview of what’s inside. You can also view any comments or likes left by other users.
- If there are multiple pages of photos in the shared album, you can navigate through them by using the arrow buttons or page numbers at the bottom of the screen.
Similarly, if you are using the Google Photos app on your mobile device, you can open the shared album by tapping on it. You will then be able to view the photos and access additional information.
Opening the shared album allows you to explore the contents and select the specific photos you wish to download. In the next step, we will guide you through the process of selecting the photos for download.
Step 4: Select the photos you want to download
After opening the shared album in Google Photos, you can now select the specific photos that you want to download. Follow these steps to make your selections:
- Browse through the photos in the shared album and determine which ones you want to download. You can click on a photo to open it in a larger view.
- To select a single photo, click on the circular checkbox icon in the top left corner of the photo. This will add a checkmark to indicate that the photo has been selected.
- If you want to select multiple photos at once, you can hold down the “Ctrl” key (Windows) or “Command” key (Mac) while clicking on the photos you wish to download. This will enable you to select multiple photos simultaneously.
- If you want to select all the photos in the shared album, you can click on the circular checkbox icon in the top left corner of the album cover photo. This will select all the photos in the album automatically.
As you make your selections, you will notice that the selected photos are highlighted or marked with checkmarks. This allows you to keep track of the photos you have chosen for download.
Remember, you can always go back and modify your selections before proceeding to the next step. Once you have chosen the desired photos, continue to the following step to learn how to download them to your device.
Step 5: Download the selected photos
Now that you have selected the photos you want to download from the shared album in Google Photos, it’s time to proceed with the actual downloading process. Follow these steps to download the selected photos:
- Once you have chosen the desired photos, look for the menu options at the top of the screen. Click on the “More options” icon (three vertical dots) to reveal a drop-down menu.
- In the drop-down menu, select the “Download” option. This will initiate the download process for the selected photos.
- If you have chosen to download multiple photos, Google Photos will automatically compress them into a .ZIP file for easier downloading. Wait for the file to be prepared and packaged.
- When the .ZIP file is ready, a pop-up window will appear, asking you to save the file to your computer or mobile device. Choose the appropriate location where you want to save the photos.
- Click on the “Save” or “Download” button to start the download process. The photos will start downloading to the specified location on your device.
Once the download is complete, you can access the downloaded photos in the location you chose. Depending on your device and settings, the photos will be saved in a folder or directory on your computer or mobile device.
Now you have successfully downloaded the selected photos from the shared album in Google Photos. In the next step, we will guide you on choosing a download location for the photos.
Step 6: Choose a download location
When downloading the selected photos from the shared album in Google Photos, it’s important to choose a suitable download location on your computer or mobile device. Follow these steps to select a download location:
- During the download process, a pop-up window will appear, asking you to save the .ZIP file containing the photos. Take note of the default download location suggested by your web browser or device.
- If you want to change the download location, click on the “Browse” or “Choose” button in the pop-up window.
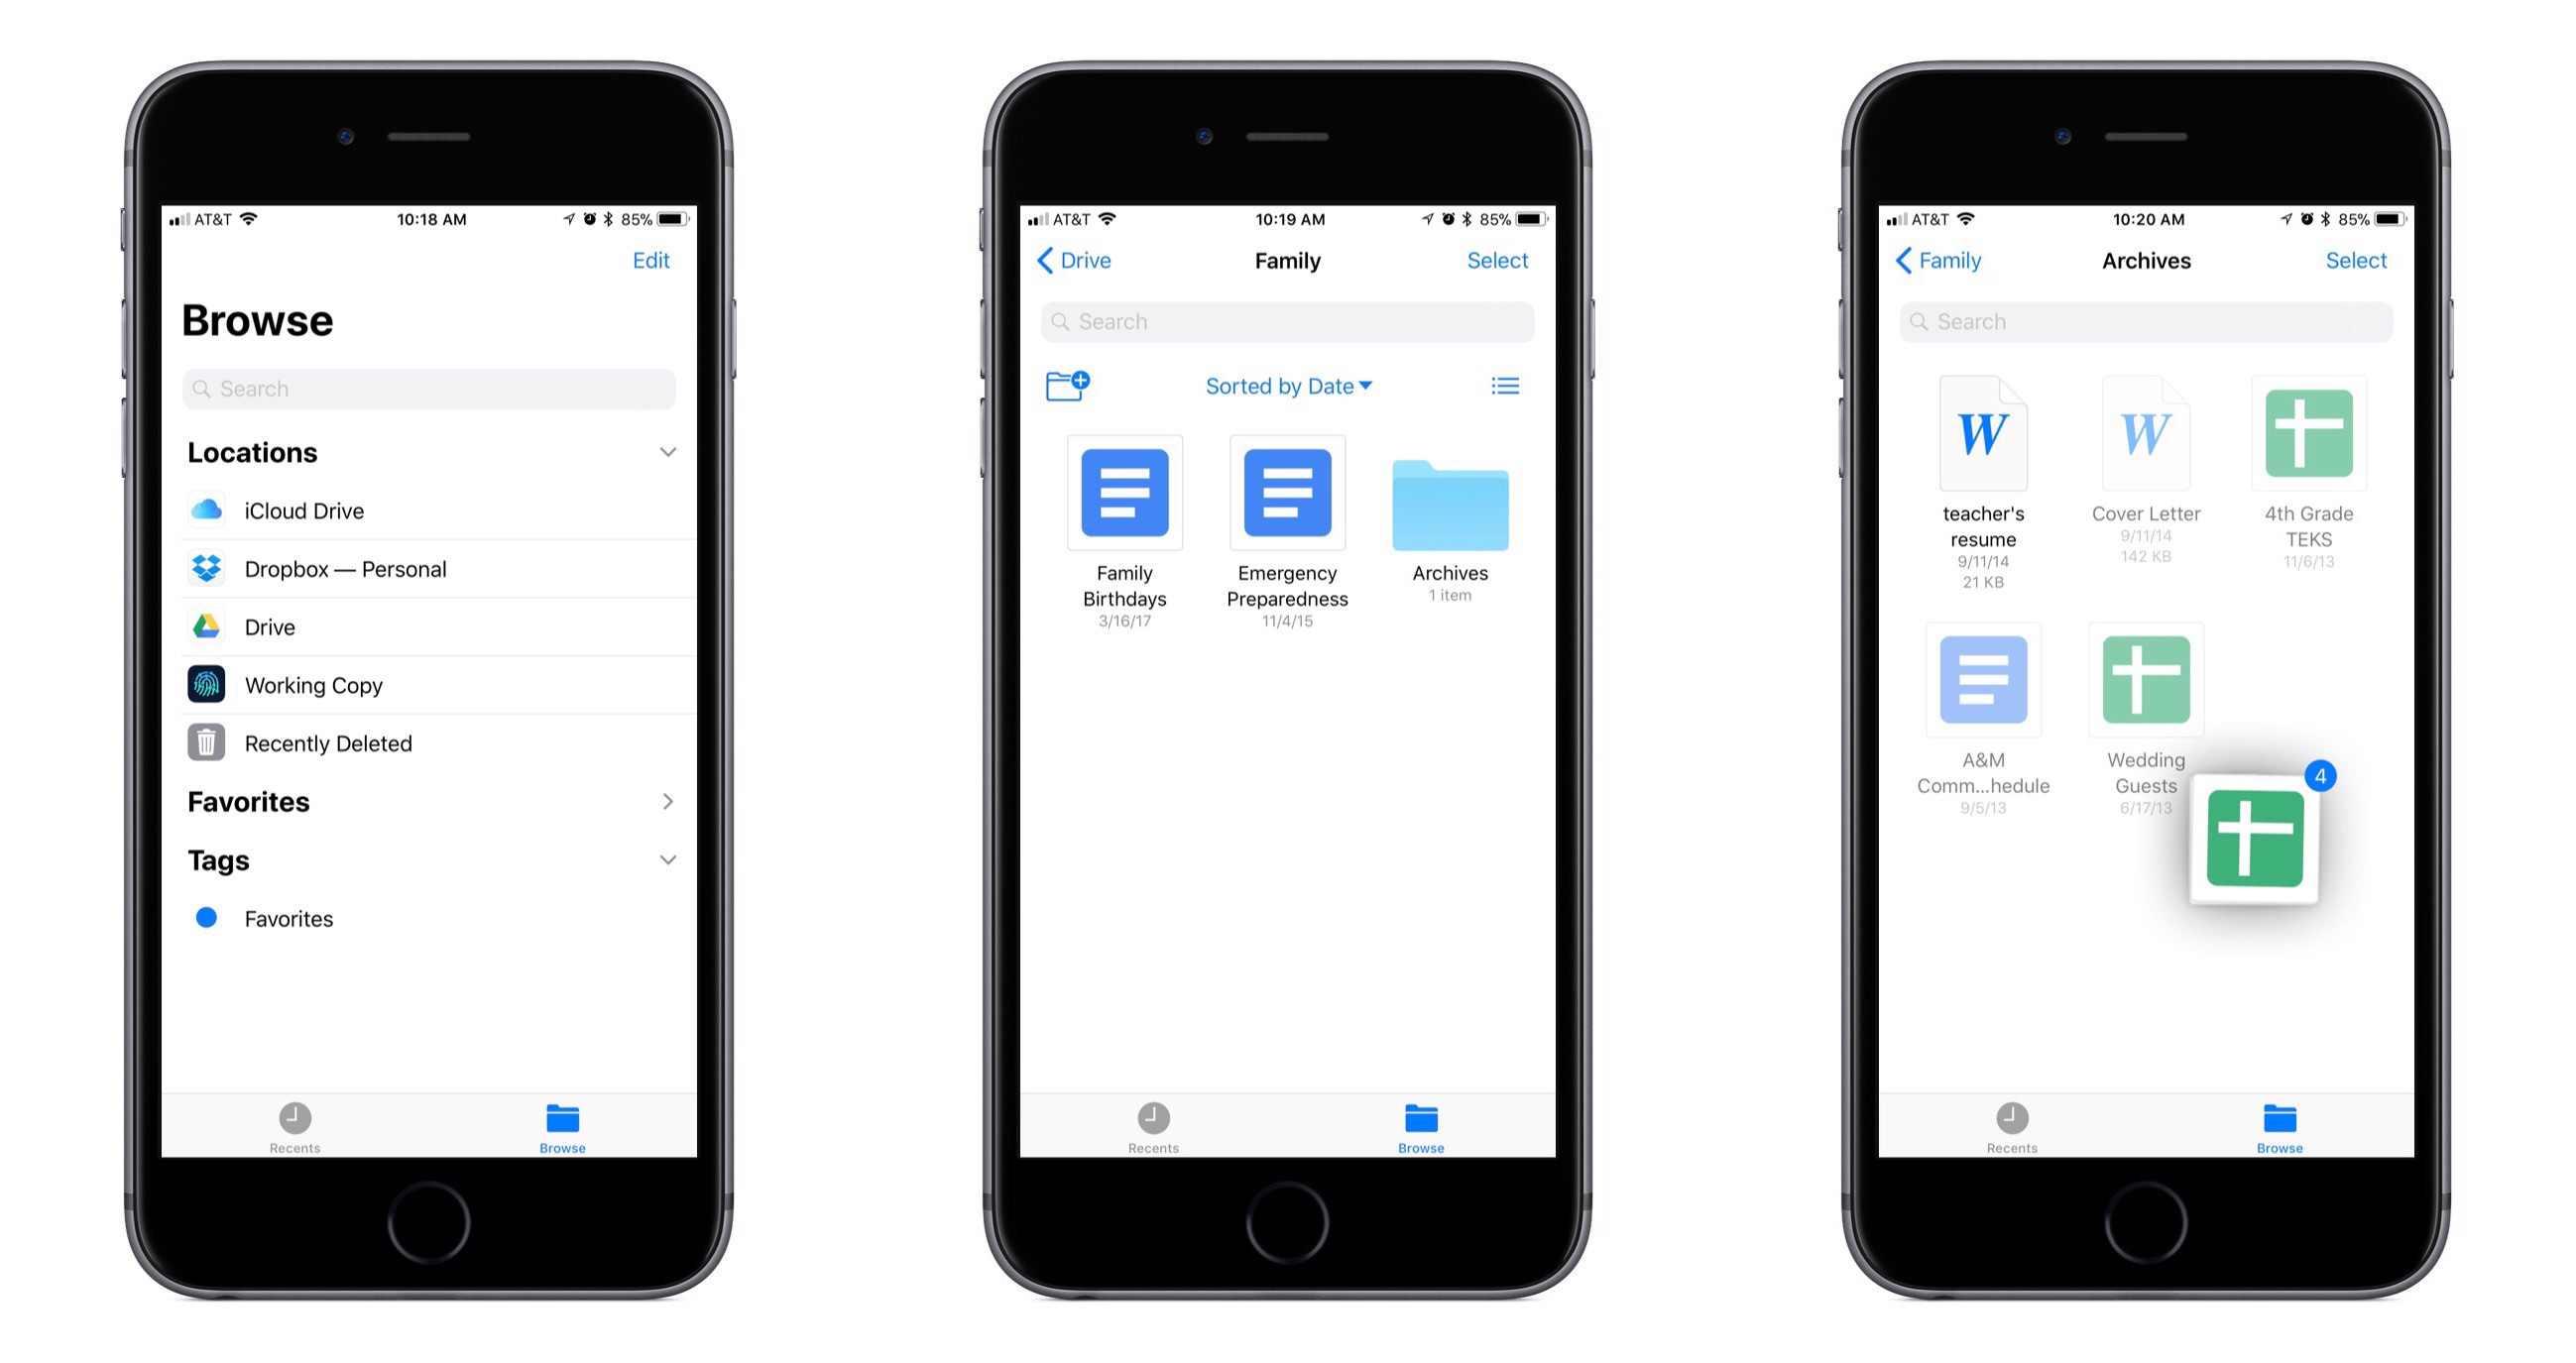
- A file explorer or finder window will open, allowing you to navigate through your device’s file system. Choose the folder or directory where you want to save the downloaded photos.
- Once you have selected the desired download location, click on the “Save” or “OK” button in the file explorer window.
By selecting a specific download location, you have control over where the downloaded photos will be stored on your computer or mobile device. It’s recommended to choose a location that is easily accessible and organized for future reference.
After choosing the download location, the .ZIP file containing the selected photos will start downloading. Once the download is complete, you can unzip or extract the photos from the .ZIP file to access the individual image files.
Now you have successfully downloaded and saved the selected photos from the shared album in Google Photos to your chosen download location. You can now enjoy these photos offline or use them for various purposes.
Conclusion
Downloading shared photos from Google Photos is a convenient way to access and save precious memories that have been shared with you. By following the steps outlined in this guide, you can easily download the shared photos and have them available on your computer or mobile device.
Remember to sign in to your Google Photos account to gain access to the shared albums. Locate the specific shared album that contains the desired photos, and open it to view the contents. From there, you can select the photos you want to download and proceed with the downloading process.
Choosing a suitable download location is crucial to ensure that the photos are stored in an organized manner and can be easily accessed in the future. Take your time to select a location that works best for your needs.
Downloading shared photos from Google Photos allows you to keep a copy of those precious moments, even when you are offline. Whether it is for archiving purposes or simply for enjoying the photos at your convenience, this feature provides a valuable way to preserve and relive special memories.
Now that you have learned how to download shared photos from Google Photos, you can confidently navigate the platform and save your treasured images with ease. Enjoy the process of downloading and cherishing the memories captured in these shared albums.