Introduction
Welcome to this tutorial on how to download Excel files on Mac. As a Mac user, you might be wondering how to easily download and save Excel files to your computer for further analysis, editing, or sharing. While the process may seem straightforward, there are a few steps to follow to ensure a successful download and seamless access to your downloaded files.
Excel files are widely used for data analysis, creating spreadsheets, and managing numerical information. Whether you receive Excel files via email attachments, download them from websites, or work with cloud storage services, knowing how to download and save them on your Mac is essential.
In this step-by-step tutorial, we will guide you through the process of downloading Excel files on your Mac using the Safari browser. Safari is the default web browser on Mac, and it offers a user-friendly interface and convenient features that enable you to smoothly navigate the web and download files.
By the end of this tutorial, you will have a clear understanding of how to download Excel files on your Mac and locate them in your Downloads folder. So, let’s get started with the first step: opening the Safari browser.
Step 1: Open the Safari browser
To begin, you need to open the Safari browser on your Mac. Safari is the default web browser on macOS and provides a seamless browsing experience with its user-friendly interface and advanced features.
To launch Safari, locate the Safari icon in the Dock, which is typically found at the bottom of your screen. It’s an icon that resembles a blue compass. Alternatively, you can use Spotlight by pressing Command + Spacebar, type “Safari,” and press Enter to open the browser.
Once Safari is open, you will see the browser window with a toolbar at the top and a search/address bar below it. You are now ready to proceed to the next step.
In some cases, you may need to update Safari to the latest version for optimal performance. To check for updates, click on the “Safari” menu in the top-left corner of the screen, and select “About Safari.” A new window will open, indicating if there are any updates available. If updates are available, follow the on-screen prompts to install them before proceeding.
With Safari open and up-to-date, you are now ready to move on to Step 2, where we will guide you through finding the Excel file you want to download.
Step 2: Find the Excel file you want to download
Now that you have Safari open, it’s time to find the Excel file that you want to download. There are several ways you can do this:
- Search online: If you know the website where the Excel file is located, simply type the website URL into the address bar and press Enter. Once you are on the website, navigate to the page or section where the Excel file is hosted.
- Use a search engine: If you don’t know the specific website, you can use a search engine like Google or Bing to find the Excel file. Simply type in the relevant keywords or file name into the search bar and browse through the search results to find the desired file.
- Access a cloud storage service: If the Excel file is stored in a cloud service like Google Drive, Dropbox, or Microsoft OneDrive, log in to your account and navigate to the folder where the file is located.
Once you have located the Excel file you want to download, ensure that it is a valid file and that you have the necessary permissions to access and download it. You can typically identify an Excel file by its file extension, which is “.xlsx” for the newer versions of Excel or “.xls” for older versions.
Now that you have found the Excel file you want to download, it’s time to move on to Step 3: clicking on the file to initiate the download process.
Step 3: Click on the file to download it
Once you have located the Excel file you want to download, the next step is to click on the file to initiate the download process. Here’s how to do it:
If you found the Excel file on a website or through a search engine:
- Position your mouse cursor over the file link or icon. You should see the cursor change to a hand symbol or a pointing finger.
- Click on the file link or icon. This will typically be a text link or a button with an arrow pointing downwards.
If you are accessing the Excel file from a cloud storage service:
- Position your mouse cursor over the file. You should see options to download, save, or open the file.
- Click on the “Download” or “Save” option. This will prompt the file to begin downloading to your Mac.
After clicking on the file, you may see a prompt or pop-up window asking for confirmation to download the file. Click on “Save” or “Download” to proceed. The file will start downloading, and you can track the progress in the browser’s downloads indicator, usually located in the top-right corner of the browser window.
It’s important to note that the time it takes to download the Excel file will vary depending on the file size and your internet connection speed. Once the download is complete, you can move on to the next step: choosing the destination folder to save the file.
Step 4: Choose the destination folder to save the file
After clicking on the Excel file and initiating the download, the browser will typically prompt you to choose a destination folder to save the file. This step allows you to specify where on your Mac’s storage you want to store the downloaded Excel file. Follow these steps to choose the destination folder:
- Once the download is initiated, a dialog box or pop-up window will appear on your screen.
- Navigate to the location where you want to save the Excel file. This can be any folder or directory on your Mac, such as the Documents folder or a specific project folder.
- Click on the folder or directory to select it.
- Click the “Save” or “OK” button to confirm your choice and save the file in the selected destination folder.
If you prefer to save downloaded files to a specific folder every time without being prompted, you can set a preferred download location in your browser settings. This makes the process even more convenient, as the file will be automatically saved to the predefined folder without any additional steps.
Once you have selected the destination folder and saved the Excel file, you’re almost done. The last step is to access the downloaded file. We’ll cover that in the next step.
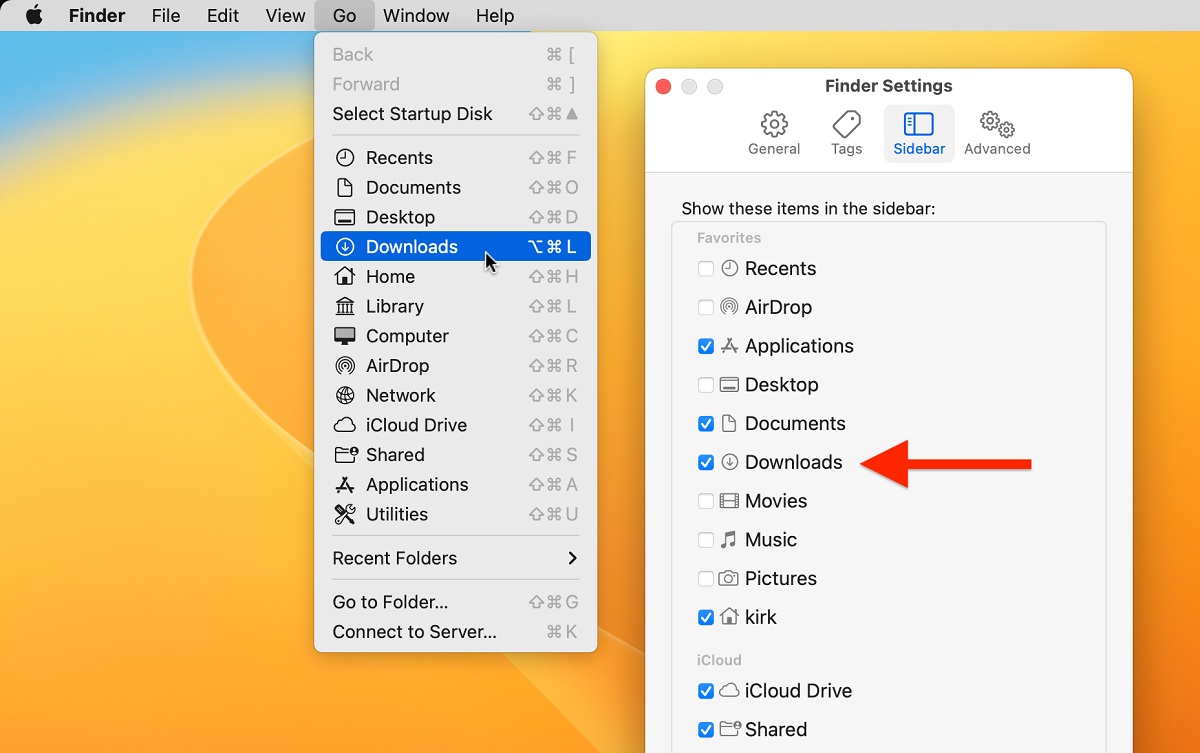
Step 5: Open the Downloads folder to access the file
Now that you have successfully downloaded the Excel file to your chosen destination folder, it’s time to access the file and start working with it. Follow these steps to open the Downloads folder and locate the file:
- Locate and open a Finder window on your Mac. You can do this by clicking on the Finder icon in the Dock or using the keyboard shortcut Command + N.
- In the sidebar of the Finder window, you will find a list of shortcuts to various folders. Look for the “Downloads” folder and click on it. Alternatively, you can access the Downloads folder by clicking “Go” in the menu bar, then selecting “Downloads” from the drop-down list.
- Once you are in the Downloads folder, you will see a list of all the files you have downloaded. Locate the Excel file you just downloaded. You can identify the file by its name or the Excel file extension, which is “.xlsx” for newer versions or “.xls” for older versions.
- Double-click on the Excel file to open it. This will launch Excel on your Mac and load the file into the program.
Once the Excel file is open, you can begin working with it, such as analyzing the data, making edits, or sharing it with others. Remember to save any changes you make to the file to ensure you retain your progress.
That’s it! You have successfully downloaded and accessed the Excel file on your Mac. Now you can leverage the power of Excel to analyze and manipulate data to meet your needs.
Conclusion
Congratulations! You have now learned how to download Excel files on your Mac using the Safari browser. This step-by-step guide has taken you through the process of opening the Safari browser, finding the Excel file you want to download, clicking on the file to initiate the download, choosing the destination folder to save the file, and accessing the downloaded file in the Downloads folder.
Downloading Excel files is a fundamental skill for Mac users who work with data analysis, spreadsheets, and numerical information. By following these steps, you can easily download Excel files from websites, search engines, or cloud storage services, and save them to your Mac for further analysis or editing.
Remember to always ensure that the downloaded file is valid and that you have the necessary permissions to access and download it. Additionally, you can set a preferred download location in your browser settings for more convenient future downloads.
Now that you have mastered the art of downloading Excel files on your Mac, you can make the most of the powerful features and functionalities that Excel offers. Whether you are analyzing financial data, creating reports, or managing budgets, Excel is a versatile tool that can assist you in accomplishing your tasks efficiently and effectively.
So go ahead, start downloading those Excel files, and unlock the potential for data-driven insights and productivity on your Mac!