Back up your data
Before you trade in your iPhone, it is crucial to back up all of your data to ensure that you don’t lose any valuable information. By creating a backup, you can easily transfer your photos, contacts, messages, and other important files to your new device. Here’s how to back up your data:
1. iCloud Backup: The easiest way to back up your iPhone is by using iCloud. Simply go to Settings > [Your Name] > iCloud > iCloud Backup, and then tap “Back Up Now.” This will initiate the backup process, and your data will be securely stored in your iCloud account.
2. iTunes Backup: If you prefer to back up your data using your computer, you can use iTunes. Connect your iPhone to your computer, open iTunes, and select your device. Under the “Summary” tab, click on “Back Up Now.” This will create a local backup on your computer.
3. Third-Party Backup Apps: There are also various third-party apps available on the App Store that can help you back up your data. These apps often provide additional features and flexibility when it comes to managing your backup files.
It’s essential to ensure that your backup is complete and up-to-date before proceeding with the trade-in process. You can do this by checking the “Last Backup” date and time in your iCloud or iTunes settings.
Remember, backing up your data not only protects you from losing important information but also makes the transfer process to your new device a breeze. So, take the time to back up your iPhone, and rest assured knowing that your data is safe and secure.
Sign out of iCloud and disable Find My iPhone
Before trading in your iPhone, it is essential to sign out of your iCloud account and disable the Find My iPhone feature. This ensures that your device is ready to be handed over to its new owner and protects your privacy. Here’s how to take these important steps:
1. Sign out of iCloud: Go to Settings on your iPhone and tap on your name at the top of the screen. Scroll down and select “Sign Out.” You will be prompted to enter your Apple ID password and choose whether to keep a copy of your iCloud data on your device. It’s recommended to choose “Keep on My iPhone” to ensure your data remains accessible until you transfer it to your new device.
2. Disable Find My iPhone: To turn off this feature, go to Settings and tap on your name. Then, select “Find My” and choose “Find My iPhone.” Toggle off the “Find My iPhone” option. You may need to enter your Apple ID password to complete the process.
By signing out of iCloud and disabling Find My iPhone, you ensure that your personal information is no longer connected to the device. This step is crucial to protect your data and prevent unauthorized access.
Remember, if you forget to sign out of iCloud or disable Find My iPhone, the new owner may encounter difficulties when setting up the device, or worse, they may have access to your personal information. Therefore, it’s essential to follow these steps before trading in your iPhone.
Once you have signed out of iCloud and disabled Find My iPhone, you can proceed with confidence, knowing that your device is ready to be transferred to its new owner without compromising your privacy.
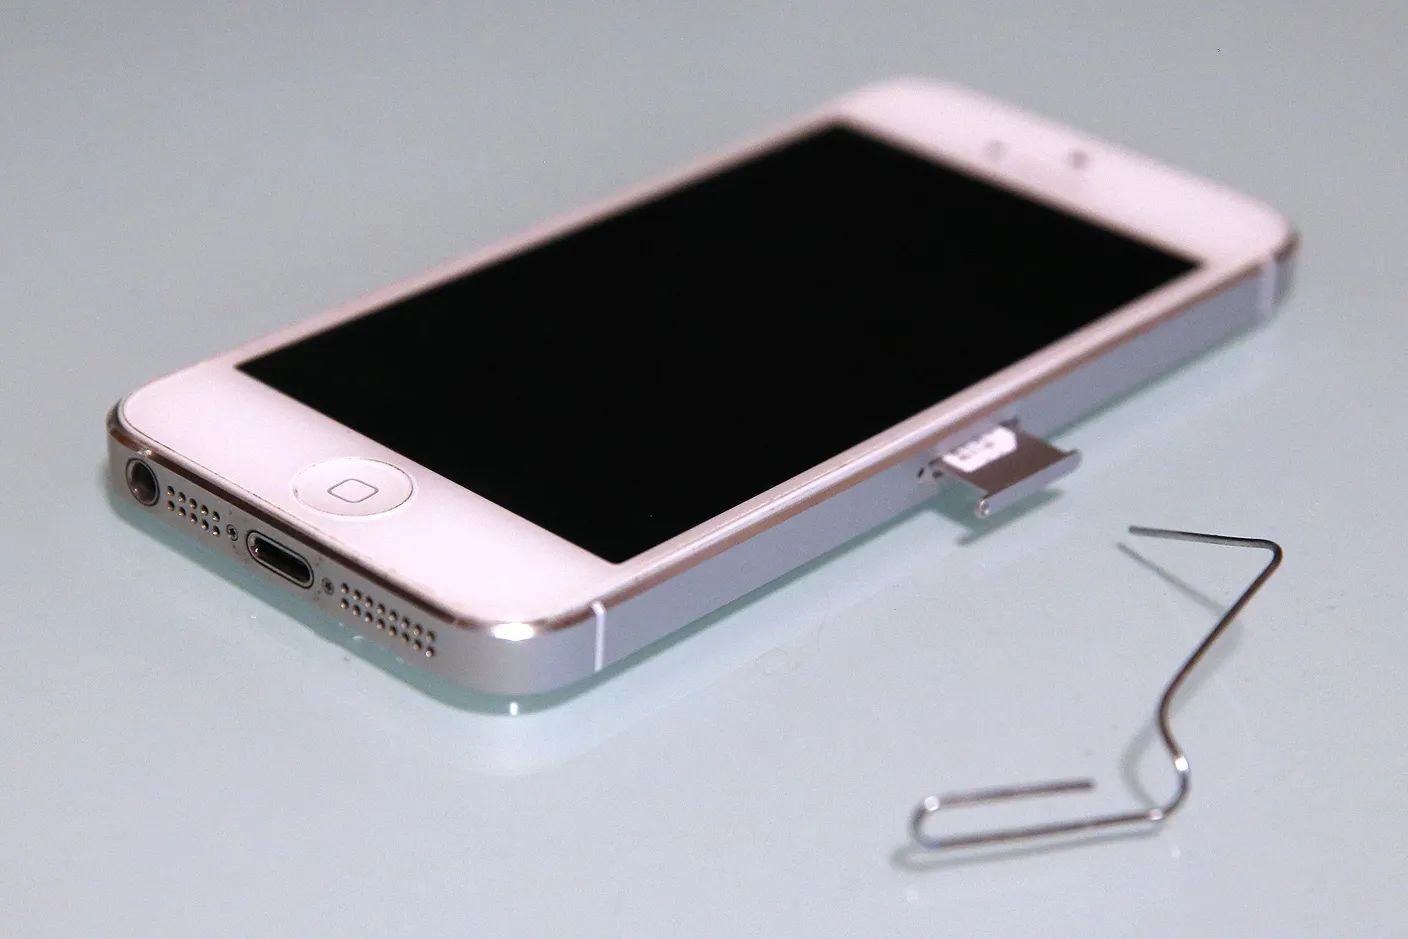
Remove your SIM card
When preparing to trade in your iPhone, one important step is to remove the SIM card. The SIM card contains your cellular network information and personal data, so removing it ensures that this information remains secure. Here’s how to remove the SIM card from your iPhone:
1. Locate the SIM card tray: The SIM card tray is usually located on the side of your iPhone. The location may vary depending on the model of your device. You can refer to the user manual or search online for the specific location of the SIM card tray for your iPhone model.
2. Insert the SIM card removal tool: Apple provides a SIM card removal tool with every iPhone. If you don’t have it, you can use a small paperclip or a similar object. Insert the tool into the small hole on the SIM card tray.
3. Eject the SIM card tray: Gently press the tool into the hole until the SIM card tray pops out slightly. Carefully pull the tray out with your fingers or with the tool. Place the tray and the SIM card in a safe place to avoid losing them.
Once you have removed the SIM card, your iPhone will no longer be connected to your cellular network. This step is important to ensure that your personal information, contacts, and text messages are not accessible to the new owner of the device.
If you are planning to use your SIM card in a new device, remember to insert it into the new device when set up. If you are transitioning to a different cellular network, you may need to obtain a new SIM card from your new carrier.
By removing the SIM card, you can trade in your iPhone with peace of mind, knowing that your personal data is protected and that you have taken an important step towards ensuring the security of your information.
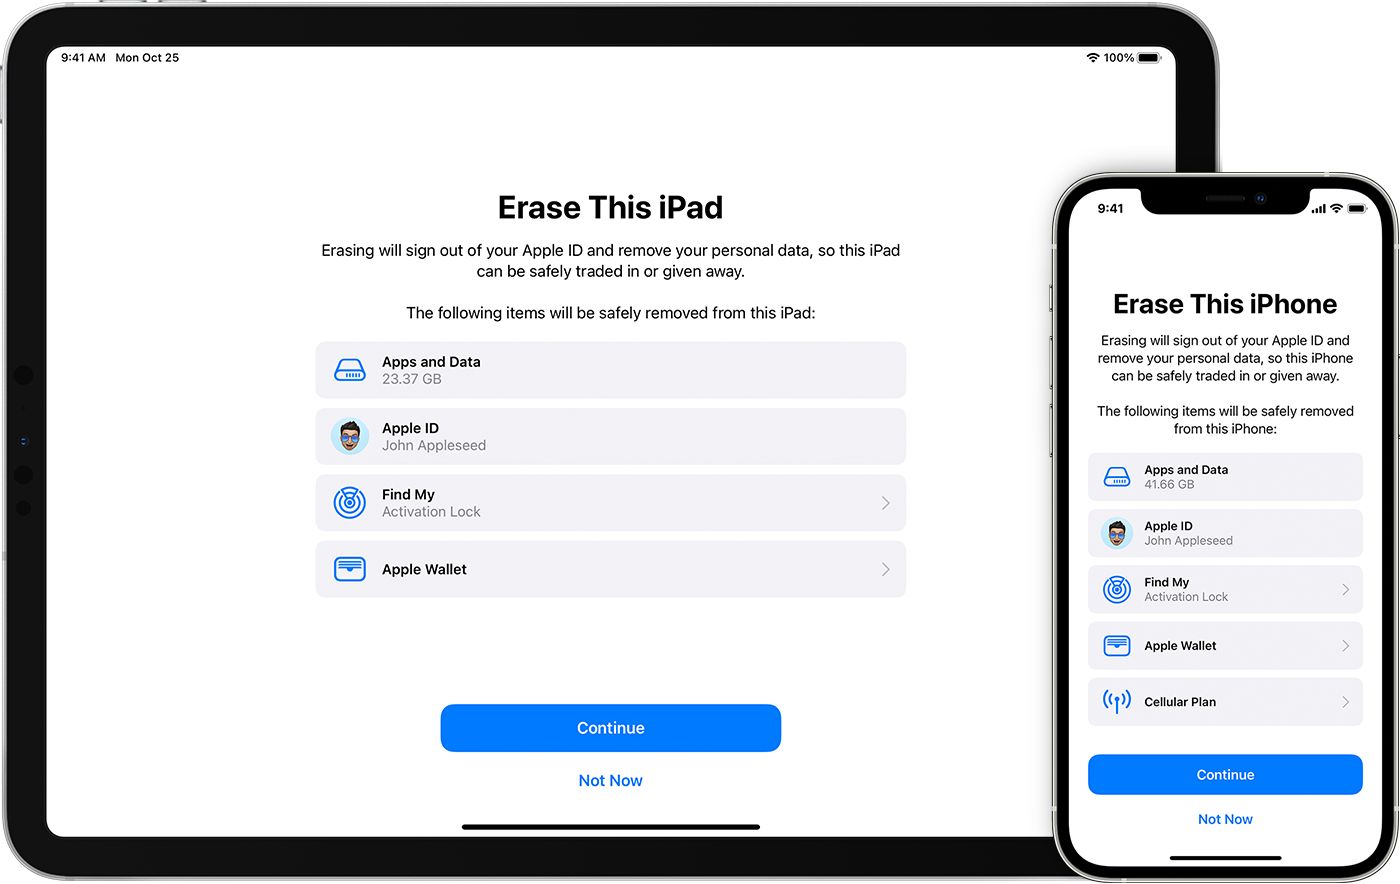
Erase all content and settings
Before trading in your iPhone, it is essential to erase all content and settings to ensure that your personal data is completely wiped from the device. This step is crucial for protecting your privacy and ensuring that no sensitive information falls into the wrong hands. Here’s how to erase all content and settings on your iPhone:
1. Backup your data: Before proceeding with the erasure process, make sure you have backed up all important data that you want to keep. You can back up your iPhone using iCloud or iTunes as mentioned earlier in this article.
2. Go to Settings: Open the Settings app on your iPhone and tap on “General.”
3. Reset: Scroll down and tap on “Reset” to access the reset options.
4. Erase All Content and Settings: Tap on “Erase All Content and Settings.” You may be prompted to enter your passcode and Apple ID password for security purposes.
5. Confirm the erasure: A warning message will appear, informing you that all your media, data, and settings will be erased. Read the warning carefully and make sure you have backed up everything you need. Tap on “Erase Now” to proceed with the erasure.
6. Wait for the process to complete: The erasure process may take a few minutes. Your device will restart, and the screen will display a progress bar indicating the status of the erasure. Do not interrupt or turn off your iPhone during this process.
Once the erasure process is complete, your iPhone will be restored to its factory settings, with all data and personal information removed. This ensures that the device is clean and ready for the new owner.
It’s worth noting that erasing all content and settings is irreversible, so double-check that you have backed up all important data before proceeding. Once the process is completed, you can confidently trade in your iPhone, knowing that your personal information is secure.
Remove all personal information and accounts
When preparing to trade in your iPhone, it’s crucial to remove all personal information and accounts to protect your privacy. This includes deleting your accounts for various services, such as email, social media, and other third-party apps. Here’s how to remove your personal information and accounts from your iPhone:
1. Sign out of accounts: Open each app on your device that requires a login, such as your email, social media, and banking apps. Go to the app’s settings or account settings, and sign out or log out of your account. This will ensure that your personal data is removed from the app and that the new owner won’t have access to your accounts.
2. Remove email accounts: Go to Settings > Mail >Accounts. Tap on each email account listed and select “Delete Account.” Confirm the removal of each email account to ensure that your messages and contacts are no longer accessible on the device.
3. Remove social media accounts: Open the settings for each social media app installed on your iPhone and look for the “Sign out” or “Log out” option. This will unlink your accounts from the device and remove your personal information.
4. Deauthorize apps and services: If you have authorized any third-party apps or services to access your iPhone, such as music streaming apps or cloud storage services, make sure to deauthorize them. This can typically be done through the app settings or the associated website.
5. Clear browsing data: If you use the Safari browser, clear your browsing history, cookies, and cache. Go to Settings > Safari > Clear History and Website Data. This will remove your browsing history and data from the device.
By removing all personal information and accounts from your iPhone, you are ensuring that your data remains private and that the new owner won’t have access to your sensitive information. It’s important to remember that simply deleting apps or data from your device may not completely remove the information, so it’s best to follow these steps to ensure a thorough deletion of your personal data.
Remember, before you remove any accounts or personal information, make sure to back up any data that you want to keep. Once you have completed these steps, you can proceed with confidence, knowing that your iPhone is ready to be traded in without compromising your privacy.
Clean your iPhone
Before trading in your iPhone, it’s important to clean the device to ensure that it is in good condition and free from dirt, dust, and fingerprints. Taking the time to clean your iPhone not only improves its appearance but also helps to maintain its functionality. Here’s how to effectively clean your iPhone:
1. Turn off your iPhone: Before cleaning your device, make sure to turn it off. This helps to prevent any accidental input while cleaning and ensures your safety.
2. Use a microfiber cloth: Start by wiping the screen and the back of your iPhone with a soft, lint-free microfiber cloth. This cloth is gentle enough to remove smudges and fingerprints without scratching the screen or damaging the device’s finish.
3. Disinfect with isopropyl alcohol: To effectively disinfect your iPhone, dampen a clean microfiber cloth with isopropyl alcohol. Make sure to wring out any excess liquid before applying it to your device. Gently wipe the screen and the back of your iPhone, focusing on areas that are frequently touched, such as buttons and the charging port.
4. Avoid getting moisture in ports: While cleaning your iPhone, be cautious not to let any moisture or cleaning solution enter the charging port, headphone jack, or speaker openings. Moisture in these areas can potentially damage your device.
5. Use a soft-bristled brush: For hard-to-reach areas, such as the edges and corners of your iPhone, use a soft-bristled brush or a toothbrush. Gently brush away any dust or debris that may have accumulated in these areas.
6. Let it dry: After cleaning your iPhone with isopropyl alcohol, allow it to air dry completely before turning it back on or placing it in a case. This ensures that there is no residual moisture that could cause damage to the device.
Cleaning your iPhone regularly not only keeps it looking sleek and presentable but also helps to prolong its lifespan. By taking the time to properly clean your device, you can ensure that it is in tip-top shape for its new owner.
Remember, it’s always a good idea to consult the Apple official website or your device’s user manual for specific cleaning recommendations, especially for newer iPhone models that may have different materials or coatings.
With a clean and well-maintained iPhone, you can confidently trade in your device, knowing that it will make a positive impression on its new owner.
Check for any repairs needed
Before trading in your iPhone, it’s important to give it a thorough inspection and check if any repairs are needed. This step ensures that your iPhone is in good condition and functioning properly, which can increase its trade-in value. Here’s how to check for any repairs that may be needed:
1. Examine the screen: Carefully inspect the screen of your iPhone for any cracks, scratches, or dead pixels. These can affect the usability and aesthetics of the device. If you notice any damage, consider getting the screen replaced or repaired by a professional technician.
2. Test the buttons and switches: Test all the buttons on your iPhone, including the volume buttons, power button, and home button (if applicable). Check if they are responsive and click properly. Also, test the functionality of the mute switch and the toggle switches for features like the camera or flashlight.
3. Check the camera and microphone: Open the camera app and test both the front and rear cameras of your iPhone. Ensure that the photos and videos are clear and that there are no issues with focus or blurry images. Additionally, make a test call or record a voice memo to confirm that the microphone is working properly.
4. Assess battery performance: Evaluate the battery performance of your iPhone by using it throughout the day and monitoring its battery life. Note any rapid battery drain or unusual behavior, such as the battery percentage dropping significantly during normal usage. If you notice any issues, consider replacing the battery before trading in your iPhone.
5. Check for water damage: Look for any signs of water damage, such as watermarks, corrosion, or a red indicator on the SIM card tray. If your iPhone has been exposed to water or other liquids, it’s recommended to have it inspected and repaired by a professional technician. Water damage can lead to various issues, including hardware malfunctions.
6. Test connectivity and sensors: Ensure that your iPhone’s Wi-Fi, Bluetooth, and cellular connectivity are working properly. Test these features by connecting to different networks, pairing with Bluetooth devices, and making phone calls. Also, check the functionality of other sensors, like the accelerometer, gyroscope, and ambient light sensor.
If you discover any issues during your inspection, it’s advisable to consult an authorized service provider or visit an Apple Store for further assessment and repair. Fixing any repairs needed before trading in your iPhone can increase its value and ensure a smoother transaction.
By thoroughly checking for any repairs needed, you can trade in your iPhone with confidence, knowing that you have provided the new owner with a device in excellent condition.
Compare trade-in offers
When you’re ready to trade in your iPhone, it’s essential to compare the trade-in offers available to get the best value for your device. Different trade-in programs and platforms may offer varying prices, so taking the time to compare your options can make a significant difference. Here’s how to effectively compare trade-in offers:
1. Research trade-in programs: Start by researching different trade-in programs and platforms that accept iPhone trade-ins. Major retailers, such as Apple, as well as third-party online marketplaces and carriers, often have their own trade-in programs. Look for reputable and trustworthy options that have positive customer reviews and provide a straightforward trade-in process.
2. Check trade-in requirements: Each trade-in program may have specific requirements and criteria for accepting trade-ins. Look into the eligibility criteria, such as the minimum iPhone model accepted, the condition requirements, and any restrictions on locked or carrier-specific devices. Make sure your device meets the necessary criteria to qualify for the trade-in offer.
3. Get quotes from multiple sources: Obtain trade-in quotes from multiple sources. Visit the websites or contact the trade-in programs directly to request a quote for your specific iPhone model. Provide accurate information about the condition of your device to receive an accurate valuation.
4. Consider trade-in values: Compare the trade-in values offered by different programs. Take note of the monetary offer as well as any additional benefits, such as store credit or gift cards that may be provided as part of the trade-in offer. Remember that higher trade-in values can mean more money in your pocket or better deals on new devices.
5. Evaluate trade-in conditions: Apart from the monetary value, consider the trade-in conditions offered by different programs. Look into factors such as shipping costs, return policies, and the ease of the trade-in process. Evaluate the convenience and reliability of the trade-in program to ensure a smooth experience.
6. Read customer reviews and feedback: To gain insights into the reliability and customer satisfaction of each trade-in program, read customer reviews and feedback. This can provide you with valuable information about the overall experience, including the speed of payment and the level of customer support provided.
By comparing trade-in offers from different programs, you can make an informed decision and choose the trade-in option that offers you the best value, convenience, and reliability. Remember to take into account not only the price offered but also the overall trade-in process and customer feedback to ensure a positive trade-in experience.
Once you have compared trade-in offers and selected the best option, you can proceed with confidence, knowing that you are getting the most value for your iPhone trade-in.
Remove your case and accessories
Before trading in your iPhone, it’s important to remove any cases and accessories that you may have attached to the device. This ensures that the trade-in process goes smoothly and that you can transfer your accessories to your new device. Here’s how to remove your case and accessories:
1. Remove the case: If you have a protective case or cover on your iPhone, carefully remove it by gently separating it from the edges of the device. Take your time to avoid any accidental damage to your iPhone or the case itself. If there are any stubborn or tight-fitting cases, refer to the manufacturer’s instructions or seek assistance if needed.
2. Check for any residue: After removing the case, inspect your iPhone for any residue or debris that may have accumulated between the case and the device. Clean the edges and back of your iPhone using a soft, lint-free cloth to ensure that it is free from any loose particles or dirt.
3. Remove screen protectors: If you have a screen protector applied to your iPhone, carefully peel it off by starting from one corner and slowly lifting it away from the screen. Take care not to leave any adhesive residue on the screen, as this can affect the visual quality and touch sensitivity. Gently clean the screen with a microfiber cloth if needed.
4. Detach accessories: Besides the case, make sure to remove any attached accessories, such as a pop socket, phone ring, or magnetic car mount. Carefully detach these accessories from your iPhone, following the manufacturer’s instructions if applicable.
5. Organize accessories for trade-in: Once you have removed the case and accessories, safely store them in a secure location. This will ensure that they are kept in good condition and ready for use with your new device. You can keep them in a small bag, pouch, or any dedicated storage container so that they don’t get misplaced or damaged during the trade-in process.
By removing your case and accessories before trading in your iPhone, you ensure that the device is clean, free from obstructions, and ready for evaluation by the trade-in program or the new owner. You also have the added benefit of being able to reuse your favorite accessories with your new device.
Remember to check the trade-in requirements of the program or platform you’re using to ensure that removing the case and accessories is necessary. Some trade-in programs may accept the device with accessories included, but it’s always a good practice to double-check and follow their guidelines to avoid any potential issues.
With your iPhone case-free and accessories removed, you can proceed with confidence, knowing that your device is prepared for the trade-in process and ready to be paired with your new accessories in the future.
Double-check everything before trading in your iPhone
Before trading in your iPhone, it’s crucial to take a final moment to double-check everything to ensure a smooth and successful trade-in process. By carefully reviewing your device, its settings, and any remaining tasks, you can trade in your iPhone with confidence. Here’s what you should double-check before trading in your iPhone:
1. Verify data backup: Ensure that you have successfully backed up all your important data, such as photos, contacts, and documents. Confirm that the backup is recent and complete by cross-checking it with your preferred backup method, whether it be iCloud or iTunes.
2. Factory reset: Perform a final factory reset on your iPhone to erase all data and reset the device to its original settings. This helps protect your privacy and ensures that your personal information will not be accessible to the new owner. Go to Settings > General > Reset > Erase All Content and Settings to initiate the reset process.
3. Check for iCloud deactivation: Verify that you have signed out of your iCloud account and disabled the Find My iPhone feature, as mentioned in a previous section. Confirming this step ensures that your iPhone is ready for the next user and prevents any potential issues during the setup process.
4. Remove all personal information: Double-check that you have removed all personal information and accounts from your iPhone. Check for any remaining traces of login credentials, emails, or personal data. This step ensures that no sensitive information is left behind and that the new owner starts with a fresh device.
5. Inspect physical condition: Give your iPhone a final visual inspection to ensure that there are no visible damages or signs of wear and tear. Check for any scratches, cracks, or dents on both the screen and the body. Taking note of the device’s condition beforehand can help address any discrepancies during the trade-in evaluation.
6. Review accessories and peripherals: Confirm that you have removed all cases, screen protectors, and accessories from your iPhone, as mentioned in a previous section. Ensure that you have collected all detachable items, such as SIM cards or memory cards, that you may have used with the device.
7. Compare trade-in offers again: Take one final look at the trade-in offers available to ensure that you are choosing the best option. Compare the trade-in values, terms, and requirements of different programs or platforms. Confirm the process, shipping instructions, and any necessary documentation for trade-in submission.
By double-checking everything before trading in your iPhone, you minimize the chances of encountering any issues or potential misunderstandings during the trade-in process. Taking this extra effort ensures that you have done your part to prepare your iPhone for a seamless transition to its new owner.
Once you have gone through this final checklist, you can confidently proceed with the trade-in process, knowing that you have taken all necessary steps to ensure a successful trade-in and handover of your iPhone.