Introduction
Welcome to the world of online invoicing with PayPal! In this digital age, businesses are constantly seeking efficient ways to manage their financial transactions. PayPal offers a comprehensive invoicing solution that simplifies the process and provides a seamless experience for both businesses and their clients.
Creating and sending invoices has never been easier. With PayPal, you can generate professional-looking invoices, customize templates, include all the necessary details, and seamlessly track payments. Whether you’re a freelancer, a small business owner, or a large corporation, PayPal’s invoicing feature is designed to cater to your specific needs.
In this article, we will guide you through the process of creating invoices on PayPal, step by step. We’ll cover everything from setting up your PayPal business account to customizing invoice templates, adding business information, itemizing products or services, and even including taxes and discounts. We’ll also explore important features like setting payment terms, sending reminders, and tracking payments.
By the end of this guide, you’ll have a clear understanding of how PayPal invoicing works and how it can benefit your business. So, let’s get started on this invoicing journey with PayPal!
Benefits of Using PayPal for Invoicing
PayPal provides a range of benefits for businesses when it comes to invoicing. Let’s explore some of the key advantages of using PayPal for your invoicing needs:
- Convenience and Efficiency: With PayPal, you can create and send invoices electronically, eliminating the need for manual paperwork and traditional mailing. This saves you time, reduces administrative costs, and streamlines the invoicing process.
- Professional and Branded Invoices: PayPal allows you to customize your invoice templates with your business logo and colors, giving a professional and personalized touch. This enhances your brand reputation and creates a more cohesive experience for your clients.
- Secure Online Payments: PayPal is a trusted payment platform that ensures secure transactions for both you and your customers. By utilizing PayPal for invoicing, you provide your clients with a familiar and secure payment method, giving them peace of mind.
- International Reach: PayPal supports transactions in multiple currencies and is accepted in over 200 countries worldwide. This means you can easily engage with international clients and receive payments from anywhere in the world, expanding your business opportunities.
- Tracking and Reporting: PayPal provides easy-to-use tools to track your invoices and monitor payment statuses. You can view detailed reports, track outstanding balances, and generate financial records for better financial management and planning.
- Automated Reminders: PayPal allows you to set up automated payment reminders, ensuring prompt payment from your clients. This saves you the manual effort of following up and improves your cash flow by reducing late payments.
- Integration with Accounting Software: PayPal seamlessly integrates with popular accounting software like QuickBooks, allowing you to sync your invoices, payments, and financial data effortlessly. This simplifies your bookkeeping and reduces the chances of errors or discrepancies.
These are just a few of the benefits that make PayPal a preferred choice for businesses when it comes to invoicing. With its user-friendly interface, robust security features, and powerful invoicing capabilities, PayPal offers a comprehensive solution to streamline your invoicing process and help you grow your business.
Creating a PayPal Business Account
To start using PayPal for invoicing, you’ll first need to create a PayPal business account. Here are the steps to get you started:
- Go to the PayPal website: Visit the PayPal website and click on the “Sign Up” button.
- Select Business Account: On the sign-up page, choose the “Business Account” option.
- Provide Business Information: Fill in the required details, including your business name, email address, and contact information. You’ll also need to create a secure password for your account.
- Confirm Email: After completing the form, PayPal will send a confirmation email to the email address you provided. Click on the verification link in the email to confirm your account.
- Link Bank Account: Next, you’ll be prompted to link your bank account to your PayPal business account. This enables you to receive payments directly into your bank account.
- Verify Bank Account: PayPal will initiate a small deposit to your linked bank account. Once you see the deposit in your bank statement, return to PayPal and enter the exact amount to verify your bank account.
- Choose Payment Preferences: Set up your payment preferences by selecting your accepted payment methods, currency, and payment notification preferences.
- Provide Business Details: Complete the additional business details required by PayPal, such as your business address, phone number, and website (if applicable).
- Review and Submit: Review all the information you provided and verify its accuracy. Once you’re satisfied, submit your application for a PayPal business account.
- Confirmation: After submitting your application, PayPal will review it and send you a confirmation email once your business account is approved.
Once your PayPal business account is set up, you’ll have access to a range of features and tools for invoicing and managing your business finances. You can now proceed to the next step of setting up your invoice settings in PayPal.
Setting Up Invoice Settings in PayPal
Once you have created your PayPal business account, the next step is to configure your invoice settings. These settings allow you to customize your invoicing experience and ensure that your invoices reflect your brand identity. Here’s how you can set up your invoice settings in PayPal:
- Log in to PayPal: Go to the PayPal website and sign in to your PayPal business account using your email address and password.
- Access the Invoice Settings: Once logged in, navigate to the “Tools” menu and select “Invoicing.”
- Choose Create Template: In the Invoicing section, click on the “Create Template” button to begin customizing your invoice template.
- Template Selection: PayPal offers pre-designed templates that you can choose from. Select the template that best suits your business’s aesthetics and needs.
- Customize Template Design: Depending on the template you chose, you can customize various elements such as font styles, colors, and logo placement. This allows you to align the invoice design with your brand identity.
- Set Default Terms and Company Information: In the template customization options, you can also set default invoice terms, such as payment due dates and late fees. Additionally, you can enter your company’s information, including your business name, contact details, and logo.
- Save and Preview: After customizing your template, save your changes and preview a sample invoice to ensure it meets your expectations.
- Manage Additional Invoice Settings: PayPal provides additional settings that you can adjust as per your invoicing requirements. These include invoice numbering, tax settings, discount options, and more. Explore these settings and adjust them based on your business needs.
- Save and Apply: Once you’ve configured all the necessary invoice settings, save your changes and apply the template as your default invoice template.
By setting up your invoice settings in PayPal, you can create a consistent and professional invoicing experience for your clients. Take the time to customize your template and configure the additional settings to streamline your invoicing process and maintain brand consistency in all your client communications.
Customizing Your Invoice Template
One of the advantages of using PayPal for invoicing is the ability to customize your invoice template. By personalizing the template, you can create a professional and branded look that represents your business. Here’s how you can customize your invoice template in PayPal:
- Access Invoice Customization: Log in to your PayPal business account and navigate to the “Tools” menu. From there, select “Invoicing” to access the invoicing section.
- Choose Customize Template: In the invoicing section, click on the “Create Template” button and select the template you want to customize.
- Layout and Design: PayPal offers a range of design options for your invoice template. You can choose the layout, font styles, colors, and other visual elements to align with your brand identity.
- Logo Placement: Upload your business logo or select one from the available options. Position it in a visually appealing spot, such as the header or footer, to create a strong brand presence.
- Add Business Information: Enter your company’s details, including the business name, address, phone number, and website. This information will be displayed on the invoice, providing clear contact information for your clients.
- Include Terms and Policies: PayPal allows you to add custom terms, payment policies, and other important information to your invoice. This helps set expectations and avoids any confusion or disputes later on.
- Preview and Adjust: After customizing the template, preview a sample invoice to ensure it looks as desired. If needed, make adjustments to the design or content until you’re satisfied with the result.
- Save and Apply Template: Once you’re happy with the customization, save your changes and apply the template as the default for your future invoices.
By customizing your invoice template in PayPal, you can create a professional and visually appealing representation of your brand. This personal touch can help build trust with your clients and make your invoices stand out among other businesses. Take the time to carefully design and customize your template to create a memorable impression and enhance your brand image.
Adding Your Business Information to the Invoice
When creating an invoice, it’s essential to include your business information to provide transparency and establish credibility with your clients. PayPal allows you to easily add your business details to the invoice template. Here’s how you can include your business information:
- Access the Invoice Customization: Log in to your PayPal business account and navigate to the “Tools” menu. Select “Invoicing” to access the invoicing section.
- Select the Template: Choose the invoice template you want to work with and click on the “Customize” or “Edit” button to make changes.
- Locate the Business Information Section: Look for the section where you can input your business details. This is usually found in the header or footer of the invoice template.
- Enter Your Business Name: Input your business name as it appears on official documents and communications. This will help your clients easily identify your company.
- Include Contact Information: Provide essential contact details such as your business address, phone number, and email address. This allows customers to reach you if they have any questions or concerns about the invoice.
- Add Website or Online Presence: If you have a website or an online presence, including it on the invoice can provide additional information to clients who may want to learn more about your business.
- Include Business Logo: Upload your business logo to the invoice template. Having your logo prominently displayed helps reinforce brand recognition and professionalism.
- Preview and Save: After entering your business information and making any necessary adjustments, preview the invoice to ensure that the details are accurate and displayed correctly. Save the changes once you are satisfied with the appearance.
By including your business information on the invoice, you provide transparency and make it easy for clients to contact you if needed. It also helps create a professional and cohesive brand image throughout your invoicing process. Take the time to accurately enter your business details and ensure they are up to date.
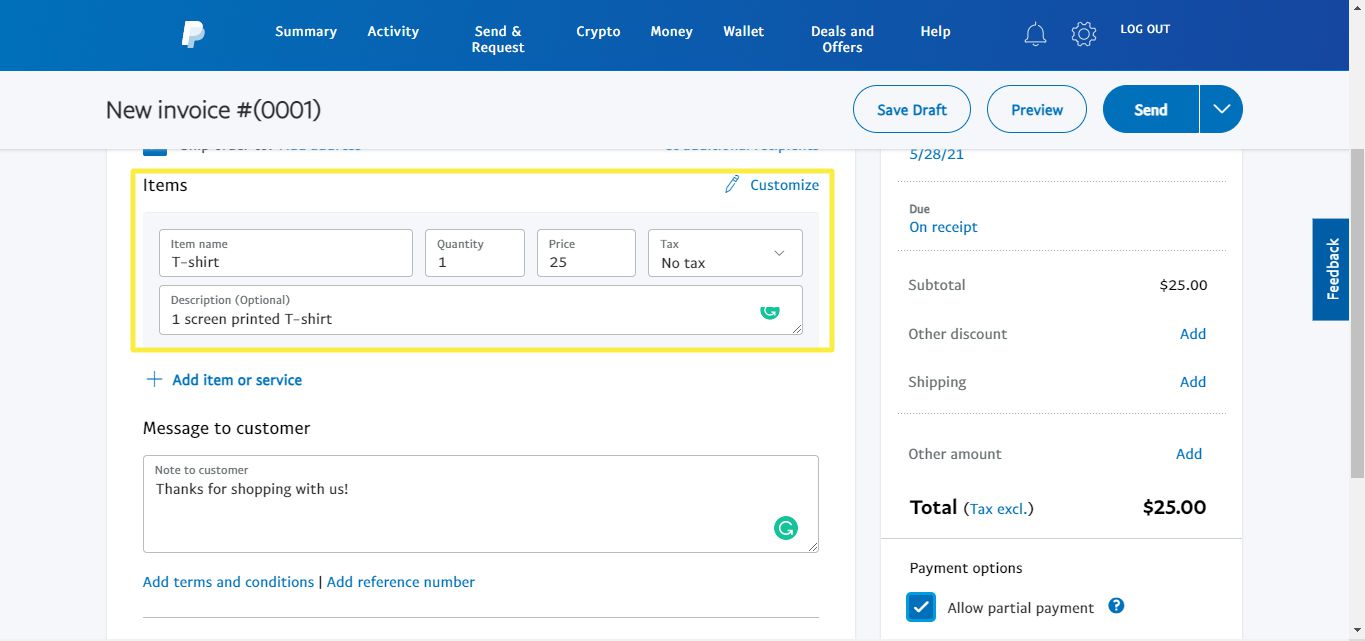
Adding Itemized Products or Services
When creating an invoice, it’s important to provide a clear breakdown of the products or services you are billing your clients for. PayPal’s invoicing feature allows you to easily add itemized details to your invoice, ensuring transparency and facilitating accurate payment processing. Here’s how you can add itemized products or services to your invoice:
- Access the Invoice Creation: Log in to your PayPal business account and navigate to the “Tools” menu. Click on “Invoicing” to access the invoicing section.
- Select the Template: Choose the invoice template you wish to work with and click on the “Customize” or “Edit” button to make changes.
- Locate the Itemized Products/Services Section: Look for a designated area on the invoice template where you can add itemized details. This is typically a table or a list format.
- Add Product/Service Information: Enter the name or description of each product or service you are invoicing for. It’s best to be specific and provide sufficient details to avoid any confusion.
- Include Quantity: Specify the quantity of each item being billed. This could be a figure, such as the number of units sold, or a time-based measurement, such as hours spent on a service.
- Enter Unit Price: Indicate the price per unit or hourly rate for each item or service. Make sure the amount is accurate and reflects your agreed-upon pricing.
- Calculate Line Total: PayPal will automatically calculate the line total by multiplying the quantity by the unit price. This gives you and your clients a clear view of the individual cost for each item or service.
- Add Additional Charges: If there are any additional charges, such as shipping fees or taxes, include them in separate line items. Clearly label the charges and provide the amount for each.
- Preview and Save: Once you have added all the itemized details to your invoice, preview the invoice to ensure accuracy. Make any necessary adjustments before saving the changes.
By providing itemized details on your invoice, you create transparency and help your clients understand the breakdown of costs. This promotes trust, minimizes disputes, and facilitates seamless payment processing. Take the time to accurately enter all the necessary information for each item or service being invoiced.
Including Taxes and Discounts
When creating an invoice, it is important to accurately reflect any applicable taxes and discounts. PayPal’s invoicing feature allows you to easily include taxes and discounts, ensuring that your invoices accurately reflect the final amount owed by your clients. Here’s how you can include taxes and discounts in your PayPal invoice:
- Access the Invoice Creation: Log in to your PayPal business account and navigate to the “Tools” menu. Click on “Invoicing” to access the invoicing section.
- Select the Template: Choose the invoice template you wish to work with and click on the “Customize” or “Edit” button to make changes.
- Locate the Taxes and Discounts Section: Look for a designated area on the invoice template where you can add taxes and discounts. This can be placed near the subtotal or as a separate line item.
- Add Tax Information: If applicable, enter the tax rate and description in the designated section. Specify whether the tax is inclusive or exclusive of the listed prices.
- Include Discount Details: If you are offering a discount to your client, clearly state the description of the discount and the amount or percentage being applied.
- Calculate Taxes and Discounts: PayPal will automatically calculate the tax amount and the discounted total based on the information provided. This ensures accuracy and transparency for both you and your clients.
- Preview and Save: Once you have included the taxes and discounts, preview the invoice to ensure that all the details are correct. Make any necessary adjustments before saving the changes.
By including taxes and discounts on your PayPal invoice, you ensure that your clients have a clear understanding of the total amount owed. Not only does this promote transparency, but it also helps to minimize any confusion or discrepancies. Take the time to accurately calculate and include taxes and discounts to ensure accurate invoicing and smooth payment processing.
Setting Payment Terms and Due Dates
Setting clear payment terms and due dates in your invoices is crucial for ensuring timely payments from your clients. PayPal’s invoicing feature provides flexibility in defining payment terms, enabling you to establish expectations and improve cash flow. Here’s how you can set payment terms and due dates in PayPal:
- Access the Invoice Creation: Log in to your PayPal business account and navigate to the “Tools” menu. Click on “Invoicing” to access the invoicing section.
- Select the Template: Choose the invoice template you want to work with and click on the “Customize” or “Edit” button to make changes.
- Locate the Payment Terms Section: Look for a specified area where you can input the payment terms and due dates for the invoice.
- Define Payment Terms: Clearly state your preferred payment terms, such as “payment due upon receipt” or specify a specific number of days after the invoice date, such as “net 30 days.”
- Specify Due Date: Based on your payment terms, calculate and enter the due date for the invoice. This allows your clients to know the deadline by which they need to submit payment.
- Provide Payment Options: Outline the various payment methods available to your clients, such as bank transfers, credit cards, or PayPal. Include your preferred payment method and any relevant instructions or account details.
- Additional Terms and Conditions: If there are any additional terms or conditions related to the payment, such as late payment fees or discounts for early payment, clearly state them on the invoice.
- Preview and Save: Once you have set the payment terms and due dates, preview the invoice to ensure accuracy. Make any necessary adjustments before saving the changes.
By setting clear payment terms and due dates in your PayPal invoice, you establish a reliable payment process and avoid any ambiguity regarding payment expectations. This helps ensure prompt payment from your clients and facilitates better cash flow management for your business. Take the time to define your payment terms clearly and communicate them effectively to your clients.
Previewing and Sending the Invoice
Before sending out an invoice to your clients, it’s crucial to preview and review the invoice to ensure accuracy and professionalism. PayPal’s invoicing feature provides an easy-to-use preview function that allows you to review your invoice before sending it. Here’s how you can preview and send your invoice using PayPal:
- Access the Invoice Creation: Log in to your PayPal business account and navigate to the “Tools” menu. Click on “Invoicing” to access the invoicing section.
- Select the Template: Choose the invoice template you want to work with and ensure that all the necessary details, such as your business information, itemized products or services, taxes, and discounts, are entered correctly.
- Preview the Invoice: Once you have completed the necessary details, click on the preview button to review how the final invoice will appear to your clients. Take a close look at the layout, formatting, and accuracy of all the information included on the invoice.
- Review and Edit: While previewing the invoice, carefully review all the information to ensure there are no errors or omissions. Double-check that the prices, quantities, and total amounts are correct. If any changes are required, go back and edit the invoice accordingly.
- Save the Invoice: After reviewing and editing the invoice, save the final version. This step ensures that the changes you made are preserved for future reference.
- Send the Invoice: Once you are satisfied with the final version, you can send the invoice directly to your client through PayPal. Enter your client’s email address, along with any additional message or instructions, and click the send button.
- Send a Reminder: If needed, you can send invoice reminders to your clients directly from PayPal. These reminders prompt your clients to take action and submit payment if they haven’t already done so.
By previewing the invoice before sending it, you can ensure that your invoice appears professional, accurate, and error-free to your clients. This step helps maintain a positive image of your business and minimizes the chances of payment delays or disputes. Take the time to thoroughly review the invoice before sending it to your client, as it serves as a representation of your professionalism and attention to detail.
Tracking and Managing Invoices in PayPal
One of the significant advantages of using PayPal for invoicing is the ability to easily track and manage your invoices. PayPal provides robust tools and features that help you stay organized and informed about the status of your invoices. Here’s how you can track and manage your invoices in PayPal:
- Access the Invoice Management: Log in to your PayPal business account and navigate to the “Tools” menu. Click on “Invoicing” to access the invoicing section.
- View Invoice Dashboard: Once in the invoicing section, you will have access to an invoice dashboard that displays all your created invoices. From here, you can see an overview of your invoices, including their status, due dates, and payment history.
- Sort and Filter Invoices: PayPal allows you to sort and filter invoices based on different parameters, such as invoice number, client name, or status. This feature enables you to quickly find specific invoices or track payments from specific clients.
- View Invoice Details: By clicking on an individual invoice, you can view the comprehensive details, including the original amount, paid amount, outstanding balance, due dates, and payment history.
- Send Payment Reminders: PayPal gives you the option to send payment reminders to your clients directly from the invoice dashboard. These reminders help prompt clients to submit payments and assist in improving your cash flow.
- Customize Invoice Status: PayPal allows you to customize the status of your invoices, such as marking them as paid, pending, or overdue. This feature helps you stay organized and keep track of outstanding payments.
- Export Invoice Data: If you need to analyze or further process your invoice data, PayPal enables you to export your invoice details to commonly used formats, such as CSV or Excel spreadsheets.
- Generate Reports: PayPal offers reporting features that allow you to generate comprehensive reports on invoicing activities, payment history, outstanding balances, and more. These reports provide valuable insights for financial analysis and record-keeping.
- Manage Recurring Invoices: If you have recurring invoicing needs, PayPal enables you to set up and manage recurring invoices for regular clients. This feature saves time and effort, especially for businesses that offer subscription-based services or recurring payments.
By taking advantage of PayPal’s tracking and management tools, you can stay organized and gain valuable insights into your invoicing activities. These features help streamline your invoicing process, ensure prompt payment, and maintain clear communication with your clients. Explore the various tracking and management options provided by PayPal to enhance your invoicing workflow and overall financial management.
Accepting Payments and Sending Reminders
With PayPal’s invoicing feature, accepting payments from your clients and sending reminders for outstanding invoices is seamless and hassle-free. PayPal provides robust tools that facilitate timely payments and help you stay on top of your invoicing. Here’s how you can accept payments and send reminders using PayPal:
- Payment Options: PayPal offers various payment options, including credit cards, bank transfers, and PayPal balances. When you send an invoice, your clients can choose their preferred payment method.
- Payment Notifications: Once your client submits a payment, PayPal sends both you and your client a payment notification to confirm the transaction. This ensures transparency and provides peace of mind for both parties.
- Payment Tracking: PayPal’s invoicing feature allows you to track and monitor the status of payments for each invoice. You can easily view whether a payment has been made, how much has been paid, and view the payment history associated with the invoice.
- Automated Reminders: PayPal enables you to set up automated reminders for unpaid or overdue invoices. These reminders are sent to your clients at predetermined intervals, prompting them to submit payment and reducing the need for manual follow-ups.
- Customize Reminder Messages: When sending payment reminders, you have the option to personalize the message included in the reminder. You can add a friendly note, reiterate the due date, or provide any additional instructions needed to facilitate payment.
- Send Manual Reminders: In addition to automated reminders, PayPal allows you to manually send reminders to individual clients directly from the invoice dashboard. This can be useful for specific cases or for sending personalized follow-up messages.
- Track Reminder History: PayPal keeps track of all the reminders sent, allowing you to see the history of reminder communications for each invoice. This helps you keep a record of your efforts in following up with clients and ensures accountability.
- Payment Reconciliation: PayPal provides detailed transaction records and financial reports that simplify the process of reconciling payments. These reports allow you to cross-reference payments received with the corresponding invoices.
- Manage Payment Disputes: In the event of a payment dispute or issue, PayPal offers a resolution center where you can manage and resolve any disputes with your clients. This helps ensure fair and transparent resolution of payment-related conflicts.
By utilizing PayPal’s invoicing features for accepting payments and sending reminders, you can streamline your payment collection process and improve your cash flow. The convenience and flexibility offered by PayPal’s payment options, combined with automated reminders and comprehensive tracking, make it easier for you to receive payments on time and maintain positive client relationships.
Conclusion
PayPal’s invoicing feature offers a user-friendly and efficient solution for businesses of all sizes to manage their invoicing process effectively. By creating a PayPal business account and utilizing the invoicing tools provided, you can streamline your invoicing workflow, enhance professionalism, and improve your cash flow management.
We explored the various benefits of using PayPal for invoicing, such as convenience, professional templates, secure online payments, international reach, tracking and reporting capabilities, and integration with accounting software. These advantages make PayPal an ideal choice for businesses seeking an efficient and reliable invoicing solution.
We also discussed how to create a PayPal business account, customize invoice templates, add business information, include itemized products or services, incorporate taxes and discounts, set payment terms and due dates, preview and send invoices, and track and manage invoices in PayPal. These step-by-step instructions guide you through the process, ensuring that you can easily create professional invoices and manage them with ease.
PayPal’s invoicing feature empowers businesses to maintain clear communication with clients, accept payments seamlessly, and track outstanding invoices. The ability to send automated reminders and generate reports provides valuable insights for financial analysis and record-keeping purposes.
In summary, PayPal’s invoicing feature offers a comprehensive solution for businesses to create professional invoices, manage payment transactions, and maintain organized invoicing records. By utilizing this powerful tool, you can streamline your invoicing process, ensure timely payments, and enhance the financial management of your business.