Introduction
Welcome to the world of cryptocurrency! If you’ve been following the latest trends, you might have heard about Tron, a decentralized digital platform that aims to revolutionize the entertainment industry. With its own native cryptocurrency, Tronix (TRX), Tron has gained significant attention from investors and enthusiasts alike.
Before we delve into the process of buying Tron, let’s understand why you should consider investing in it. Tron offers a unique value proposition by providing a decentralized platform for content creators to directly connect with consumers, eliminating the need for intermediaries. This peer-to-peer network aims to empower artists, musicians, and other creatives by enabling them to retain control over their work and receive fair compensation.
Furthermore, Tron has garnered partnerships with prominent companies, including Samsung, further enhancing its credibility and potential for growth. As Tron continues to make waves in the cryptocurrency space, investing in Tron could present exciting opportunities for the future.
If you’re ready to seize the potential benefits of owning Tron, this step-by-step guide will walk you through the process of buying Tron digital currency, from setting up a digital wallet to securely storing your Tron.
Before we begin, it’s essential to note that the world of cryptocurrency can be complex, and investing in any digital currency carries inherent risks. It’s important to conduct thorough research, assess your risk tolerance, and seek advice from a financial expert before making any investment decisions. With that being said, let’s dive into the process of buying Tron!
What is Tron and why should you consider buying it?
Tron is a decentralized blockchain platform that aims to transform the entertainment industry by leveraging the power of blockchain technology. Founded by Justin Sun in 2017, Tron offers a decentralized ecosystem where content creators can connect directly with their audience, cutting out intermediaries that often take a significant portion of their earnings.
One of the key reasons to consider buying Tron is its potential to revolutionize the entertainment industry. The current entertainment landscape is often controlled by centralized platforms that impose high fees, limit creative freedom, and fail to adequately compensate artists and creators for their work. Tron aims to address these issues by providing a decentralized platform where artists can monetize their content more directly, receive fair compensation, and have greater control over their intellectual property.
Tron’s partnerships with leading companies, such as Samsung, lend further credibility to its potential. These collaborations can open up new opportunities for Tron in terms of mass adoption and integration with existing systems and infrastructure.
In addition to its goal of decentralizing the entertainment industry, Tron offers other advantages that make it an attractive investment option. The Tron network boasts high scalability and throughput, which means it can handle a large volume of transactions quickly and efficiently. This is crucial in ensuring a seamless user experience and widespread adoption of the platform.
Furthermore, Tron has a dedicated development team working tirelessly to enhance the platform’s features and functionality. The constant updates and improvements contribute to the growth and long-term viability of Tron as a digital currency.
It’s important to note that investing in cryptocurrencies, including Tron, carries inherent risks. The market is highly volatile and can experience significant price fluctuations. It’s crucial to conduct thorough research, assess your risk tolerance, and only invest funds that you can afford to lose.
However, if you believe in the transformative potential of a decentralized entertainment industry and are willing to take on the associated risks, Tron can offer exciting investment opportunities with its innovative platform and growing ecosystem.
Step-by-step guide to buying Tron
If you’re ready to venture into the world of Tron and purchase TRX, here is a step-by-step guide to help you navigate the process:
- Step 1: Setting up a digital wallet
- Step 2: Choosing a cryptocurrency exchange
- Step 3: Creating an account on the chosen exchange
- Step 4: Verifying your identity
- Step 5: Adding funds to your exchange account
- Step 6: Placing a buy order for Tron
- Step 7: Storing and securing your Tron
The first step in buying Tron is to set up a digital wallet to store your TRX securely. There are various types of wallets available, including hardware wallets, software wallets, and online wallets. Choose a wallet that meets your security needs and offers compatibility with Tron.
Next, you’ll need to choose a reputable cryptocurrency exchange that supports Tron. Look for exchanges that have a user-friendly interface, strong security measures, and a wide range of trading pairs. Some popular exchanges that offer TRX trading include Binance, Huobi, and Coinbase.
Once you’ve selected an exchange, visit their website and create an account. Provide the necessary information, such as your email address and password, to register your account.
Many exchanges require users to complete a Know Your Customer (KYC) process to comply with legal and security regulations. This typically involves providing a copy of your identification document and sometimes proof of address. Follow the instructions provided by the exchange to complete the verification process.
After your account is verified, you’ll need to deposit funds into your exchange account. Most exchanges accept deposits in fiat currency, such as USD or EUR, or popular cryptocurrencies like Bitcoin or Ethereum. Follow the deposit instructions provided by the exchange to fund your account.
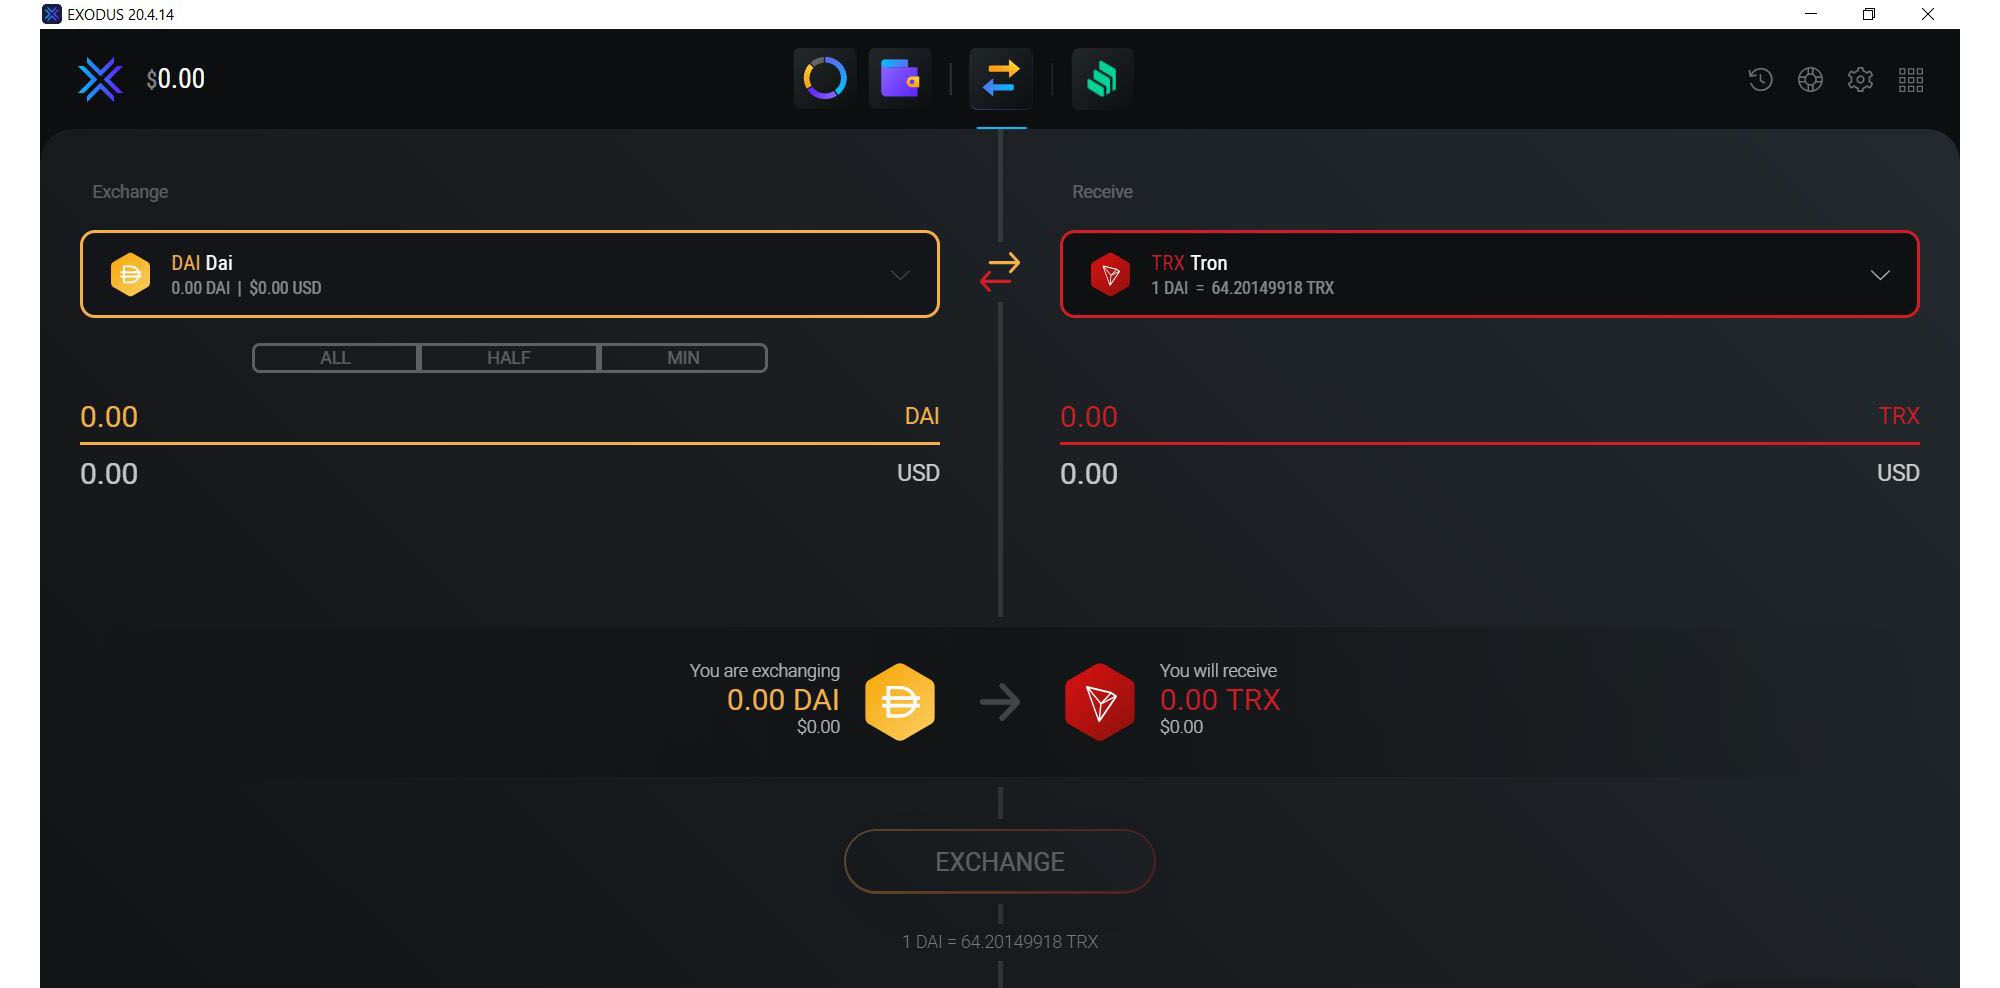
With funds in your exchange account, you can now place a buy order for Tron. On the exchange platform, locate the TRX trading pair and specify the amount of TRX you want to purchase. Review the details before executing the trade.
Once your purchase is complete, it’s crucial to transfer your TRX from the exchange to your digital wallet. Leaving your TRX on the exchange exposes it to potential security risks. Follow the instructions provided by your wallet to securely transfer your TRX and ensure they are safely stored.
Remember to take necessary precautions, such as enabling two-factor authentication on your exchange account and regularly updating your wallet and exchange software, to enhance the security of your Tron holdings.
By following these steps, you can successfully purchase Tron and become part of the growing Tron ecosystem.
Setting up a digital wallet
The first step in buying Tron is to set up a digital wallet to store your TRX securely. A digital wallet, also known as a cryptocurrency wallet, is a software or hardware-based tool that allows you to store, send, and receive digital currencies like Tron.
When choosing a digital wallet for Tron, there are a few key factors to consider:
- Security: Security is paramount when it comes to storing your TRX. Look for wallets that offer robust security features, such as encryption, two-factor authentication (2FA), and the ability to control your private keys.
- Compatibility: Ensure that the wallet you choose supports Tron. There are different types of wallets available, including web wallets, desktop wallets, mobile wallets, and hardware wallets. Consider your preferences and requirements when selecting a wallet type.
- User-Friendliness: A wallet with a user-friendly interface and intuitive design can make the process of managing your TRX easier and more enjoyable.
Here are some popular digital wallets that support Tron:
- Tron Wallet: Tron Wallet is the official wallet designed specifically for storing TRX. It is available as a web wallet, mobile wallet (iOS and Android), and Chrome extension. It offers a user-friendly interface, strong security, and easy access to Tron’s DApps (decentralized applications).
- Trust Wallet: Trust Wallet is a multi-currency wallet that supports Tron and other popular cryptocurrencies. It is available as a mobile wallet and offers a simple and intuitive user interface, along with strong security features.
- Ledger Nano S: If you prefer a hardware wallet for enhanced security, the Ledger Nano S is a popular option. It provides offline storage for your Tron and other cryptocurrencies, protecting your private keys from online threats.
Once you have selected a wallet, the next step is to download and install the wallet software or set up the hardware wallet according to the manufacturer’s instructions. During the setup process, you will be prompted to generate a unique wallet address or import an existing Tron address if you already have one.
It is essential to securely back up your wallet’s recovery phrase or private key, as this is the only way to regain access to your TRX in case of loss or theft. Store this information in a safe, offline location to prevent unauthorized access.
With your digital wallet now set up, you have taken the first step towards buying and storing Tron securely. In the next steps, we will explore how to choose a cryptocurrency exchange and create an account to start trading Tron.
Choosing a cryptocurrency exchange
Once you have set up your digital wallet to store your Tron (TRX), the next step is to choose a cryptocurrency exchange where you can buy and trade Tron. A cryptocurrency exchange is an online platform that allows users to buy, sell, and trade various cryptocurrencies, including Tron.
When choosing a cryptocurrency exchange, there are several factors to consider:
- Reputation and Security: It is essential to choose an exchange with a good reputation and a track record of security. Look for reviews, user feedback, and the exchange’s security measures to ensure your funds are in safe hands.
- Supported Trading Pairs: Check if the exchange supports Tron (TRX) trading pairs. Look for exchanges that offer TRX trading against popular cryptocurrencies like Bitcoin (BTC) or Ethereum (ETH).
- Liquidity: Liquidity refers to the ease with which a cryptocurrency can be bought or sold on an exchange. Choose an exchange with high liquidity for Tron to ensure that your orders can be executed swiftly and at competitive prices.
- User Experience: Consider the user experience offered by the exchange. Look for exchanges with user-friendly interfaces, easy navigation, and a responsive customer support team.
- Transaction Fees: Exchanges charge various fees for trading cryptocurrencies. Compare the transaction fees across different exchanges and choose one that offers competitive rates.
- Additional Features: Some exchanges offer additional features like margin trading, staking, or lending services. If you are interested in these features, consider choosing an exchange that provides them.
Here are a few popular cryptocurrency exchanges where you can trade Tron:
- Binance: Binance is one of the largest and most reputable cryptocurrency exchanges globally. It offers a wide range of trading pairs, including TRX against multiple cryptocurrencies. Binance provides a user-friendly interface, strong liquidity, and competitive fees for trading Tron.
- KuCoin: KuCoin is another popular exchange that supports Tron trading. It offers a user-friendly platform, robust security measures, and a range of trading pairs. KuCoin also has its native cryptocurrency, called KuCoin Shares (KCS), which offers additional benefits to holders.
- Coinbase Pro: Coinbase Pro is a well-known cryptocurrency exchange that offers TRX trading for users based in supported countries. It provides a reliable and secure platform, with advanced trading features suitable for experienced traders.
Before choosing an exchange, it’s a good practice to research and compare different options based on your preferences and requirements. Consider factors such as the exchange’s reputation, security measures, fees, and available trading pairs to find the best fit for your trading needs.
Once you have selected a cryptocurrency exchange, the next step is to create an account on the exchange. In the next section, we will guide you through the process of creating an account and verifying your identity.
Creating an account on the chosen exchange
After selecting a cryptocurrency exchange to trade Tron (TRX), the next step is to create an account on the chosen exchange. This process typically involves providing some personal information and setting up security measures.
Here’s a step-by-step guide on how to create an account on a cryptocurrency exchange:
- Visit the exchange’s website: Start by visiting the official website of the cryptocurrency exchange you have chosen.
- Sign up or register: Look for the “Sign up,” “Register,” or “Create Account” button on the website’s homepage. Click on it to begin the registration process.
- Provide your email address: Enter your email address in the designated field. Make sure to use a valid and secure email address that you have access to.
- Create a strong password: Choose a robust password that includes a combination of letters, numbers, and special characters. Ensure that your password is unique and not used for any other accounts.
- Accept the Terms of Service and Privacy Policy: Read and understand the exchange’s Terms of Service and Privacy Policy. If you agree to the terms, check the box or click on the designated button to accept them.
- Complete the verification process: Depending on the exchange’s requirements, you may need to verify your email address by clicking on a verification link sent to your email. Some exchanges may also require additional identity verification, such as submitting a copy of your identification document.
- Set up two-factor authentication (2FA): To enhance the security of your account, it is highly recommended to enable two-factor authentication. This typically involves setting up an authentication app, such as Google Authenticator or Authy, and linking it to your exchange account.
- Secure your account: After creating your account, take a few additional steps to secure it. This can include enabling email notifications for login attempts, regularly updating your password, and avoiding sharing sensitive account information with others.
Once you have completed these steps, you will have successfully created an account on the chosen cryptocurrency exchange. Take some time to explore the exchange’s features, user interface, and available trading pairs.
It’s important to note that some cryptocurrency exchanges may have specific requirements or limitations based on your jurisdiction of residence. Make sure to review and comply with any additional regulations or procedures set forth by the exchange.
In the next section, we will discuss the process of verifying your identity on the exchange, if required.
Verifying your identity
Once you have created an account on the chosen cryptocurrency exchange, the next step is to verify your identity. Many exchanges require users to go through a Know Your Customer (KYC) process to comply with regulatory requirements and enhance security measures.
Here’s how you can verify your identity on a cryptocurrency exchange:
- Access the account settings: Log in to your exchange account and navigate to the account settings or profile section. Look for an option related to identity verification or KYC.
- Provide personal information: You will be asked to provide certain personal information, such as your full name, date of birth, address, and sometimes occupation. Enter the required details accurately and ensure that they match your identification documents.
- Upload identification documents: To verify your identity, most cryptocurrency exchanges require you to upload a copy of your identification documents. This can include a passport, driver’s license, or national ID card. Follow the instructions provided by the exchange and make sure to submit clear and legible copies of the required documents.
- Submit additional documentation: Depending on the exchange’s requirements, you may need to provide additional documents to support your identity verification. This can include proof of address, such as a utility bill or bank statement, as well as a selfie or photo holding your identification document.
- Wait for verification: Once you have submitted the necessary documents, the exchange will review your information and verify your identity. The verification process can take anywhere from a few minutes to several days, depending on the exchange’s procedures and volume of verification requests.
- Check your verification status: Monitor your email or the exchange’s platform for updates regarding your verification status. Some exchanges may provide a status indicator or notification within your account dashboard.
- Follow up if necessary: If your verification process takes longer than expected or if you have any issues or concerns, reach out to the exchange’s customer support for assistance. They should be able to provide guidance and help address any verification-related queries.
It’s important to note that the level of identity verification required may vary between exchanges and jurisdictions. Some exchanges may offer different verification tiers, each with specific limits on trading volume or account features, depending on the level of verification completed.
Completing the identity verification process provides an added layer of security and ensures compliance with regulatory standards. It also helps protect your account from unauthorized access and potential fraudulent activities.
Once your identity is verified, you’ll be able to access the full features of the exchange, including higher trading limits, withdrawal capabilities, and potentially advanced trading options.
In the next section, we will discuss the process of adding funds to your exchange account to begin trading Tron.
Adding funds to your exchange account
After successfully creating an account and verifying your identity on the chosen cryptocurrency exchange, the next step is to add funds to your exchange account. These funds will allow you to start trading Tron (TRX) and other cryptocurrencies available on the exchange.
Here’s a step-by-step guide on how to add funds to your exchange account:
- Log in to your exchange account: Visit the exchange’s website and log in with your credentials to access your account dashboard.
- Navigate to the deposit section: Look for the “Deposit” or “Funds” section within your account dashboard. Different exchanges may have varying terms or locations for deposit options.
- Select the cryptocurrency: If the exchange supports multiple cryptocurrencies, choose Tron (TRX) from the list of available cryptocurrencies for deposit.
- Copy the deposit address: The exchange will provide you with a unique deposit address for Tron. It is crucial to copy the address accurately.
- Open your digital wallet: Launch your Tron-compatible digital wallet where you previously stored your TRX.
- Initiate a transfer: Within your wallet, initiate a transfer to the deposit address provided by the exchange. Ensure that you enter the correct amount and double-check the address to avoid any errors.
- Confirm the transaction: Follow the instructions in your wallet to confirm and complete the transaction. The transfer may take some time to be confirmed on the Tron blockchain, so be patient.
- Monitor the deposit status: Once you have initiated the transfer, keep an eye on the deposit status within your exchange account. The exchange will confirm the arrival of your TRX and credit it to your account balance.
- Wait for the required confirmations: Depending on the exchange’s policies, a certain number of confirmations on the Tron blockchain may be required before the funds are fully available for trading. This can take a few minutes to several minutes, depending on network congestion.
Please note that the number of confirmations required may vary among exchanges, so be sure to check the specific requirements on your chosen exchange.
It’s important to consider any transaction fees associated with the deposit. Some exchanges may charge a small fee for depositing funds, while others may offer fee-free deposits for certain cryptocurrencies.
Once your funds are successfully credited to your exchange account, you are ready to start trading Tron and take advantage of the exchange’s features and trading tools.
In the next section, we will guide you through the process of placing a buy order for Tron on the cryptocurrency exchange.
Placing a buy order for Tron
With funds successfully added to your exchange account, you’re now ready to place a buy order for Tron (TRX) on the chosen cryptocurrency exchange. Placing a buy order allows you to purchase Tron at the desired price and quantity.
Here’s a step-by-step guide on how to place a buy order for Tron:
- Access the trading section: Navigate to the trading section of the exchange where you can buy and sell cryptocurrencies. This may be labeled as “Exchange,” “Markets,” or a similar term.
- Select the TRX trading pair: Look for Tron (TRX) among the available trading pairs. It is usually denominated in Bitcoin (BTC), Ethereum (ETH), or another base currency supported by the exchange.
- Choose the type of buy order: Exchanges offer different types of buy orders, such as market orders and limit orders. A market order purchases Tron at the current market price, while a limit order allows you to set a specific price at which you want to buy TRX.
- Set the quantity: Specify the quantity or amount of Tron you want to buy. This can be entered in TRX or the base currency equivalent, depending on the exchange’s interface.
- Review the order details: Double-check the order details, including the type of order (market or limit) and the quantity of Tron you intend to purchase. Take note of any transaction fees associated with the order.
- Place the order: Once you are satisfied with the order details, confirm and place the buy order. The exchange will execute the order according to the specified parameters.
- Monitor the order status: After placing the order, monitor its status within your exchange account. You can typically see whether the order is filled or partially filled. If the order is not immediately filled, it may be pending until the market reaches the specified price for a limit order.
- Cancel or modify the order: If needed, you can cancel or modify the buy order before it is executed. Most exchanges provide options to cancel or adjust the order parameters until it is fully filled.
It’s important to note that the execution of your buy order is subject to market conditions and liquidity. If market conditions change rapidly, the order may be partially filled or not filled at all. It’s always a good practice to set realistic prices and quantities based on current market trends and your trading strategy.
Once your buy order is executed and filled, the Tron you purchased will be reflected in your exchange account balance. You can either choose to leave the TRX in your exchange account for further trading or withdraw it to your personal Tron-compatible wallet for enhanced security.
In the next section, we will discuss the importance of storing and securing your Tron holdings.
Storing and securing your Tron
After purchasing Tron (TRX) and completing your trading activities on the cryptocurrency exchange, it’s crucial to store and secure your Tron holdings properly. While leaving your TRX on the exchange may be convenient for trading, it poses certain risks as exchanges can be vulnerable to hacks or other security breaches.
Here are some essential steps to store and secure your Tron:
- Transfer your TRX to a personal wallet: To enhance the security of your Tron holdings, it is recommended to transfer the TRX from the exchange to a personal Tron-compatible wallet. This allows you to have full control over your private keys and ensures that your TRX is not susceptible to exchange vulnerabilities.
- Choose a suitable Tron wallet: There are several types of wallets available to store Tron, including desktop wallets, mobile wallets, and hardware wallets. Select a wallet that suits your needs in terms of security, user interface, and compatibility with Tron.
- Back up your wallet: After setting up your Tron wallet, it’s essential to back up its recovery phrase or private key. This backup is crucial as it allows you to restore your wallet or access your TRX in case of loss, theft, or damage to your device.
- Secure your wallet: Implement stringent security measures for your Tron wallet. Set strong passwords, enable two-factor authentication (2FA), and consider additional security features provided by the wallet, such as encryption or biometric authentication if available.
- Be cautious with your private keys: Keep your private keys private and do not share them with anyone. Be mindful of phishing attempts, scams, or malicious software that may try to obtain your private keys.
- Regularly update your wallet software: Stay up to date with the latest wallet software updates to benefit from security patches, bug fixes, and new features. These updates often contain important security enhancements.
- Implement additional security measures: Consider implementing additional layers of security, such as using a separate computer or mobile device dedicated solely to cryptocurrency activities. This reduces the risk of exposing your Tron wallet to potential malware or hacking attempts.
- Backup your wallet: Regularly back up your wallet after making any significant changes or transactions. Store the backup in a secure and offline location, such as an external hard drive or encrypted USB drive.
- Keep aware of potential scams: Stay vigilant and informed about potential scams or phishing attempts targeting Tron users. Be cautious when receiving unsolicited communications or participating in unknown websites or platforms.
By following these steps and implementing robust security measures, you can help protect your Tron holdings from potential threats and ensure that you have full control and ownership over your TRX.
Remember, cryptocurrency investments carry inherent risks, and it’s crucial to stay informed and exercise caution when managing your digital assets.
With the proper storage and security measures in place, you can confidently hold and manage your Tron investments while actively engaging in the Tron ecosystem.
Conclusion
Congratulations! You have reached the end of this step-by-step guide on how to buy Tron (TRX), one of the leading cryptocurrencies revolutionizing the entertainment industry. By following the outlined process, you have learned how to set up a digital wallet, choose a cryptocurrency exchange, create an account, verify your identity, add funds, place buy orders, and securely store your Tron holdings.
Tron offers a unique value proposition by empowering content creators and artists, eliminating intermediaries, and providing a decentralized platform for direct engagement with their audience. Buying Tron can be a strategic investment for those who believe in the transformative potential of a decentralized entertainment industry and want to support cutting-edge blockchain technology.
However, it’s important to remember that investing in cryptocurrencies carries risks. The market is highly volatile, and prices can fluctuate significantly. It’s crucial to conduct thorough research, only invest what you can afford to lose, and seek professional guidance if needed.
In your journey as a Tron investor, always prioritize the security of your investments. Set up a secure digital wallet, choose reputable exchanges, and follow recommended security practices to protect your Tron holdings from potential threats.
As with any investment, it’s important to stay informed about market trends, regulatory developments, and technological advancements in the cryptocurrency space. Continuously educating yourself and keeping up with the latest news will help you make informed decisions and adapt to the ever-evolving landscape of cryptocurrencies.
Remember that this guide serves as a starting point and not financial advice. It’s essential to conduct your own research, understand your risk tolerance, and make investment decisions that align with your financial goals and circumstances.
We hope this guide has provided you with valuable insights and practical steps to navigate the process of buying Tron. Embrace the exciting opportunities that the Tron ecosystem presents, and may your venture into the world of digital assets be rewarding and fulfilling.