Introduction
Welcome to the world of acoustic guitars, where every strum, chord, and melody comes alive in the resonance of the wood. As a guitarist, one of the most crucial aspects of your instrument is its action. The action refers to the height of the strings above the fretboard and plays a significant role in determining the playability, tone, and overall feel of your guitar.
Having the right action on your acoustic guitar is essential for achieving optimal playability and tone. Whether you’re a beginner or a seasoned player, understanding how to set and adjust the action can greatly enhance your experience and performance. In this article, we’ll explore the importance of action on an acoustic guitar and delve into the factors that affect it. We’ll also provide step-by-step guides on how to measure, adjust, and maintain the action to suit your playing style and preferences.
So, if you’re ready to unlock the full potential of your acoustic guitar and take your playing to the next level, let’s dive in and discover the world of action adjustments.
The Importance of Action on an Acoustic Guitar
The action on an acoustic guitar plays a crucial role in its overall playability and tone. It refers to the height of the strings above the fretboard. The right action allows for comfortable fretting, smooth string bending, and optimal resonance, while the wrong action can lead to discomfort, poor intonation, and an undesirable playing experience.
One of the primary benefits of having the correct action is enhanced playability. When the action is set appropriately, it becomes easier to press down the strings and play chords and notes with precision. This reduces finger fatigue and allows for longer practice sessions and performances without discomfort.
Moreover, the action also affects the tone of an acoustic guitar. A higher action tends to produce a louder, more dynamic sound with greater sustain. This can be advantageous for genres that require a powerful projection, such as bluegrass or country. On the other hand, a lower action results in a softer, more mellow sound, ideal for fingerstyle playing and genres like folk or jazz.
Additionally, the action influences intonation, which is the accuracy of the notes as you move up and down the fretboard. Properly set action ensures that each note rings true and in tune, allowing you to play melodies and chords across the entire fretboard without any pitch discrepancies.
Overall, the importance of action on an acoustic guitar cannot be underestimated. It affects how comfortable the guitar feels in your hands, the way it resonates and projects sound, and the accuracy of the notes you play. By understanding the significance of action and learning how to adjust it according to your preference, you can unlock the full potential of your instrument and take your playing to new heights.
Factors Affecting Action
Several factors come into play when determining the appropriate action for an acoustic guitar. Understanding these factors will help you make informed decisions when it comes to adjusting the action to suit your playing style and preferences.
1. Neck Relief: Neck relief refers to the slight curvature of the guitar’s neck. A straight neck can result in low action, while too much relief can lead to high action. Adjusting the truss rod, located inside the neck, can help achieve the optimal neck relief for your guitar.
2. Nut Height: The height of the nut, which supports the strings at the top of the fretboard, can affect the action. If the nut slots are too high, it can cause higher action near the first few frets. Conversely, if the slots are too low, it can result in buzzing and low action. Ensuring the nut slots are properly filed or replaced can help achieve the desired action.
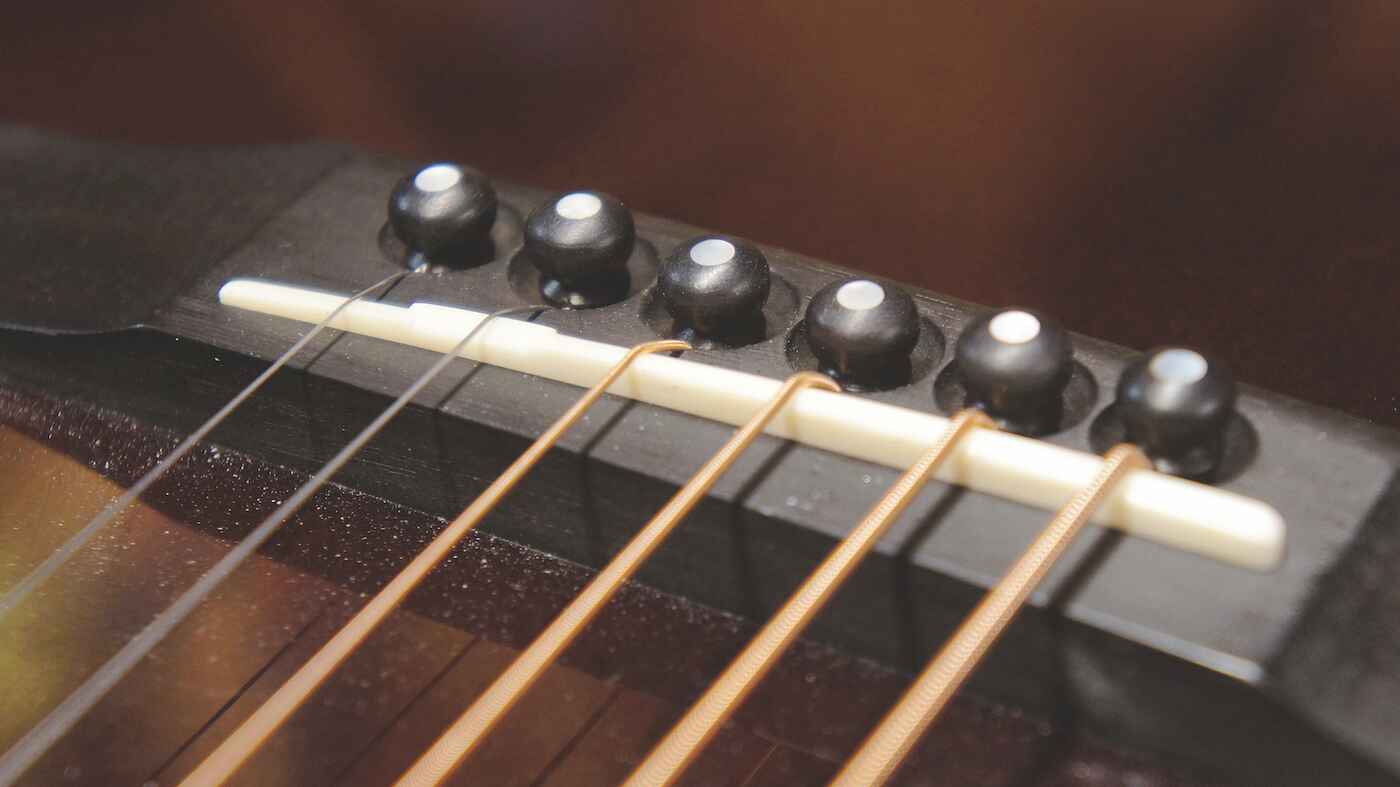
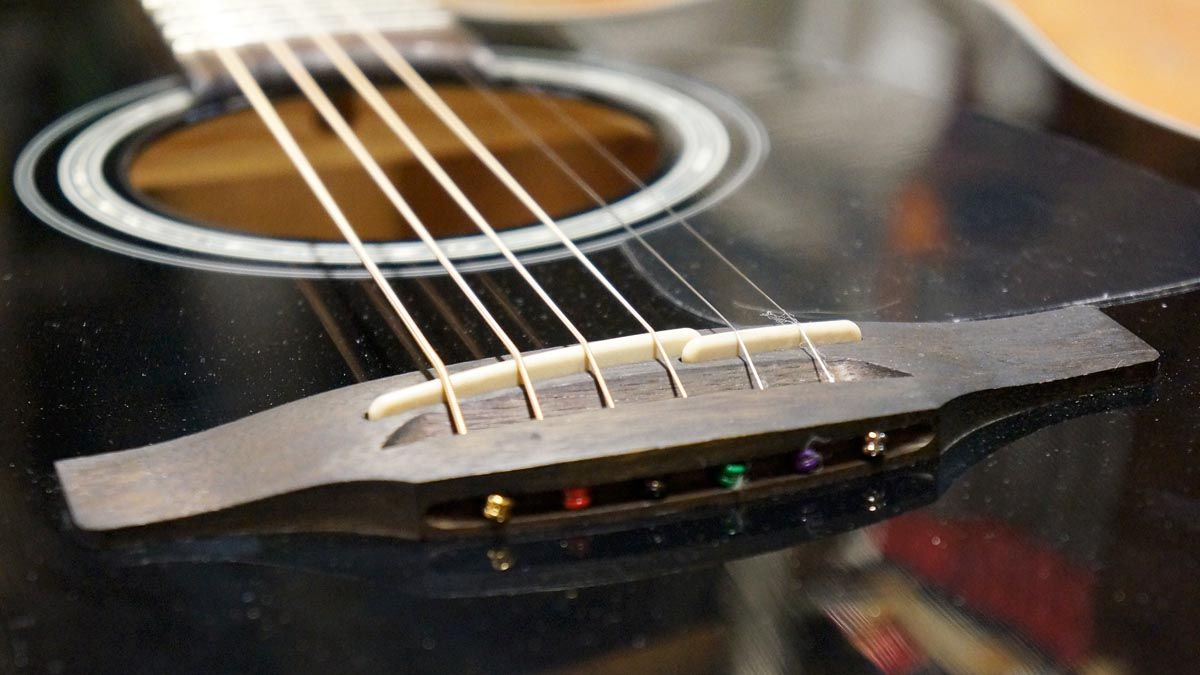
3. Saddle Height: The saddle, located on the bridge of the guitar, also contributes to the action. Raising or lowering the saddle can adjust the action across the entire fretboard. It is essential to know the appropriate height for your playing style to achieve the desired action.
4. String Gauge: The gauge of the strings you use can also impact the action. Lighter gauge strings require less tension to achieve the desired pitch, thus allowing for lower action. Conversely, heavier gauge strings require more tension, potentially resulting in higher action. Experimenting with different string gauges can help you find the perfect balance between tone and playability.
5. Playing Style: Different playing styles demand different actions. If you predominantly strum chords, a slightly higher action might be more suitable for the increased volume and resonance. If you prefer intricate fingerstyle playing, a lower action can facilitate quicker finger movements and intricate techniques. Consider your playing style when adjusting the action to ensure optimal performance.
By taking these factors into account, you can make informed decisions and adjustments to achieve the desired action on your acoustic guitar. It’s all about finding the right balance to enhance playability, tonality, and your overall playing experience.
How to Measure Action on an Acoustic Guitar
Measuring the action on an acoustic guitar is a fundamental step in assessing its playability and determining if any adjustments are necessary. Here are the steps to measure the action effectively:
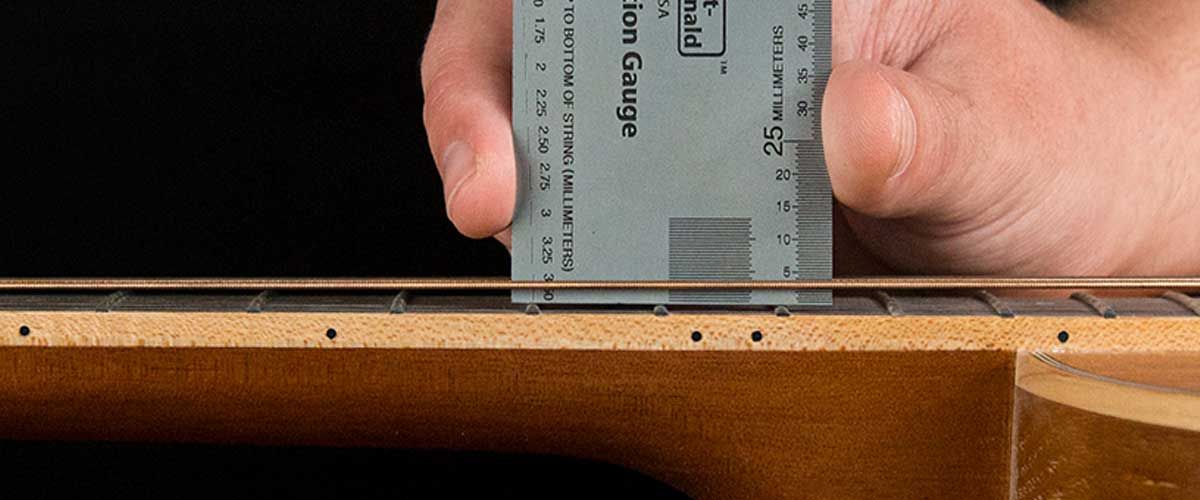
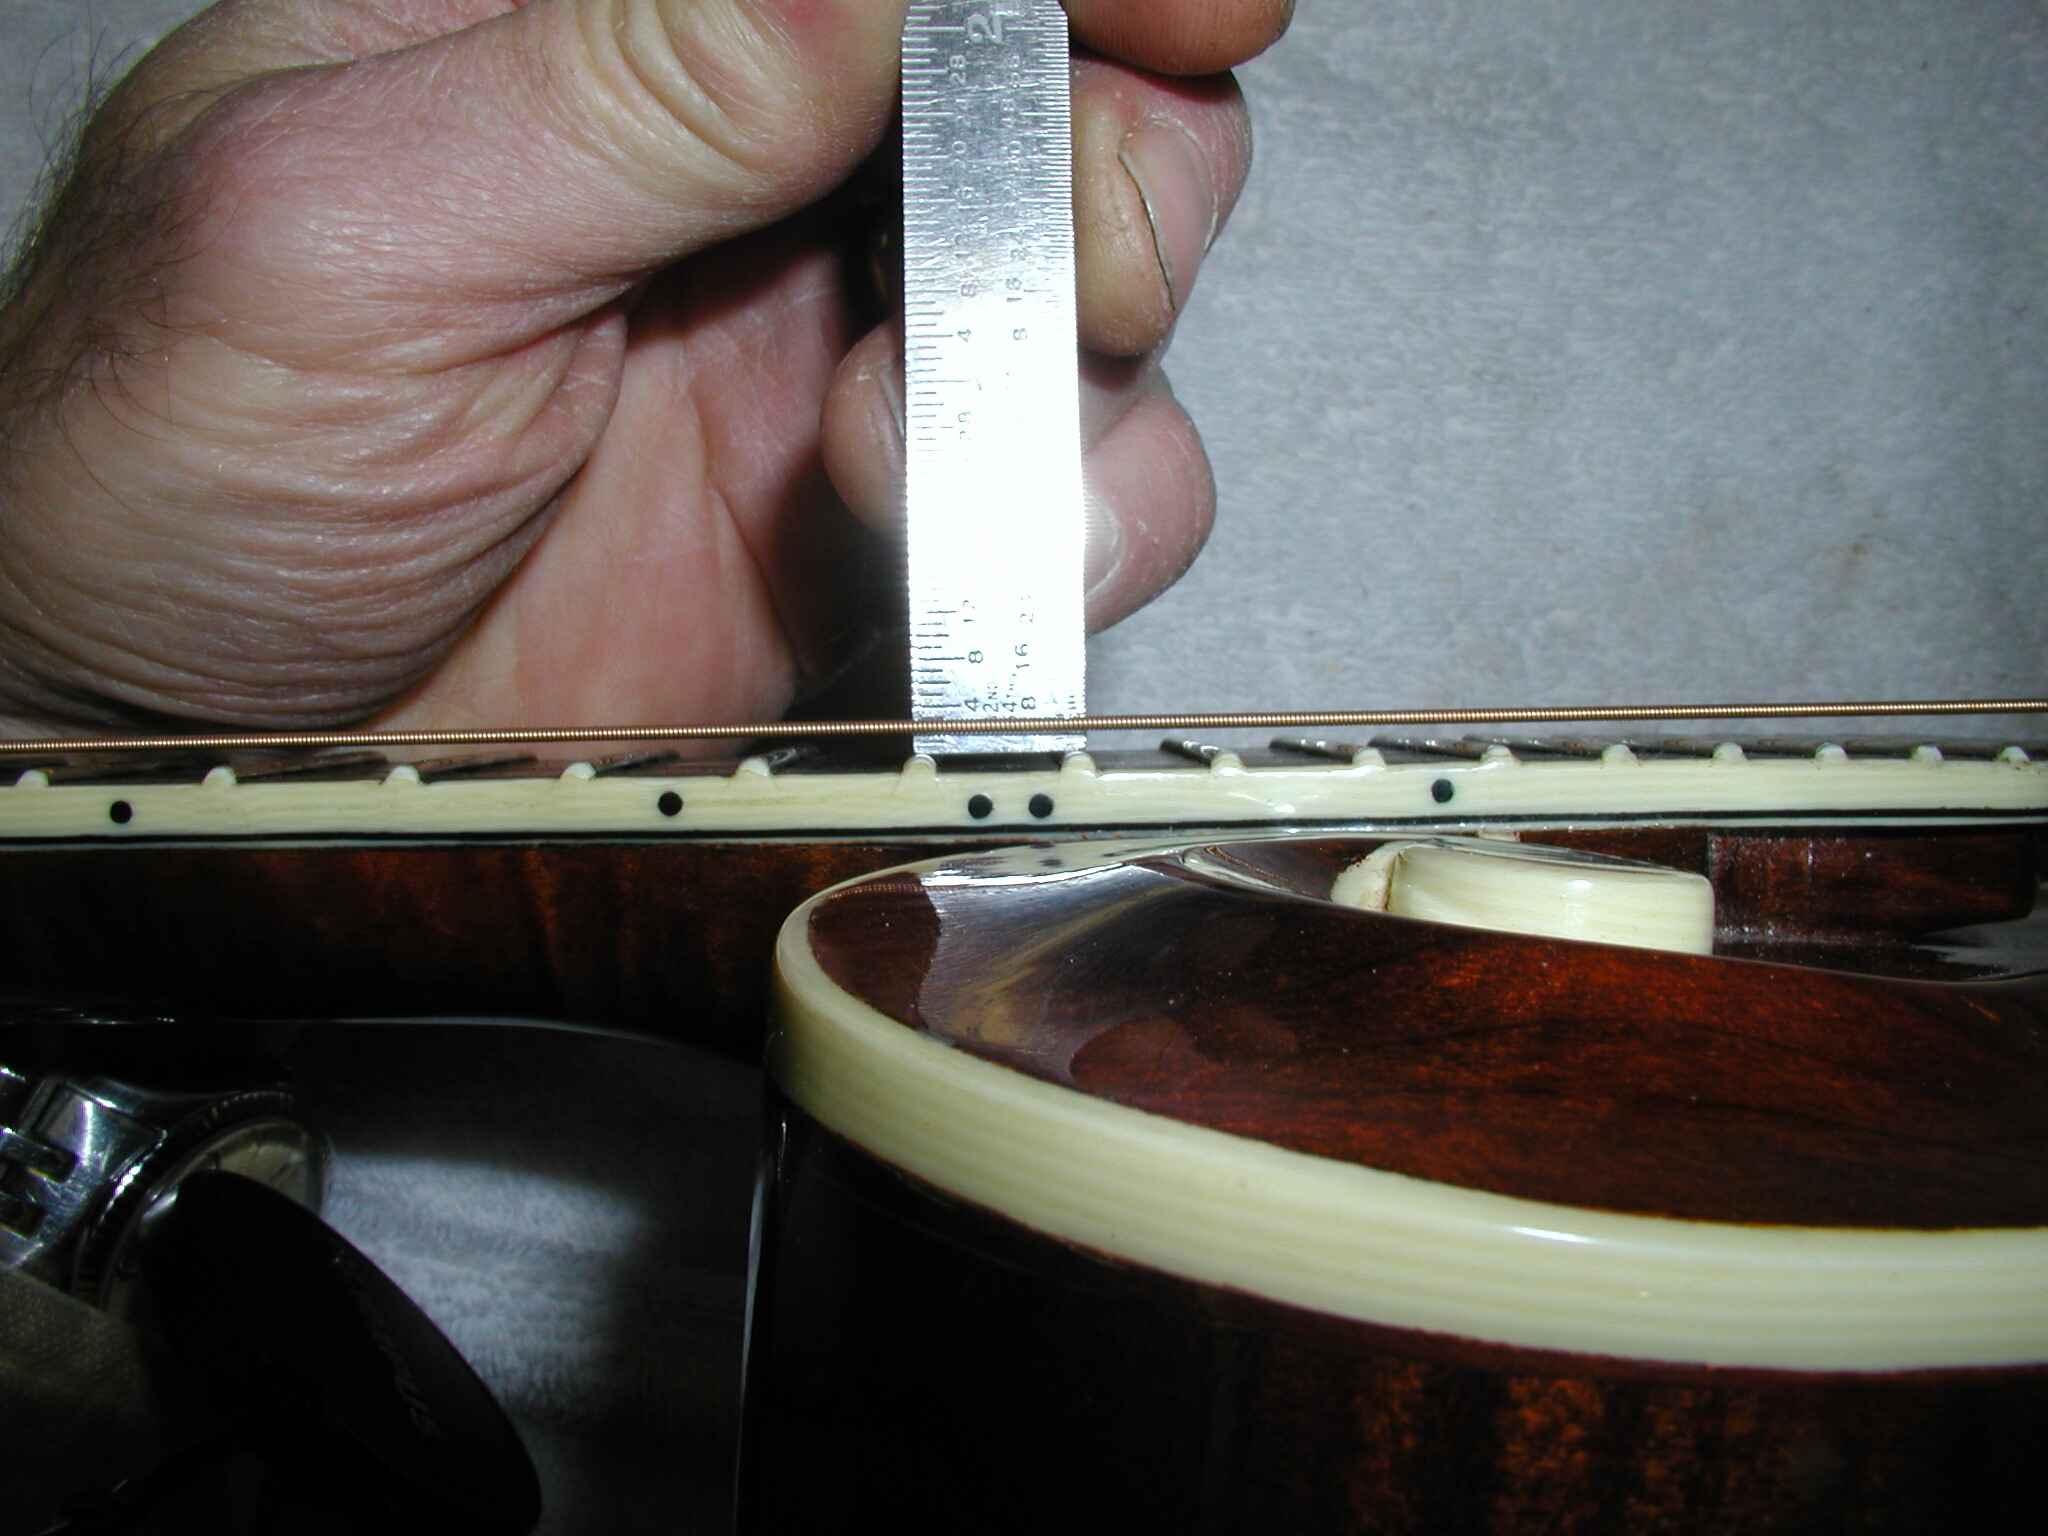
- 1. Get a ruler or a specialized action gauge: To measure the action, you’ll need a ruler or a specialized action gauge designed specifically for guitars. The gauge typically has measurements in inches or millimeters, making it easier to get accurate readings.
- 2. Locate the 12th fret: The 12th fret is located exactly halfway between the guitar’s nut and saddle. It is generally marked with a double dot or another distinctive marker.
- 3. Measure the distance between the string and the fret at the 12th fret: Place the ruler or action gauge right on top of the 12th fret with its edge touching the bottom of the strings. Measure the distance between the top of the fret and the bottom of the string. This measurement represents the action.
- 4. Take multiple measurements: Repeat the process for all six strings, measuring the action at the 12th fret. Take note of any discrepancies between the strings as this could indicate the need for adjustments.
Remember that the desired action can vary based on personal preferences and playing style. However, as a general guideline, a typical action measurement at the 12th fret for the high E string should be around 2.4mm to 2.8mm (0.094 to 0.110 inches) for the bass E string, and around 3.0mm to 3.5mm (0.118 to 0.138 inches).
By measuring the action on your acoustic guitar regularly, you’ll be able to assess any changes and make appropriate adjustments to maintain optimal playability and performance.
Recommended Action Height for Different Playing Styles
The optimal action height for an acoustic guitar can vary depending on your playing style and personal preference. Here are some general recommendations for different playing styles:
- 1. Strumming and basic chord playing: If you primarily strum chords or play basic rhythm guitar, a slightly higher action may be suitable. This allows for increased string dynamics, volume, and resonance. A recommended action height at the 12th fret would be around 2.5mm to 3.0mm (0.098 to 0.118 inches) for the high E string, gradually increasing to 3.5mm to 4.0mm (0.138 to 0.157 inches) for the bass E string.
- 2. Fingerstyle and intricate playing: For intricate fingerstyle playing that involves delicate techniques and quick finger movements, a lower action is often preferred. A recommended action height at the 12th fret would be around 2.0mm to 2.5mm (0.079 to 0.098 inches) for the high E string, gradually increasing to 2.8mm to 3.2mm (0.110 to 0.126 inches) for the bass E string.
- 3. Slide guitar playing: Slide guitar playing typically requires a higher action to prevent the slide from buzzing against the frets. A recommended action height at the 12th fret would be around 3.0mm to 4.0mm (0.118 to 0.157 inches) for the high E string, gradually increasing to 4.5mm to 5.5mm (0.177 to 0.217 inches) for the bass E string.
These recommended action heights are just a starting point. It’s essential to remember that personal preference and playing style ultimately determine the optimal action for you. Experiment with different action heights, starting from the guidelines provided, and adjust as needed to achieve the desired playability and tone.
Keep in mind that these recommended measurements may not be suitable for every guitar or player, as other factors like neck relief and string gauge can influence the action height. Trust your ears and hands when making adjustments to find the perfect action for your unique playing style.
Common Problems with High or Low Action
The action on an acoustic guitar can affect its playability and overall performance. If the action is too high or too low, certain problems may arise that can hinder your playing experience. Here are some common problems associated with high or low action:
- 1. High Action:
- Difficulty fretting: High action makes it harder to press the strings down, requiring more effort and potentially causing discomfort and fatigue.
- Intonation issues: Higher action can lead to poor intonation, causing the guitar to be out of tune when playing up the fretboard.
- Buzzing strings: If the action is excessively high, there is a increased likelihood of buzzing strings, resulting in a lack of sustain and unwanted noise.
- Restricted playability: Chords and complex techniques become more challenging to execute with high action, limiting your ability to perform certain playing styles.
- 2. Low Action:
- String buzzing: When action is too low, the strings can buzz against the frets, causing unwanted noise and uneven tone.
- Poor intonation: Low action can affect intonation, causing notes to be sharp or flat when playing higher up the fretboard.
- String rattle: Excessive low action can result in string rattle against the frets, which can dampen the sustain and overall sound quality of the guitar.
- Reduced volume: With low action, the strings may not vibrate as freely, leading to a decrease in volume and projection.
It’s important to find the right balance when adjusting the action on your acoustic guitar. Striking a balance between playability and tone is crucial to ensure a comfortable playing experience and optimal sound quality. By addressing any issues associated with high or low action, you can maximize the potential of your instrument.
Adjusting the Action on an Acoustic Guitar
Adjusting the action on an acoustic guitar allows you to fine-tune the playability and tone of your instrument. Whether you need to lower the action for easier fretting or raise it to improve string resonance, the process involves making adjustments to various components of the guitar. Here’s an overview of how to adjust the action:
Tools Needed for Adjusting the Action:
- – Truss rod wrench
- – Nut files or sandpaper
- – Bridge saddle files or sandpaper
- – Ruler or specialized action gauge
- – Screwdriver (if necessary)
Step-by-Step Guide to Lowering the Action:
- 1. Loosen the guitar strings: To access the truss rod, bridge saddle, or nut for adjustments, you’ll need to loosen the strings. This will prevent unnecessary tension and allow for easier manipulation of the components.
- 2. Adjust the truss rod: If the action needs to be lowered or raised due to neck relief issues, adjust the truss rod. Using a truss rod wrench, turn it clockwise to reduce relief or counterclockwise to add relief. Make subtle adjustments, as small changes can have significant effects.
- 3. File the nut slots: If the action is still too high, you may need to file the nut slots to reduce the height of the strings at the first frets. Use nut files or sandpaper to carefully file and lower the slots. Be sure to maintain the proper angle of the slots to prevent buzzing or string binding.
- 4. File the bridge saddle: If further action adjustment is necessary, focus on the bridge saddle. Carefully file the saddle, removing material from the bottom until the desired action is achieved. Keep the saddle level and ensure proper height distribution among the strings.
- 5. Restring and check the action: Once you’ve made the adjustments, restring the guitar and check the action using a ruler or specialized action gauge. Measure the action at the 12th fret of each string, ensuring it falls within the recommended range for your playing style.
Step-by-Step Guide to Raising the Action:
- 1. Loosen the guitar strings: As with lowering the action, start by loosening the strings to provide easier access to the components requiring adjustment.
- 2. Add shims to the saddle: If the action needs to be raised due to specific playing requirements, you can add shims under the bridge saddle. Shims can be made from materials like bone, wood, or plastic. Stack and insert the shims until you achieve the desired height increase.
- 3. Adjust the truss rod (if necessary): Raising the action may also involve adjusting the truss rod. Use a truss rod wrench to make slight clockwise turns to add relief if needed.
- 4. Restring and check the action: Once the adjustments are made, restring the guitar and check the action using a ruler or specialized action gauge. Measure the action at the 12th fret of each string to ensure it meets the desired height for your playing style.
Remember, adjusting the action on an acoustic guitar requires precision and patience. If you’re unsure about making these adjustments yourself, it’s best to seek guidance from a professional guitar technician to avoid any potential damage to your instrument.
Tools Needed for Adjusting the Action
When it comes to adjusting the action on an acoustic guitar, having the right tools is essential to ensure accurate and safe adjustments. Here are the tools you’ll need for the task:
- Truss rod wrench: The truss rod wrench is a specialized tool used to adjust the truss rod, which controls the relief or curvature of the guitar’s neck. Truss rod wrenches come in various sizes to fit different guitar models, so make sure you have the correct size for your instrument.
- Nut files or sandpaper: Nut files or sandpaper are necessary for filing the nut slots, which control the height of the strings at the first few frets. Nut files come in various sizes corresponding to the different string gauges, ensuring a proper fit for each slot. If you don’t have nut files, sandpaper can be used to carefully lower the slots.
- Bridge saddle files or sandpaper: Bridge saddle files or sandpaper are used to adjust the height and contour of the bridge saddle. These tools are crucial for raising or lowering the action at the saddle, which affects the overall string height across the fretboard. Make sure to use files or sandpaper specifically designed for guitar bridge saddles to ensure proper shaping and prevent damage to the guitar.
- Ruler or specialized action gauge: A ruler or specialized action gauge is necessary for measuring the action at different points on the guitar. This tool allows you to determine the string height at the 12th fret or other specific locations, helping you assess if further adjustments are needed.
- Screwdriver (if necessary): In some cases, you may need a screwdriver to make adjustments to the bridge saddle height screws or truss rod access cover, depending on your guitar’s design. Ensure you have the appropriate screwdriver that fits the screw heads properly to avoid damaging them.
Having these tools readily available will make the process of adjusting the action on an acoustic guitar smoother and more efficient. Keep in mind that it’s important to use the correct tools and exercise caution when making adjustments to ensure the integrity and functionality of your instrument.
Step-by-Step Guide to Lowering the Action on an Acoustic Guitar
If you find that the action on your acoustic guitar is too high and want to make it more comfortable for playing, you can lower the action by following these step-by-step instructions:
- 1. Loosen the guitar strings: To make adjustments to the action, start by loosening the strings. This relieves tension on the components and makes it easier to work on the guitar. Loosen each string by turning the tuning pegs counterclockwise until they are sufficiently slack.
- 2. Evaluate the neck relief: Assess the curvature of the neck to determine if it needs adjustment. Hold down the first and last fret on the low E string, then observe the gap between the bottom of the string and the tops of the frets around the midpoint of the neck. Ideally, there should be a slight gap, known as “neck relief.” If the gap is too significant or non-existent, adjusting the truss rod may be necessary.
- 3. Adjust the truss rod: If the neck relief needs adjustment, locate the truss rod adjustment point, usually located either at the headstock end or inside the soundhole. Use a truss rod wrench that matches the size of the nut, and make gentle quarter-turn adjustments clockwise to tighten and reduce relief or counterclockwise to loosen and increase relief. Make small adjustments and pause to let the neck adjust before reevaluating the relief.
- 4. File the nut slots: If the action at the first few frets is still too high, you may need to file the nut slots to lower the strings. Use nut files or sandpaper to carefully file the bottom of each slot, removing small amounts of material at a time. Check the action frequently by playing open strings and observing the gap between the string and the first fret. Repeat the filing process gradually until the desired action is achieved.
- 5. File the bridge saddle: If the action remains too high, further adjustment can be made at the bridge saddle. Use bridge saddle files or sandpaper to file and lower the saddle. Work on the bottom of the saddle evenly, keeping it level and maintaining the correct radius. Take measurements throughout the process to ensure the desired action height.
- 6. Retune and check the action: Once you’ve made the necessary adjustments, retune the guitar and check the action using a ruler or specialized action gauge. Measure the distance between the bottom of the strings and the top of the 12th fret. Refer to recommended action heights for your playing style, and adjust if necessary by repeating Steps 4 and 5.
Remember, the process of lowering the action requires precision and patience. If you are uncertain or uncomfortable making these adjustments yourself, it is recommended to consult a professional guitar technician to ensure the best results and maintain the integrity of your instrument.
Step-by-Step Guide to Raising the Action on an Acoustic Guitar
If you find that the action on your acoustic guitar is too low and want to raise it for better playability or tone, you can follow these step-by-step instructions:
- 1. Loosen the guitar strings: To begin the process of raising the action, start by loosening the guitar strings. This relieves tension on the components and makes it easier to work on the guitar. Turn the tuning pegs counterclockwise for each string until the strings are sufficiently slack.
- 2. Evaluate the neck relief: Assess the curvature of the neck to determine if additional relief is necessary. Hold down the first and last fret on the low E string, and observe the gap between the bottom of the string and the tops of the frets around the midpoint of the neck. If the gap is too small or nonexistent, adjusting the truss rod may be necessary.
- 3. Adjust the truss rod (if necessary): If you determine that the neck relief needs adjustment, locate the truss rod adjustment point, usually at the headstock end or inside the soundhole. Use a truss rod wrench with the correct size to make small quarter-turn adjustments. Clockwise turns tighten the truss rod, while counterclockwise turns loosen it. Make subtle adjustments and give the neck time to settle before reevaluating the relief.
- 4. Add shims to the saddle: If the action still needs to be raised, one method is to add shims under the bridge saddle. Shims can be made from materials like bone, wood, or plastic. Insert the shims underneath the saddle to increase its height gradually. Use thin shims and add or remove them as necessary to achieve the desired action height.
- 5. Retune and check the action: After raising the saddle or making any adjustments, retune the guitar and check the action using a ruler or specialized action gauge. Measure the distance between the bottom of the strings and the top of the 12th fret. Take into account the recommended action heights for your playing style. If needed, repeat Steps 3 and 4 until the desired action height is achieved.
It’s important to note that raising the action on an acoustic guitar requires careful consideration and experimentation. If you’re unsure or uncomfortable making these adjustments yourself, it’s always best to seek assistance from a professional guitar technician to ensure the best outcome and maintain the integrity of your instrument.
Tips for Maintaining Optimum Action on an Acoustic Guitar
Once you’ve achieved the desired action on your acoustic guitar, it’s important to maintain it to ensure optimal playability and performance. Here are some tips to help you keep the action at its best:
- Regularly check and adjust neck relief: The curvature of the neck can change over time due to factors like climate and string tension. Periodically check the neck relief using the appropriate method for your guitar and make any necessary truss rod adjustments to maintain the ideal relief.
- Monitor the nut and saddle: Keep an eye on the nut and saddle to ensure they remain in good condition. Check for any signs of wear or damage, such as worn grooves in the nut or saddle. Replace or repair these components as needed to maintain proper string height and alignment.
- Proper string installation: When changing strings, make sure they are installed correctly to avoid any unnecessary stress on the nut slots or saddle. Proper winding techniques for the tuning pegs can help maintain the desired tension for the strings.
- Monitor string height at various points: Regularly measure the action at different areas of the fretboard, not just at the 12th fret. This will help you identify any specific areas that may need adjustment, such as the first few frets or near the body of the guitar.
- Keep the guitar properly humidified: Fluctuations in humidity can cause the neck to warp or the top to sink, affecting the action. Use a humidifier or dehumidifier as necessary to maintain a stable humidity level, especially in regions with extreme weather conditions.
- Regular professional setup: Schedule periodic professional setups to get your guitar thoroughly inspected and adjusted by a qualified guitar technician. This will ensure that all components are in optimal condition and the action is properly set for your playing style.
By following these tips, you can maintain the optimum action on your acoustic guitar, ensuring consistent playability, tone, and overall performance. Remember that slight adjustments may be necessary over time due to natural changes, so stay attentive and make necessary tweaks to keep your guitar playing at its best.
Conclusion
Understanding and adjusting the action on an acoustic guitar is a crucial skill for any guitarist who wants to optimize playability, tone, and overall performance. Whether you’re a beginner or an experienced player, knowing how to measure, lower, or raise the action can greatly enhance your playing experience.
We explored the importance of action on an acoustic guitar and how it affects playability, tonality, and intonation. Factors such as neck relief, nut height, saddle height, string gauge, and playing style all come into play when determining the appropriate action for your instrument.
By following the step-by-step guides and using the necessary tools, you can adjust the action to your preferred height, suit your playing style, and achieve the desired balance between comfort and tone. Whether you’re strumming chords, fingerpicking intricate melodies, or playing slide guitar, the right action can make all the difference.
It’s essential to regularly check and maintain the optimum action on your acoustic guitar. Regular inspections, adjustments, and proper setup not only ensure the best playability but also help prevent any potential damage or wear on the guitar’s components.
Remember, if you’re uncertain about making adjustments or if you encounter any difficulties, it’s always a good idea to consult with a professional guitar technician who can provide expert guidance and ensure the best outcome for your instrument.
By paying attention to the action on your acoustic guitar and making the necessary adjustments, you’ll unlock its full potential and achieve a rewarding playing experience every time you pick up your beloved instrument.