Introduction
Learning to play the acoustic guitar is a fulfilling and creative journey that can bring joy and satisfaction to music enthusiasts. With the advancement of technology and the internet, it is now easier than ever to learn how to play the guitar online. Whether you are a beginner or an experienced player looking to enhance your skills, online resources provide a convenient and cost-effective way to learn and improve.
There are numerous advantages to learning the guitar online. One of the key benefits is the flexibility it offers. Unlike traditional guitar lessons, online platforms allow you to learn at your own pace and choose when and where to practice. This flexibility is especially beneficial for those with busy schedules or geographical limitations.
Another advantage is the wealth of resources available on the internet. Online guitar lessons offer a wide range of tutorials, videos, and interactive tools that cater to different skill levels and musical genres. Whether you want to learn fingerpicking, strumming, or playing lead guitar, you can find specialized lessons tailored to your preferences.
When starting your guitar journey online, it is important to find the right resources. Look for reputable websites or platforms that offer structured lessons, clear instructions, and a supportive community. Reading online reviews and seeking recommendations from fellow musicians can help you make an informed decision.
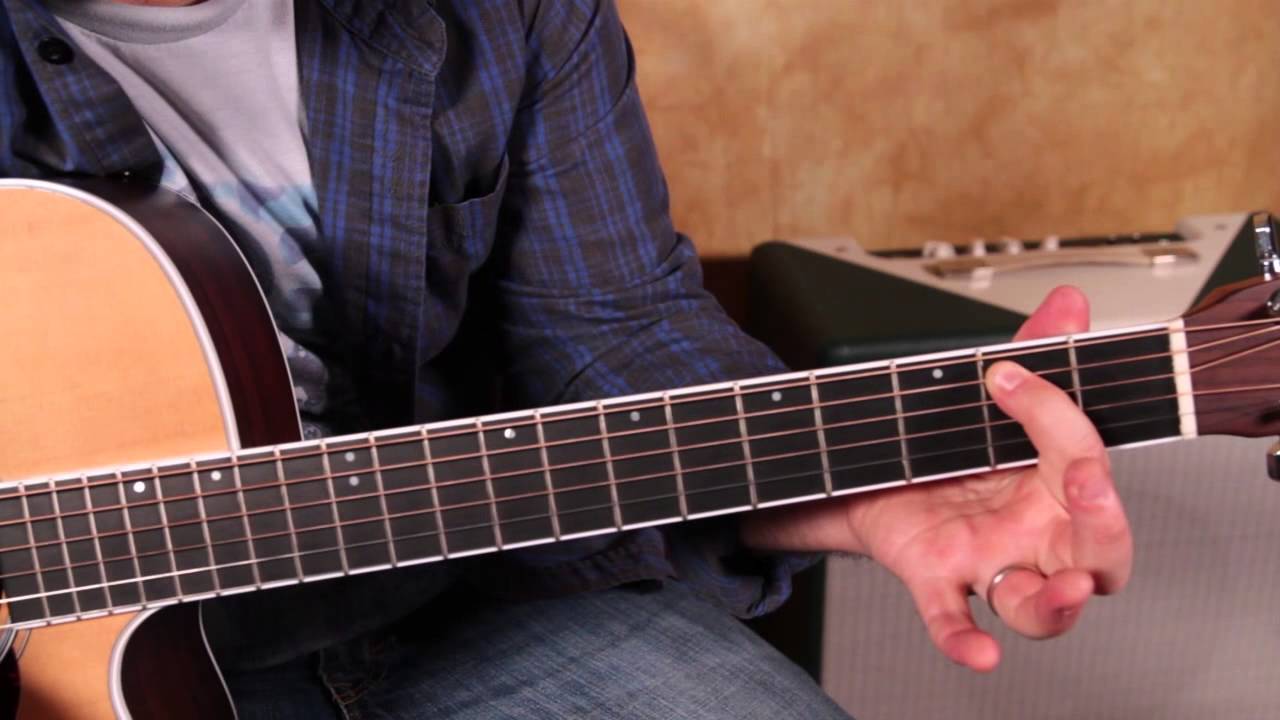
Before diving into playing, it is essential to understand the basic components of an acoustic guitar. Familiarize yourself with the body, neck, strings, and tuning pegs. This knowledge will help you develop better technique and improve your playing experience.
Once you have your guitar ready, the first step is tuning it. Proper tuning ensures that your guitar produces accurate and pleasant sounds. Learn how to use a digital tuner or tune by ear using reference notes. Regular tuning practice will train your ears and help you develop better pitch recognition.
Next, you will want to learn basic guitar chords. Chords are the foundation of most songs and mastering them allows you to play a wide variety of music. Start with open chords such as G, C, D, and A major and progress to more complex chords as you gain confidence.
In addition to chords, understanding strumming patterns is crucial for creating rhythm and adding dynamics to your playing. Practice different strumming techniques like downstrokes, upstrokes, and alternating patterns. Experiment with variations and incorporate them into your playing style.
When it comes to reading guitar tabs, it is a useful skill to acquire as it allows you to learn songs quickly. Tabs provide a visual representation of where to place your fingers on the fretboard, making it easier to follow along and play your favorite tunes.
Now that you have built a solid foundation, it’s time to start playing simple songs. Choose songs that match your skill level and practice regularly. Playing familiar tunes not only keeps you motivated but also helps refine your technique and musicality.
As you progress, you may want to explore more advanced techniques like fingerpicking, barre chords, and improvisation. These skills will expand your musical repertoire and open up new possibilities for expressing yourself on the guitar.
Consistency and regular practice are key to improving your guitar playing. Develop a practice routine that suits your schedule and stick to it. Set specific goals and track your progress to stay motivated. Remember, it’s not just about the quantity of practice, but also the quality.
Lastly, troubleshoot common problems that guitarists often encounter. Whether it’s buzzing strings, difficulties with finger placement, or lack of speed, understanding these issues and finding effective solutions will help you overcome hurdles and continue progressing.
Learning to play an acoustic guitar online for free can be a rewarding experience. It offers flexibility, abundant resources, and the opportunity to connect with a global community of fellow guitar enthusiasts. Embrace the journey, stay dedicated, and enjoy the process of becoming a skilled and passionate guitarist.
Benefits of Learning Guitar Online
Learning to play guitar online offers a multitude of benefits that make it an appealing option for aspiring musicians. Here are some key advantages:
- Flexibility: Online guitar lessons provide the flexibility to learn at your own pace and according to your schedule. You can choose when and where to practice, allowing you to fit your learning around other commitments.
- Convenience: With online lessons, there’s no need to travel to a physical location for classes. All you need is an internet connection and a guitar, and you can access the lessons from the comfort of your own home.
- Cost-Effectiveness: Compared to private guitar lessons, learning online can be more cost-effective. Many online resources offer free lessons, tutorials, and instructional videos, allowing you to learn without breaking the bank.
- Extensive Resources: The internet is a treasure trove of guitar learning resources. Online platforms provide a vast array of tutorials, lesson plans, chord charts, and song libraries. You can find resources catering to various skill levels, musical styles, and genres.
- Interactive and Multimedia Learning: Online guitar lessons often incorporate interactive elements, such as quizzes, exercises, and play-along tracks. These interactive features enhance the learning experience and ensure better engagement with the material.
- Global Community: Learning guitar online allows you to connect with a global community of musicians. Online forums, discussion boards, and social media groups provide opportunities to seek advice, share experiences, and collaborate with fellow guitarists from around the world.
- Personalized Learning: Online lessons offer the flexibility to choose the skills and techniques you want to focus on. Whether you’re interested in fingerpicking, jazz improvisation, or rock power chords, you can find specialized lessons tailored to your specific interests.
- Improved Self-Discipline: Learning guitar online requires self-discipline and motivation. By setting goals, creating a practice routine, and tracking your progress, you develop valuable self-discipline skills that can be applied in various areas of life.
- Accessible Learning Materials: Online guitar lessons are accessible at any time and can be revisited as often as needed. You have the freedom to review concepts, replay tutorials, or practice exercises multiple times until you feel confident.
Learning guitar online offers a convenient, comprehensive, and cost-effective way to develop your guitar skills. With the abundance of resources and the supportive online community, you can embark on a musical journey that is tailored to your preferences and goals.
Finding the Right Online Resources
When it comes to learning guitar online, finding the right resources is crucial to ensure a fruitful and effective learning experience. Here are some tips to help you find the ideal online guitar learning platform:
- Reputation and Credibility: Look for online platforms or websites with a good reputation and positive reviews from fellow guitarists. Seek recommendations from trusted sources or join online communities to gather insights about the best platforms available.
- Structured Lessons and Curriculum: A well-structured curriculum can provide a clear path for your learning journey. Ensure that the online resources you choose offer a step-by-step approach, gradually building your skills from beginner to advanced levels.
- Clear Instructions and Demonstrations: The quality of instruction is essential for effective learning. Make sure the online lessons provide clear instructions and demonstrations, making it easy for you to understand and follow along.
- Varied Learning Materials: Look for platforms that offer diverse learning materials, including video tutorials, written lessons, chord charts, and interactive exercises. Variety in teaching methods ensures a comprehensive and engaging learning experience.
- Genre and Style Compatibility: Consider your preferred musical genre and style of playing. Ensure that the online resources cater to your specific interests, whether you’re into rock, blues, classical, or fingerstyle guitar.
- Supportive Community: A strong online community can greatly enhance your learning journey. Look for platforms that provide opportunities to connect with fellow guitarists, such as forums, discussion boards, or social media groups. Interacting with others can foster motivation, inspiration, and collaboration.
- Free and Paid Options: Assess your budget and determine whether you prefer free or paid resources. Both options have their advantages. Free resources can be a great starting point, while paid platforms often offer more comprehensive content and additional features.
- Trial Periods and Money-Back Guarantees: Some online platforms offer trial periods or money-back guarantees, allowing you to test their services before committing. Take advantage of these offers to ensure that the platform aligns with your learning style and preferences.
- User-Friendly Interface: Ensure that the online platform has a user-friendly interface that is easy to navigate. A well-organized and intuitive interface will streamline your learning experience and enable you to access the resources effortlessly.
By considering these factors, you can find the right online resources that suit your learning needs and preferences. Remember, every guitarist is unique, so take your time to explore various platforms and find the one that resonates with your musical goals and aspirations.
Understanding the Parts of an Acoustic Guitar
Before delving into learning how to play the acoustic guitar, it is essential to familiarize yourself with its different parts. Understanding the components of a guitar will not only enhance your playing experience but also facilitate better communication with other musicians. Here are the key parts of an acoustic guitar:
- Body: The body of an acoustic guitar is the large, hollow section that amplifies the sound. It is typically made of wood and can come in different shapes and sizes, such as dreadnought, concert, or auditorium.
- Soundhole: Located on the body, the soundhole is a circular opening that allows the sound to escape from inside the guitar. The size and shape of the soundhole affect the tone and resonance of the instrument.
- Top (Soundboard): The top of the guitar, also known as the soundboard, is the front face of the body. It is usually made of spruce, cedar, or mahogany, and its vibration is responsible for producing the guitar’s tone.
- Back and Sides: The back and sides of the guitar form the body’s main structure. They are typically made of wood, which can affect the guitar’s resonance and tonal characteristics.
- Neck: The neck is the long, narrow section that extends from the body of the guitar. It is usually made of hardwood and houses the frets, fingerboard, and truss rod.
- Frets: Frets are the metal bars embedded along the neck of the guitar. They divide the neck into different sections, enabling precise finger placement to produce specific notes and chords.
- Fingerboard (Fretboard): The fingerboard is a smooth, flat surface mounted on the neck, just above the frets. It is usually made of hardwood and provides a comfortable playing surface for the fingers.
- Headstock: The headstock is located at the top of the guitar’s neck. It houses the tuning pegs and string slots, allowing for precise tuning and string tension adjustment.
- Tuning Pegs (Tuners): Found on the headstock, tuning pegs are used to adjust the tension of the strings, ensuring they produce the correct pitch when played. Tuners can be either machine heads or friction pegs, depending on the guitar.
- Strings: Acoustic guitars typically have six strings, numbered from the thickest (low E) to the thinnest (high E). The strings are made of steel or nylon, depending on the guitar type and preference.
- Nut: The nut is a small strip located at the top of the neck. It has notches or slots where the strings rest, maintaining proper spacing, alignment, and string height.
- Saddle: The saddle is a small strip located on the bridge of the guitar. It provides support for the strings and transfers their vibrations to the body, influencing the overall tone and volume.
- Bridge: The bridge is the wooden or metal piece located on the body of the guitar, beneath the soundhole. It anchors the strings and transmits their vibrations to the soundboard, contributing to the guitar’s resonance.
Understanding these different parts of an acoustic guitar will give you a solid foundation before you begin playing. Take some time to examine and familiarize yourself with your instrument, as this knowledge will greatly enhance your playing technique and overall understanding of the guitar.
Tuning Your Guitar
Properly tuning your guitar is essential to ensure that it produces accurate and pleasing sounds. While there are various tuning methods, the most common tuning for acoustic guitars is standard tuning, which is EADGBE from the thickest to the thinnest string. Here are some steps to help you tune your guitar:
- Use a Digital Tuner: Consider using a digital tuner, which is a convenient tool for accurate tuning. Simply clip the tuner onto the headstock of your guitar and pluck each string. The tuner will display the pitch of the string, indicating whether it is too high or too low.
- Tune the Low E (6th) String: Start by tuning the low E string (thickest string). Pluck the string and adjust the tuning peg until the tuner shows that the string is in tune. Turn the peg clockwise or counterclockwise to raise or lower the pitch accordingly.
- Use the 5th Fret Method: Once the low E string is in tune, you can use it as a reference to tune the other strings. Press down the 5th fret of the low E string and pluck the A string (5th string) open. Adjust the A string’s tuning peg until it matches the pitch of the 5th fret of the low E string.
- Tune the D (4th), G (3rd), B (2nd), and High E (1st) Strings: Repeat the previous step for the remaining strings. Press down the 5th fret of the A string and pluck the D string (4th string) open. Tune it until it matches the pitch of the 5th fret of the A string. Repeat the process for the G, B, and high E strings.
- Check Your Tuning: Once all the strings are tuned, strum all the strings together and listen for any discrepancies. If any strings sound out of tune, repeat the tuning process for those particular strings until they are in tune.
- Tune by Ear: If you prefer to tune by ear, you can use a reference pitch from a piano, a tuning fork, or an online tuner. Play the reference pitch and match the pitch of each string by adjusting the tuning pegs.
Remember to tune your guitar regularly, as changes in temperature, humidity, and string tension can cause it to go out of tune. Regular tuning practice will also train your ears and improve your ability to recognize when a string is out of tune.
Learning to tune your acoustic guitar is an essential skill that will significantly enhance your playing experience. Whether you use a digital tuner or tune by ear, a well-tuned guitar ensures that your notes and chords sound clear, harmonious, and in tune with other instruments.
Basic Guitar Chords
Learning basic guitar chords is a fundamental step towards becoming a proficient guitarist. Chords are the building blocks of many songs and provide the foundation for accompanying melodies and vocals. Here are some essential chords for beginners:
- G Major (G): Place your index finger on the 2nd fret of the A string, your middle finger on the 3rd fret of the low E string, and your ring finger on the 3rd fret of the B string. Strum all the strings starting from the low E string.
- C Major (C): Position your ring finger on the 3rd fret of the A string, your middle finger on the 2nd fret of the D string, and your index finger on the 1st fret of the B string. Strum from the A string.
- D Major (D): Place your index finger on the 2nd fret of the G string, your ring finger on the 3rd fret of the B string, and your middle finger on the 2nd fret of the high E string. Strum from the D string.
- A Major (A): Put your index finger on the 1st fret of the D string, your middle finger on the 2nd fret of the G string, and your ring finger on the 2nd fret of the B string. Strum from the A string.
- E Major (E): Position your index finger on the 1st fret of the G string, your middle finger on the 2nd fret of the A string, and your ring finger on the 2nd fret of the D string. Strum from the low E string.
- Am (A Minor): Place your middle finger on the 2nd fret of the D string, strumming all the strings except the low E string. This chord is an alternative to the A major chord and is commonly used in various musical genres.
These chords are a great starting point for beginners, as they are widely used and can be found in countless songs. Practice transitioning smoothly between them, and focus on proper finger placement and clear strumming.
As you gain more confidence, consider learning additional basic chords such as E minor (Em), D minor (Dm), and A7. This will expand your chord vocabulary and enable you to play a wider range of songs.
Keep in mind that learning chords takes patience and practice. Start slowly and gradually increase your speed as you become more comfortable. Practice strumming patterns to add rhythm and variation to your chord progressions.
Online resources provide chord charts and diagrams that visually illustrate finger placement for each chord. Take advantage of these tools to ensure you are playing the chords correctly and producing the desired sounds.
Remember, with regular practice and dedication, mastering basic guitar chords will set a solid foundation for your guitar playing journey and enable you to play a wide variety of songs.
Strumming Patterns
Mastering different strumming patterns is essential for adding rhythm, dynamics, and musicality to your guitar playing. Strumming patterns determine the timing and emphasis of strums, creating a unique feel for each song. Here are some popular strumming patterns to practice:
- Downstrokes: This basic strumming pattern involves strumming downwards with your dominant hand (usually using a pick) across all the strings. Start by keeping a steady rhythm and focus on accuracy and consistency. Once you are comfortable with downstrokes, you can add variations and incorporate other techniques.
- Upstrokes: Upstrokes are the opposite of downstrokes, where you strum upwards with your pick or fingers. Practice strumming upwards across all the strings, focusing on maintaining a steady rhythm and consistency in tone. Combine upstrokes with downstrokes for a more dynamic and varied strumming pattern.
- Alternate Strumming: Alternate strumming involves alternating between downstrokes and upstrokes. Start by practicing a simple pattern, such as down-up-down-up, ensuring that each strum is consistent and even. As you progress, experiment with different combinations and patterns to create more complex rhythms.
- Syncopated Strumming: Syncopation involves emphasizing off-beat or unusual rhythms, adding a unique groove to your playing. Experiment with accenting the strums on the off-beats or subdividing the beats to create interesting rhythmic patterns. Syncopated strumming can add energy and complexity to your playing, especially in genres like funk, reggae, or jazz.
- Fingerstyle Picking: Fingerstyle picking involves using your fingers to pluck the strings individually, allowing for more intricate and melodic patterns. Start by practicing simple fingerpicking patterns, using your thumb for the bass strings and your fingers for the higher strings. As you gain proficiency, experiment with more complex fingerpicking patterns and incorporate them into your playing.
When practicing strumming patterns, it is important to focus on maintaining a consistent rhythm, staying in time with a metronome or backing track. Start with a slower tempo and gradually increase the speed as you become more comfortable.
Listening to songs and studying different genres can also help broaden your understanding of strumming patterns and provide inspiration for creating your own unique patterns. Pay attention to the timing and feel of different songs, and try to replicate their rhythms and strumming techniques.
Remember, developing a solid foundation in strumming patterns takes time and practice. Start with simpler patterns and gradually progress to more complex ones. As you become more proficient, you will gain the ability to interpret and create strumming patterns that suit the songs you want to play.
Utilize online resources, tutorials, and practice along with songs to improve your strumming skills. The more you practice, the more comfortable and confident you’ll become with different strumming patterns, allowing you to express yourself fully on the guitar.
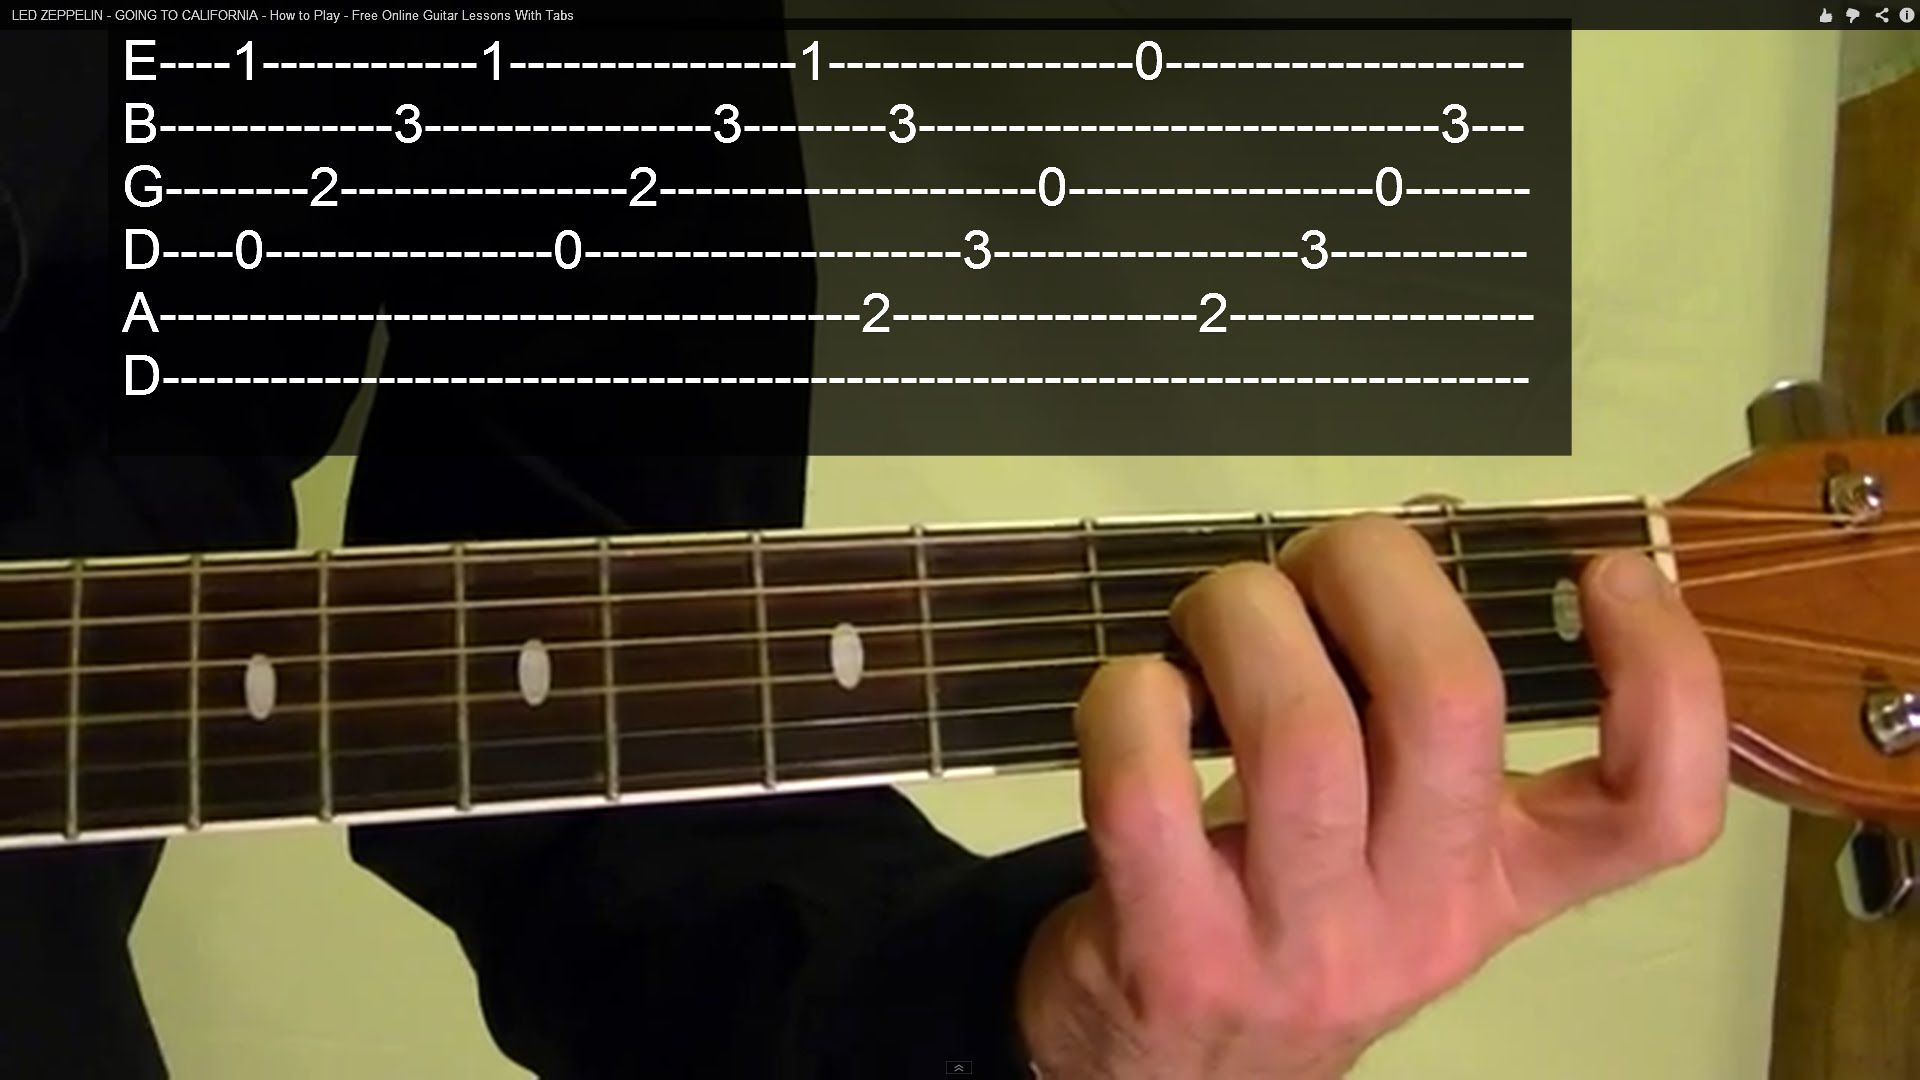
Reading Guitar Tabs
Guitar tabs, or tablature, are a popular form of notation for guitarists. Tabs provide a visual representation of where to place your fingers on the fretboard, making it easier to learn songs and play them accurately. Here’s a guide on how to read guitar tabs:
A guitar tab consists of six lines representing the six strings of the guitar. The thickest string, the low E string, is at the bottom, while the thinnest string, the high E string, is at the top. Numbers on the lines indicate which fret to play:
- For example, a “0” means you play the open string (unfretted).
- A “1” means you press down the string on the 1st fret with your finger.
- A “2” indicates pressing down the string on the 2nd fret, and so on.
- Multiple numbers stacked vertically indicate playing multiple strings simultaneously, usually represented by holding down a barre with a finger.
- Numbers appearing on the same vertical line mean those notes are played at the same time, representing a chord.
Here’s an example of a guitar tab for a simple chord progression:
e|---0---3---2---0---|
B|---1---0---3---1---|
G|---0---0---2---0---|
D|---2---0---0---2---|
A|---3---2---x---3---|
E|---x---3---x---x---|
By following the numbers from left to right, you can play the indicated notes or chords. Strum the corresponding strings as shown in the tab, and you will be able to replicate the music. The “-” symbol is often used to indicate a pause in playing.
It’s worth noting that guitar tabs don’t include information on rhythm or timing. To get a sense of the song’s timing, listen to the original recording or use your knowledge of the song to match the tab with the proper rhythm.
As you become more comfortable with reading guitar tabs, you can tackle more complex songs and solos. Remember to start with simpler tabs and gradually progress to more challenging ones.
Online resources provide a wealth of guitar tabs for different songs and genres. Explore tab websites, online communities, or guitar tutorial platforms to find tabs that match your interests and skill level. With practice, reading guitar tabs will become a valuable skill that allows you to learn and play a wide variety of music on your guitar.
Playing Simple Songs
Playing simple songs on the guitar is an exciting milestone in your musical journey. It allows you to apply the chords, strumming patterns, and techniques you have learned, while experiencing the joy of making music. Here are some tips to get started:
- Choose Songs with Basic Chords: Look for songs that use the chords you are familiar with, such as G, C, D, and A. Starting with songs that have straightforward chord progressions will help build your confidence and reinforce your chord transitioning skills.
- Practice Chord Transitions: Pay attention to the transitions between chords in the song. Practice moving smoothly and efficiently between each chord, ensuring that your fingers are in the right position and that there are no buzzes or muted strings. Start by playing each chord individually and gradually incorporate the transitions while maintaining the rhythm.
- Start Slowly: When learning a new song, start by playing it at a slower tempo. This will allow you to focus on the chord changes, strumming patterns, and any other techniques involved. As you become more comfortable, gradually increase the speed until you can play the song at its intended tempo.
- Listen to the Original Recording: Listening to the original recording of the song you’re learning is essential. Pay attention to the rhythm, timing, and dynamics of the song. Use it as a reference to ensure you’re capturing the essence and feel of the music as you play.
- Sing Along: Singing along while playing guitar can enhance your musicality and help you internalize the song. It will also improve your sense of timing and rhythm. Even if you’re not confident in your singing abilities, don’t be shy about giving it a try!
- Add Personal Touches: Once you feel comfortable playing a song as written, don’t be afraid to add your personal touch. Experiment with different strumming patterns, chord inversions, or embellishments to make the song your own. This will allow you to put your unique stamp on the music and develop your musical style.
- Record Yourself: Recording yourself playing songs is a helpful way to identify areas for improvement. It allows you to objectively assess your playing, spot any mistakes or inconsistencies, and work on refining those sections.
- Share with Others: Share your progress with friends, family, or fellow musicians. Performing in front of others can boost your confidence and provide valuable feedback. Consider joining a local guitar group or participating in open mic nights to showcase your skills and connect with other musicians.
Remember, playing simple songs is a stepping stone towards more complex pieces. Enjoy the process, and don’t be discouraged by mistakes. With practice and patience, you will continue to grow as a guitarist, and playing songs will become even more rewarding and enjoyable.
Advanced Techniques to Explore
Once you have developed a solid foundation in basic guitar skills, it’s time to explore more advanced techniques that can elevate your playing to the next level. Here are some techniques to consider:
- Fingerpicking: Fingerpicking involves plucking the strings individually with your fingers, allowing for more intricate and melodic playing. Explore fingerpicking patterns and develop independence among your fingers. Practice playing arpeggios, picking patterns, and incorporating thumb slaps or percussive elements.
- Barre Chords: Barre chords are movable chords that allow you to play the same chord shape in different positions on the neck. By using one finger to press down multiple strings, you can play various chord types and move them up and down the fretboard. Start with simple barre chords, such as F and Bm, and gradually progress to more complex voicings.
- Scale and Lead Guitar Playing: Dive into scales, such as the pentatonic or blues scale, to develop your lead guitar skills. Learn different licks and melodic patterns to use in solos and improvisation. Experiment with techniques like bending, vibrato, slides, and hammer-ons/pull-offs to add expression and flavor to your lead playing.
- Chord Inversions and Extensions: Explore chord inversions to add variety and richness to your chord progressions. Experiment with different voicings, such as adding a bass note or using higher-register voicings. Additionally, learn about chord extensions, such as 7th, 9th, or sus4 chords, to create more complex and colorful sounds.
- Hybrid Picking: Hybrid picking combines the use of a pick and individual finger-plucking to expand your playing possibilities. This technique allows for faster picking and more intricate patterns. Focus on coordinating your pick and finger movements to achieve a smooth and seamless sound.
- Slide Guitar: Slide guitar involves using a slide or metal tube to glide along the strings, creating unique and soulful sounds. Experiment with slide playing techniques, such as slide vibrato, legato slides, and controlled sliding between phrases.
- Harmonics: Harmonics are bell-like tones produced by lightly touching the strings at specific frets and plucking them. Explore natural harmonics, pinch harmonics, and artificial harmonics to add ethereal and captivating elements to your playing.
- Rhythm Techniques: Expand your rhythmic skills by exploring percussive and rhythmic techniques like palm muting, ghost notes, slapping, and tapping. These techniques can add texture and groove to your playing, especially in genres like funk, reggae, or percussive acoustic styles.
Remember, mastering advanced techniques requires time, patience, and dedicated practice. Start by focusing on one technique at a time and integrate it into your playing gradually. Consistent practice and exploration of these techniques will enhance your versatility and creativity as a guitarist.
Utilize online resources, instructional videos, and learning materials specific to each technique to aid your understanding. Seek guidance from experienced guitarists or consider taking lessons to receive tailored instruction and feedback on your advanced technique development.
Ultimately, these advanced techniques will allow you to expand your musical repertoire, express yourself more freely on the guitar, and immerse yourself in a wider range of musical genres and styles.
Practicing Tips and Strategies
Effective and consistent practice is key to improving your guitar playing skills. Incorporating specific tips and strategies into your practice routine can help you make the most of your practice sessions. Here are some valuable tips to enhance your practice:
- Create a Practice Schedule: Establish a regular practice schedule that suits your lifestyle and commitments. Consistency is key, so aim for shorter, focused practice sessions rather than infrequent long sessions.
- Set Goals: Set specific goals for each practice session or week. Whether it’s mastering a new chord, learning a new song, or improving your speed, having clear objectives will help you stay motivated and focused.
- Break it Down: When tackling a challenging technique or song, break it down into smaller, manageable sections. Practice each section separately and gradually piece them together. This approach allows you to conquer difficult parts and build your confidence as you progress.
- Practice Slowly: Start slowly and play with precision. This allows you to focus on proper technique, finger placement, and accuracy. Gradually increase the tempo as you become more comfortable and confident.
- Use a Metronome: Incorporate a metronome into your practice routine to develop your sense of timing and improve your rhythm. Start at a comfortable tempo and gradually increase it as you gain proficiency. Playing to a metronome also helps you develop consistency and control over your tempo.
- Record and Evaluate Yourself: Record your practice sessions and performances to objectively evaluate your playing. Listen for areas of improvement, such as timing issues, fretting accuracy, or clarity in chord changes. This reflection will help you identify weaknesses and focus on specific areas that need more practice.
- Practice Technique Exercises: Dedicate time to specific technique exercises that target areas you want to improve, such as scales, finger exercises, or strumming patterns. These exercises enhance your technical skills and build muscle memory for smoother and more efficient playing.
- Stay Focused and Present: During practice, eliminate distractions and fully immerse yourself in the music. Concentrate on the sound, the feel of the strings, and the mechanics of your playing. This focused practice will increase your mindfulness and connection with the guitar.
- Experiment and Explore: Don’t limit yourself to specific exercises or songs. Allow room for exploration and experimentation. Engage in improvisation, play along with different genres, or try writing your own music. This creative exploration keeps your practice sessions enjoyable and enhances your musicality.
- Seek Feedback: Regularly seek feedback from experienced guitarists or instructors. They can provide valuable insights, suggestions, and corrections that will help you refine your playing and correct any bad habits.
Remember, effective practice requires patience, perseverance, and a positive mindset. Accept that progress comes with time, and embrace the learning journey. Celebrate your achievements and enjoy the process of becoming a skilled and confident guitarist.
Troubleshooting Common Problems
As you embark on your guitar-playing journey, you may encounter various challenges or problems along the way. Understanding and troubleshooting these common issues will help you overcome hurdles and continue progressing. Here are some common guitar-playing problems and suggestions for solving them:
- String Buzz: String buzz occurs when a string produces an unwanted rattling sound. This can be caused by various factors such as improper finger placement, insufficient finger pressure, or a low string action. To resolve this issue, ensure your fingers are pressing the strings down firmly behind the frets, adjust your hand position, or consider adjusting the action of your guitar if necessary.
- Muted Strings: Muted strings occur when your fingers unintentionally touch adjacent strings, dampening their sound. Pay attention to your finger placement and make sure each finger is only touching the string it needs to fret. Keep your fingers arched and find a comfortable hand position to avoid accidentally muting other strings.
- Fretting Out: Fretting out refers to a situation where a string buzzes or mutes when played on certain frets. This can be due to a high string action or uneven frets. Adjusting the truss rod, bridge height, or seeking professional setup can help resolve this issue. If the problem persists, consult a luthier or guitar technician to ensure proper fret leveling and setup.
- Poor Timing: Poor timing can hinder your playing, making it sound disjointed or out of sync with a song. To improve your timing, practice with a metronome or backing track to develop a strong sense of rhythm. Start with slower tempos and gradually increase the speed as you become more comfortable. Tap your foot or count along with the beat to internalize the rhythm and improve your overall timing.
- Struggling with Barre Chords: Barre chords can be challenging, especially for beginners. If you’re having difficulty achieving clear and consistent barre chords, make sure your finger is pressing down firmly across all the necessary strings. Experiment with adjusting your finger position and the angle of your barre. Additionally, strengthening your hand and finger muscles through targeted exercises can help improve your barre chord technique over time.
- Lack of Speed and Accuracy: Developing speed and accuracy takes time and practice. Start by playing slowly and focus on accuracy and consistency. Gradually increase your speed as you build muscle memory and finger strength. Practice with a metronome to develop precise timing, and break down fast passages into smaller sections, gradually increasing the tempo as you master each section.
- Difficulty Switching Between Chords: Smoothly transitioning between chords can be challenging, especially when first starting out. Practice chord transitions separately, ensuring each finger finds its position efficiently. Slowly increase the speed of your transitions, ensuring that you maintain accuracy and clarity. Using common pivot fingers (shared fingers between chords) can assist in seamless transitions.
- Struggling with Rhythm and Strumming Patterns: Developing a solid sense of rhythm and mastering strumming patterns can take time and practice. Start by focusing on simple rhythms and gradually progress to more complex strumming patterns. Break down challenging patterns into smaller sections and practice them slowly until you feel comfortable. Use a metronome or play along with recordings to improve your timing and internalize different rhythmic patterns.
Remember, troubleshooting common guitar-playing problems requires patience, persistence, and a willingness to experiment with different solutions. Don’t get discouraged if you encounter difficulties – instead, view them as opportunities for growth and improvement. Keep practicing, seek guidance when needed, and enjoy the process of overcoming obstacles to become a more skilled guitarist.
Conclusion
Congratulations on embarking on your journey to learn how to play the acoustic guitar online! With the convenience and abundance of resources available, you have the opportunity to develop your skills and express yourself through music. By following the tips and strategies outlined in this guide, you can make the most of your online guitar learning experience.
Remember to take advantage of the flexibility that online learning provides, allowing you to learn at your own pace and choose the resources that suit your preferences. Use online forums and communities to connect with fellow guitarists for support, inspiration, and collaboration.
Understanding the various parts of the guitar, tuning it correctly, mastering basic chords, and exploring different strumming patterns provide the foundation for your playing. As you progress, don’t be afraid to delve into more advanced techniques and continually challenge yourself.
Regular practice is crucial for improving your guitar skills. Plan your practice sessions, set goals, and break down complex skills into manageable parts. Use tools like metronomes, recording devices, and online resources to guide and evaluate your progress.
Along your journey, you may encounter challenges or experience frustration. Troubleshoot common problems by identifying the issues and implementing targeted solutions. Remember that perseverance and a positive mindset are vital for overcoming obstacles.
Through dedication, practice, and exploration, you will continue to grow as a guitarist. Embrace the joy of playing simple songs, and gradually expand your repertoire to more complex pieces. Express your creativity, experiment with techniques, and find your own unique style of playing.
Finally, keep in mind that learning an instrument is a lifelong journey. Enjoy the process, celebrate your achievements, and continue to seek new opportunities to expand your musical horizons. Whether you aspire to perform on stage, write your own songs, or simply play for personal enjoyment, learning to play the acoustic guitar online opens up a world of possibilities for you as a musician. So keep strumming, practicing, and nurturing your passion for music!