Introduction
Welcome to our guide on how to install the Ring Video Doorbell 2nd Generation. The Ring Video Doorbell is a fantastic device that allows you to monitor and interact with anyone at your front door, no matter where you are. Whether you’re at work, on vacation, or simply in another part of your home, the Ring Video Doorbell provides convenience, security, and peace of mind.
In this step-by-step guide, we will walk you through the process of installing the Ring Video Doorbell 2nd Generation. We will cover everything from gathering the required tools and materials, to wiring the doorbell and ensuring it is working properly. So let’s get started!
Please note that before starting the installation, it is crucial to read the instructions provided by Ring and familiarize yourself with the specific requirements for your particular doorbell model.
Installing the Ring Video Doorbell 2nd Generation may require some basic knowledge of electrical wiring and access to a power source. If you are not comfortable working with electricity, it is recommended to consult a professional electrician to assist you with the installation process.
Now that we have covered the basics, let’s move on to the first step – gathering the required tools and materials.
Step 1: Gathering the Required Tools and Materials
Before you begin the installation process, it is essential to ensure that you have all the necessary tools and materials ready. Here is a list of what you’ll need:
- Ring Video Doorbell 2nd Generation
- Mounting bracket and installation screws
- Screwdriver (Phillips or flathead, depending on the screw type)
- Drill and drill bits (if necessary)
- Wire strippers
- Wire nuts or connectors
- Level
- Power source (such as an existing doorbell transformer or an outlet)
- Smartphone or tablet with the Ring app installed
- Steady ladder or step stool
Ensure that you have all the tools and materials before you start the installation process, as it will save you time and prevent any interruptions.
It is also essential to read the manufacturer’s instructions to understand the specific requirements for your Ring Video Doorbell model. Some models might have additional tools or materials needed.
Once you have gathered all the necessary tools and materials, you’re ready to move on to the next step – preparing your doorbell area.
Step 2: Preparing Your Doorbell Area
Before you install the Ring Video Doorbell 2nd Generation, it’s important to prepare the area where you’ll be mounting the doorbell. Follow these steps to ensure a smooth installation:
- Turn off the power: Begin by turning off the power to your existing doorbell at the circuit breaker. This step is crucial for your safety and to avoid any electrical mishaps during the installation process.
- Remove the old doorbell: If you have an existing doorbell, carefully remove it from the mounting location on the wall or door frame. You may need to unscrew it or detach it from any wires.
- Clean the mounting area: Use a clean cloth or mild cleaner to wipe away any debris, dirt, or dust from the mounting area. This will ensure a secure and stable installation.
- Ensure a level installation: Use a level to check the horizontal and vertical alignment of the mounting area. Adjust if necessary, so that the Ring Video Doorbell will be installed straight and level.
It’s essential to properly prepare the doorbell area to ensure a secure and functional installation. Taking the time to clean the area and confirm its levelness will contribute to the overall stability and performance of your Ring Video Doorbell.
Once you have completed these steps, you’re now ready to move on to the next step – installing the Mounting Bracket.
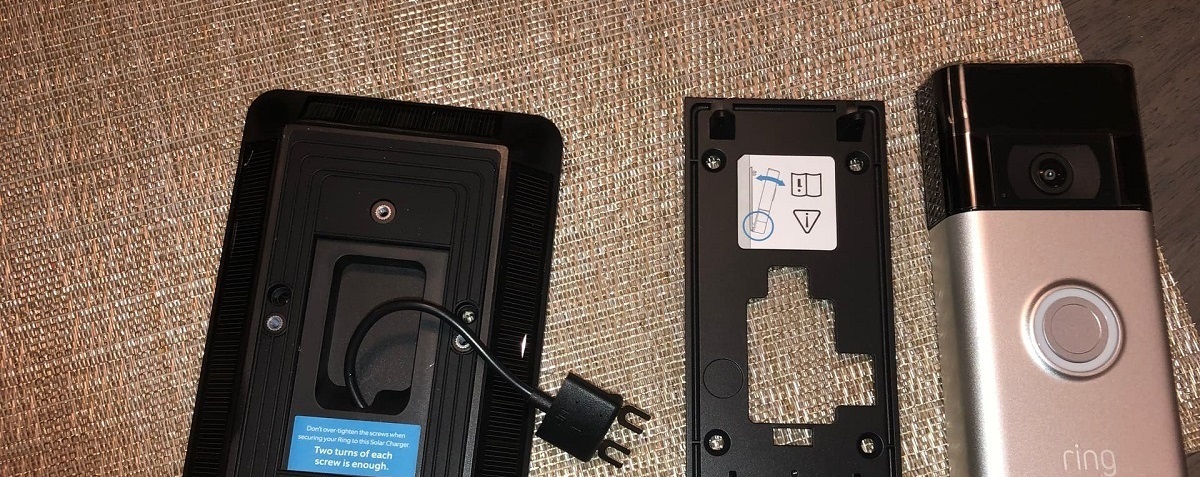
Step 3: Installing the Mounting Bracket
Installing the mounting bracket is an important step in securing the Ring Video Doorbell to your door frame or wall. Follow these steps to install the mounting bracket:
- Position the mounting bracket: Hold the mounting bracket against the desired location on your door frame or wall. Make sure it is aligned and level with the help of a level.
- Mark the screw holes: Use a pencil or marker to mark the screw holes on the door frame or wall through the holes of the mounting bracket. This will serve as a guide when drilling or inserting the screws.
- Drill pilot holes (if necessary): If your mounting surface requires it, use a drill and an appropriate drill bit to create pilot holes at the marked locations. This will make screw insertion easier and prevent any damage to the surface.
- Attach the mounting bracket: Align the mounting bracket with the pilot holes (or marked holes) and secure it in place using the provided screws. Make sure the bracket is firmly and securely attached to the door frame or wall.
- Double-check the levelness: After attaching the mounting bracket, use the level again to confirm that it is still level and properly aligned. Adjust if necessary.
Installing the mounting bracket is a crucial step as it ensures the stability and proper positioning of your Ring Video Doorbell. Taking the time to accurately position and secure the bracket will contribute to the overall success of your installation.
With the mounting bracket securely in place, you’re now prepared to move on to the next step – wiring the video doorbell.
Step 4: Wiring the Video Doorbell
Wiring the Ring Video Doorbell correctly is crucial to ensure proper functionality. Here’s how to wire your video doorbell:
- Identify the existing wiring: If you have an existing doorbell, locate the wires that connect it to the power source. Typically, there will be two wires, a “hot” wire (usually red or black) and a “neutral” wire (usually white or gray).
- Turn off the power: Before working with the wiring, turn off the power to your doorbell at the circuit breaker for your safety.
- Remove the existing doorbell: If you have an existing doorbell, disconnect the wires from it. Loosen the screws or wire nuts that secure the wires and gently pull them out.
- Prepare the wires: Strip the insulation off the ends of the wires to expose a small portion of bare wire. Use wire strippers, following the manufacturer’s instructions.
- Connect the wires to the Ring Video Doorbell: Connect the “hot” wire to the “hot” terminal screw on the back of the video doorbell and the “neutral” wire to the “neutral” terminal screw. Tighten the screws to secure the wires.
- Secure the wiring: If needed, use wire nuts or connectors to secure the connection between the wires and the video doorbell. This will help prevent any loose connections and ensure a reliable electrical connection.
- Double-check the wiring: Before proceeding, double-check that the wiring is properly connected and secure. This step is crucial to avoid any electrical issues.
Wiring the Ring Video Doorbell correctly will ensure that it powers up and functions as intended. If you’re unsure about working with wiring or if you encounter any difficulties during this step, it is recommended to seek the assistance of a professional electrician.
Now that you have successfully wired your video doorbell, let’s move on to the next step – attaching the Ring Video Doorbell to the mounting bracket.
Step 5: Attaching the Ring Video Doorbell to the Bracket
Now that you have the mounting bracket installed and the wiring complete, it’s time to attach the Ring Video Doorbell to the bracket. Follow these steps to ensure a secure attachment:
- Line up the doorbell: Carefully line up the holes on the back of the Ring Video Doorbell with the screws or tabs on the mounting bracket. Hold the doorbell in place, making sure it is level.
- Attach the doorbell: Once the doorbell is aligned, gently push it onto the bracket until it fully engages. You may hear a click or feel a solid connection when it’s properly attached.
- Tighten the security screws: Depending on the model of your Ring Video Doorbell, there may be security screws included. If applicable, secure the doorbell in place by tightening these screws using the provided screwdriver or tool.
- Test the doorbell’s stability: Give the doorbell a gentle shake to ensure it is firmly and securely attached to the mounting bracket. This step is important to ensure that the doorbell won’t become loose or fall off over time.
Attaching the Ring Video Doorbell to the mounting bracket is a critical step in completing the installation process. Double-check that the doorbell is securely attached before proceeding to the next step.
Once the Ring Video Doorbell is securely attached to the bracket, it’s time to power it up and test its functionality. Let’s move on to the next step – powering up and testing the doorbell.
Step 6: Powering Up and Testing the Doorbell
After attaching the Ring Video Doorbell to the mounting bracket, it’s time to power it up and ensure it’s functioning correctly. Follow these steps to power up and test your doorbell:
- Turn on the power: If you had turned off the power at the circuit breaker earlier, now is the time to switch it back on.
- Launch the Ring app: On your smartphone or tablet, launch the Ring app and log in to your Ring account. If you don’t have the app, you can download it from your device’s app store.
- Add your doorbell: In the Ring app, select the option to add a new device. Follow the on-screen instructions to connect your Ring Video Doorbell to your Wi-Fi network.
- Test the doorbell button: With the Ring app connected to your doorbell, press the doorbell button to test if it’s working. You should receive a notification on your device and be able to see a live video feed.
- Adjust settings and preferences: Use the Ring app to customize various settings, such as motion detection sensitivity, notification preferences, and video recording options. Explore the app to familiarize yourself with all the available features.
- Perform additional tests: Walk around your property to test the motion detection capabilities of the Ring Video Doorbell. Ensure that the alerts are working correctly and that you can view the live video feed without any issues.
Powering up and testing the Ring Video Doorbell is an essential final step in the installation process. It allows you to verify that all components are functioning correctly and gives you the opportunity to fine-tune settings according to your preferences.
Once you have completed these tests and are satisfied with the functionality of your Ring Video Doorbell, congratulations! You have successfully completed the installation process.
Conclusion
Congratulations on successfully installing your Ring Video Doorbell 2nd Generation! You have now empowered yourself with an incredible device that will enhance the security and convenience of your home. By following the step-by-step instructions in this guide, you have ensured a proper and reliable installation.
Remember, before starting the installation process, it’s essential to gather all the necessary tools and materials and familiarize yourself with the manufacturer’s instructions. Taking the time to prepare properly will make the installation smoother and more efficient.
Throughout the installation, we covered various steps, including gathering tools and materials, preparing the doorbell area, installing the mounting bracket, wiring the video doorbell, attaching the doorbell to the bracket, and powering up and testing the device.
Now that your Ring Video Doorbell is up and running, you can enjoy the convenience of being able to monitor your front door from anywhere using your smartphone or tablet. Whether you’re at work, on vacation, or relaxing at home, you’ll never miss a visitor or package delivery.
Remember to explore the features and settings of the Ring app to customize your experience further. Adjust motion detection settings, set up notifications, and take advantage of the recorded videos to maximize the functionality of your Ring Video Doorbell.
If you have any further questions or need assistance, refer to the Ring website or reach out to their customer support for guidance. Enjoy the peace of mind and security that your Ring Video Doorbell brings to your home!