Introduction
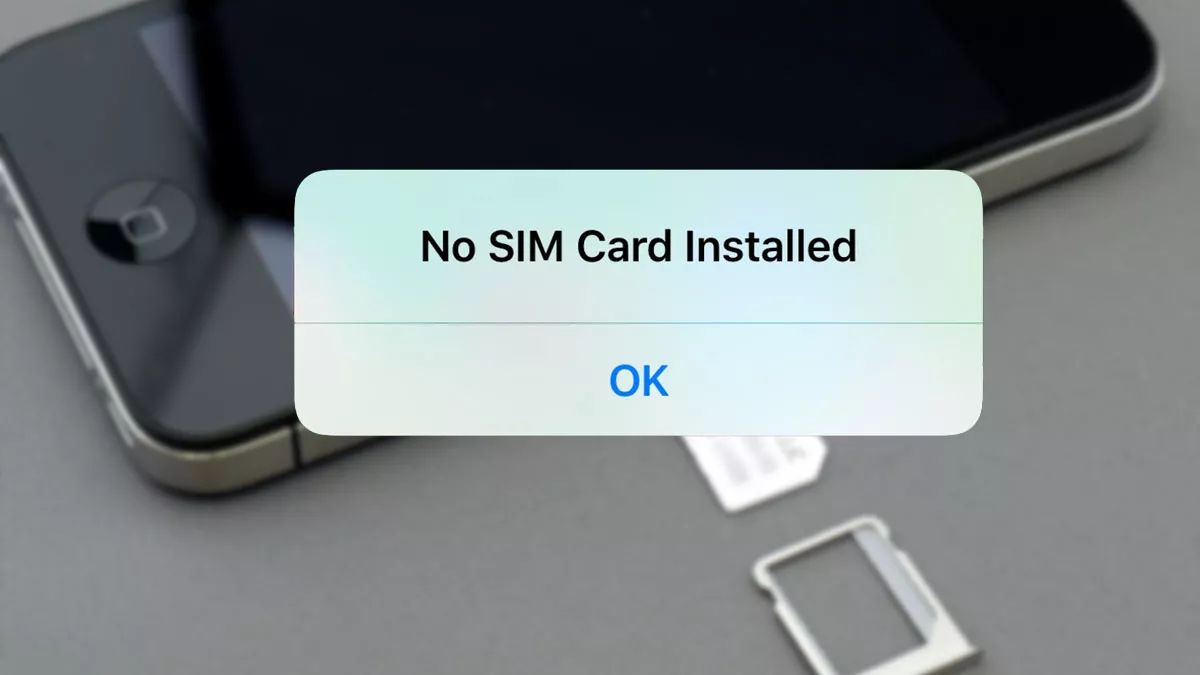
When it comes to troubleshooting issues with your iPhone, the SIM card can often be a culprit. Whether you're experiencing connectivity problems, network issues, or a persistent "No SIM Card Installed" error, resetting your iPhone's SIM card can be a simple yet effective solution. In this comprehensive guide, we'll walk you through the step-by-step process of resetting your iPhone's SIM card, empowering you to tackle common connectivity challenges with confidence.
A malfunctioning SIM card can disrupt your ability to make calls, send texts, and access mobile data, making it essential to address any related issues promptly. By following the instructions outlined in this guide, you'll gain a clear understanding of how to safely remove and reinsert your iPhone's SIM card, as well as inspect it for any visible damage or debris. This proactive approach can help you troubleshoot connectivity problems and restore your iPhone's functionality without the need for professional assistance.
Understanding the importance of a properly functioning SIM card is crucial in maintaining seamless communication and connectivity on your iPhone. Whether you're a seasoned iPhone user or a newcomer to the world of iOS devices, having the knowledge and confidence to reset your SIM card can be a valuable skill. By the end of this guide, you'll be equipped with the expertise to navigate the process of resetting your iPhone's SIM card, empowering you to overcome common connectivity obstacles and enjoy uninterrupted use of your device.
Now, let's dive into the step-by-step instructions for resetting your iPhone's SIM card, ensuring that you have the necessary tools and knowledge to address connectivity issues effectively.
Step 1: Power Off Your iPhone
Before embarking on the process of resetting your iPhone's SIM card, it's crucial to initiate the procedure by powering off your device. This step is essential to ensure the safety of both your iPhone and the SIM card during the subsequent actions.
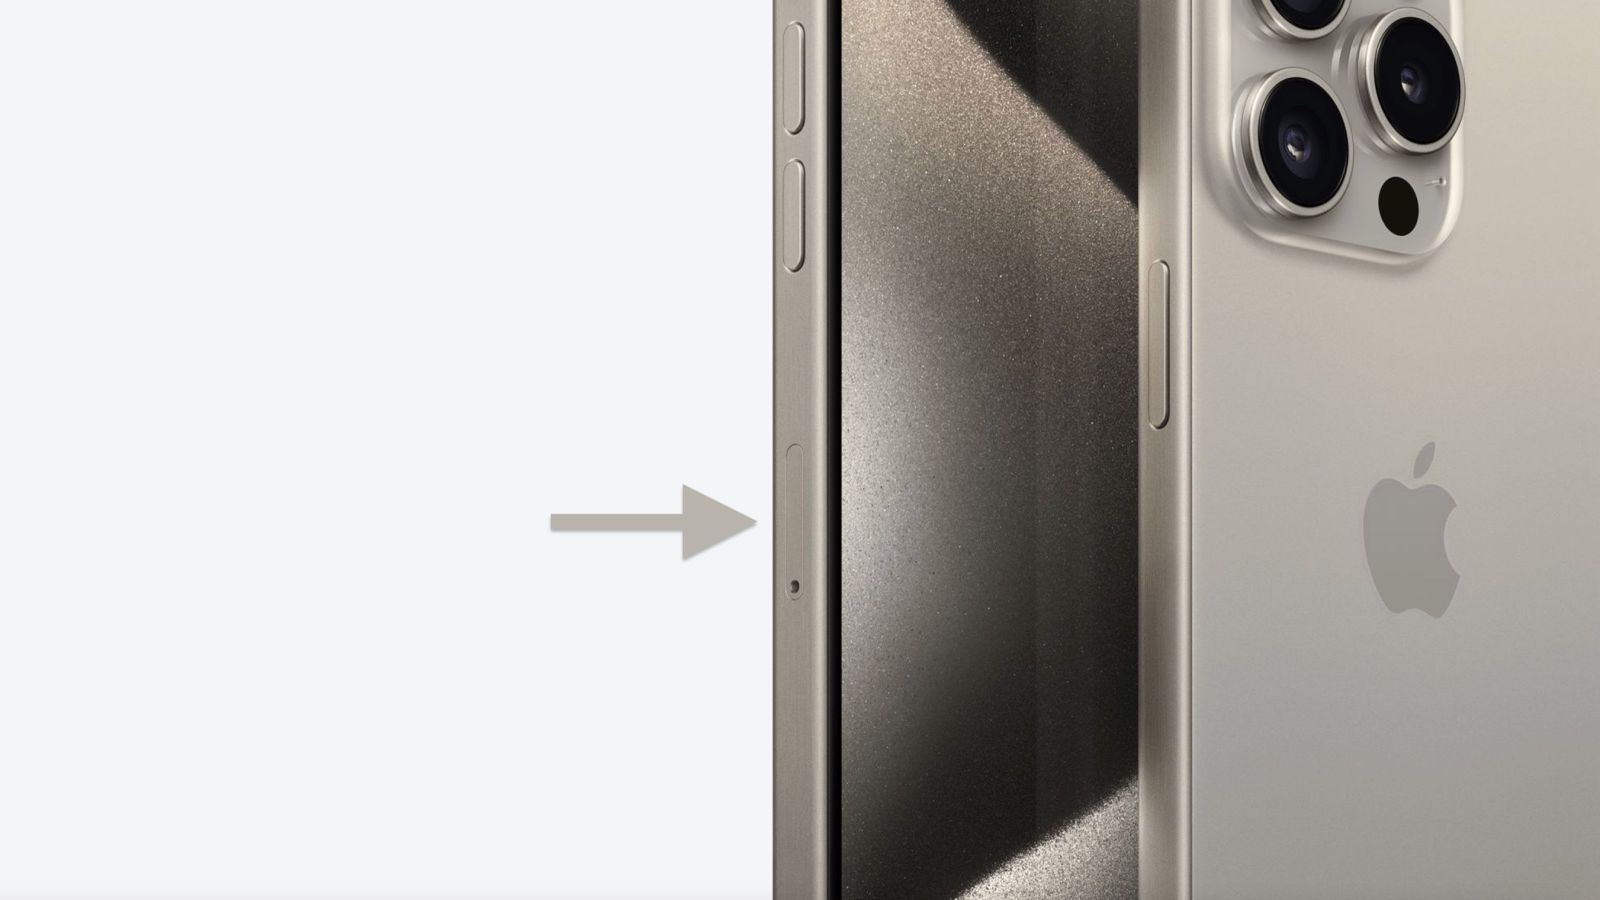
To power off your iPhone, begin by locating the power button, which is typically situated on the right-hand side of the device. Press and hold the power button until the "slide to power off" slider appears on the screen. Once this slider is visible, swipe it from left to right to shut down your iPhone completely.
By powering off your iPhone, you are effectively minimizing the risk of causing any damage to the SIM card or the device itself. This precautionary measure creates a safe environment for the subsequent steps involved in resetting the SIM card.
It's important to exercise patience and caution during this process, ensuring that the power off sequence is completed without any interruptions. Once your iPhone is powered off, you can proceed to the next step with the confidence that your device is in a secure state for the SIM card reset procedure.
Taking the time to power off your iPhone sets the stage for a smooth and trouble-free SIM card reset process. By following this initial step, you are laying the foundation for a successful resolution to any connectivity issues you may be experiencing.
With your iPhone powered off, you are now ready to proceed to the next step of ejecting the SIM card tray, a pivotal stage in the process of resetting your iPhone's SIM card. This seamless transition from powering off your device to accessing the SIM card tray sets the tone for a well-executed SIM card reset, ultimately leading to a potential resolution of any connectivity challenges you may encounter.
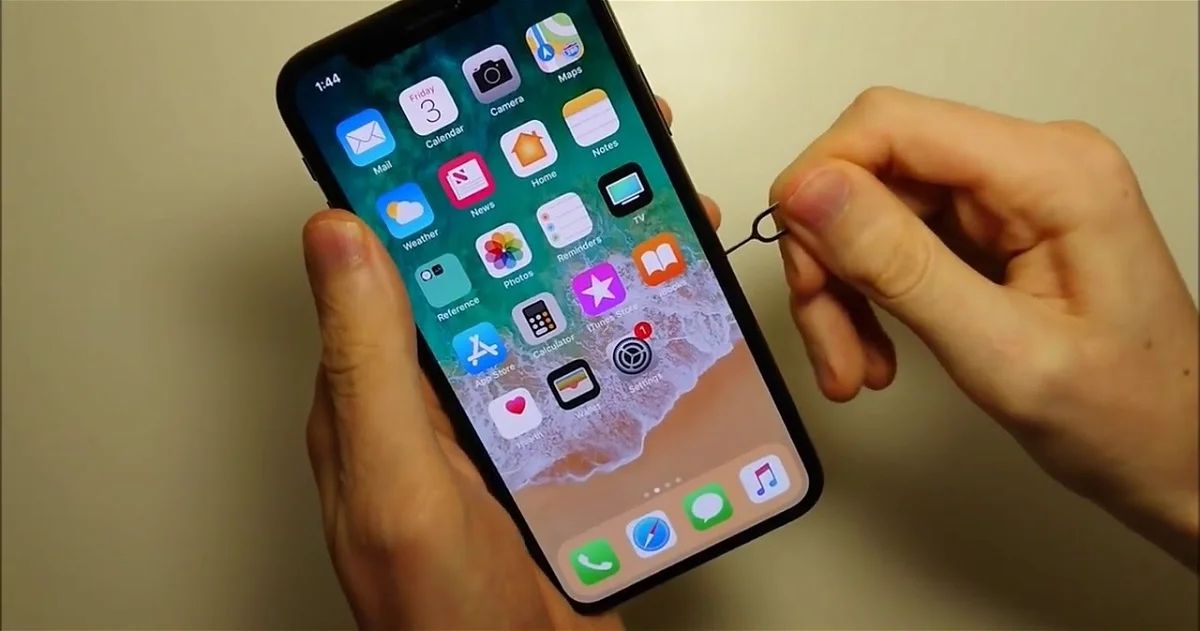
Step 2: Eject the SIM Card Tray
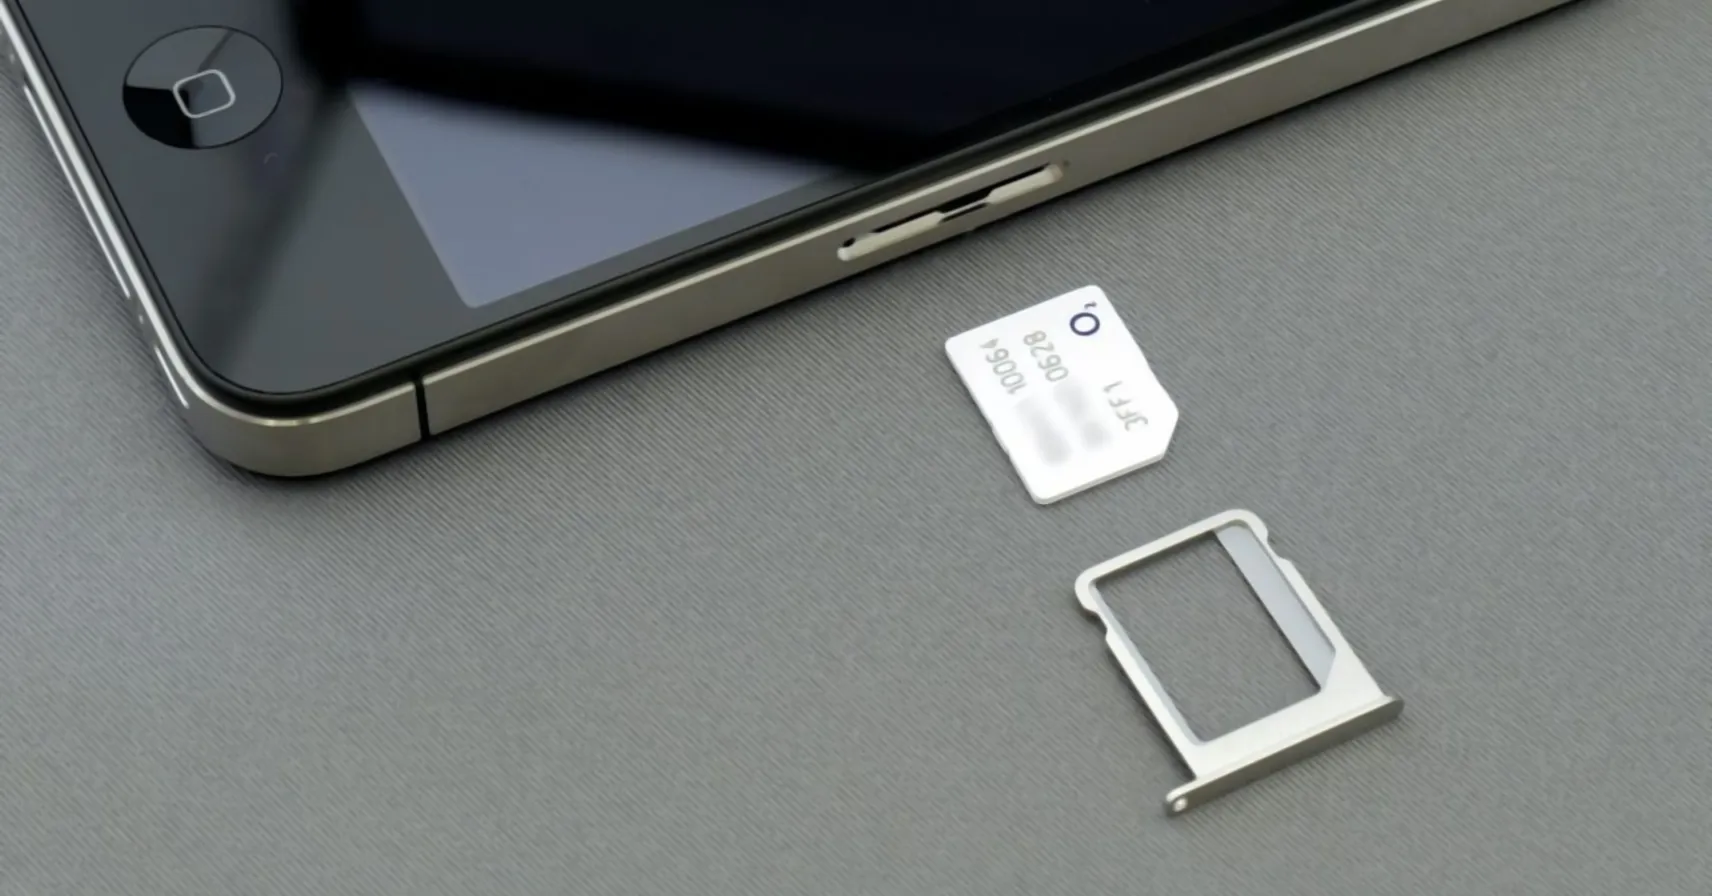
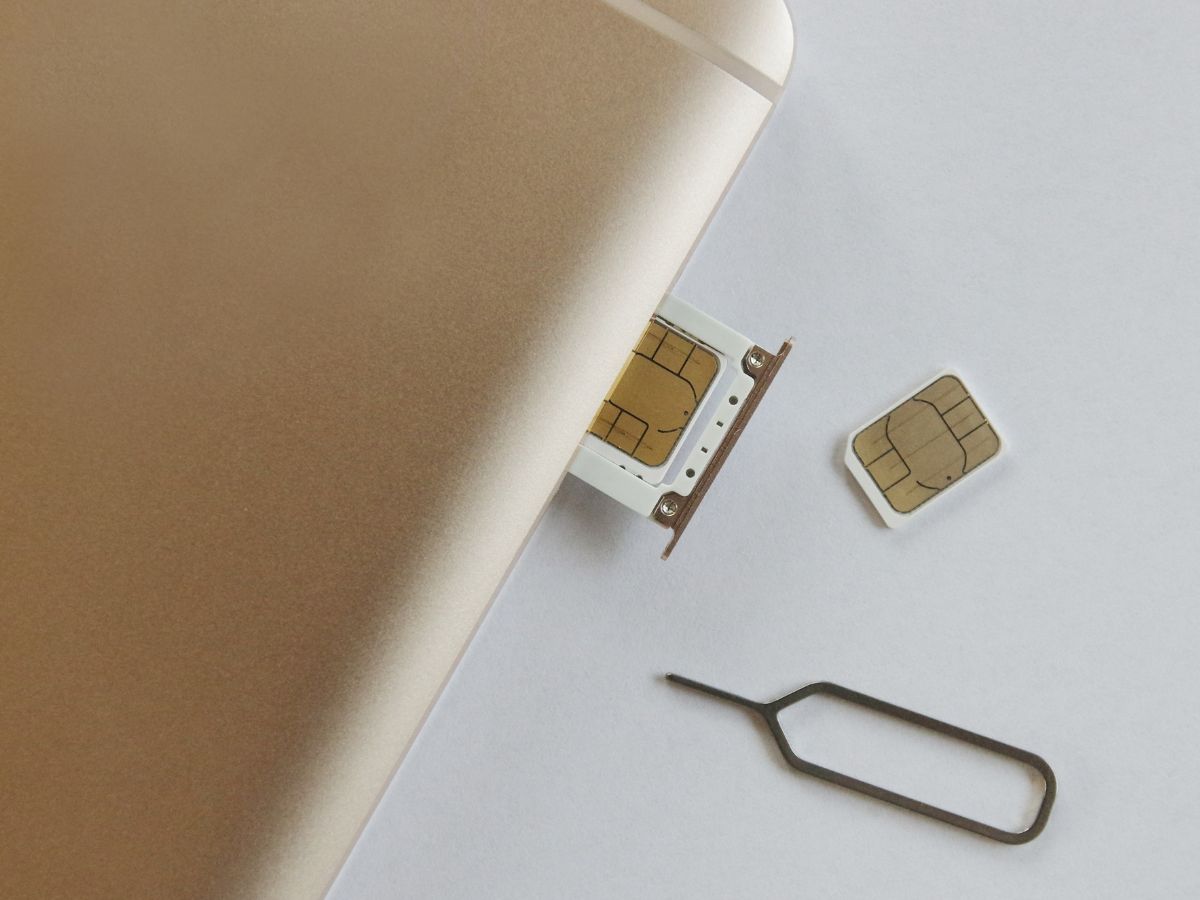
Ejecting the SIM card tray is a crucial step in the process of resetting your iPhone's SIM card. This action allows you to access the SIM card and inspect it for any issues that may be affecting its functionality. To eject the SIM card tray, you will need a SIM eject tool or a small paperclip.
Begin by locating the SIM card tray on your iPhone. The location of the SIM card tray may vary depending on the iPhone model, but it is commonly found on the side of the device. Once you have identified the SIM card tray, insert the SIM eject tool or the end of a straightened paperclip into the small pinhole next to the tray. Apply gentle pressure to push the tool into the pinhole, and the SIM card tray should pop out slightly.
Carefully grasp the ejected SIM card tray and pull it out of the iPhone. The tray will slide out smoothly, allowing you to access the SIM card housed within it. It's important to handle the tray and SIM card with care to avoid any damage during this process.
Ejecting the SIM card tray provides you with direct access to the SIM card, enabling you to proceed with the subsequent steps of removing, inspecting, and reinserting the card. This seamless action sets the stage for a thorough examination of the SIM card, ensuring that any potential issues are identified and addressed effectively.
With the SIM card tray successfully ejected, you are now prepared to move on to the next step of removing the SIM card from the tray. This smooth transition from ejecting the tray to handling the SIM card highlights the systematic approach to troubleshooting and resolving connectivity issues on your iPhone.
Ejecting the SIM card tray is a fundamental aspect of the SIM card reset process, positioning you to engage with the SIM card directly and take proactive measures to address any underlying issues. This deliberate action paves the way for a comprehensive evaluation of the SIM card, ultimately contributing to the potential resolution of connectivity challenges.
Step 3: Remove the SIM Card
With the SIM card tray successfully ejected from your iPhone, the next pivotal step in the process of resetting your iPhone's SIM card is to carefully remove the SIM card from the tray. This step allows you to inspect the SIM card for any visible damage, debris, or irregularities that may be contributing to connectivity issues.
Gently examine the SIM card tray to locate the SIM card. The SIM card is a small, rectangular chip that fits snugly within the tray. Take care to handle the SIM card delicately, avoiding any unnecessary bending or rough handling that could potentially damage the card.
Using your fingertips, carefully lift the SIM card from the tray, ensuring that you maintain a firm yet gentle grip to prevent the card from slipping or being damaged. If the SIM card appears to be stuck, refrain from using excessive force to dislodge it, as this could lead to unintended damage.
Once the SIM card is removed from the tray, take a moment to visually inspect it for any signs of damage or foreign debris. Look for scratches, dents, or discoloration on the metal contacts of the SIM card. Additionally, check for any dust or particles that may have accumulated on the surface of the card.
Inspecting the SIM card allows you to identify any potential issues that could be impacting its functionality. By conducting a thorough visual examination, you are better equipped to determine the condition of the SIM card and assess whether it may be contributing to the connectivity challenges you are experiencing.
Upon completing the inspection, set the SIM card aside in a safe and clean location, ensuring that it is protected from any potential damage or contamination. This careful handling of the SIM card reinforces the importance of treating the delicate component with the utmost care and attention.
With the SIM card successfully removed from the tray and inspected for any visible issues, you are now prepared to progress to the subsequent step of reinserting the SIM card into the tray. This seamless transition underscores the systematic approach to troubleshooting and resolving connectivity issues on your iPhone, setting the stage for a comprehensive SIM card reset process.
Removing the SIM card from the tray is a critical phase in the process of resetting your iPhone's SIM card, empowering you to engage directly with the SIM card and assess its condition. This deliberate action positions you to take proactive measures to address any potential issues, ultimately contributing to the potential resolution of connectivity challenges.
Step 4: Inspect the SIM Card
With the SIM card delicately removed from the tray, the next crucial step in the process of resetting your iPhone's SIM card involves a meticulous inspection of the SIM card itself. This step is pivotal in identifying any potential issues or irregularities that could be contributing to connectivity challenges.
Begin by closely examining the metal contacts on the SIM card. These contacts are essential for establishing a secure connection with the iPhone's SIM card slot. Look for any signs of damage, such as scratches, discoloration, or debris accumulation. These visual cues can provide valuable insights into the condition of the SIM card and its potential impact on connectivity.
In addition to examining the metal contacts, take note of the overall condition of the SIM card. Look for any visible signs of physical damage, such as cracks, dents, or warping. Even minor imperfections can disrupt the functionality of the SIM card, potentially leading to connectivity issues.
Inspect the edges and surfaces of the SIM card for any foreign debris or particles. Dust, dirt, or residue can accumulate over time and interfere with the proper insertion and functioning of the SIM card. A thorough visual inspection can reveal the presence of such contaminants, prompting the necessary cleaning or maintenance steps to restore the SIM card to optimal condition.
Furthermore, consider the compatibility of the SIM card with your iPhone. If you've recently obtained a new SIM card or made changes to your mobile carrier subscription, ensure that the SIM card is compatible with your iPhone model and network provider. Incompatibility issues can manifest as persistent connectivity problems, underscoring the importance of verifying the suitability of the SIM card for your device.
By conducting a comprehensive inspection of the SIM card, you are actively engaging in the troubleshooting process, seeking to identify and address any potential factors contributing to connectivity challenges. This proactive approach empowers you to make informed decisions regarding the next steps in the SIM card reset process, ultimately working towards the restoration of seamless connectivity on your iPhone.
With the inspection of the SIM card completed, you are now prepared to proceed to the subsequent step of reinserting the SIM card into the tray, marking a seamless transition in the SIM card reset process. This systematic approach underscores the significance of a thorough evaluation in troubleshooting and resolving connectivity issues, positioning you to take effective measures towards restoring optimal functionality to your iPhone.
Step 5: Reinsert the SIM Card
After carefully inspecting the SIM card and addressing any visible issues, the next pivotal step in resetting your iPhone's SIM card is to reinsert the SIM card into the tray. This action marks a crucial phase in the process, as it sets the stage for restoring seamless connectivity and functionality to your iPhone.
To begin, ensure that the SIM card tray is free from any debris or obstructions that could impede the insertion of the SIM card. Gently wipe the tray with a clean, dry cloth to remove any dust or particles, creating a clean and secure environment for the SIM card.
Next, position the SIM card above the tray, aligning the notched corner of the card with the corresponding notch in the tray. Take care to orient the SIM card correctly, as improper alignment can hinder the insertion process and potentially cause damage to the card or the tray.
With precision and steady hands, carefully place the SIM card back into the tray, ensuring that it fits snugly and securely within the designated slot. Apply gentle pressure to ensure that the SIM card is seated properly, taking care to avoid excessive force that could lead to misalignment or damage.
Once the SIM card is reinserted into the tray, gently slide the tray back into the iPhone until it is flush with the device. Ensure that the tray glides smoothly into place, indicating that the SIM card is securely positioned within the iPhone.
Reinserting the SIM card is a critical step in the SIM card reset process, signifying the transition from inspection to restoration. By handling the SIM card with care and precision, you are actively contributing to the seamless reintegration of the card into your iPhone, setting the stage for potential resolution of connectivity challenges.
With the SIM card securely reinserted into your iPhone, you are now prepared to progress to the final step of powering on your device. This seamless transition underscores the systematic approach to troubleshooting and resolving connectivity issues, positioning you to restore optimal functionality to your iPhone with confidence.
By following the step-by-step instructions outlined in this guide, you have gained the expertise to reset your iPhone's SIM card effectively, empowering you to address common connectivity challenges and enjoy uninterrupted use of your device.
Step 6: Power On Your iPhone
With the SIM card securely reinserted into the tray, the final step in the process of resetting your iPhone's SIM card involves powering on your device. This pivotal action marks the culmination of the systematic SIM card reset process, setting the stage for the potential restoration of seamless connectivity and functionality to your iPhone.
To power on your iPhone, press and hold the power button located on the right-hand side of the device. As the iPhone boots up, you'll be greeted by the familiar Apple logo, indicating that the device is initializing and preparing to regain full functionality.
As your iPhone powers on, it's essential to allow the device sufficient time to complete the startup process. Depending on the model and any recent software updates, the boot-up duration may vary. Exercise patience as your iPhone goes through the startup sequence, ensuring that the device is given ample time to initialize all essential components, including the SIM card and network connectivity.
Once your iPhone has successfully powered on, unlock the device and navigate to the home screen. Take a moment to observe the signal strength indicator, typically located in the upper-left corner of the screen. A strong signal icon signifies that the SIM card has been recognized, and the device is successfully connected to the mobile network.
With your iPhone powered on and the signal indicator displaying a strong connection, you have effectively completed the SIM card reset process. By following the step-by-step instructions outlined in this guide, you have demonstrated the knowledge and expertise to troubleshoot and address common connectivity challenges with confidence.
As you resume using your iPhone for calls, texts, and data access, monitor the device for any signs of improved connectivity and functionality. The successful completion of the SIM card reset process positions you to enjoy uninterrupted use of your device, free from the persistent "No SIM Card Installed" error or other connectivity issues.
By systematically resetting your iPhone's SIM card, you have taken proactive measures to address potential connectivity challenges, empowering you to maintain seamless communication and network access on your device. With the SIM card reset process successfully executed, you can now enjoy the full benefits of a properly functioning SIM card and optimized connectivity on your iPhone.
Conclusion
In conclusion, the process of resetting your iPhone's SIM card is a fundamental skill that empowers you to address common connectivity challenges with confidence. By following the step-by-step instructions outlined in this guide, you have gained valuable insights into the systematic approach to troubleshooting and resolving issues related to the SIM card and network connectivity on your iPhone.
The journey of resetting your iPhone's SIM card begins with the essential step of powering off your device, creating a secure environment for the subsequent actions. Ejecting the SIM card tray and delicately removing the SIM card pave the way for a thorough inspection, allowing you to identify potential issues that may be impacting its functionality.
The meticulous inspection of the SIM card provides valuable insights into its condition, enabling you to assess its compatibility, physical integrity, and the presence of any foreign debris. This proactive evaluation sets the stage for the seamless reinsertion of the SIM card into the tray, marking a pivotal phase in the restoration of optimal connectivity on your iPhone.
As the SIM card is securely reinserted, the final step of powering on your iPhone signifies the culmination of the SIM card reset process. With the device successfully initialized, you have the opportunity to enjoy uninterrupted use of your iPhone, free from the persistent "No SIM Card Installed" error or other connectivity issues.
By systematically resetting your iPhone's SIM card, you have demonstrated the knowledge and expertise to troubleshoot and address common connectivity challenges effectively. This proactive approach empowers you to maintain seamless communication and network access on your device, ultimately enhancing your overall iPhone experience.
As you continue to utilize your iPhone for calls, texts, and data access, the successful completion of the SIM card reset process positions you to enjoy the full benefits of a properly functioning SIM card and optimized connectivity. The skills and insights gained from this guide equip you to navigate potential connectivity challenges with ease, ensuring that you can make the most of your iPhone's capabilities.
In embracing the process of resetting your iPhone's SIM card, you have taken proactive measures to address potential connectivity challenges, ultimately contributing to the seamless functioning of your device. With the knowledge and confidence gained from this guide, you are well-prepared to tackle future connectivity issues and maintain a seamless iPhone experience.