Introduction
Properly placing a SIM card in your iPhone 13 is an essential step to ensure seamless connectivity and access to your mobile network. Whether you're setting up a new device or replacing an existing SIM card, understanding the correct procedure is crucial for a smooth and hassle-free experience. With the advancements in mobile technology, the process of inserting a SIM card has evolved, and the iPhone 13 features a streamlined design that requires precision and care when handling the SIM card tray.
In this tutorial, we will guide you through the step-by-step process of properly placing a SIM card in your iPhone 13. By following these instructions, you can confidently navigate the intricacies of the SIM card installation and optimize your iPhone 13 for cellular connectivity. From locating the SIM card tray to re-inserting it into your device, each step is designed to empower you with the knowledge and skills needed to complete this task with ease.
So, whether you're a seasoned iPhone user or a newcomer to the iOS ecosystem, this tutorial will equip you with the essential know-how to handle your iPhone 13's SIM card with confidence. Let's dive into the details and ensure that you can effortlessly manage your SIM card, enabling your iPhone 13 to stay connected and functional at all times.
Step 1: Turn off the iPhone 13
Before embarking on the process of placing a SIM card into your iPhone 13, it is crucial to begin by turning off the device. This simple yet essential step ensures that you can safely handle the device without the risk of causing any disruptions or damage during the SIM card installation.
Turning off your iPhone 13 is a straightforward process that can be accomplished in a few simple steps. Firstly, locate the side button, also known as the power button, on the right side of your device. This button serves a dual purpose, allowing you to power off your iPhone 13 and perform various other functions.
To power off your iPhone 13, press and hold the side button along with either the volume up or volume down button until the power off slider appears on the screen. Once the slider is displayed, simply drag it from left to right to turn off your device.
By powering off your iPhone 13 before proceeding with the SIM card installation, you minimize the risk of any electronic interference and ensure a safe environment for handling the device. This precautionary measure not only safeguards the integrity of your iPhone 13 but also sets the stage for a smooth and uninterrupted SIM card placement process.
With your iPhone 13 powered off, you are now ready to progress to the next step in the SIM card installation journey. This initial step lays the foundation for a seamless and secure process, allowing you to proceed with confidence and clarity as you navigate the remaining steps of placing the SIM card into your iPhone 13.
Taking the time to power off your device exemplifies the attention to detail and precision that is essential when handling delicate components such as the SIM card tray. With your iPhone 13 safely powered down, you are well-prepared to move forward and embark on the subsequent stages of this tutorial, bringing you closer to successfully placing your SIM card and optimizing your device for connectivity.
Step 2: Locate the SIM card tray
Locating the SIM card tray is a pivotal step in the process of placing a SIM card in your iPhone 13. The SIM card tray houses the SIM card and is designed to ensure a secure and stable connection with your mobile network. In the case of the iPhone 13, the SIM card tray is ingeniously integrated into the device's sleek and modern design, adding to the overall aesthetic appeal while serving a crucial functional purpose.
To locate the SIM card tray on your iPhone 13, you will need to identify the specific slot where the tray is situated. On the right side of the device, you will notice a small, recessed slot, often accompanied by a pinhole. This discreet slot is precisely where the SIM card tray is housed, and it plays a central role in facilitating the seamless installation of your SIM card.
The SIM card tray on the iPhone 13 is strategically positioned to ensure easy accessibility while maintaining a discreet and unobtrusive presence. Its placement aligns with the device's overall ergonomic design, allowing for a harmonious integration that does not compromise the device's visual appeal or functionality.
As you familiarize yourself with the location of the SIM card tray, take note of the subtle yet purposeful design elements that contribute to the iPhone 13's overall user experience. The precise positioning of the SIM card tray reflects Apple's commitment to intuitive and user-friendly design, ensuring that essential components are easily identifiable and readily accessible.
By locating the SIM card tray on your iPhone 13, you are taking a significant stride towards mastering the intricacies of the device and gaining a deeper understanding of its internal mechanisms. This foundational knowledge sets the stage for a seamless and successful SIM card installation process, empowering you to navigate the subsequent steps with confidence and precision.
With the SIM card tray identified, you are now poised to progress to the next phase of the tutorial, where you will delve into the practical steps of inserting and securing the SIM card in your iPhone 13. This crucial milestone brings you one step closer to optimizing your device for cellular connectivity and ensuring that your iPhone 13 is fully equipped to meet your communication needs.
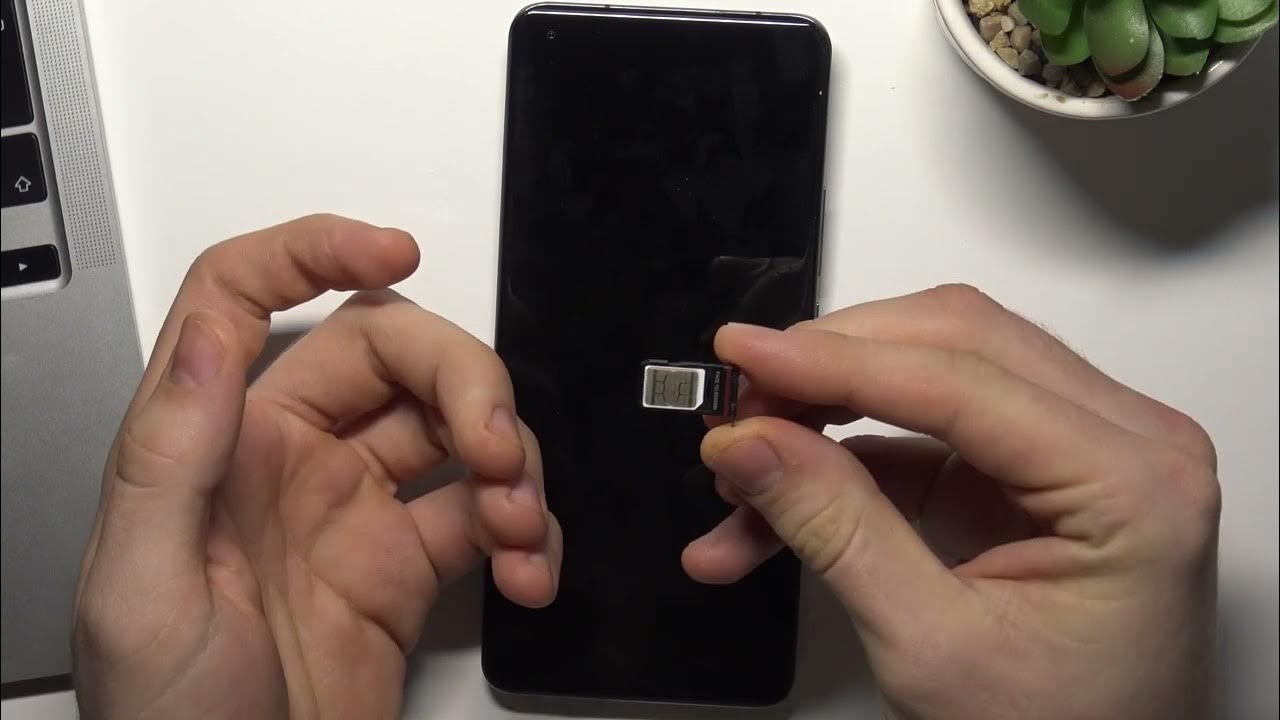
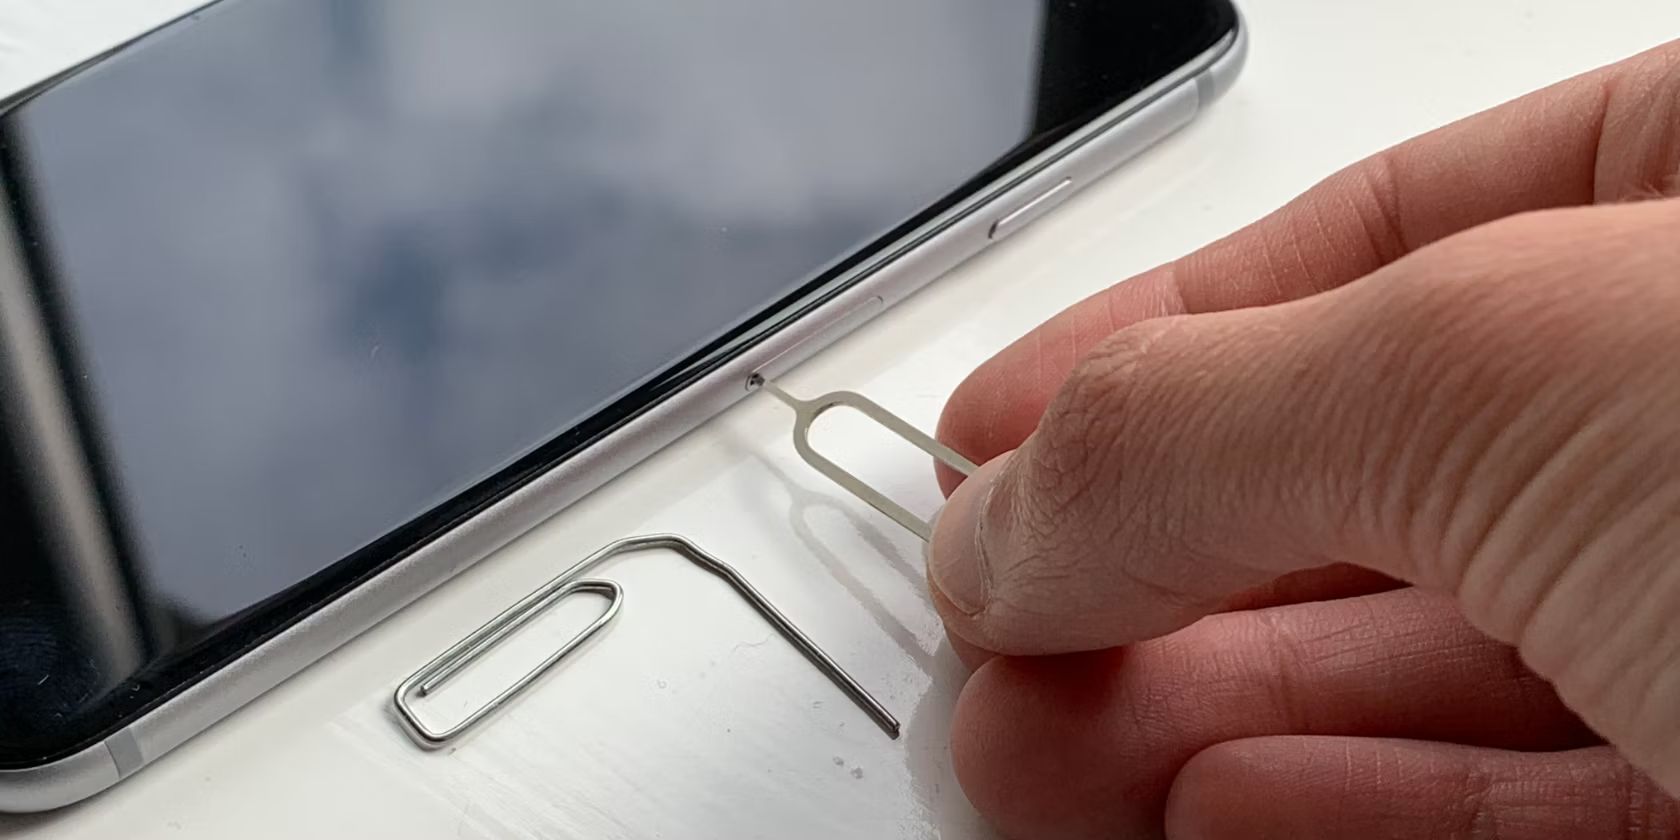
Step 3: Insert the SIM eject tool
Inserting the SIM eject tool is a pivotal step in the process of properly placing a SIM card in your iPhone 13. The SIM eject tool, a small yet indispensable accessory that accompanies your iPhone 13, serves as the key to unlocking the SIM card tray and gaining access to the compartment where the SIM card will be housed. This tiny tool embodies a blend of functionality and precision, playing a crucial role in facilitating the seamless installation of your SIM card.
To initiate the process, locate the SIM eject tool that was included in the packaging of your iPhone 13. The SIM eject tool is typically housed within a small compartment alongside the user manual and other accessories. Its compact size and discreet presence underscore its significance as an essential component in the SIM card installation journey.
Once you have retrieved the SIM eject tool, hold it firmly between your thumb and index finger, taking note of its sleek and minimalist design. The SIM eject tool features a slender, elongated shape with a fine, pointed tip, designed to navigate the intricacies of the SIM card tray with precision and ease. Its ergonomic design reflects Apple's commitment to user-centric functionality, ensuring that even the smallest components are crafted with meticulous attention to detail.
With the SIM eject tool in hand, position it carefully over the small pinhole located adjacent to the SIM card tray on your iPhone 13. The pinhole is strategically placed to align with the internal mechanism of the SIM card tray, allowing the SIM eject tool to engage with the tray and initiate its release.
Gently but firmly, exert pressure on the SIM eject tool, directing it into the pinhole with a steady, controlled motion. As the tool makes contact with the internal mechanism, you will feel a subtle resistance before the SIM card tray begins to disengage and protrude from the device.
By skillfully maneuvering the SIM eject tool, you effectively trigger the release mechanism within the SIM card tray, setting the stage for the subsequent steps of the SIM card installation process. This precise and deliberate action demonstrates the importance of the SIM eject tool as a catalyst for accessing the SIM card tray, underscoring its role as a fundamental component in the overall procedure.
With the SIM eject tool successfully engaged, you are now prepared to progress to the subsequent steps of the tutorial, where you will delve into the intricacies of removing the SIM card tray and securely placing the SIM card within it. This pivotal phase brings you one step closer to mastering the art of properly placing a SIM card in your iPhone 13, paving the way for a seamless and successful installation process.
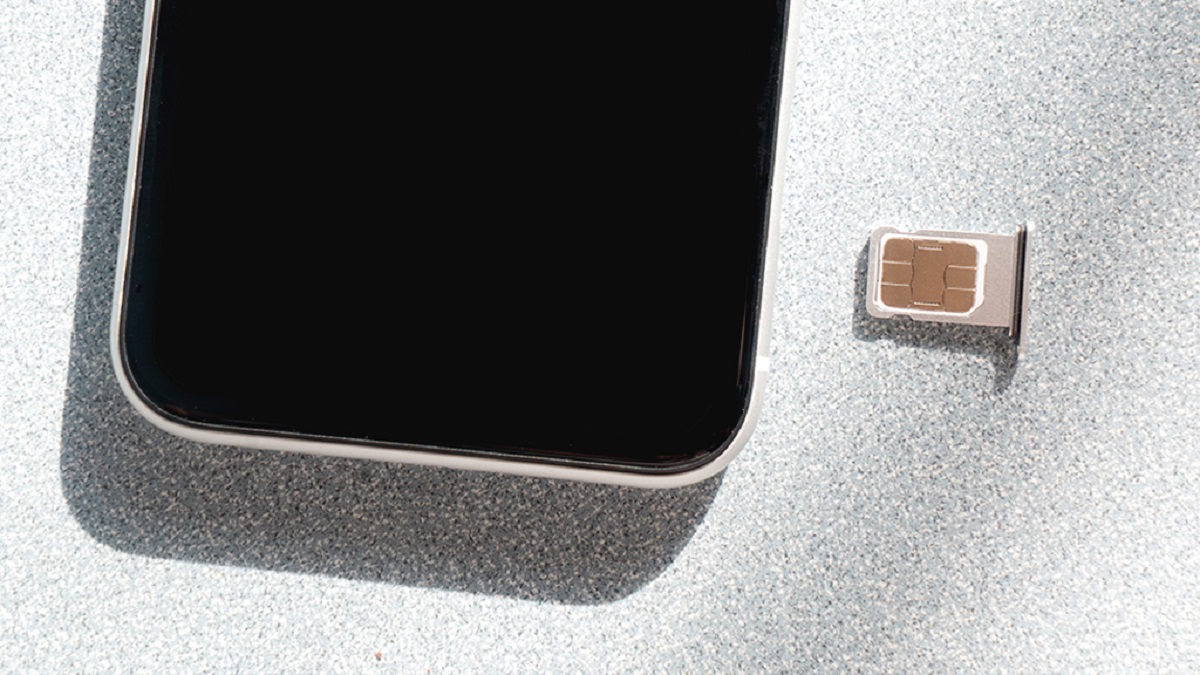
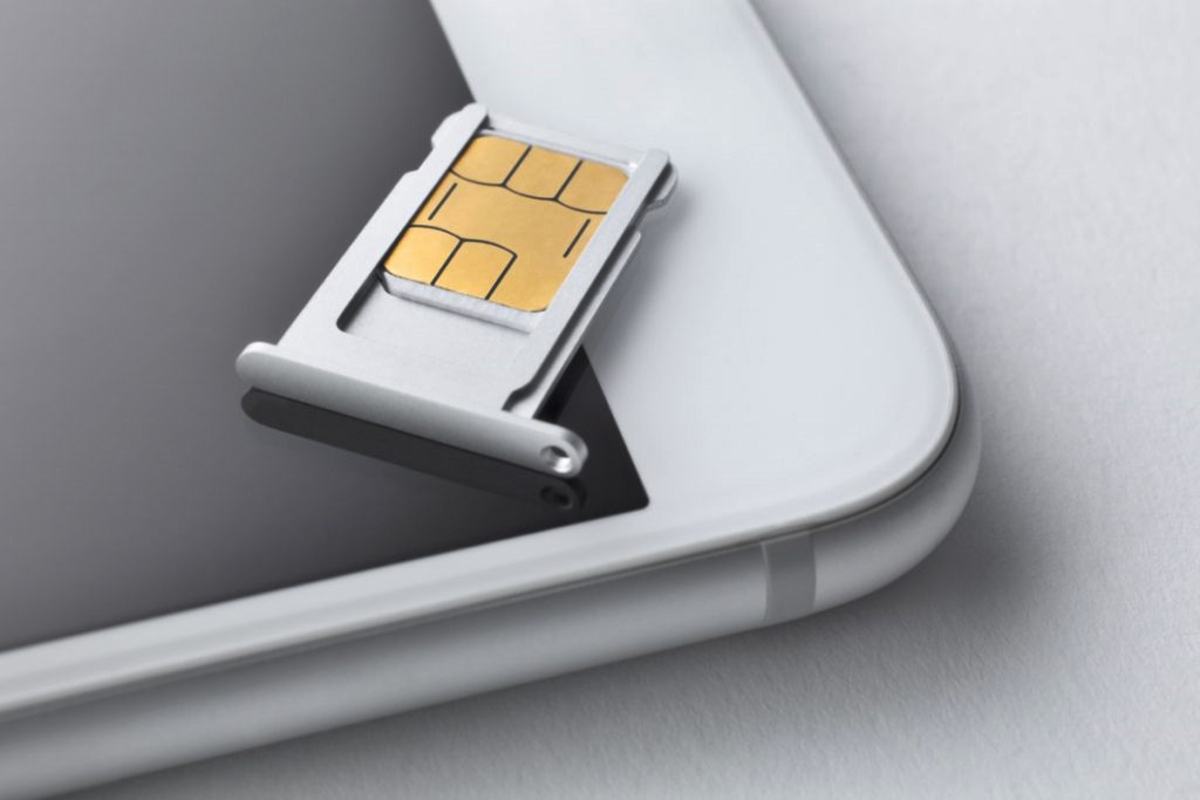
Step 4: Remove the SIM card tray
Once the SIM eject tool has successfully initiated the release of the SIM card tray from your iPhone 13, it's time to carefully remove the tray from the device. This crucial step sets the stage for seamlessly placing the SIM card within the tray, ensuring a secure and stable connection with your mobile network.
As the SIM card tray begins to protrude from the device, exercise caution and precision in handling it. Grasp the exposed edge of the tray with gentle yet firm pressure, ensuring that you maintain a steady grip to prevent any accidental slippage or mishandling. The SIM card tray is designed to slide out smoothly, guided by the controlled motion of your hand as you carefully extract it from your iPhone 13.
As the SIM card tray is gradually released from the device, take note of its compact dimensions and sleek construction. The tray features a subtle indentation that aligns with the contours of your iPhone 13, reflecting a harmonious integration that prioritizes both functionality and aesthetic appeal. Its refined design underscores Apple's commitment to precision engineering, ensuring that essential components seamlessly complement the device's overall form and function.
With the SIM card tray now in your hand, take a moment to inspect its interior, noting the designated slot where the SIM card will be placed. The tray is meticulously crafted to accommodate the SIM card with precision, providing a secure and stable housing for this vital component. As you familiarize yourself with the intricacies of the tray, appreciate the seamless marriage of design and functionality that defines this essential element of your iPhone 13.
By successfully removing the SIM card tray from your iPhone 13, you have reached a pivotal juncture in the SIM card installation process. This milestone signifies your progression towards seamlessly placing the SIM card within the tray, a critical step that will optimize your device for cellular connectivity. With the SIM card tray in hand, you are now primed to embark on the subsequent phase of the tutorial, where you will delve into the intricate steps of placing the SIM card within the tray, bringing you closer to completing the installation process with confidence and precision.
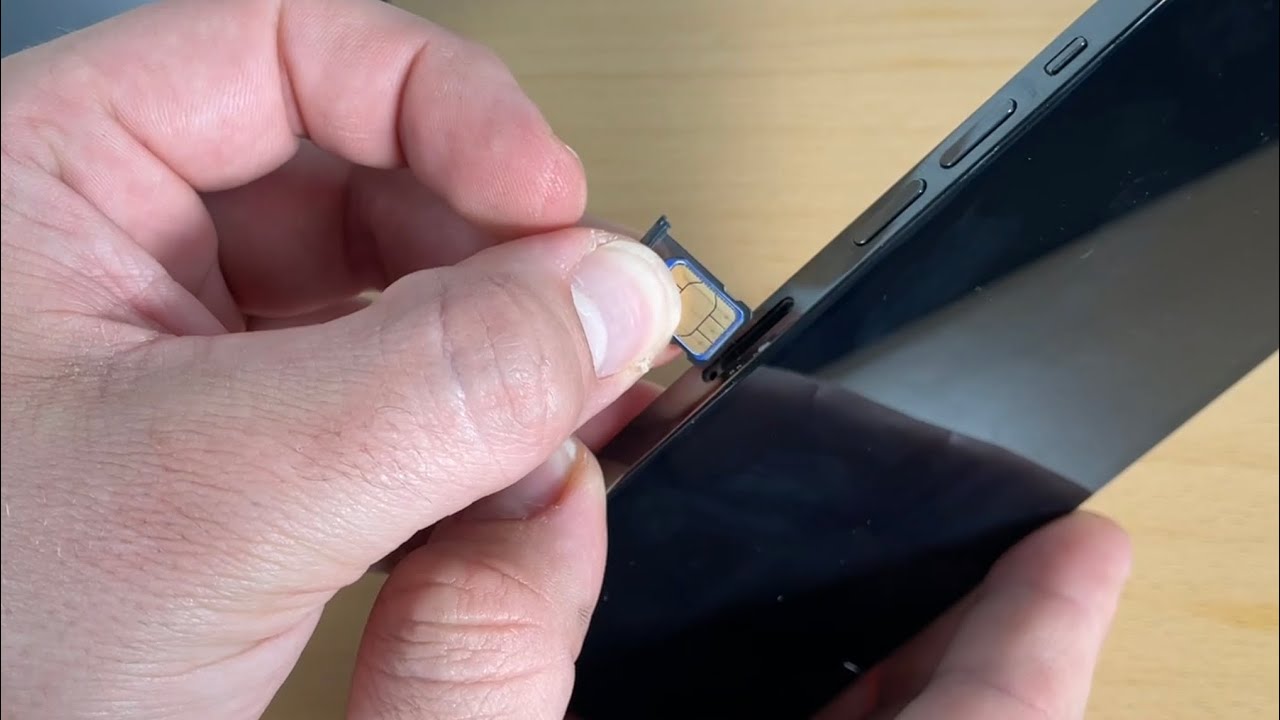
Step 5: Place the SIM card in the tray
With the SIM card tray in hand, the next pivotal step in the process of properly placing a SIM card in your iPhone 13 is to carefully position the SIM card within the designated slot on the tray. This step demands precision and attention to detail, ensuring that the SIM card is securely housed within the tray to facilitate seamless connectivity with your mobile network.
Begin by examining the SIM card tray and identifying the specific slot intended for the SIM card. The tray features a discreet compartment, meticulously designed to accommodate the SIM card with precision. Take note of the subtle grooves and contours within the slot, which align with the dimensions of the SIM card, ensuring a snug and secure fit.
Retrieve the SIM card from its packaging, handling it with care to avoid any damage to its delicate components. The SIM card is a diminutive yet essential element of your iPhone 13, embodying the gateway to your mobile network connectivity. Its compact size belies its significance, underscoring the importance of handling it with the utmost delicacy and attention.
Position the SIM card over the designated slot on the tray, aligning its edges with the contours of the slot to ensure a seamless fit. The SIM card features a notch that corresponds to the orientation of the slot, allowing for effortless alignment and insertion. With steady and controlled pressure, gently lower the SIM card into the slot, ensuring that it rests securely within the confines of the tray.
As the SIM card settles into place, take a moment to appreciate the precision and finesse required to seamlessly position this vital component within the tray. The snug fit and secure placement of the SIM card are paramount, ensuring a stable and reliable connection with your mobile network. This meticulous process underscores the attention to detail and care that define the installation of the SIM card in your iPhone 13.
By successfully placing the SIM card within the tray, you have achieved a significant milestone in the installation process, setting the stage for the subsequent step of re-inserting the SIM card tray into your iPhone 13. This pivotal accomplishment brings you one step closer to optimizing your device for seamless connectivity, underscoring your commitment to mastering the art of properly placing a SIM card in your iPhone 13.
Step 6: Re-insert the SIM card tray
With the SIM card securely placed within the tray, the next critical step in the process of properly installing a SIM card in your iPhone 13 is to delicately re-insert the SIM card tray into the device. This step requires finesse and precision, ensuring that the tray seamlessly integrates with your iPhone 13 to establish a secure and stable connection with your mobile network.
Begin by carefully aligning the SIM card tray with the corresponding slot on the right side of your iPhone 13. The tray is designed to slide smoothly into the slot, guided by the subtle contours and dimensions that harmonize with the device's sleek and ergonomic design. As you position the tray, ensure that it glides effortlessly into place, reflecting a seamless integration that underscores Apple's commitment to user-friendly functionality.
Exert gentle and controlled pressure as you delicately guide the SIM card tray back into the device, taking note of the subtle resistance that indicates its secure placement. The tray should fit snugly within the slot, aligning with the device's contours to achieve a seamless and unobtrusive profile. This precision ensures that the SIM card tray is securely housed within your iPhone 13, setting the stage for optimal connectivity and network access.
As the SIM card tray seamlessly re-integrates with your iPhone 13, take a moment to appreciate the meticulous attention to detail that defines this crucial step. The smooth and effortless insertion of the tray reflects your commitment to mastering the art of properly placing a SIM card in your iPhone 13, underscoring your dedication to optimizing your device for seamless connectivity.
By successfully re-inserting the SIM card tray into your iPhone 13, you have reached a pivotal juncture in the installation process, bringing you one step closer to ensuring that your device is fully equipped to meet your communication needs. This accomplishment signifies your mastery of the intricate steps involved in handling the SIM card tray, underscoring your ability to navigate the complexities of mobile device management with confidence and precision.
Step 7: Turn on the iPhone 13
With the SIM card securely placed and the tray re-inserted into your iPhone 13, the final step in the process of properly placing a SIM card is to power on your device. This pivotal action marks the culmination of the installation process, initiating the activation of your iPhone 13 and signaling the seamless integration of the SIM card with your device's cellular network.
To power on your iPhone 13, press and hold the side button, located on the right side of the device, until the Apple logo appears on the screen. As the device powers up, take note of the fluid and efficient startup process, reflecting the advanced engineering and seamless functionality that define the iPhone 13. The vibrant display comes to life, signaling the device's readiness to connect with your mobile network and embark on its journey as your trusted communication companion.
As your iPhone 13 powers on, observe the familiar interface and intuitive user experience that are emblematic of Apple's commitment to user-centric design. The device seamlessly transitions from the powered-off state to an active and responsive mode, ready to serve as your gateway to a world of connectivity and communication. The seamless activation of your iPhone 13 underscores the successful placement of the SIM card and the meticulous steps taken to ensure its secure integration with the device.
With your iPhone 13 now powered on and fully operational, take a moment to appreciate the successful completion of the SIM card installation process. The device stands poised to deliver a seamless and reliable mobile experience, underpinned by the secure placement of the SIM card and the meticulous attention to detail that has defined each step of the installation journey.
As your iPhone 13 completes its startup sequence, revel in the knowledge that your device is now fully equipped to keep you connected, informed, and empowered. The successful activation of your iPhone 13 signifies your adeptness at managing the intricacies of mobile device installation, underscoring your ability to navigate the complexities of technology with confidence and precision.
By turning on your iPhone 13 and completing the SIM card installation process, you have demonstrated your mastery of this essential task, ensuring that your device is primed to serve as your steadfast companion in the dynamic world of mobile communication.
Conclusion
In conclusion, properly placing a SIM card in your iPhone 13 is a fundamental task that encompasses precision, attention to detail, and a deep understanding of the device's internal mechanisms. Throughout this tutorial, we have embarked on a comprehensive journey, guiding you through each step with clarity and insight. From powering off the device to successfully activating your iPhone 13, every stage of the process has been meticulously outlined to empower you with the knowledge and skills needed to master this essential task.
By turning off your iPhone 13 at the outset, you set the stage for a safe and uninterrupted SIM card installation process, showcasing your commitment to meticulous device management. Locating the SIM card tray and skillfully engaging the SIM eject tool underscored your ability to navigate the intricacies of the device's design, reflecting a keen understanding of its internal components.
The careful removal and re-insertion of the SIM card tray demonstrated your precision and finesse, highlighting your dedication to seamlessly integrating the tray with your iPhone 13. Placing the SIM card within the tray showcased your attention to detail, ensuring a secure fit and optimal connectivity. Finally, the successful activation of your iPhone 13 marked the triumphant culmination of the installation process, underscoring your adeptness at managing the complexities of mobile device functionality.
As you reflect on this tutorial, you can take pride in your newfound mastery of properly placing a SIM card in your iPhone 13. Your commitment to precision, attention to detail, and seamless execution have equipped you with the essential skills to navigate the intricacies of mobile device management with confidence and expertise.
With your iPhone 13 now fully equipped to keep you connected and engaged, you stand poised to embark on a seamless and reliable mobile experience, underpinned by the successful placement of the SIM card and the meticulous attention to detail that has defined each step of the installation journey.
As you integrate this newfound knowledge into your mobile device management repertoire, you can approach future tasks with the same confidence and precision, ensuring that your iPhone 13 remains optimized for seamless connectivity and reliable network access. This accomplishment signifies your adeptness at managing the intricacies of mobile device installation, underscoring your ability to navigate the complexities of technology with confidence and precision.