Introduction
Welcome to the comprehensive guide on safely extracting a SIM card from the iPhone 13. The SIM card, or Subscriber Identity Module, is a crucial component that enables your iPhone to connect to a cellular network, allowing you to make calls, send messages, and access mobile data. Whether you need to switch to a new SIM card or troubleshoot connectivity issues, understanding how to safely remove and reinsert the SIM card is essential for iPhone users.
In this guide, we will walk you through the step-by-step process of safely extracting the SIM card from your iPhone 13. We will cover everything from gathering the necessary tools to locating the SIM card tray and using the SIM eject tool. By following these instructions, you can confidently manage your iPhone's SIM card without the fear of causing any damage to your device.
So, if you're ready to learn the proper technique for handling your iPhone 13's SIM card, let's dive into the details and ensure that you have the knowledge and skills to perform this task with ease and confidence.
Step 1: Gather the necessary tools
Before embarking on the process of extracting the SIM card from your iPhone 13, it's essential to gather the necessary tools to ensure a smooth and hassle-free experience. Here's what you'll need:
-
SIM Eject Tool: This small, metal tool is specifically designed for ejecting the SIM card tray from your iPhone. It usually comes packaged with the device or can be obtained separately from an Apple Store or authorized retailer. The SIM eject tool features a tiny, pointed end that fits into the SIM tray's eject hole, allowing for easy removal.
-
Good Lighting: Adequate lighting is crucial for effectively locating the SIM card tray on your iPhone 13. Whether you're indoors or outdoors, ensure that you have ample light to clearly see the device's exterior and identify the SIM card tray's position.
-
Stable Work Surface: To prevent any accidental slips or drops, it's advisable to perform the SIM card extraction process on a stable and flat work surface. This could be a table, desk, or any other surface that provides a secure area for handling your iPhone.
-
Microfiber Cloth: A soft microfiber cloth can be used to wipe the iPhone's exterior, ensuring that the device is free from dust, fingerprints, or any other debris that could potentially interfere with the SIM card extraction process.
By having these tools at your disposal, you can approach the SIM card extraction process with confidence and peace of mind, knowing that you have everything you need to complete the task successfully. With the tools in hand, you're now ready to move on to the next step and locate the SIM card tray on your iPhone 13.
Step 2: Locate the SIM card tray
Locating the SIM card tray on your iPhone 13 is the crucial first step in the process of safely extracting the SIM card. The SIM card tray houses the SIM card and is designed to be easily accessible for removal and insertion. To locate the SIM card tray on your iPhone 13, follow these detailed steps:
-
Identify the Device Model: Before proceeding, it's important to identify the specific model of your iPhone 13. The location of the SIM card tray may vary slightly depending on the model. For the iPhone 13, the SIM card tray is typically located on the right-hand side of the device.
-
Inspect the Device Exterior: With good lighting and a stable work surface, carefully examine the exterior of your iPhone 13. The SIM card tray is usually located along the right edge of the device, near the middle or slightly below the side button.
-
Locate the SIM Card Tray Slot: Once you've identified the right-hand side of your iPhone 13, look for a small, recessed slot. This slot is the entry point for the SIM eject tool and indicates the position of the SIM card tray. It may feature a tiny pinhole or a small indentation, signaling the presence of the SIM card tray beneath the surface.
-
Differentiate from Other Openings: As you inspect the device's exterior, it's important to differentiate the SIM card tray slot from other openings such as the volume buttons or the side button. The SIM card tray slot is typically the only small, discreet opening along the right edge of the iPhone 13.
By carefully following these steps and paying close attention to the device's exterior, you can confidently locate the SIM card tray on your iPhone 13. Once you have successfully identified the SIM card tray's position, you are ready to proceed to the next step and use the SIM eject tool to safely remove the SIM card.
With the SIM card tray located, you're now equipped with the knowledge to move forward in the SIM card extraction process. This critical step sets the stage for the safe and successful removal of the SIM card from your iPhone 13.
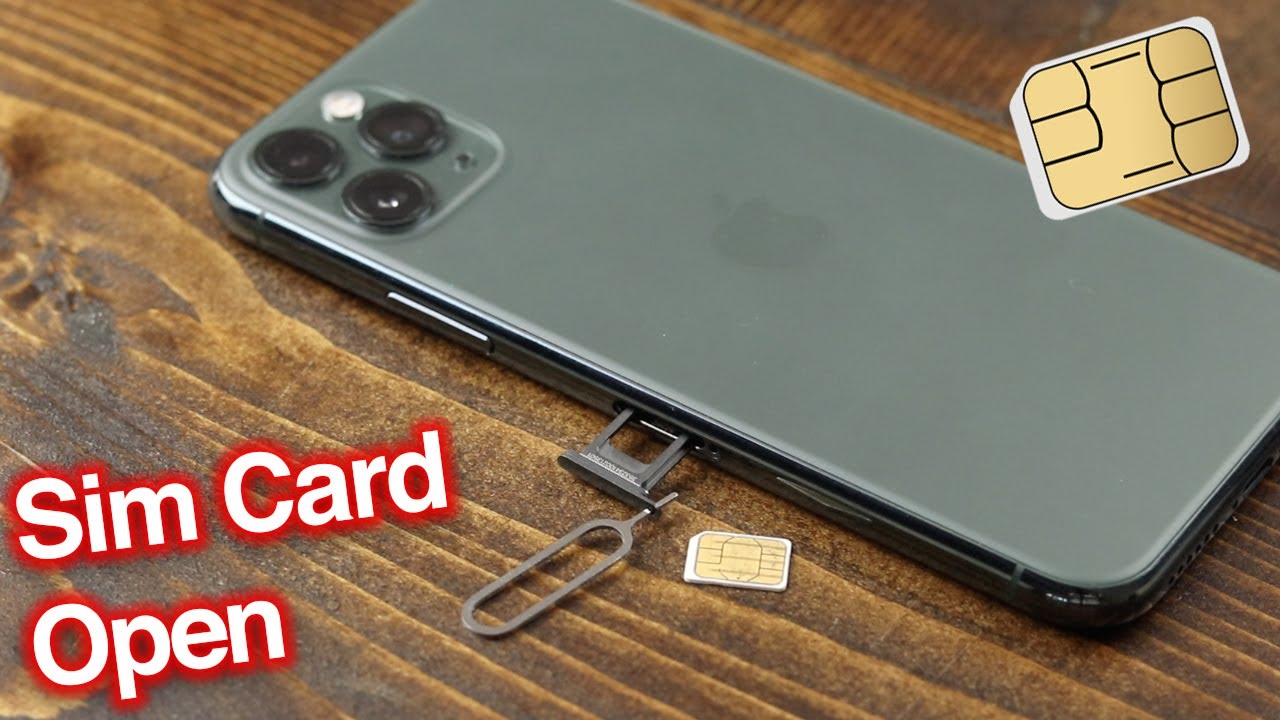
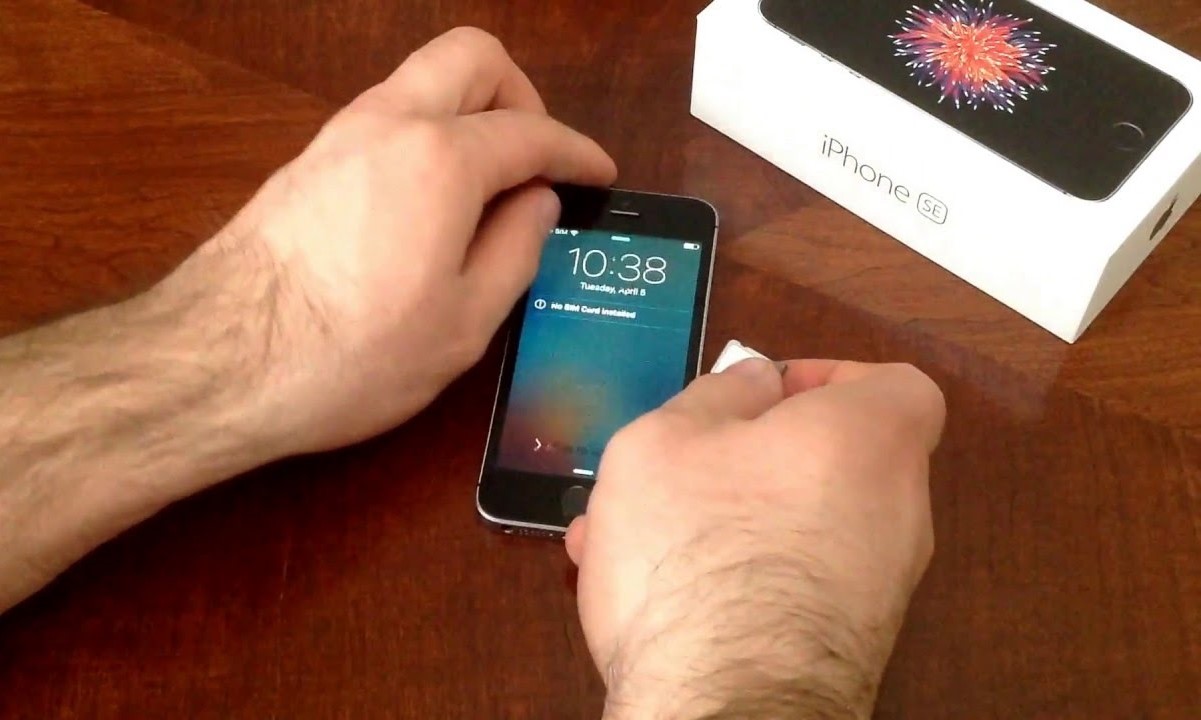
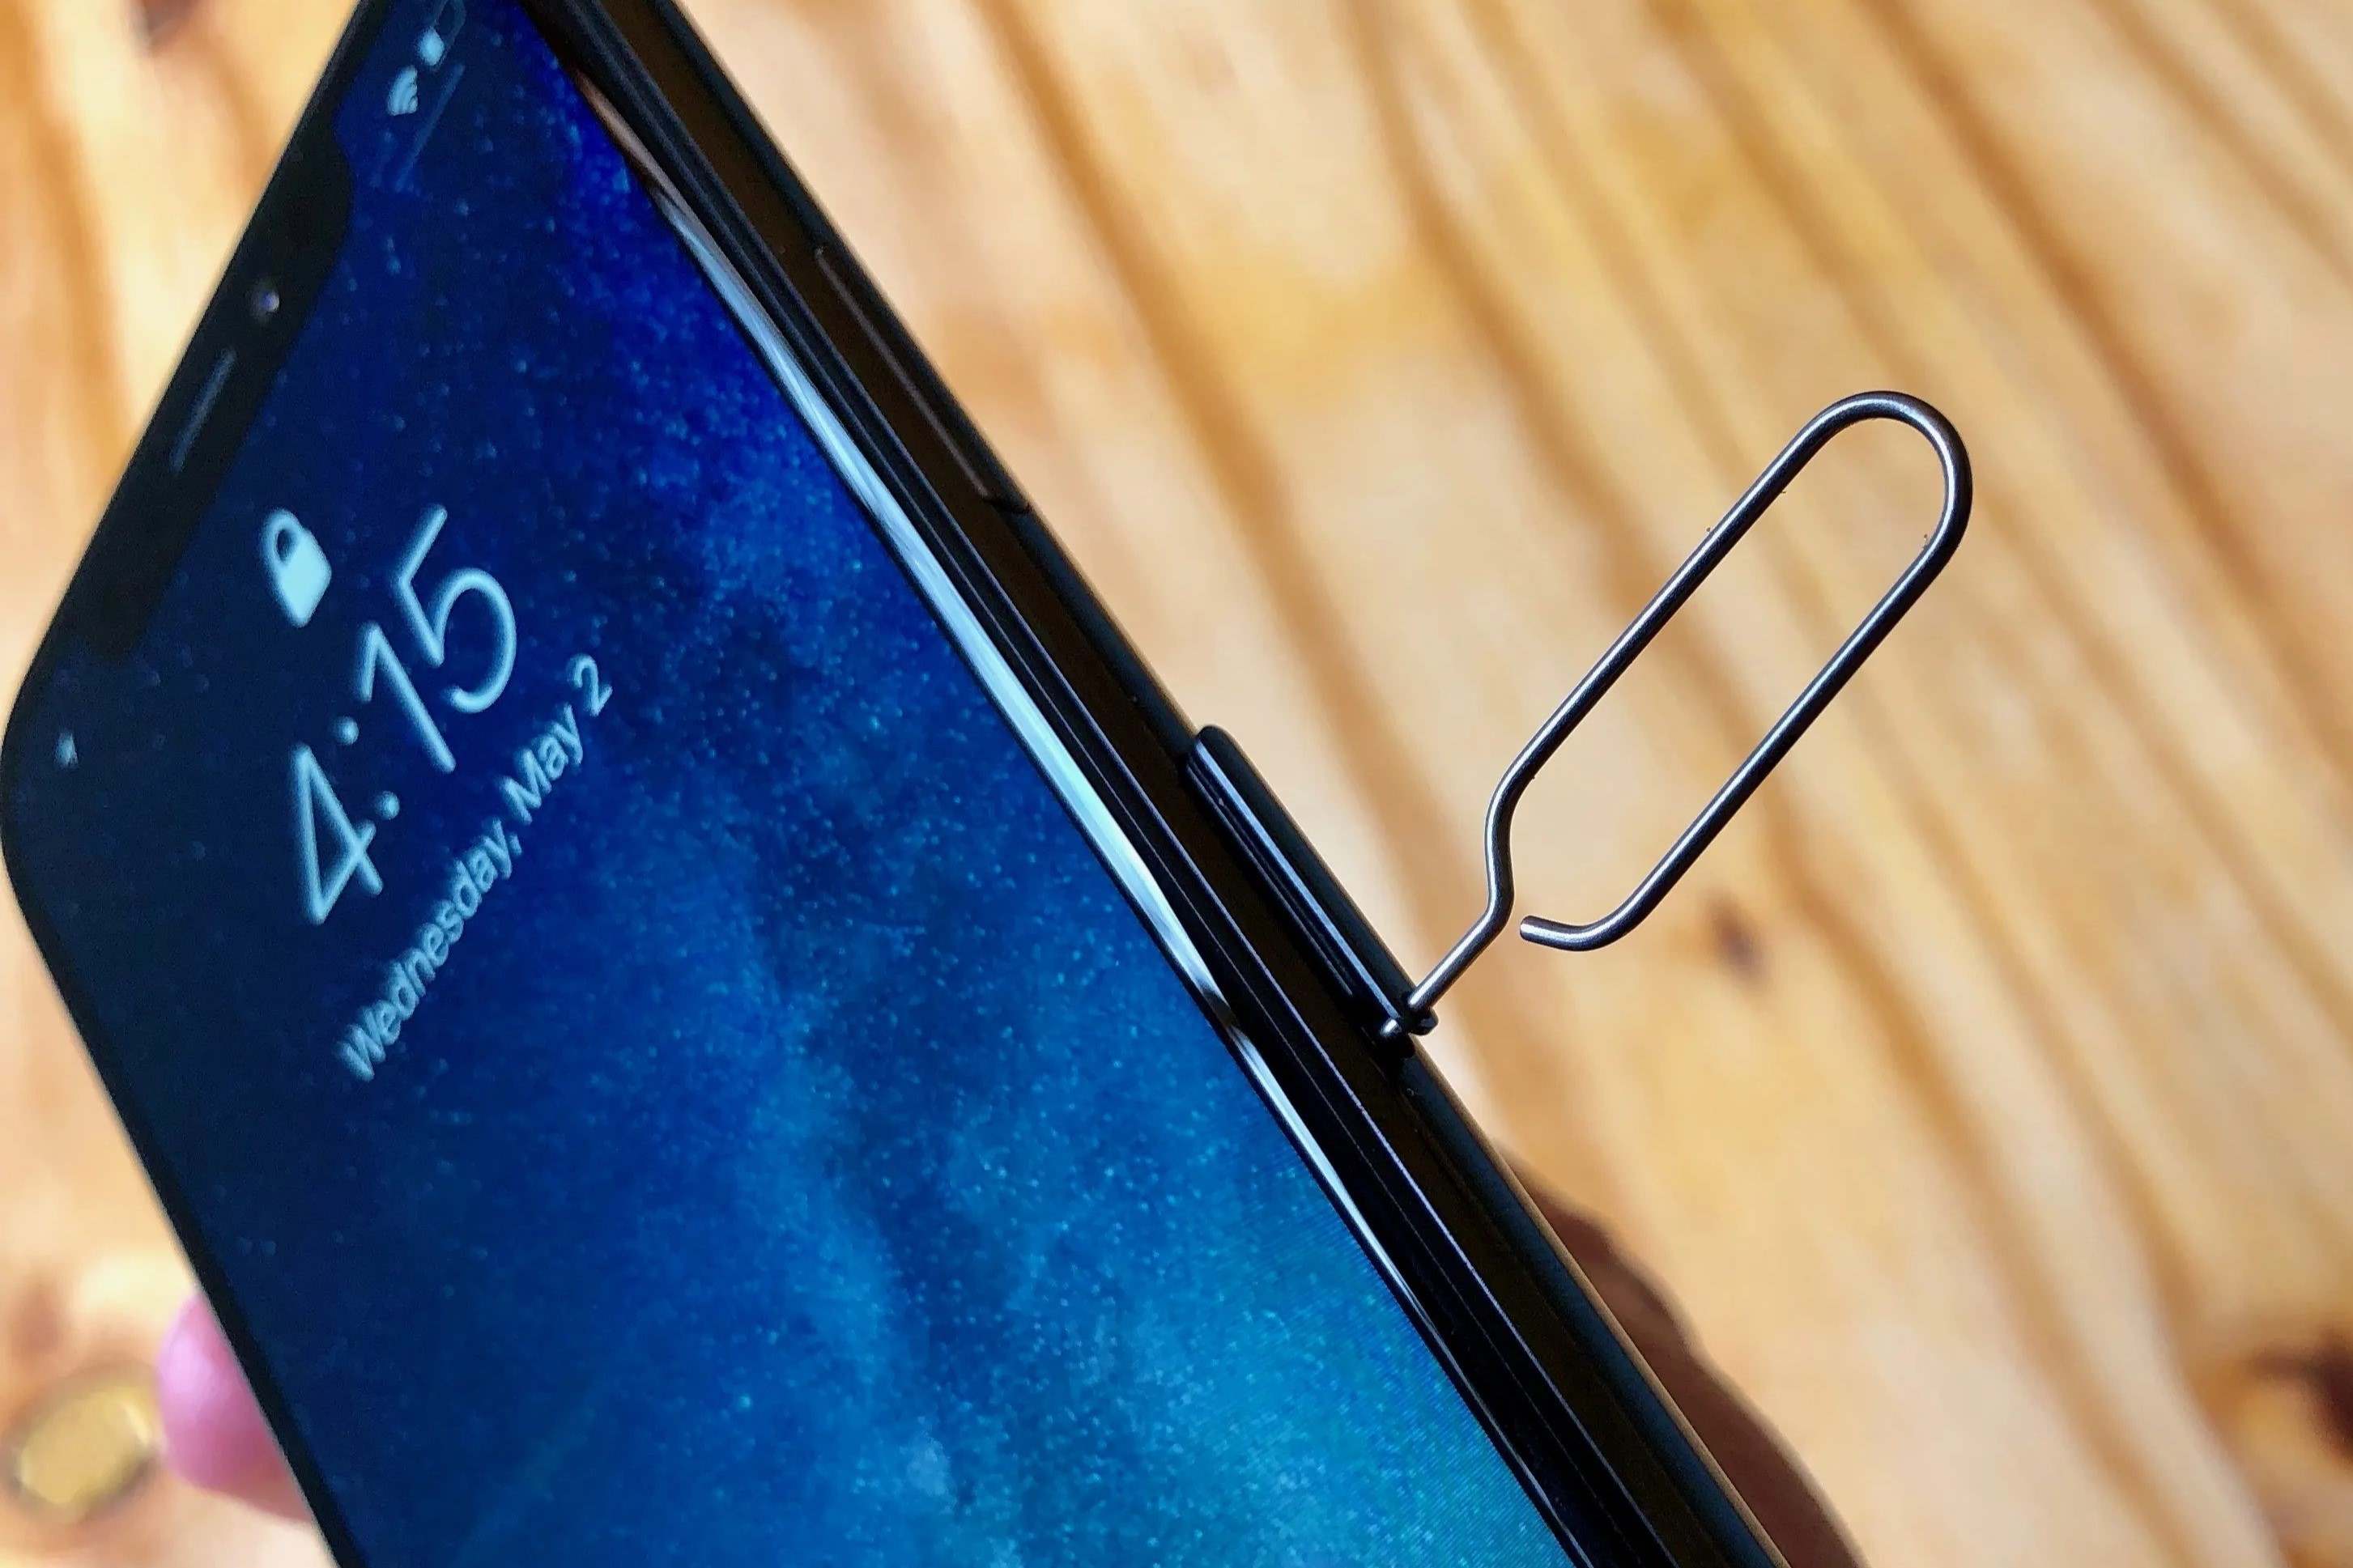
Step 3: Use the SIM eject tool
Now that you have successfully located the SIM card tray on your iPhone 13, it's time to utilize the SIM eject tool to safely remove the SIM card. The SIM eject tool, a small and pointed metal tool, is specifically designed to facilitate the effortless extraction of the SIM card tray from your device. Here's a detailed breakdown of the steps involved in using the SIM eject tool:
-
Retrieve the SIM Eject Tool: Ensure that you have the SIM eject tool readily available. This tool is often included in the original iPhone packaging or can be obtained separately from an Apple Store or authorized retailer. If you have the SIM eject tool at hand, proceed to the next step.
-
Insert the SIM Eject Tool: Take the SIM eject tool and carefully insert the pointed end into the small pinhole or indentation located next to the SIM card tray slot on your iPhone 13. Apply gentle pressure to push the tool into the hole, and you will feel a slight resistance as the tool engages with the internal mechanism.
-
Apply Even Pressure: Once the SIM eject tool is inserted, exert even pressure to depress the internal mechanism within the SIM card tray. This action will cause the tray to pop out slightly from the device, allowing you to grasp and remove it with ease.
-
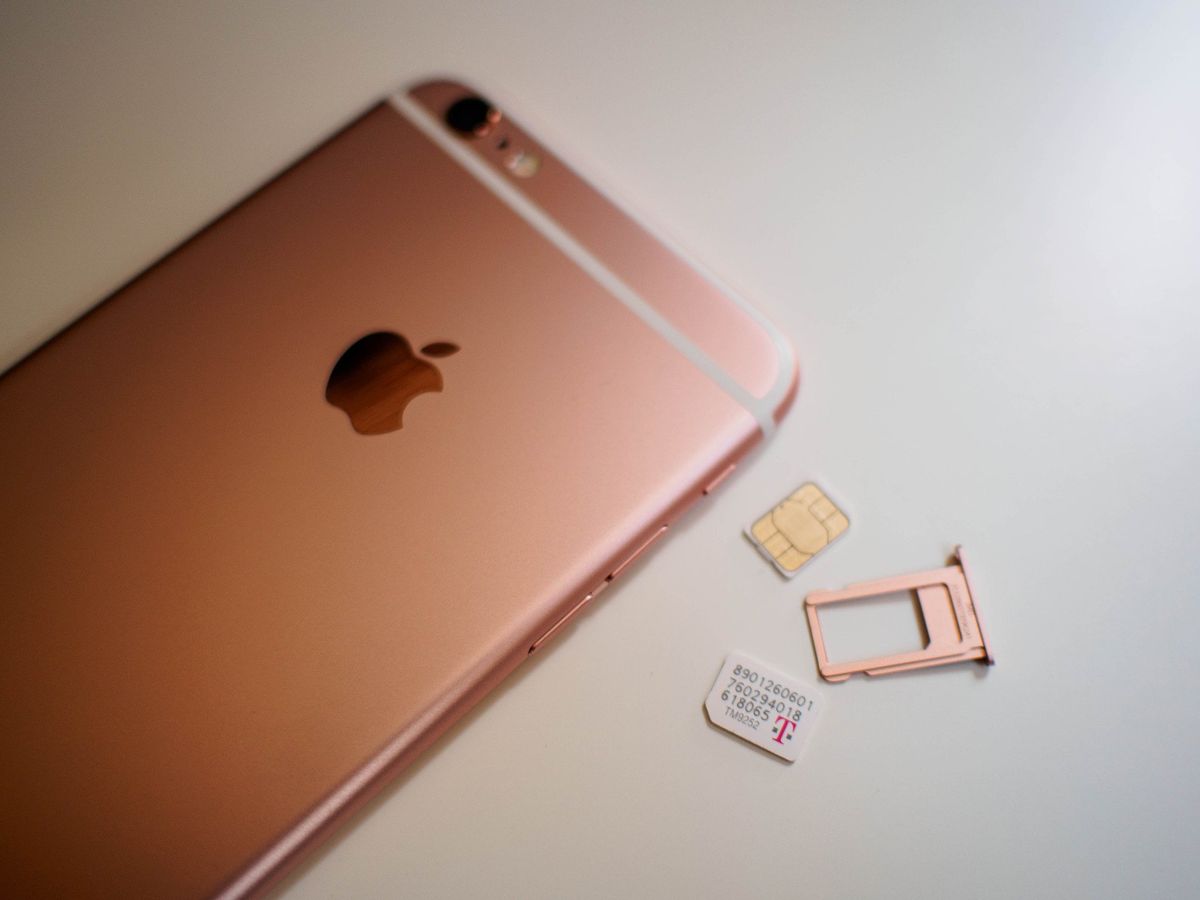
Remove the SIM Card Tray: With the SIM card tray partially ejected, gently pull it out from the device using your fingers. Exercise caution and ensure a steady grip to prevent any accidental drops or damage to the SIM card tray.
By following these steps, you can effectively utilize the SIM eject tool to safely remove the SIM card tray from your iPhone 13. This process is designed to be straightforward and user-friendly, allowing you to handle the extraction with confidence and precision. With the SIM card tray in hand, you're now ready to proceed to the next step and carefully remove the SIM card from the tray.
With the SIM card tray successfully ejected, you have completed a crucial phase in the process of safely extracting the SIM card from your iPhone 13. This step sets the stage for the seamless removal of the SIM card, ensuring that you can proceed with confidence and precision.
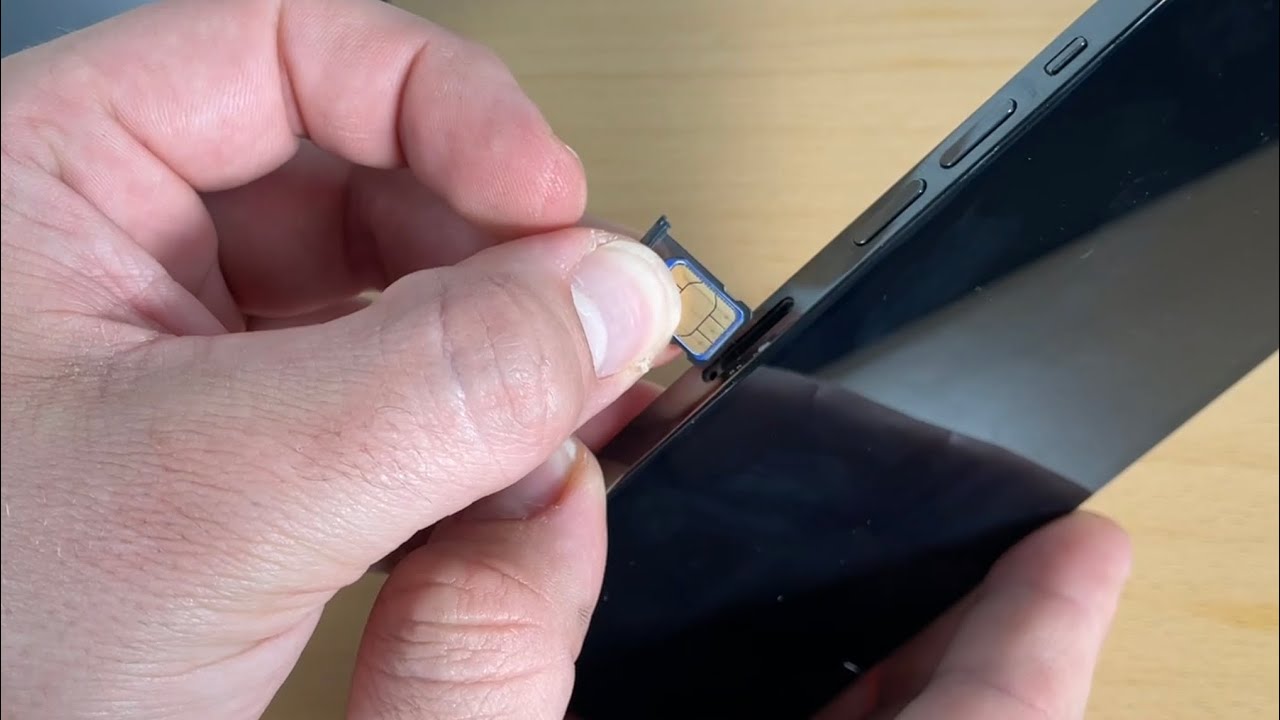
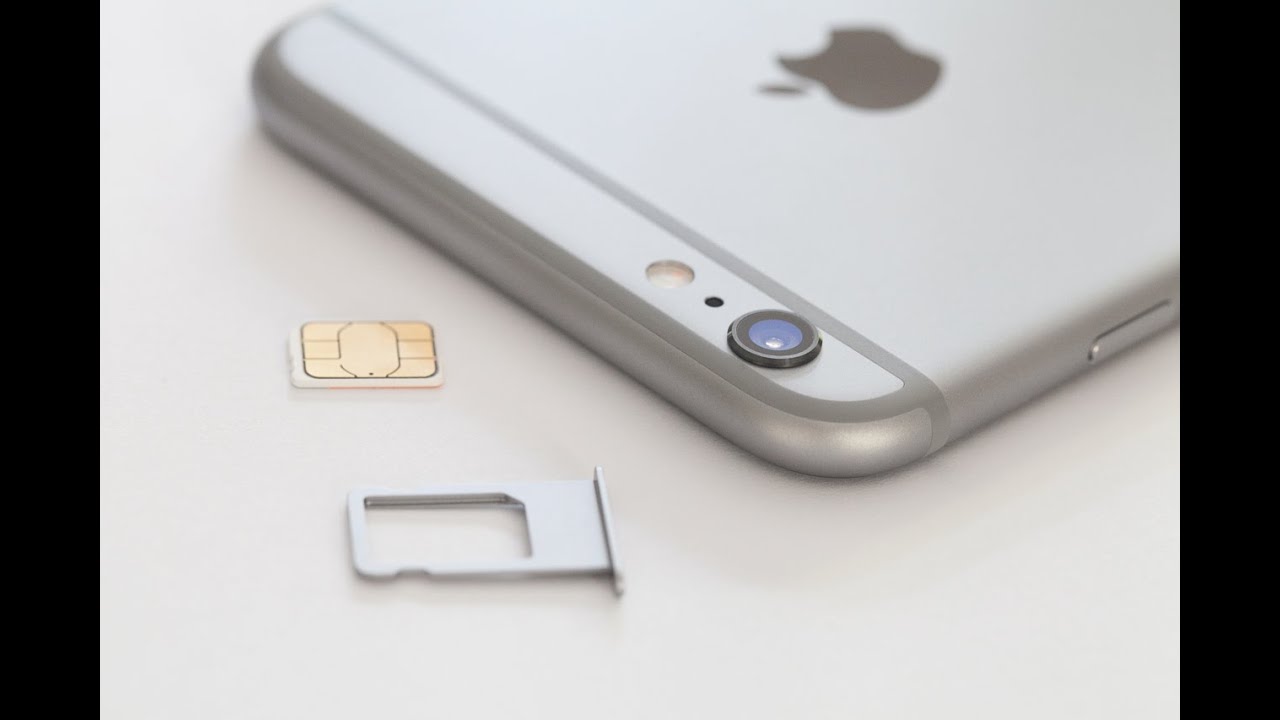
Step 4: Remove the SIM card
With the SIM card tray successfully ejected from your iPhone 13, the next step is to carefully remove the SIM card from the tray. The SIM card is a small, rectangular chip that stores crucial information related to your cellular network connectivity. It's essential to handle the SIM card with care to avoid any damage or misalignment. Here's a detailed guide on how to safely remove the SIM card from the tray:
-
Inspect the SIM Card Tray: Before proceeding, take a moment to examine the SIM card tray and locate the position of the SIM card. The SIM card is typically nestled within a small, designated slot within the tray, often accompanied by a diagram indicating the correct orientation for insertion.
-
Gently Remove the SIM Card: Using your fingers, carefully lift the SIM card from the tray, ensuring a delicate touch to avoid bending or damaging the card. It's important to maintain a steady grip while handling the SIM card, as it is a delicate component that requires precise handling.
-
Observe the Orientation: As you remove the SIM card, take note of its orientation within the tray. The SIM card features a specific shape with one corner angled or notched, indicating the correct alignment for insertion into the device. By observing the orientation, you can ensure that the SIM card is reinserted correctly during the next steps.
-
Inspect for Damage: While the SIM card is in your hand, take a moment to inspect it for any signs of damage, such as scratches, bends, or discoloration. If the SIM card appears to be in good condition, proceed to the next step. However, if you notice any damage, it may be necessary to replace the SIM card before reinserting it into your iPhone 13.
By following these steps, you can safely and effectively remove the SIM card from the tray, setting the stage for the subsequent reinsertion process. With the SIM card in hand, you are now prepared to proceed to the final step and reinsert the SIM card tray into your iPhone 13.
Step 5: Reinsert the SIM card tray
After safely removing the SIM card from your iPhone 13, the final step in the process is to reinsert the SIM card tray back into the device. This step is crucial for restoring the connectivity and functionality of your iPhone, ensuring that the SIM card is securely placed within the device. Here's a detailed guide on how to reinsert the SIM card tray with precision and care:
-
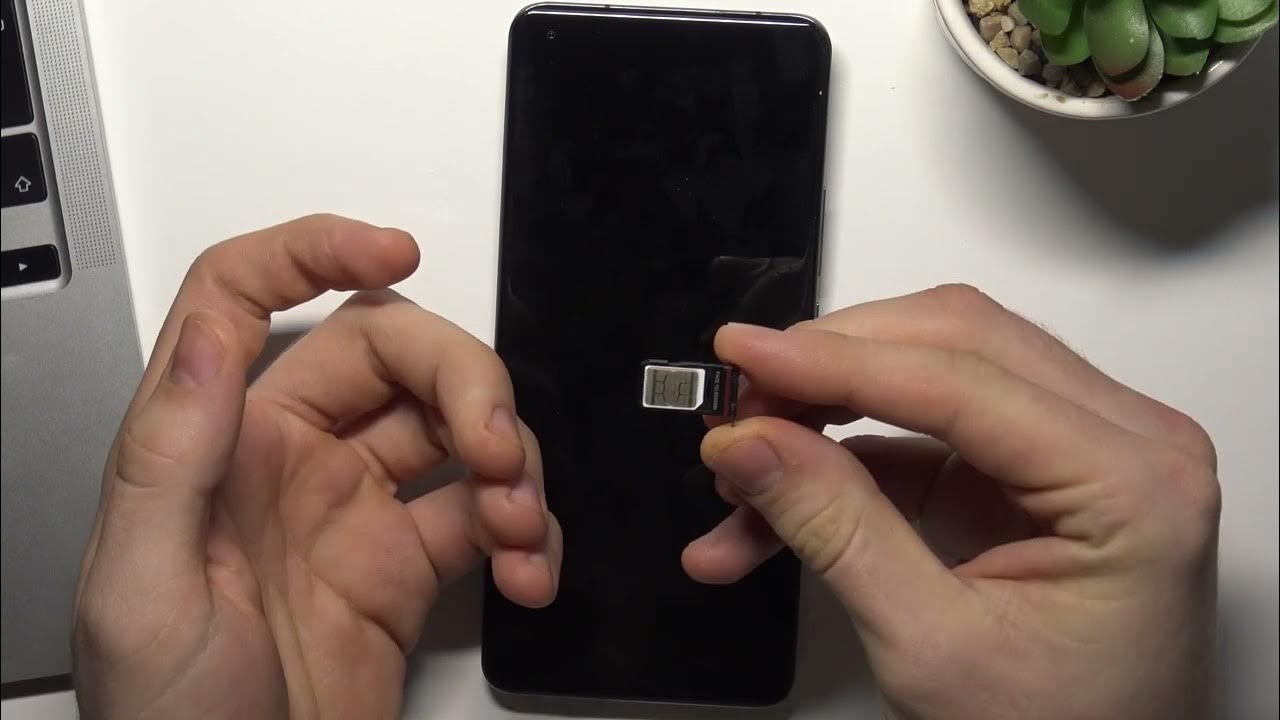
Prepare the SIM Card Tray: Before reinserting the tray, take a moment to ensure that it is free from any dust, debris, or foreign particles that may have accumulated during the removal process. Use a soft microfiber cloth to gently wipe the tray, ensuring that it is clean and ready for the SIM card.
-
Position the SIM Card: With the SIM card in hand, carefully align it with the designated slot within the SIM card tray. Pay close attention to the orientation of the SIM card, ensuring that the angled or notched corner matches the corresponding indicator within the tray. This alignment is essential for the proper functioning of the SIM card within the device.
-
Place the SIM Card into the Tray: Once the SIM card is aligned, gently lower it into the designated slot within the SIM card tray. Ensure that the card sits flush and level within the tray, without any protrusions or misalignments. A secure fit is crucial for maintaining a stable connection and preventing any disruptions to your cellular service.
-
Insert the SIM Card Tray: With the SIM card securely placed within the tray, carefully position the tray near the SIM card slot on your iPhone 13. Align the tray with the device's housing and gently slide it back into place, ensuring a smooth and seamless insertion. Apply even pressure to the tray, allowing it to slot back into the device without resistance.
-
Verify the Secure Fit: Once the SIM card tray is fully inserted, take a moment to verify that it sits flush with the device's exterior. Ensure that the tray is securely positioned and that there are no gaps or uneven edges. A secure fit indicates that the SIM card is properly housed within the device, ready to enable cellular connectivity.
By following these steps, you can successfully reinsert the SIM card tray into your iPhone 13, completing the process of safely managing your device's SIM card. With the tray securely in place, you can power on your iPhone and resume seamless connectivity, knowing that the SIM card has been handled with precision and care.
Conclusion
Congratulations! You have successfully navigated the process of safely extracting and reinserting the SIM card in your iPhone 13. By following the comprehensive guide outlined in this article, you have gained the knowledge and confidence to manage your device's SIM card with precision and care.
It's important to recognize the significance of understanding the steps involved in handling the SIM card of your iPhone 13. The SIM card serves as the gateway to your cellular network connectivity, enabling you to stay connected, make calls, send messages, and access mobile data. By mastering the process of safely extracting and reinserting the SIM card, you have empowered yourself to seamlessly manage your device's essential components.
Furthermore, the ability to locate the SIM card tray, utilize the SIM eject tool, and handle the SIM card with care reflects your commitment to maintaining the optimal functionality of your iPhone 13. This level of attentiveness and proficiency in managing the device's components contributes to an enhanced user experience and ensures that your iPhone operates at its best.
As you reflect on the journey of safely managing your iPhone 13's SIM card, it's essential to recognize the value of the skills you have acquired. The knowledge gained from this guide not only enables you to troubleshoot connectivity issues but also prepares you to adapt to changing SIM cards when necessary, accommodating your evolving communication needs.
In conclusion, your commitment to understanding and mastering the process of safely extracting and reinserting the SIM card in your iPhone 13 is a testament to your dedication to device maintenance and proficiency. By following the steps outlined in this guide, you have demonstrated a proactive approach to device management, ensuring that your iPhone 13 remains a reliable and efficient companion in your daily life.
With this newfound expertise, you are well-equipped to confidently manage your iPhone 13's SIM card, knowing that you possess the skills and knowledge to navigate this essential aspect of device maintenance. Embrace this accomplishment, and continue to explore and enhance your understanding of your iPhone 13, empowering yourself to make the most of its capabilities.