Introduction
Welcome to the world of cryptocurrencies, where digital assets like Ethereum have gained immense popularity in recent years. If you’ve invested in Ethereum and are now looking to withdraw it to cash, you’ve come to the right place. In this guide, we will walk you through the step-by-step process of converting your Ethereum holdings into real-world money.
As the second-largest cryptocurrency by market capitalization, Ethereum offers a decentralized platform for creating and executing smart contracts and decentralized applications. While its utility within the digital ecosystem is vast, sometimes you may need to convert your Ethereum into traditional currency for various reasons, such as paying bills, making purchases, or simply cashing out your investment.
While the process of converting Ethereum to cash may seem daunting at first, rest assured that it can be a straightforward and secure process. However, it’s important to keep in mind that the specific steps and platforms involved may vary depending on your location and the regulations in place.
In this guide, we will provide you with a general overview of the process, and it’s important to note that you should always conduct thorough research and consult with experts before making any financial decisions.
So, if you’re ready to learn how to withdraw Ethereum to cash, let’s dive into the steps involved in the process. By the end of this guide, you’ll have a clear understanding of how to convert your Ethereum holdings into the fiat currency of your choice.
Step 1: Set up a digital wallet
Before you can withdraw Ethereum to cash, you’ll need a digital wallet to store your Ethereum tokens securely. A digital wallet is a software application that allows you to manage and store your cryptocurrencies. Here are the steps to set up a digital wallet:
- Research and choose a reliable digital wallet: There are various types of digital wallets available, including web-based wallets, software wallets, hardware wallets, and mobile wallets. Each type has its own advantages and security features. Research different options and choose a wallet that aligns with your needs and preferences.
- Download and install the wallet: Once you’ve chosen a digital wallet, visit the official website or app store associated with the wallet provider. Follow the instructions to download and install the wallet on your device.
- Create a new wallet: After installing the wallet, open the application and follow the prompts to create a new wallet. This typically involves setting a strong password and generating a unique wallet address.
- Secure your wallet: It’s crucial to prioritize the security of your digital wallet. Enable any additional security features offered by the wallet, such as two-factor authentication or biometric authentication. Backup your wallet’s private keys or seed phrases in a secure location, as this will be essential for recovering your wallet if it’s ever lost or compromised.
Once you have successfully set up your digital wallet, you’re ready to move on to the next step of the process. It’s important to note that some cryptocurrency exchanges also provide built-in wallets, allowing you to skip this step if you choose to use their wallet services. However, it’s generally recommended to have a separate wallet for added security and control over your funds.
Step 2: Choose a cryptocurrency exchange
After setting up your digital wallet, the next step in withdrawing Ethereum to cash is to choose a cryptocurrency exchange. A cryptocurrency exchange is a platform that allows you to buy, sell, and trade cryptocurrencies.
When selecting a cryptocurrency exchange, keep the following factors in mind:
- Reputation and reliability: Look for exchanges with a good reputation and positive user reviews. Choose an exchange that has been operating for a while and has a track record of secure transactions.
- Licensing and regulations: Ensure that the exchange is compliant with the laws and regulations of your country or region. Dealing with a licensed exchange adds an extra layer of protection for your funds.
- Supported currencies: Check if the exchange supports Ethereum and the fiat currency you wish to withdraw. Popular options include USD, EUR, and GBP, but availability may vary depending on the exchange.
- Trading fees: Review the fee structure of the exchange. Different exchanges have different fee models, including transaction fees, deposit/withdrawal fees, and trading fees. Consider the fees and choose an exchange that aligns with your budget.
- User interface and features: Evaluate the user interface and features provided by the exchange. Look for a platform that is user-friendly and offers additional tools and resources to enhance your trading experience.
- Liquidity: Liquidity refers to the ability to buy or sell an asset quickly without impacting its price significantly. Choose an exchange with high liquidity to ensure smooth and efficient trading.
- Security measures: Prioritize exchanges that implement stringent security measures, such as two-factor authentication, cold storage for funds, and insurance against theft or hacking incidents.
Take your time to research and compare different cryptocurrency exchanges based on these factors. It’s advisable to create an account on a reputable exchange that meets your requirements.
Once you have chosen a cryptocurrency exchange, you’re prepared to proceed to the next step: creating an account on the exchange.
Step 3: Create an account on the exchange
Creating an account on a cryptocurrency exchange is a crucial step in withdrawing Ethereum to cash. Follow these steps to create your account:
- Select the exchange: Visit the website of the cryptocurrency exchange you have chosen and navigate to the signup or register page.
- Provide necessary information: Fill in the required information in the registration form. Typically, this includes your name, email address, and a strong password. Some exchanges may require additional identity verification, such as uploading a photo of your ID or proof of address.
- Agree to the terms and conditions: Read and accept the terms and conditions of the exchange. It’s vital to understand the rules and policies of the platform you’re using.
- Verify your account: Some exchanges may require you to verify your email address by clicking on a confirmation link sent to your registered email. Additionally, if identity verification is necessary, follow the instructions provided by the exchange to complete the verification process.
- Set up two-factor authentication (2FA): Enable two-factor authentication for an added layer of security. This typically involves linking your exchange account with a 2FA app on your smartphone, which generates a unique verification code for each login attempt.
Once you have completed the account creation process, you will have access to your exchange account dashboard. From here, you can proceed to the next step, which is linking your digital wallet to the exchange.
Remember to secure your exchange account with a strong, unique password, and avoid sharing your login credentials with anyone to protect your funds and personal information.
Step 4: Link your digital wallet to the exchange
Once you have created an account on the cryptocurrency exchange, the next step is to link your digital wallet to the exchange. This will allow you to transfer your Ethereum from your wallet to the exchange for selling and converting to cash. Follow these steps to link your digital wallet:
- Access your exchange account: Log in to your account on the cryptocurrency exchange using your registered email address and password.
- Navigate to the wallet section: Find the wallet or balances section of the exchange platform. This is where you can manage your cryptocurrencies.
- Locate the Ethereum wallet: Within the wallet section, search for the Ethereum wallet. Some exchanges may have a specific section for different cryptocurrencies, while others may have a general wallet for all supported cryptocurrencies.
- Generate a deposit address: Within the Ethereum wallet, you’ll find an option to generate a deposit address. Click on this option to create a unique address for your Ethereum deposits.
- Copy the deposit address: Once the deposit address is generated, copy it carefully. This address is where you will send your Ethereum from your digital wallet.
- Open your digital wallet: Launch your digital wallet application or access the web-based wallet you have set up previously.
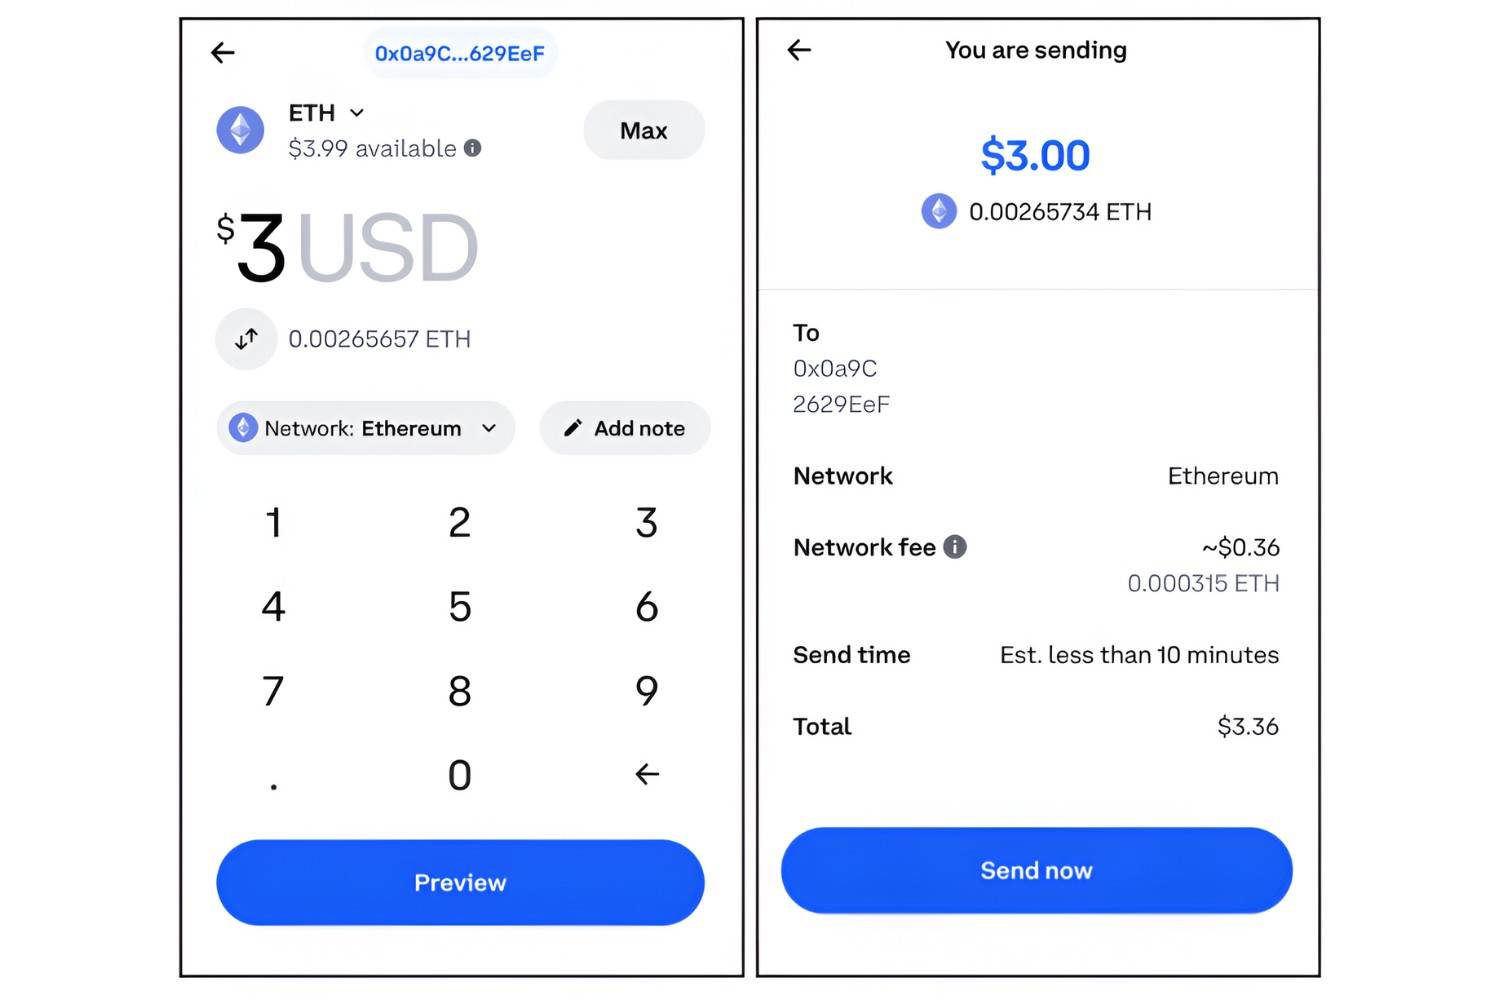
- Initiate a transfer: Within your digital wallet, look for the option to send or transfer Ethereum. Paste the deposit address from the exchange into the recipient or destination field.
- Set the transfer amount: Enter the amount of Ethereum you wish to transfer to the exchange. Verify that the amount is correct before proceeding.
- Confirm the transfer: Review all the details of the transfer, including the recipient address and the amount. Once you are certain, confirm the transfer.
After initiating the transfer, the Ethereum should be sent from your digital wallet to the exchange. The transfer time may vary depending on network congestion and other factors.
Once the Ethereum successfully arrives in your exchange wallet, you’re now ready to sell it for cash. Proceed to the next step for more details on the selling process.
Step 5: Sell Ethereum for cash
Now that you have transferred your Ethereum to your exchange wallet, the next step is to sell your Ethereum for cash. The process may vary slightly depending on the cryptocurrency exchange, but here are the general steps to follow:
- Access the trading section: Navigate to the trading or exchange section on the cryptocurrency exchange platform. This is where you can initiate the selling process.
- Select the Ethereum trading pair: Look for the trading pair that matches Ethereum with the fiat currency you wish to convert it into. For example, if you want to convert Ethereum into US dollars, look for the ETH/USD trading pair.
- Choose the sell option: Once you have selected the Ethereum trading pair, choose the sell option to initiate the selling process.
- Set the sell order details: Specify the amount of Ethereum you want to sell or the amount of fiat currency you wish to receive. You may have the option to set a specific price or use the current market price.
- Review the order: Double-check all the details of your sell order, including the quantity and price. Ensure everything is accurate before proceeding.
- Execute the sell order: Once you are satisfied with the order details, execute the sell order. This will initiate the process of converting your Ethereum into cash.
- Confirmation and settlement: Depending on the exchange, your sell order may be executed instantly or it may take some time for the transaction to be processed and settled. Keep an eye on your account balance to see when the cash funds are available.
It is important to note that the price of Ethereum can fluctuate rapidly, so the actual cash amount received may differ from the initial order value. Market conditions and trading volume can impact the selling price of Ethereum, so it’s advisable to monitor the markets and set realistic expectations.
Once your Ethereum has been successfully sold and converted into cash, you can move on to the final step of the process: withdrawing the cash to your bank account.
Step 6: Withdraw cash to your bank account
After successfully selling your Ethereum for cash on the cryptocurrency exchange, the next step is to withdraw the cash to your bank account. Here’s how you can complete the withdrawal process:
- Navigate to the withdrawal section: Access the withdrawal or funds section on the cryptocurrency exchange platform. This is where you can initiate the transfer of cash to your bank account.
- Choose the withdrawal method: Select the withdrawal method that allows you to transfer funds directly to your bank account. Common options include bank wire transfers or automated clearing house (ACH) transfers.
- Enter your bank account details: Provide the necessary information for your bank account, including the account number, bank name, and routing number. Make sure to double-check the accuracy of the details to avoid any errors.
- Specify the withdrawal amount: Enter the amount of cash you wish to withdraw from your exchange account to your bank account. Some exchanges may have minimum withdrawal requirements, so ensure your chosen amount meets those criteria.
- Review the withdrawal request: Take a moment to review all the details of your withdrawal request, including the account details and the withdrawal amount. Confirm that everything is correct before proceeding.
- Initiate the withdrawal: Once you are satisfied with the details, initiate the withdrawal process by submitting your request. The exchange will process the withdrawal and transfer the cash funds to your bank account.
- Wait for the transfer: Depending on the exchange and the banking system, the transfer may take some time to complete. Factors such as weekends or holidays can also affect the processing time. Patience is required during this stage.
- Check your bank account: Monitor your bank account for the arrival of the funds. Once the withdrawal is processed, the cash should reflect in your account balance.
It’s essential to note that withdrawal fees may apply, depending on the exchange and withdrawal method you choose. Take this into consideration and factor it into your decision-making process.
Always ensure that you are providing accurate and up-to-date bank account information to avoid any issues with the withdrawal process. If you encounter any difficulties or delays, reach out to the exchange’s customer support for assistance.
Now that you have successfully withdrawn your cash to your bank account, you have completed the process of converting your Ethereum holdings into real-world money.
Step 7: Consider alternative withdrawal methods
In addition to withdrawing cash to your bank account, there are alternative methods for converting your Ethereum into tangible assets. Here are a few alternative withdrawal methods to consider:
- Cryptocurrency debit cards: Cryptocurrency debit cards function like regular debit cards but are linked to your cryptocurrency holdings. These cards allow you to spend your Ethereum directly at merchants accepting Visa or Mastercard. Some providers even offer cashback rewards in cryptocurrency.
- P2P exchanges: Peer-to-peer (P2P) exchanges connect buyers and sellers directly, enabling you to trade Ethereum for cash with other individuals. These platforms facilitate secure transactions and often offer various payment methods, including bank transfers, cash deposits, and mobile payment apps.
- Cryptocurrency ATMs: Cryptocurrency ATMs are physical machines where you can buy or sell cryptocurrencies using cash. Some ATMs also support Ethereum withdrawals, allowing you to receive cash directly from the machine. Find a cryptocurrency ATM near you and check if it supports Ethereum withdrawals.
- Gift cards and vouchers: Some platforms allow you to convert your Ethereum into gift cards or vouchers for popular retailers. These can be used to make purchases or redeemed for cash value.
- Peer-to-peer lending: If you want to earn interest on your Ethereum holdings, you can consider lending your Ethereum on peer-to-peer lending platforms. These platforms connect borrowers and lenders and allow you to earn interest on your lent Ethereum.
Before exploring alternative withdrawal methods, it’s essential to research and evaluate the legitimacy and security of the specific platforms or services you plan to use. Confirm that the platform has a good reputation, transparent fees, and secure protocols in place to protect your funds.
Keep in mind that alternative withdrawal methods may have different procedures, fees, and limitations compared to traditional cash withdrawals. Consider your needs, preferences, and the level of convenience you seek when deciding which method is most suitable.
By considering alternative withdrawal methods, you can explore additional avenues for converting your Ethereum into various forms of value, offering flexibility and options beyond traditional cash withdrawals.
Conclusion
Congratulations! You have reached the end of this guide on how to withdraw Ethereum to cash. Converting your Ethereum holdings into real-world money can open up a world of possibilities, whether it’s paying bills, making purchases, or simply cashing out your investment.
Throughout this guide, we have covered the key steps involved in the withdrawal process:
- Setting up a digital wallet to securely store your Ethereum.
- Choosing a reputable cryptocurrency exchange to facilitate the selling process.
- Creating an account on the exchange to access its services.
- Linking your digital wallet to the exchange to transfer your Ethereum.
- Selling Ethereum for cash on the exchange by executing a sell order.
- Withdrawing cash to your bank account or considering alternative withdrawal methods.
Remember, each step requires careful consideration, research, and attention to detail. It’s crucial to prioritize security and follow best practices to protect your funds and personal information throughout the process.
As with any financial transaction, it is always recommended to consult with experts, stay informed about the latest regulations, and consider the specific requirements and limitations based on your location and circumstances.
Whether you choose to follow the traditional route of cash withdrawal to your bank account or explore alternative options like cryptocurrency debit cards or P2P exchanges, the decision ultimately depends on your unique preferences and goals.
As the cryptocurrency landscape continues to evolve, stay informed about new developments, emerging technologies, and evolving regulations that may impact the withdrawal process in the future.
We hope this guide has provided you with valuable insights and a clear roadmap for withdrawing your Ethereum holdings to cash. Remember, always exercise caution, conduct thorough research, and make informed decisions when dealing with cryptocurrencies and financial transactions.