Introduction
Venmo is a popular mobile payment platform that allows users to send and receive money with just a few taps on their smartphones. It has quickly become the go-to app for splitting bills, paying back friends, and even making charitable donations. One of the key features of Venmo is the ability to add friends, enabling you to easily transact with people in your social circle.
In this article, we will guide you through the process of adding friends on Venmo. Whether you want to connect with long-time buddies or make new acquaintances, Venmo makes it effortless to keep track of your financial interactions. We will walk you through the steps, ensuring that you can seamlessly expand your Venmo network.
Adding friends on Venmo opens up a world of possibilities for convenient money transfers. Whether you need to split the cost of dinner with your roommate, send a birthday gift to your cousin, or even pay your share of the monthly rent to your landlord, having a solid network of friends on Venmo will streamline these transactions.
So, grab your smartphone, download the Venmo app (if you haven’t already), and get ready to dive into this step-by-step guide on how to add friends on Venmo. By the end of this article, you’ll be well-equipped to connect with your friends, family, and beyond, and experience the convenience that Venmo has to offer!
Step 1: Sign in to Your Venmo Account
Before you can start adding friends on Venmo, you need to sign in to your Venmo account. If you don’t have an account yet, you can easily create one by downloading the Venmo app from the App Store or Google Play Store, and following the registration process.
Once you have the Venmo app installed on your mobile device, open the app and enter your login credentials. You can sign in either with your username and password, or using your Facebook or Google account if you’ve linked them to your Venmo profile.
If you’ve forgotten your password, don’t worry! Venmo provides an option to reset it. Simply click on the “Forgot?” link below the password field and follow the prompts to reset your password.
After successfully signing in to your Venmo account, you’ll be greeted with the home screen of the app, where you can view your transaction history, check your balance, and access various features and settings. Now, you’re ready to proceed to the next step and add friends on Venmo.
Remember to keep your login credentials secure and never share them with anyone. This will help protect your Venmo account from unauthorized access and ensure the security of your transactions.
Step 2: Navigate to the “Friends” Tab
Once you have signed in to your Venmo account, the next step is to navigate to the “Friends” tab. This is where you will find the option to add friends on Venmo and manage your existing connections.
To access the “Friends” tab, locate the menu icon in the top-left corner of the Venmo app. It typically appears as three horizontal lines stacked on top of each other. Tap on the menu icon to open the side menu.
In the side menu, you’ll see various options. Look for the “Friends” tab and tap on it. This will take you to the “Friends” section of the app, where you can view your current friends and search for new ones.
Once you’re on the “Friends” tab, you’ll see a list of your existing friends on Venmo. This list displays their names, profile pictures, and usernames. You can scroll through the list to find the friend you want to add or remove.
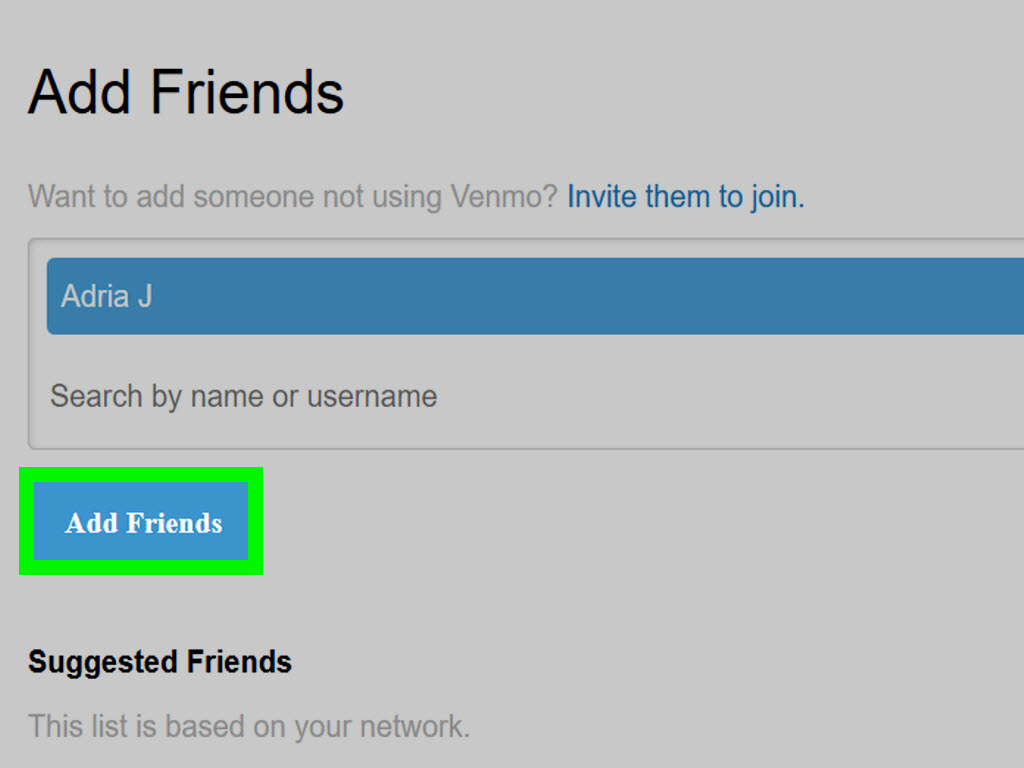
Additionally, the “Friends” tab provides options to search for new friends. At the top of the page, there is a search bar where you can enter the username, phone number, or email of the person you want to add as a friend on Venmo. The app will then display relevant search results based on the provided information.
In summary, navigating to the “Friends” tab is a crucial step in the process of adding friends on Venmo. It allows you to manage your current connections, search for new friends, and ultimately expand your Venmo network.
Step 3: Add a Friend by Username
Adding a friend on Venmo is simple and straightforward, especially if you know their username. Follow these steps to add a friend using their username:
- Go to the “Friends” tab in your Venmo app as mentioned in the previous step.
- In the search bar at the top of the page, enter the username of the person you want to add as a friend.
- As you type, Venmo will start suggesting usernames that match the entered text. Simply select the correct username from the list. If the person’s username doesn’t appear, make sure you have entered it correctly or try a different search method such as their phone number or email.
- Once you have selected the correct username, you will be taken to their profile page. Here, you can review their profile picture, bio, and recent transactions to ensure you are adding the right person.
- On the profile page, you will see a button that says “Add Friend.” Tap on this button to send a friend request to the person. Note that the other person will need to accept your friend request for the connection to be established.
- Once you have sent the friend request, you will see a message confirming that it has been sent. Now, all you have to do is wait for the person to accept your request.
Adding friends by their username on Venmo is a convenient way to connect with people you already know or want to transact with on the platform. It’s quick, easy, and requires minimal effort. Just make sure you have the correct username and that you send the friend request to the right person.
Now that you know how to add a friend on Venmo using their username, you can move on to the next step and explore different methods to add friends by phone number or email.
Step 4: Add a Friend by Phone Number or Email
If you don’t know your friend’s Venmo username, you can still add them as a friend using their phone number or email address. Follow these steps to add a friend on Venmo using their phone number or email:
- Head to the “Friends” tab in your Venmo app.
- In the search bar at the top of the page, enter the phone number or email address of the person you want to add as a friend.
- As you type, Venmo will start suggesting contacts or registered Venmo users that match the entered information. Simply select the correct contact or user from the list.
- If the person’s phone number or email address doesn’t appear, double-check that you have entered it correctly. You can also ask the person directly if they have registered their contact details with Venmo.
- Once you have selected the correct contact or user, you will be taken to their profile page. Similar to adding a friend by username, review their profile picture, bio, and recent transactions to ensure you are adding the right person.
- On their profile page, you will see a button that says “Add Friend.” Tap on this button to send a friend request to the person. Again, note that the other person will need to accept your friend request for the connection to be established.
- After sending the friend request, you will receive a confirmation message indicating that it has been sent. Now, you just have to wait for the person to accept your request.
Adding friends by their phone number or email address on Venmo provides an alternative method to connect with individuals who may not have a readily known Venmo username. It offers greater flexibility and accessibility when expanding your Venmo network.
Remember to always verify the contact details before sending a friend request. This ensures that you are connecting with the right person and avoids any potential errors or misunderstandings.
Now that you are familiar with adding friends by username, phone number, or email on Venmo, you can proceed to the next step to learn how to confirm friend requests and establish connections.
Step 5: Confirm the Friend Request
Once you’ve sent a friend request to someone on Venmo, the next step is to wait for them to accept your request. When they do, you can establish a connection and start transacting with each other. Follow these steps to confirm a friend request on Venmo:
- After sending a friend request, you’ll see a notification in the “Friends” tab of the Venmo app indicating that the request is pending. This notification will also appear on the person’s profile page, showing them that you have sent them a friend request.
- The person you sent the request to will receive a notification from Venmo, either through the app or via email, depending on their notification settings. The notification will prompt them to review and accept the friend request.
- Once the person accepts your friend request, you will receive a notification confirming the connection. The person’s name will now appear in your list of friends in the “Friends” tab on Venmo.
- You can also check the status of your friend requests by going to your profile page and tapping on the “Friends” tab. Here, you’ll see a section dedicated to pending friend requests, which includes the usernames of the people you’ve sent requests to who haven’t accepted yet.
It is important to note that the person you send a friend request to has the option to accept or decline it. If they decline the request, you will not be connected as friends on Venmo.
Alternatively, if you receive a friend request from someone on Venmo, you can choose whether to accept or decline their request. This allows you to have control over who you connect with and ensures that your Venmo network consists of trusted individuals.
Confirming friend requests is a vital step in establishing connections on Venmo. Once your friend requests are accepted, you can enjoy the convenience of easy money transfers and split payments with your Venmo network.
Now that you know how to confirm friend requests on Venmo, you’re ready to explore the additional functionality of managing and removing friends, which we’ll cover in the next step.
Step 6: Remove a Friend on Venmo
While adding friends on Venmo can streamline your financial interactions, there may come a time when you need to remove someone from your friend list. Whether it’s due to changing circumstances or a desire to keep your Venmo network more selective, removing a friend on Venmo is a simple process. Follow these steps:
- Open the Venmo app and go to the “Friends” tab, as we discussed in earlier steps.
- Scroll through your list of friends to find the person you want to remove. You can also use the search bar at the top of the page to quickly locate them by typing their username or name.
- Once you’ve located the friend you wish to remove, tap on their profile picture or username to go to their profile page.
- On their profile page, you’ll find a button that says “Unfriend.” Tap on this button to remove them from your friend list.
- A confirmation prompt will appear asking if you’re sure you want to unfriend the person. Confirm your decision by tapping on “Unfriend” again.
- After unfriending the person, they will no longer appear in your list of friends on Venmo. However, please note that unfriending someone will not affect any existing payments or transactions you’ve made to or received from them in the past.
Removing a friend on Venmo gives you control over your connections, allowing you to curate your network based on your preferences and needs. Whether it’s to declutter your friend list or to maintain privacy, unfriending someone on Venmo is a straightforward process.
Remember to always consider the implications of unfriending someone on Venmo and ensure it aligns with your desired level of interaction and financial transparency.
Now that you know how to remove a friend on Venmo, you have all the necessary knowledge to navigate the platform’s friend management features effectively.
Conclusion
Adding friends on Venmo is a valuable feature that enhances the convenience and ease of money transfers among individuals. Whether you want to split bills, send gifts, or simply keep track of financial interactions with your social circle, having a solid network of friends on Venmo is essential.
In this comprehensive guide, we have walked you through the step-by-step process of adding friends on Venmo. We started by signing in to your Venmo account, navigating to the “Friends” tab, and then adding friends by username, phone number, or email. We also covered how to confirm friend requests and establish connections, as well as how to remove friends from your list if needed.
By following these steps, you can build a reliable network of friends on Venmo that allows for seamless and efficient money transfers. Whether it’s splitting expenses with roommates, reimbursing friends for dinner, or sending gifts for special occasions, Venmo makes it easy to handle financial transactions among friends and acquaintances.
Remember to always verify the details of the person you are adding as a friend on Venmo and be cautious when sharing personal information. Venmo provides various security measures to protect your account and ensure safe transactions, but it’s important to stay vigilant and use best practices when transacting with friends on the platform.
We hope this guide has provided you with the knowledge and confidence to navigate the world of adding and managing friends on Venmo. Now, go ahead and expand your Venmo network, enjoy the convenience it offers, and make transactions with ease!