Introduction
Venmo has revolutionized the way we send money to friends, family, and even merchants. This popular payment app has made splitting bills, paying rent, and reimbursing your friends for that amazing concert ticket seamless and hassle-free. With its user-friendly interface and convenient features, Venmo has quickly become a go-to platform for transferring funds electronically.
Whether you’re new to Venmo or already a user looking to make the most of its functionalities, this guide will walk you through the process of sending money, linking your bank account, adding contacts, and much more. You’ll discover how to navigate the app effortlessly and leverage its security features to protect your transactions.
Signing up for Venmo is free and can be done in just a few simple steps. Once you’re registered, you’ll have the ability to send and receive money directly from your smartphone or computer. Gone are the days of scrambling for cash or writing checks. Venmo allows you to settle your debts with the tap of a finger.
If you’re wondering about the security of your transactions, rest assured that Venmo takes privacy seriously. The app offers multiple layers of security measures to safeguard your sensitive information. We’ll delve into these features later in the guide, so you can feel confident when using Venmo for your financial transactions.
So, if you’re ready to simplify your payment process and join the millions of users who have embraced Venmo, let’s get started with signing up and exploring its features.
Signing Up for Venmo
Signing up for Venmo is a quick and straightforward process. Follow these steps to get started:
- Download the Venmo app: Visit the App Store or Google Play Store on your smartphone and search for “Venmo.” Download and install the app onto your device.
- Create an account: Open the Venmo app and tap “Sign Up” to create a new account. You’ll be prompted to enter your email address, phone number, and password. Choose a strong, unique password to keep your account secure.
- Verify your account: Venmo will send a confirmation code to the phone number you provided during the sign-up process. Enter this code in the app to verify your account.
- Customize your profile: Once your account is verified, you can personalize your Venmo profile by adding a profile picture and a username. Your username is how others will be able to find you on Venmo, so choose wisely.
- Link a bank account or debit card: To send or receive money on Venmo, you’ll need to link a bank account or debit card. This allows Venmo to access the funds necessary for your transactions.
It’s important to note that Venmo is currently only available for users in the United States. You’ll need a US mobile phone number, US bank account, or debit card to sign up successfully.
Once you’ve completed these steps, you’re ready to start using Venmo. The app’s intuitive design and user-friendly interface make it simple to navigate and begin sending money to your contacts.
Linking a Bank Account or Debit Card
To make seamless payments and transfers on Venmo, you’ll need to link a bank account or debit card. This allows Venmo to securely access the funds needed for your transactions. Here’s how you can link your bank account or debit card:
- Open the Venmo app: Launch the Venmo app on your smartphone and sign in to your account.
- Navigate to the settings: Tap on the three horizontal lines in the top-left corner to open the menu. From there, select “Settings.”
- Select “Payment Methods”: In the Settings menu, choose the “Payment Methods” option.
- Add a bank account or debit card: Tap on the “Add a bank or card” option. You can choose to link either a bank account or a debit card, depending on your preference.
- Follow the prompts: Venmo will guide you through the process of adding your bank account or debit card. You may be asked to provide the necessary information, such as your account or card number, routing number, or expiration date. Make sure to enter the correct information to avoid any potential issues.
- Confirm your account or card: Once you’ve entered all the required information, Venmo will send a small test deposit to your linked bank account or place a temporary hold on your linked debit card. You’ll need to verify the amount of the test deposit to confirm your account or card.
It’s important to note that linking a bank account is generally the preferred option since it allows for larger transaction limits on Venmo. However, if you prefer to use a debit card, it can also be a convenient option, especially for smaller transactions.
Once your bank account or debit card is linked and confirmed, you can easily select it as your funding source when making payments on Venmo. This ensures that your transactions are processed smoothly and efficiently.
Adding Contacts
One of the key features of Venmo is the ability to easily add and manage contacts. This allows you to quickly send and request money from your friends, family, and other contacts who are also using Venmo. Here’s how you can add contacts on Venmo:
- Open the Venmo app: Launch the Venmo app on your smartphone and sign in to your account.
- Access your contacts: Tap on the menu icon in the top-left corner, and then select “Contacts” from the list of options.
- Import contacts: Venmo offers the option to import your contacts from your phone’s contact list, Facebook, or other sources. This makes it easier to find and connect with your friends who are also using Venmo. You can select the contact import option that suits you best.
- Add contacts manually: If you prefer, you can manually add contacts by tapping the “Add New Contact” button and entering their name, email address, or Venmo username.
- Manage your contacts: Once your contacts are added, you can view and organize them in the Contacts section of the app. You can add notes, labels, or even create groups to help you keep track of your different contacts.
By adding contacts on Venmo, you can easily find and connect with the people you frequently transact with. This saves you time and effort, as you won’t have to search for their information each time you want to send or request money.
It’s important to note that privacy settings on Venmo allow you to control who can see your contacts and transactions. You can adjust your settings to make your transactions visible to the public, visible to only your contacts, or completely private, depending on your preference.
With a complete list of contacts on Venmo, you’ll have a seamless and efficient experience when it comes to sending and receiving money from your trusted network of friends and family.
Sending Money to a Contact
Now that you have added your contacts on Venmo, it’s time to start sending money. Whether you owe a friend for dinner or want to contribute to a group gift, Venmo makes it easy to send money to your contacts. Follow these simple steps to send money on Venmo:
- Open the Venmo app: Launch the Venmo app on your smartphone and sign in to your account.
- Select a contact: Tap on the menu icon in the top-left corner and choose “Contacts.” Select the contact you want to send money to from your list of contacts.
- Enter the amount: Once you’ve selected the contact, enter the amount you want to send. You can also include a note to specify the purpose of the transaction, such as “Dinner” or “Utilities.”
- Select the funding source: Choose the bank account or debit card you want to use to fund the payment. If you haven’t linked any payment methods yet, follow the instructions to do so.
- Review and confirm: Double-check the details of the transaction, including the contact, amount, and funding source. If everything looks correct, tap the “Pay” button to complete the transaction.
Once the transaction is complete, Venmo will notify both you and your contact of the payment. The money will be instantly transferred, allowing your contact to access the funds and use them as needed.
It’s worth noting that Venmo offers a social aspect, allowing you to share and comment on your transactions. You can choose whether to make your transactions public, visible to only your contacts, or keep them completely private. This adds an extra layer of transparency and engagement to your payment experience.
With Venmo, sending money to your contacts has never been easier. Whether it’s splitting bills, reimbursing friends, or making quick payments, Venmo streamlines the process and ensures fast and convenient transactions.
Requesting Money from a Contact
Need to collect money from a friend or group for a shared expense? Venmo makes it simple to request money directly from your contacts. Follow these steps to request money on Venmo:
- Open the Venmo app: Launch the Venmo app on your smartphone and sign in to your account.
- Select a contact: Tap on the menu icon in the top-left corner and choose “Contacts.” Select the contact you want to request money from.
- Request an amount: Once you’ve selected the contact, tap on the “Request” button. Enter the amount you want to request and add a note if necessary, such as the reason for the request or the deadline for payment.
- Send the request: Review the details of your request and tap the “Request” button to send it to your contact.
Once you’ve sent the request, your contact will receive a notification and can easily pay you back directly through the Venmo app. They can choose to accept and pay the requested amount or modify it if necessary.
Venmo also allows you to send reminders to your contacts if they haven’t fulfilled the payment request within a certain timeframe. This ensures that you stay on top of your finances and receive the money you need on time.
Whether you’re collecting money for rent, utilities, or a group gift, Venmo’s request feature provides a hassle-free way to manage your shared expenses. It saves you from uncomfortable conversations about money and eliminates the need for cash or checks, making the process convenient and efficient.
By utilizing Venmo’s request feature, you can easily keep track of who owes you money and receive timely payments from your contacts, reducing any financial stress or confusion.
Paying with Venmo at Merchants
Venmo not only allows you to send and receive money between friends, but it also offers the convenience of making purchases at participating merchants. With the “Pay with Venmo” feature, you can make secure and seamless transactions directly from your Venmo account. Here’s how to pay with Venmo at merchants:
- Look for the Venmo logo: When you’re ready to make a purchase, keep an eye out for the Venmo logo at the merchant’s checkout or payment page. It indicates that they accept Venmo as a payment method.
- Select Venmo as your payment option: During the checkout process, choose the “Pay with Venmo” option. This will redirect you to the Venmo app or website to complete the payment.
- Confirm the details: Once in the Venmo app or website, review the payment details, including the merchant name, amount, and any applicable discounts or offers. Verify that everything is correct before proceeding.
- Choose your funding source: Select the bank account or debit card you want to use to fund the payment. If needed, you can add or link a payment method at this stage.
- Complete the transaction: Tap the “Pay” button to confirm the payment. Venmo will process the transaction and provide a confirmation, which you can save or refer to for your records.
It’s important to note that not all merchants accept Venmo as a payment method. However, the number of businesses that do is continuously growing, particularly online and in-app purchases. The Venmo app includes a “Shop” tab that highlights merchants where you can pay with Venmo, making it easier to discover new places to shop.
Paying with Venmo provides a convenient and secure way to complete your transactions. You no longer have to reach for your wallet, enter card details, or manually transfer money. Venmo streamlines the payment process, allowing you to make purchases swiftly and effortlessly.
Next time you’re shopping online or visiting a participating merchant, keep Venmo in mind as a convenient payment option. It’s a safe and efficient way to complete your transactions, letting you focus on enjoying your purchase.
Withdrawing Funds from Venmo
After receiving payments or accumulating funds in your Venmo account, you may want to withdraw the funds and transfer them to your bank account. Venmo provides several options for withdrawing money, making it convenient to access your funds when needed. Here’s how you can withdraw funds from Venmo:
- Open the Venmo app: Launch the Venmo app on your smartphone and sign in to your account.
- Access the menu: Tap on the menu icon in the top-left corner of the app to open the menu.
- Select “Transfer to Bank”: From the menu options, choose “Transfer to Bank.” This will take you to the next step of the withdrawal process.
- Choose the withdrawal amount: Enter the amount that you want to transfer from your Venmo balance to your bank account. You can transfer the full balance or select a specific amount to withdraw.
- Select the destination: Choose the bank account where you want the funds to be deposited. If you haven’t linked a bank account yet, you will be prompted to add one by entering the necessary information.
- Confirm the withdrawal: Review the details of your withdrawal, including the amount and destination bank account. If everything looks correct, tap the “Transfer” or “Confirm” button to initiate the withdrawal.
It’s important to note that Venmo may charge a nominal fee for instant transfers, which allow you to access the funds in your bank account almost immediately. However, you also have the option to choose standard transfers, which are free of charge but may take 1-3 business days to process.
Once the withdrawal is initiated, Venmo will process the transaction and transfer the funds to your linked bank account. You can track the progress of the withdrawal in the “Transfer to Bank” section of the app, and you will receive a confirmation once the funds have been successfully deposited.
Withdrawing funds from Venmo provides the flexibility to access your money and use it as needed. Whether you want to transfer funds to cover expenses, make a purchase, or simply have the cash readily available, Venmo’s withdrawal options allow you to easily manage your financial resources.
By utilizing Venmo’s withdrawal feature, you can confidently receive money into your Venmo account and transfer it to your bank account whenever it’s convenient for you.
Venmo Security Features
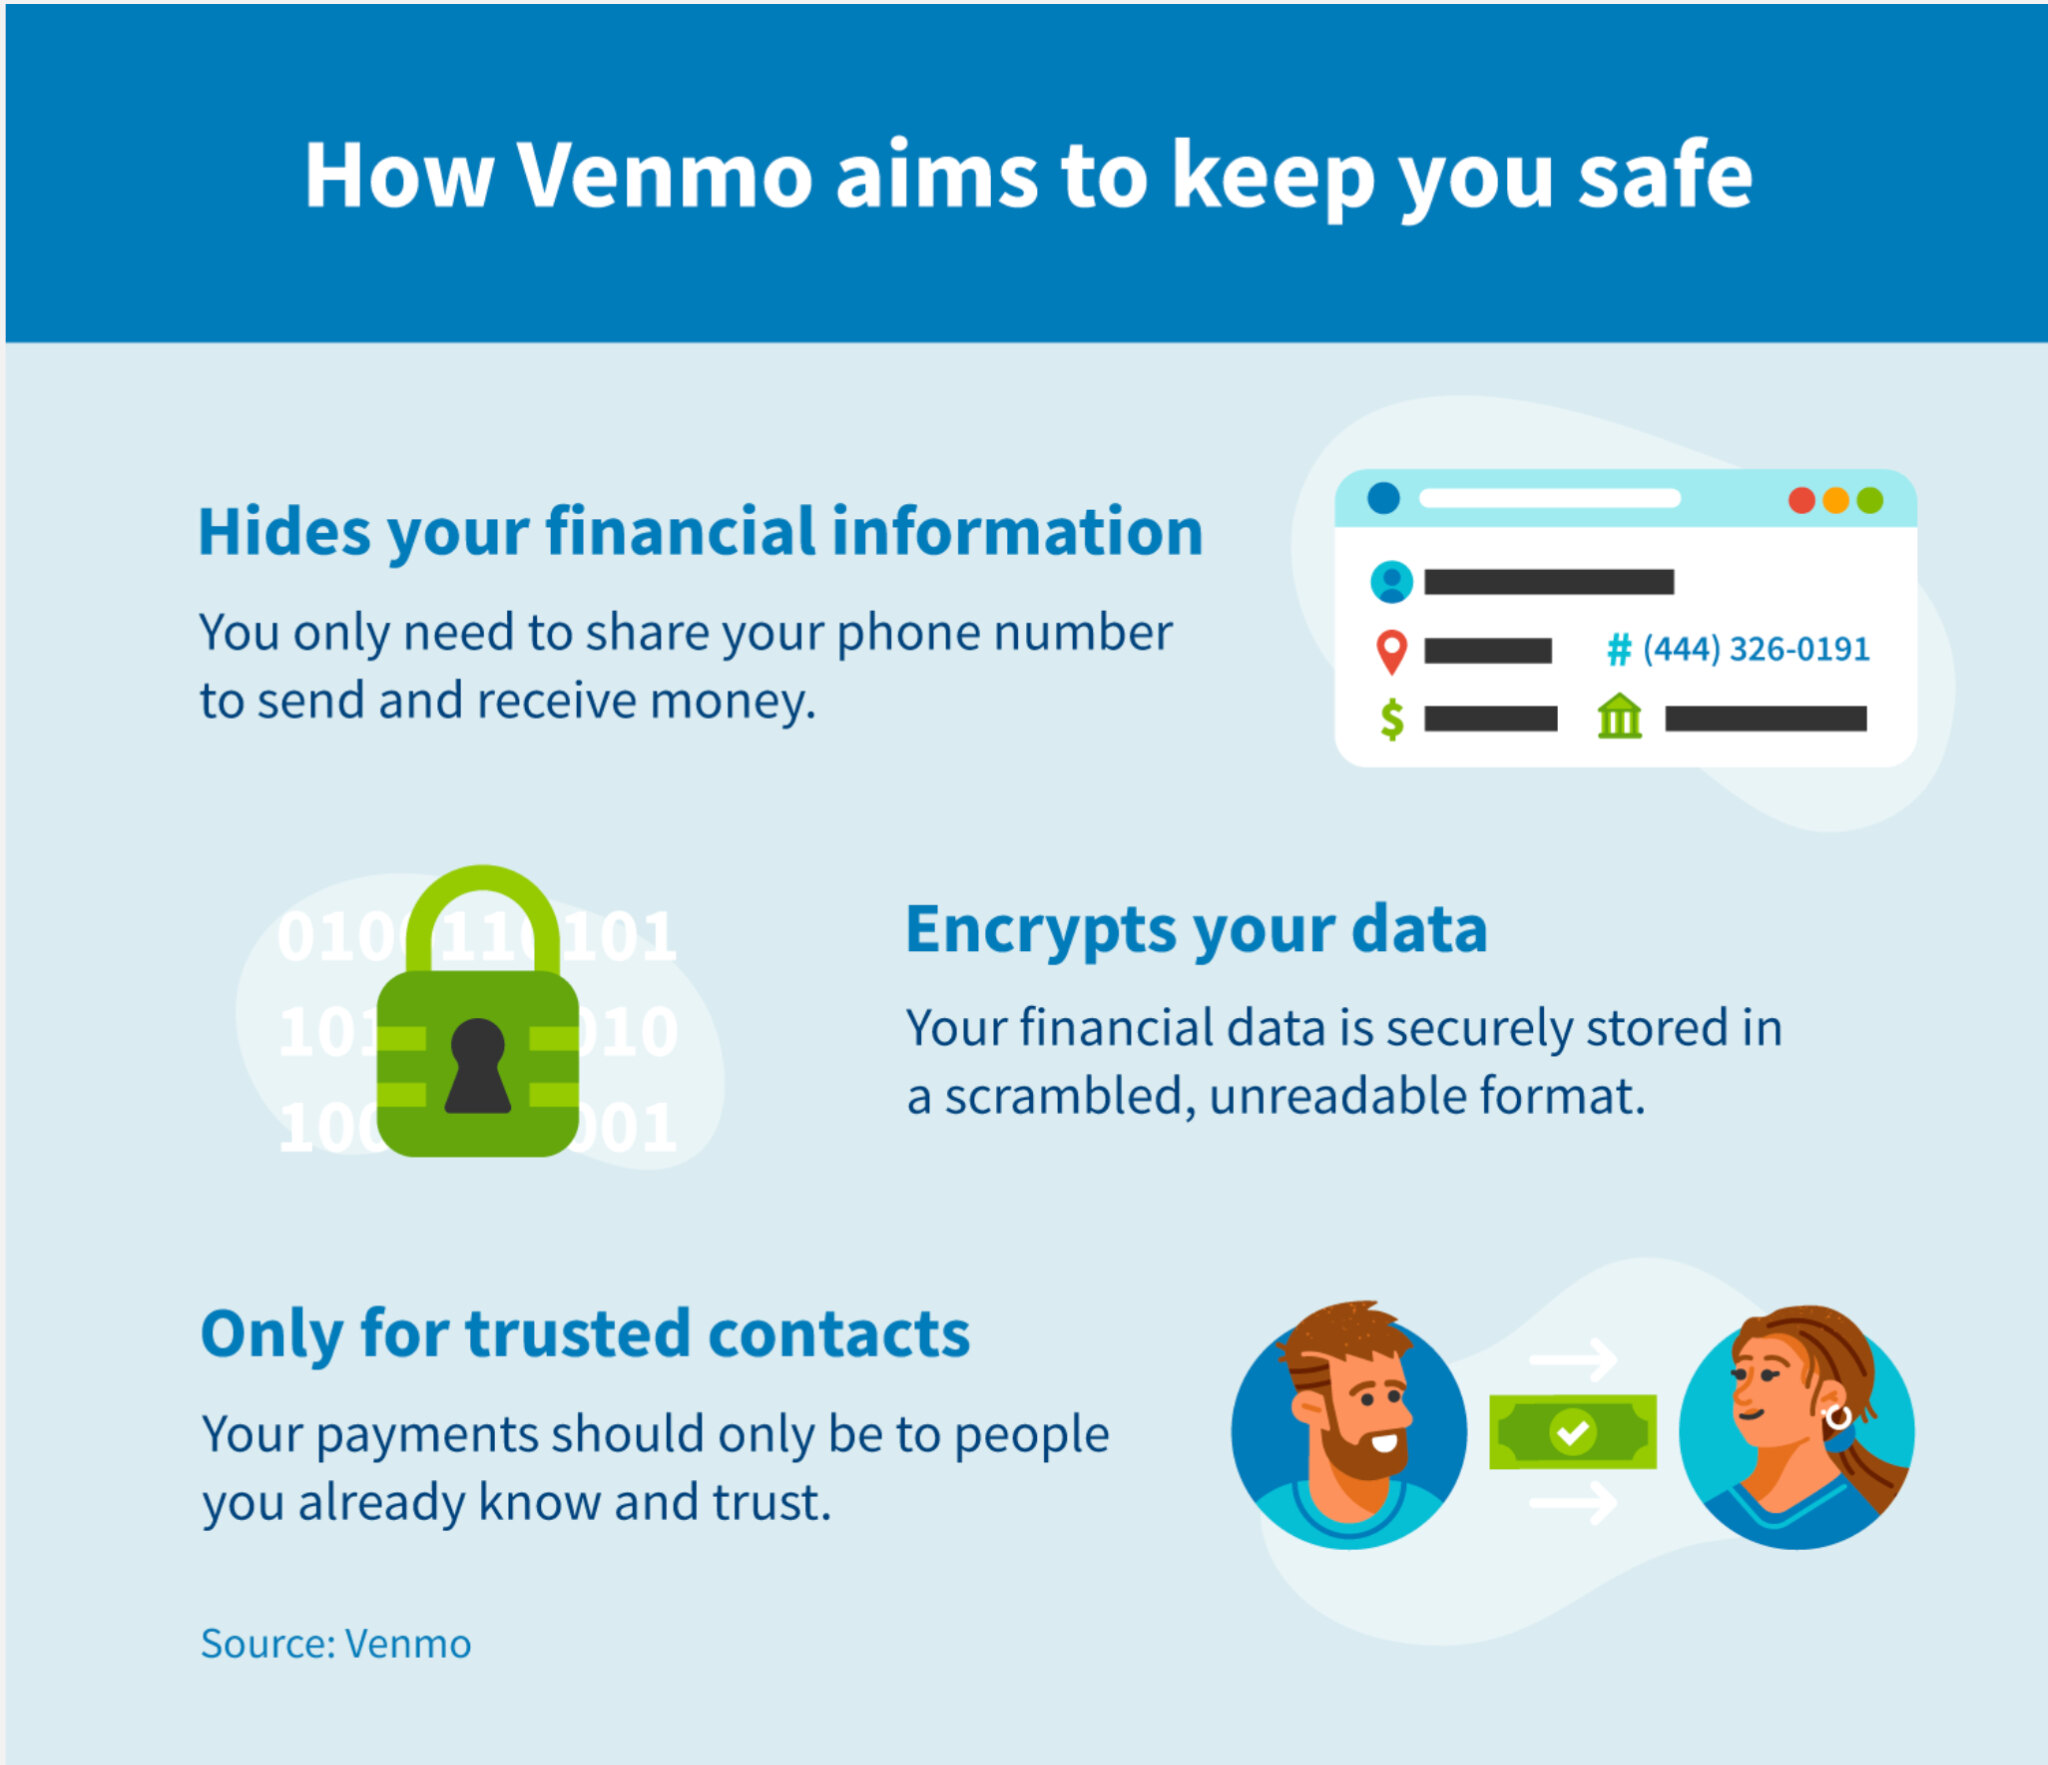
Venmo takes the security and privacy of its users’ financial information seriously. The app includes a variety of security features to protect your account and transactions. Here are some notable security features offered by Venmo:
1. Two-factor authentication: Venmo offers two-factor authentication as an added layer of security during the login process. This feature requires you to provide a unique security code, typically sent to your registered mobile device, in addition to your password.
2. PIN protection: Venmo allows you to set up a personal identification number (PIN) that you must enter before accessing your account. This PIN provides an extra safeguard in case your device falls into the wrong hands.
3. Touch ID or Face ID: If your smartphone or tablet supports biometric authentication, such as Touch ID or Face ID, you can enable these features within the Venmo app. This ensures that only you can access your account with your unique fingerprint or facial recognition.
4. In-app transaction notifications: Venmo sends push notifications to your mobile device for every transaction made from your account. This helps you stay on top of your account activity and quickly identify any unauthorized or suspicious transactions.
5. Social settings: Venmo allows you to customize your privacy settings, deciding who can see your transactions and friend list. You can choose to keep your transactions private, visible to your contacts, or make them completely public. This gives you control over the visibility of your financial activity.
6. Purchase protection: Venmo provides purchase protection for authorized payments made through the app. If you encounter any issues with a purchase, such as receiving an incorrect or damaged item, you can reach out to Venmo for assistance in resolving the dispute.
It’s important to note that while Venmo has implemented these security measures, it’s essential for users to take their own precautions, such as using strong, unique passwords, regularly updating their device’s operating system, and being cautious with sharing personal information.
By incorporating these security features, Venmo enhances the safety of your financial transactions and provides peace of mind when using the app to send and receive money.
Venmo Fees and Limits
When using Venmo, it’s important to understand the fees and limits associated with various transactions. Here’s an overview of the fees and limits you should be aware of:
1. Sending and Receiving Money:
There are no fees for sending and receiving money on Venmo when using your linked bank account or debit card. However, Venmo charges a fee for instant transfers to your debit card, which allows you to access funds almost immediately.
2. Venmo to Venmo Payments:
There are generally no fees for Venmo-to-Venmo payments, whether you’re sending money to friends or making payments to approved merchants. These transactions are typically free of charge.
3. Withdrawals:
Venmo offers standard withdrawals to your linked bank account, which are free of charge. However, if you prefer to have the funds available instantly, you can opt for instant transfers to your eligible debit card for a nominal fee.
4. Transaction Limits:
Venmo has certain limits in place to ensure the security of your transactions. These limits include:
- A weekly rolling limit for sending and receiving money, which initially starts at $299.99. This limit can be increased by verifying your identity.
- A limit on the amount that can be sent in a single transaction, typically capped at $4,999.99. For larger transactions, additional steps and verification may be required.
It’s important to note that Venmo’s fees and limits may vary and are subject to change. Therefore, it’s recommended to review the latest information provided by Venmo or consult their customer support for the most up-to-date details.
Understanding the fees and limits associated with Venmo transactions can help you make informed decisions and avoid any surprises or unexpected charges. It’s always a good practice to review the terms and conditions of any financial service you use to ensure you are aware of the associated costs and restrictions.
Tips for Using Venmo Efficiently
Venmo offers a seamless and convenient way to send and receive money, but there are a few tips and tricks that can help you make the most out of your Venmo experience. Here are some tips for using Venmo efficiently:
1. Keep Your Contacts Organized:
Organize your contacts by adding labels or grouping them based on common categories, such as friends, family, or roommates. This makes it easier to find the right contact when sending or requesting money, saving you time and effort.
2. Enable Notifications:
Make sure to enable notifications in the Venmo app. This ensures that you receive instant updates about payment requests, transactions, and other important account activities. Staying notified allows you to stay on top of your finances and take prompt action when needed.
3. Utilize the “Split” Feature:
Venmo’s “Split” feature allows you to divide expenses among multiple contacts effortlessly. When splitting a bill, simply enter the total amount and select the contacts involved. Venmo will automatically calculate each person’s share, making it easy for everyone to contribute their portion.
4. Add a Note to Transactions:
When sending or requesting money, adding a note can help provide context to the transaction. Whether it’s mentioning the reason for the payment or a friendly message, including a note adds a personal touch and reduces the chance of misunderstandings.
5. Set Up Autopay:
If you frequently owe money to the same contact for recurring expenses, consider setting up autopay. With this feature, Venmo will automatically send payments on a predetermined schedule, avoiding the need for manual transactions each time.
6. Check Payment Privacy Settings:
Review your payment privacy settings to ensure they align with your preferences. You can choose to make your transactions public, visible to your contacts, or completely private. Adjusting these settings allows you to control the level of privacy you desire for your financial activity.
7. Monitor Your Account:
Regularly review your Venmo account activity to ensure there are no unauthorized transactions. If you notice any suspicious activity, report it to Venmo immediately. Being vigilant about monitoring your account promotes security and peace of mind.
8. Update Your Venmo App:
Always keep your Venmo app updated to ensure you have access to the latest security features and enhancements. Enabling automatic updates on your device will keep your app up-to-date without you having to manually check for updates.
By following these tips, you can maximize the efficiency and convenience of using Venmo for your financial transactions. Venmo makes it easy to manage your money and simplify the process of splitting bills, making payments, and staying connected with friends and family.
Conclusion
Venmo has undoubtedly revolutionized the way we send and receive money. Its user-friendly interface, convenient features, and strong security measures make it a top choice for individuals looking for a hassle-free and efficient payment solution. By following the steps outlined in this guide, you can easily sign up for Venmo, link your bank account or debit card, add contacts, and start sending and receiving money with ease.
Whether you’re splitting bills, reimbursing friends, paying merchants, or simply managing your finances, Venmo streamlines the process and eliminates the need for cash or checks. With its in-app notifications, social features, and customizable privacy settings, Venmo keeps you informed and in control of your financial activity.
As with any financial service, it’s important to stay vigilant and take necessary precautions to protect your account and personal information. Utilize the security features offered by Venmo, such as two-factor authentication, PIN protection, and transaction notifications. Additionally, always review your privacy settings and keep your Venmo app up-to-date to access the latest enhancements and security features.
Venmo’s fees and transaction limits are also important factors to consider. Understanding the costs associated with different transactions and the limits in place helps you make informed decisions and avoids any unexpected charges or restrictions.
In conclusion, Venmo empowers individuals to easily and securely send and receive money in various situations. With its innovative features and commitment to user security, Venmo continues to be a trusted and convenient platform for digital transactions. Incorporating Venmo into your financial routine can save you time, simplify your money transfers, and enhance your overall payment experience.