Introduction
Webcams have become an essential tool in our daily lives, enabling us to connect with others, attend virtual meetings, and capture precious moments. However, it can be incredibly frustrating when the image from your webcam appears blurry or unclear. This can hinder effective communication and diminish the overall experience.
There are various factors that can contribute to a blurry webcam image. Understanding these factors and implementing the appropriate solutions can significantly improve your webcam clarity. In this article, we will explore the common reasons behind blurry webcams and provide tips on how to enhance their image quality.
Before we delve into the solutions, it’s important to note that the clarity of your webcam’s output is intrinsically linked to its hardware specifications. Higher resolution webcams tend to produce sharper and clearer images. However, even with a high-quality webcam, various external factors can affect the clarity of the image.
In the following sections, we will discuss the most common factors that can contribute to blurry webcams and provide actionable tips to address them. By implementing these techniques, you can ensure that your webcam provides clear and crisp visuals for all your video calls, online meetings, and virtual experiences.
Factors Affecting Webcam Clarity
When trying to determine why your webcam appears blurry, it is important to consider a few key factors that can affect its clarity. Let’s explore these factors in detail:
- 1. Low resolution: The resolution of your webcam determines the level of detail it can capture. If your webcam has a low resolution, it may result in a blurry or pixelated image.
- 2. Poor lighting conditions: Insufficient or uneven lighting can dramatically impact the clarity of your webcam. Dimly lit environments or harsh lighting can cause shadows, making the image appear blurry or washed out.
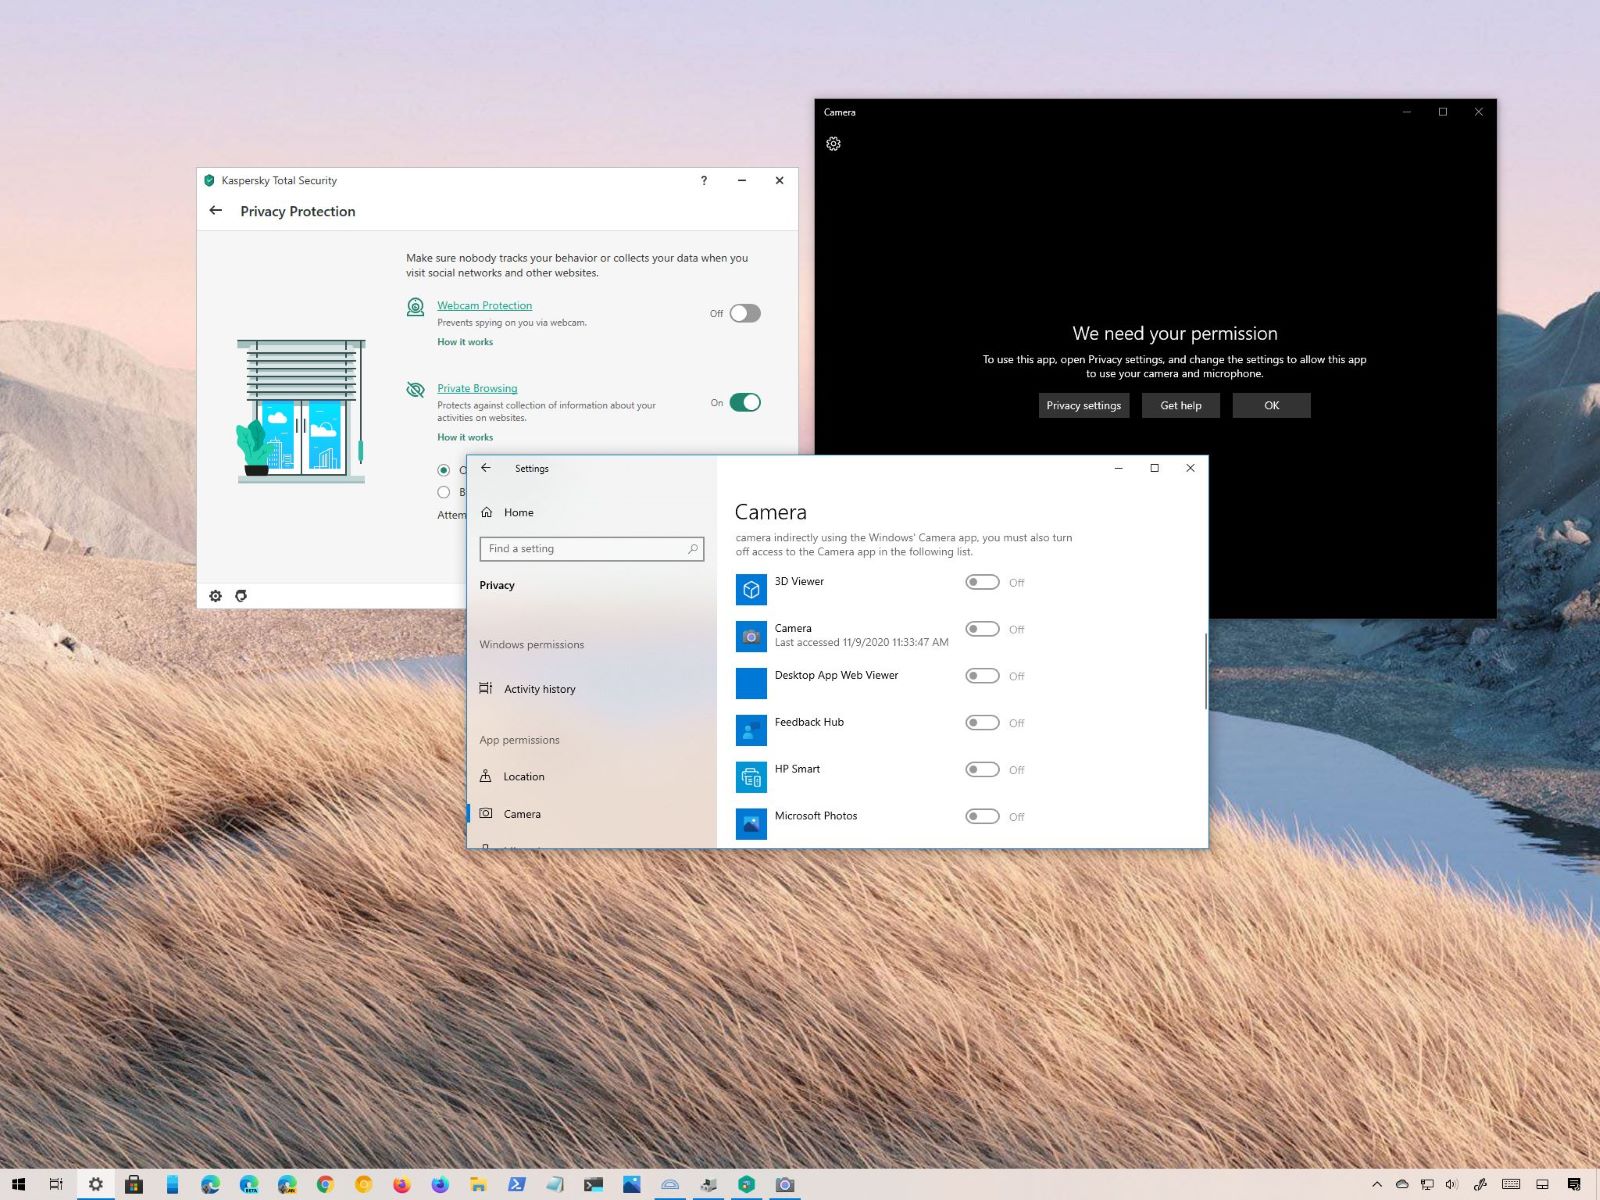
- 3. Outdated drivers: Webcam drivers are crucial for its optimal performance. Outdated or incompatible drivers can lead to blurry or distorted images. Keeping your drivers up to date can often resolve this issue.
- 4. Dirty lens: Over time, dust, fingerprints, or smudges can accumulate on your webcam’s lens, resulting in reduced image quality. Cleaning the lens regularly can restore clarity to your webcam’s output.
- 5. Wrong focus settings: If your webcam’s focus is not properly adjusted, it can lead to a blurry image. Ensuring that the focus is set correctly can greatly enhance the clarity of your webcam’s output.
- 6. Insufficient bandwidth: If you have a slow or unstable internet connection, it can affect the quality of your webcam’s video stream. Insufficient bandwidth can result in a blurry or laggy image.
- 7. Hardware limitations: Some webcams may have hardware limitations that can impact their image quality. Inferior lenses or sensors can contribute to blurriness in the output.
By identifying and addressing these factors, you can take the necessary steps to enhance the clarity of your webcam’s video stream. In the next section, we will provide actionable tips to improve webcam clarity and ensure a sharp and crisp image.
Low Resolution
Low resolution is a common reason behind blurry webcam images. The resolution refers to the number of pixels a camera can capture, and a lower resolution camera will have fewer pixels, resulting in a less detailed and potentially blurry image.
Webcams typically have different resolution options available, such as 720p or 1080p. Higher resolutions, such as 1080p, offer better image quality and clarity. If you are experiencing blurriness with your webcam, it may be set to a lower resolution.
To check and adjust the resolution of your webcam:
- Open the webcam settings or control panel on your computer. This can usually be accessed through the device manager or the webcam’s software.
- Look for the “Video Settings” or “Video Resolution” option.
- Select the highest available resolution, such as 1080p, if it is supported by your webcam.
- Save the changes and close the settings.
By selecting a higher resolution, you can significantly improve the clarity and sharpness of your webcam’s output. Keep in mind that adjusting the resolution may require sufficient computing power and bandwidth for smooth video streaming.
If your webcam doesn’t offer higher resolution options, you may need to consider upgrading to a webcam with a better resolution. A webcam with a higher resolution will provide a clearer image and enhance your overall video calling experience.
Now that we’ve discussed the impact of low resolution on webcam clarity, let’s move on to the next factor – poor lighting conditions – and explore how it can affect the image quality of your webcam.
Poor Lighting Conditions
Poor lighting conditions can significantly impact the clarity and quality of your webcam’s image. Insufficient or uneven lighting can create shadows and make the image appear blurry or washed out.
Here are some tips to optimize the lighting for your webcam:
- Find a well-lit area: Choose a location with ample natural or artificial light. Avoid sitting in areas with strong backlighting or harsh overhead lighting that can obscure your face or create unflattering shadows.
- Position yourself properly: Ensure that you are facing the main source of light. The light source should be in front of you, illuminating your face evenly. This will prevent shadows and improve the clarity of your webcam image.
- Use additional lighting: If the available lighting is still not sufficient, consider using external light sources. Use desk lamps, ring lights, or softbox lights to provide even and diffused lighting. Place them strategically to minimize shadows and create a well-lit environment.
- Avoid glare and reflections: Be mindful of any shiny objects or reflective surfaces in the camera’s field of view. Glare and reflections can distort the image and make it appear blurry. Adjust the positioning of your webcam and remove any reflective objects if possible.
- Experiment with light color temperature: Different light sources emit light with varying color temperatures. Adjusting the color temperature of the lighting can have a significant impact on the webcam image. Warm or cool LED bulbs can create different effects, so experiment to find the lighting that works best for you.
By optimizing the lighting conditions during your webcam sessions, you can minimize shadows, reduce blurriness, and enhance the overall clarity of your image. Keep in mind that finding the right lighting setup may require some trial and error, but the results will be well worth it.
Next, we will explore how outdated webcam drivers can affect the clarity of the webcam’s output and discuss the steps to update them.
Outdated Drivers
Outdated webcam drivers can often be a culprit behind blurry or distorted webcam images. Drivers are software programs that allow your webcam to communicate with your computer’s operating system. Over time, outdated drivers can cause compatibility issues and impact the performance of your webcam.
To resolve this issue, it is important to keep your webcam drivers up to date. Here’s how you can update your webcam drivers:
- Identify your webcam model: Start by determining the make and model of your webcam. You can usually find this information on the webcam itself or check the documentation that came with it.
- Visit the manufacturer’s website: Once you have identified the webcam model, visit the manufacturer’s official website. Look for the “Support” or “Downloads” section.
- Search for the latest drivers: Navigate to the driver download section on the website. Search for the latest drivers available for your webcam model. Be sure to download the drivers that are compatible with your computer’s operating system.
- Install the updated drivers: After downloading the updated drivers, run the installation file and follow the on-screen instructions to install them on your computer. Restart your computer if prompted.
Updating your webcam drivers can not only improve the clarity of the image but also enhance the overall functionality and performance of your webcam. If you encounter difficulties in finding the appropriate drivers on the manufacturer’s website, you can also try using third-party driver update software to automate the process.
Regularly checking for driver updates and keeping your webcam drivers current will ensure that you are utilizing the latest optimizations and enhancements provided by the manufacturer. This will help prevent blurry or distorted images caused by outdated drivers.
Now that we’ve addressed the issue of outdated drivers, let’s move on to another potential factor that can affect the clarity of your webcam – a dirty lens.
Dirty Lens
A dirty lens is a common issue that can cause your webcam image to appear blurry or distorted. Over time, dust, fingerprints, and smudges can accumulate on the lens, obstructing the incoming light and degrading the image quality.
Here’s how you can clean the lens of your webcam to improve clarity:
- Gather cleaning supplies: Prepare a microfiber cloth or lens cleaning solution, along with a gentle cleaning brush or compressed air canister.
- Power off your webcam: Before cleaning the lens, ensure that your webcam is turned off to prevent any accidental damage.
- Gently brush away debris: Use a soft brush or compressed air to remove any loose dirt or debris from the camera lens. Be careful not to apply too much pressure or scratch the lens surface.
- Apply cleaning solution: If you are using a lens cleaning solution, apply a small amount to the microfiber cloth. Avoid spraying the solution directly onto the lens.
- Wipe the lens: Gently wipe the lens in a circular motion using the microfiber cloth. Start from the center and gradually move outward. Ensure that you clean the entire surface of the lens.
- Double-check for smudges: After cleaning, inspect the lens for any remaining smudges or streaks. If necessary, repeat the cleaning process to achieve a clear and smudge-free lens.
Regularly cleaning your webcam lens can greatly improve the clarity and sharpness of the image. It is recommended to clean the lens every few weeks or whenever you notice a decrease in the image quality.
Remember to handle the lens with care, as it can be delicate. Avoid using excessive force or abrasive materials that can scratch or damage the lens surface. By keeping your webcam lens clean, you can ensure that the incoming light is unobstructed, resulting in a clearer and more vibrant image.
Now that we’ve covered the importance of cleaning the lens, let’s move on to the next factor that can affect your webcam’s clarity – wrong focus settings.
Wrong Focus Settings
Having incorrect focus settings on your webcam can lead to a blurry and unfocused image. The focus determines the sharpness and clarity of the objects in the camera’s field of view. If the focus is not properly adjusted, the image may appear blurry or out of focus.
Here are some steps to check and adjust the focus settings on your webcam:
- Open the webcam settings: Launch the webcam settings or control panel on your computer. This can usually be accessed through the device manager or the webcam’s software.
- Locate the focus settings: Look for the “Video Settings” or “Camera Settings” option in the webcam settings menu. You may find the focus settings under the “Image” or “Advanced Settings” tab.
- Adjust the focus: Most modern webcams have an autofocus feature, which automatically adjusts the focus. However, if your webcam does not have autofocus or if it is not functioning properly, you may need to manually adjust the focus. Some webcams have a focus ring around the lens that can be rotated to adjust the focus. Alternatively, there may be a slider or a numeric field that allows you to set the focus manually.
- Test the focus: After adjusting the focus settings, preview the image on your webcam to see if it appears clearer and more focused. Make small adjustments as needed until you achieve the desired focus.
It is important to note that not all webcams have manual focus settings. If your webcam does not offer focus adjustments or if the autofocus is not functioning properly, you may need to consider replacing the webcam with a model that provides better focus control.
By ensuring the correct focus settings on your webcam, you can achieve a clear and sharply focused image, enhancing the overall quality of your video calls and recordings.
Now that we’ve explored the significance of focus settings, let’s move on to the next factor that can impact webcam clarity – insufficient bandwidth.
Insufficient Bandwidth
Insufficient bandwidth is a common reason for blurry or laggy webcam images. Bandwidth refers to the amount of data that can be transmitted over an internet connection within a specific time frame. If your internet connection lacks the necessary bandwidth, it can negatively impact the quality and clarity of your webcam’s video stream.
Here are some tips to improve your internet connection and ensure sufficient bandwidth for a clearer webcam image:
- Check your internet speed: Use online speed testing tools to measure your internet speed. Ideally, you should have a high-speed broadband connection with a minimum upload speed of 1 Mbps for a smooth video call experience.
- Close bandwidth-consuming applications: Other applications or downloads running in the background can consume bandwidth and cause your webcam image to appear blurry or laggy. Close any unnecessary applications and pause any ongoing downloads to free up bandwidth.
- Connect via wired connection: If you’re using a wireless connection, try connecting your computer directly to the router using an Ethernet cable. Wired connections tend to provide a more stable and consistent internet connection, ensuring a smoother video streaming experience.
- Move closer to the Wi-Fi router: If you must use a wireless connection, make sure you are within range of the Wi-Fi router. Being too far away from the router can weaken the signal strength and reduce the available bandwidth.
- Limit devices on the network: If multiple devices are connected to your network and using bandwidth simultaneously, it can cause congestion and result in reduced video quality. Disconnect or disable any unnecessary devices to free up bandwidth.
- Upgrade your internet plan: If you consistently experience low bandwidth and poor video quality despite optimizing your connection, consider upgrading to a higher-speed internet plan. A faster plan will provide you with more bandwidth, ensuring a smoother and clearer webcam experience.
Optimizing your internet connection and ensuring sufficient bandwidth is crucial for improving the clarity and smoothness of your webcam’s video stream. By following these tips, you can minimize lag, reduce blurriness, and maintain a clearer and more enjoyable webcam experience.
Now that we’ve addressed the issue of insufficient bandwidth, let’s move on to the final factor that can affect webcam clarity – hardware limitations.
Hardware Limitations
Hardware limitations can have a significant impact on the clarity and quality of your webcam’s image. While many modern webcams offer high-resolution and advanced features, some older or lower-end models may have hardware limitations that can contribute to a blurry or less clear image.
Here are a few common hardware limitations that can affect webcam clarity:
- Inferior lenses: Lower-end webcams often come with lower-quality lenses, which can result in reduced image sharpness and clarity. These lenses may not be able to capture fine details as effectively as higher-quality lenses.
- Smaller sensors: Webcams with smaller sensors may struggle to capture enough light, leading to a grainy or dim image. Larger sensors have more surface area to gather light, resulting in better image quality and clarity.
- Limited autofocus: Some webcams have limited or no autofocus capability. Without autofocus, achieving optimal focus may require manual adjustments, which can be challenging and result in a blurry image if not set correctly.
- Processing power: Older or lower-spec computers may not have sufficient processing power to handle high-resolution video streams effectively. This can result in lag, frame drops, or reduced image quality during webcam sessions.
If you are using a webcam with hardware limitations that impact image clarity, there are a few steps you can take to mitigate the issues:
- Optimize webcam settings: Adjusting brightness, contrast, saturation, or sharpness settings in your webcam software can sometimes compensate for hardware limitations and improve the clarity of your image.
- Improve lighting conditions: Proper lighting can make a significant difference in the image quality regardless of hardware limitations. Follow the tips mentioned earlier to optimize the lighting in your environment.
- Upgrade your webcam: If you frequently experience blurry or unsatisfactory image quality, you may consider investing in a higher-quality webcam with better hardware specifications. Upgrading to a webcam with a higher resolution, larger sensor, or advanced features can greatly enhance the clarity and overall image quality.
Understanding the hardware limitations of your webcam can help you make the most out of its capabilities and take necessary measures to optimize the clarity of your webcam’s output.
Now that we’ve discussed the various factors that can affect webcam clarity, let’s move on to the next section, where we’ll provide practical tips and techniques to improve webcam clarity.
Tips to Improve Webcam Clarity
While there are several factors that can contribute to blurry webcam images, there are also practical steps you can take to enhance clarity and improve the overall quality of your webcam’s output. Follow these tips to achieve a clearer and more professional-looking image during your video calls, online meetings, or recordings:
- Adjust Webcam Settings: Explore the settings in your webcam software to fine-tune parameters such as brightness, contrast, saturation, and sharpness. Making these adjustments can significantly improve the clarity and overall visual quality of your webcam’s output.
- Optimize Lighting: Ensure that your environment is well-lit and avoid harsh backlighting. Proper lighting eliminates shadows and provides an even illumination, resulting in a clearer image. Use natural light whenever possible or invest in artificial lighting solutions, such as desk lamps or ring lights.
- Clean the Lens: Regularly clean the lens of your webcam using a microfiber cloth or lens cleaning solution. Removing dust, smudges, and fingerprints from the lens will help maintain optimal image clarity.
- Update Webcam Drivers: Keep your webcam drivers up to date to ensure compatibility and access to the latest optimizations. Outdated drivers can lead to blurriness or other performance issues. Visit the manufacturer’s website or use driver update software to install the latest drivers.
- Check Focus Settings: Make sure the focus settings on your webcam are correctly adjusted. If your webcam supports autofocus, ensure that it is enabled. For webcams without autofocus, manually adjust the focus to achieve a sharp and clear image.
- Improve Internet Connection: A stable and high-speed internet connection is essential for clear and smooth video streaming. Close bandwidth-consuming applications, connect via a wired connection if possible, and consider upgrading your internet plan if you consistently experience lag or low bandwidth issues.
- Upgrade Hardware if Necessary: If you find that your current webcam is unable to deliver the desired image quality, consider upgrading to a higher-resolution webcam with advanced features. A webcam with better hardware specifications can significantly enhance clarity and overall video quality.
By implementing these tips, you can greatly improve the clarity and professional appearance of your webcam image. Remember to experiment and adjust settings based on your specific environment and preferences to achieve the best results.
Now that we’ve covered these tips, let’s conclude our discussion on improving webcam clarity.
Adjust Webcam Settings
One of the first steps to improving webcam clarity is to adjust the settings in your webcam software or control panel. By tweaking various parameters, you can enhance the visual quality and achieve a clearer image. Here are some settings to consider:
- Brightness: Increasing the brightness can help brighten a dimly lit environment and make the image more visible. However, be cautious not to overdo it, as excessive brightness may lead to washed-out colors or glare.
- Contrast: Adjusting the contrast can increase the difference between light and dark areas, enhancing the overall sharpness and depth of the image. Be careful not to set the contrast too high, as it may result in loss of details or unnatural-looking visuals.
- Saturation: Saturation controls the intensity of colors in the image. Adjusting this setting can make the colors appear more vibrant and lifelike. However, ensure that the saturation level is not excessive, as it may result in unrealistic or overly saturated colors.
- Sharpness: Increasing the sharpness setting can enhance the fine details and edges in the image, leading to a crisper appearance. However, be cautious not to increase it too much, as it may introduce artifacts or make the image look overly processed.
- White Balance: White balance adjusts the color temperature of the image to make whites appear pure and natural. Experiment with different white balance settings to eliminate any unwanted color casts and achieve accurate color reproduction.
- Frame Rate: Frame rate refers to the number of frames captured per second. Higher frame rates result in smoother motion, but keep in mind that higher frame rates require more bandwidth and processing power. Find a balance between smoothness and clarity based on your computer’s capabilities and internet connection.
- Resolution: Adjusting the resolution setting can directly impact the clarity and level of detail in the image. Choose the highest resolution available that is supported by your webcam and ensures smooth video streaming without overloading your system.
Experiment with these settings and find the optimal combination that suits your preferences and environment. Keep in mind that the adjustments may need to be made on the software or control panel provided by the webcam’s manufacturer.
Remember to save the changes after making any adjustments and test the results by previewing the webcam image or conducting a video call. It may take some trial and error to find the right settings that produce the best clarity and visual quality.
Now that we’ve discussed adjusting webcam settings, let’s move on to the next tip – optimizing lighting conditions.
Optimize Lighting
Optimizing lighting conditions is crucial for improving webcam clarity and achieving a professional-looking image. Proper lighting not only reduces shadows but also enhances the details and colors captured by your webcam. Here are some tips to optimize lighting for your webcam:
- Natural Light: Whenever possible, utilize natural light as your primary light source. Position yourself facing a window or other natural light sources to evenly illuminate your face. Natural light provides a soft and flattering illumination that can enhance clarity and accurate color representation.
- Avoid Harsh Lighting: Harsh lighting, such as direct sunlight or strong overhead lights, can create harsh shadows and overexposure. Position yourself in a way that avoids direct light hitting your face or causing glare on your webcam lens. Diffuse harsh lighting with curtains, blinds, or sheer materials if needed.
- Artificial Lighting: If natural light is not sufficient or consistent, consider supplementing it with artificial lighting. Invest in desk lamps, ring lights, or softbox lights to provide additional light sources. Place them strategically to minimize shadows and create an even and well-lit environment.
- Positioning: Experiment with the placement of your lights to find the most flattering and effective setup. Position one or multiple light sources at diagonal angles from your face to minimize shadows. Avoid placing lights directly behind you as it can cause backlighting and make your face appear dark.
- Color Temperature: Different light sources have varying color temperatures. Adjust the color temperature of your lighting to achieve the desired effect. Warm light (yellowish-orange) can create a cozy atmosphere, while cool light (bluish-white) can provide a more focused and professional look. Find the color temperature that complements your skin tone and the desired ambiance.
- Test and Adjust: After setting up your lighting, test the results by previewing your webcam or conducting a video call. Make adjustments as needed, such as repositioning the lights or changing their intensity, to achieve the desired lighting balance and clarity.
Remember to strike a balance between having enough light for clarity without overexposing the image. Each environment is unique, so it may require some experimentation to find the lighting setup that works best for you.
By optimizing the lighting conditions, you can greatly enhance the clarity, sharpness, and overall quality of your webcam image. Now, let’s move on to the next tip – cleaning the lens of your webcam.
Clean the Lens
Over time, dust, fingerprints, and smudges can accumulate on the lens of your webcam, which can result in blurry or distorted images. Cleaning the lens is a simple yet effective way to improve the clarity and sharpness of your webcam’s output. Here’s how you can clean the lens of your webcam:
- Gather cleaning supplies: Prepare a microfiber cloth or lens cleaning solution, along with a gentle cleaning brush or compressed air canister.
- Power off your webcam: Before cleaning the lens, ensure that your webcam is turned off to prevent any accidental damage.
- Gently brush away debris: Use a soft brush or compressed air to remove any loose dirt or debris from the camera lens. Be careful not to apply too much pressure or scratch the lens surface.
- Apply cleaning solution: If you are using a lens cleaning solution, apply a small amount to the microfiber cloth. Avoid spraying the solution directly onto the lens.
- Wipe the lens: Gently wipe the lens in a circular motion using the microfiber cloth. Start from the center and gradually move outward. Ensure that you clean the entire surface of the lens.
- Double-check for smudges: After cleaning, inspect the lens for any remaining smudges or streaks. If necessary, repeat the cleaning process to achieve a clear and smudge-free lens.
It is essential to be gentle and avoid using abrasive materials or excessive force while cleaning the lens. Scratches or damage to the lens can further degrade the image quality. Additionally, avoid using household cleaning agents, as they may contain chemicals that can damage the lens coating.
By regularly cleaning the lens, you can remove any obstructions that may cause blurriness and ensure that your webcam captures a clear and focused image. Make lens cleaning a part of your routine maintenance to maintain optimal image quality.
Now that we’ve discussed cleaning the lens, let’s move on to the next tip – updating webcam drivers.
Update Drivers
Outdated webcam drivers can significantly impact the performance and image quality of your webcam. Updating the drivers ensures that your webcam is functioning optimally and can help improve clarity and overall video quality. Here’s how you can update your webcam drivers:
- Identify your webcam model: Start by identifying the make and model of your webcam. You can usually find this information on the webcam itself or in the documentation that came with it.
- Visit the manufacturer’s website: Go to the official website of the webcam’s manufacturer and navigate to the “Support” or “Downloads” section.
- Search for the latest drivers: Look for the drivers specific to your webcam model and compatible with your computer’s operating system. Download the latest available drivers.
- Install the updated drivers: Once the drivers are downloaded, run the installation file and follow the on-screen instructions to install the updated drivers on your computer. Restart your computer if prompted to complete the installation process.
- Verify functionality: After updating the drivers, open your webcam software or a video conferencing application to verify that the image quality has improved and that your webcam is functioning properly.
It’s worth noting that some operating systems, such as Windows, may automatically search and install drivers for your webcam. However, it is still recommended to check the manufacturer’s website for the latest drivers, as the ones provided by the operating system may not always be the most up-to-date.
Regularly updating your webcam drivers ensures compatibility with the latest software and operating system updates, resolves any known issues, and improves the overall performance and clarity of your webcam’s output.
Now that we’ve discussed updating drivers, let’s move on to the next tip – checking focus settings for your webcam.
Check Focus Settings
Checking and adjusting the focus settings of your webcam is crucial for achieving a clear and sharp image. Incorrect focus settings can result in a blurry or unfocused appearance, impacting the overall clarity of your webcam output. Here’s how you can check and adjust the focus settings:
- Open the webcam settings: Access the webcam settings or control panel on your computer. This can usually be done through the device manager or the webcam’s dedicated software.
- Locate the focus settings: Look for the “Video Settings” or “Camera Settings” option in the webcam settings menu. The focus settings are typically found under the “Image” or “Advanced Settings” tab.
- Adjust the focus: Most modern webcams have autofocus functionality, which automatically adjusts the focus for you. Check if autofocus is enabled and functioning correctly. However, if your webcam doesn’t support autofocus or it’s not working as expected, you can adjust the focus manually.
- Manual focus adjustment: Some webcams have a physical focus ring around the lens that can be rotated to adjust the focus. In other cases, you may find a slider or a numeric field in the software that allows you to set the focus manually. Experiment by rotating the focus ring or adjusting the slider until the image appears sharp and clear.
- Test the focus: After making adjustments, preview the webcam image or conduct a video call to test the focus settings. Make fine adjustments if necessary to achieve the desired level of sharpness and clarity.
It’s important to keep in mind that not all webcams offer manual focus adjustments. Some lower-end models or built-in webcams may only support autofocus. In such cases, ensure that the autofocus function is enabled and working correctly.
By checking and adjusting the focus settings of your webcam, you can ensure that the camera captures a sharp and focused image, enhancing the overall clarity and quality of your video calls or recordings.
Now that we’ve discussed checking focus settings, let’s move on to the next tip – improving your internet connection to enhance webcam clarity.
Improve Internet Connection
An unstable or slow internet connection can severely impact the clarity and quality of your webcam’s video stream. To ensure a clear and smooth webcam experience, it is essential to optimize your internet connection. Here are some tips to improve your internet connection for better webcam clarity:
- Check your internet speed: Use online speed testing tools to measure your internet speed. A minimum upload speed of 1 Mbps is recommended for smooth video streaming. If your current speed is below this threshold, contact your internet service provider to explore options for upgrading your plan.
- Close bandwidth-consuming applications: Close any unnecessary applications or downloads running in the background. Bandwidth-intensive tasks can diminish the available bandwidth for your webcam, causing lag and reducing the clarity of the image. To optimize your webcam’s performance, limit the number of active applications on your network.
- Connect via a wired connection: If possible, connect your computer directly to the router using an Ethernet cable instead of relying on a wireless connection. Wired connections tend to offer faster and more stable speeds, resulting in a smoother and clearer video streaming experience.
- Position yourself closer to the router: If you need to use a wireless connection, ensure that you are within a reasonable range of your Wi-Fi router. Walls and obstacles can weaken the signal strength, leading to reduced bandwidth. Moving closer to the router can improve the signal quality and enhance your webcam’s performance.
- Limit the number of devices on the network: If multiple devices are connected to your network, they can compete for bandwidth and affect the webcam’s performance. Disconnect or disable any unnecessary devices to prioritize the available bandwidth for your webcam.
- Upgrade your internet plan if necessary: If you consistently encounter low bandwidth and poor video quality despite optimizing your connection, consider upgrading to a higher-speed internet plan. A faster plan with a higher upload speed will provide you with the necessary bandwidth to support clear and smooth webcam streaming.
Improving your internet connection is crucial for a crisp and uninterrupted webcam experience. By implementing these tips, you can help ensure that your webcam has sufficient bandwidth to deliver a clear and high-quality image during video calls, online meetings, or recordings.
Now that we’ve discussed improving the internet connection, let’s move on to the final tip – considering hardware upgrades if necessary.
Upgrade Hardware If Necessary
If you have followed the previous tips and are still not satisfied with the clarity and quality of your webcam, it may be time to consider upgrading your hardware. Upgrading your webcam or other components of your computer system can have a significant impact on the overall image quality. Here are a few areas to consider:
- Webcam: Consider upgrading to a higher-quality webcam with better resolution and advanced features. Higher-resolution webcams capture more details, resulting in a sharper and clearer image. Look for webcams that offer improved lenses, larger sensors, and better low-light performance for enhanced clarity in various lighting conditions.
- Computer Processor and Graphics Card: Insufficient processing power can affect the quality and smoothness of the webcam stream. If your computer is outdated or has a slow processor or graphics card, upgrading these components can enhance the webcam’s performance and allow for clearer and more fluid video streaming.
- Internet Router: If you experience consistent connectivity issues or slow internet speeds, upgrading your router may help ensure a more stable and faster internet connection. Look for routers that support higher bandwidth and prioritize traffic for smooth video streaming.
- Internet Service Plan: If you consistently encounter low bandwidth and poor video quality despite optimizing your connection, consider upgrading to a higher-tier internet service plan. Plans with faster upload and download speeds can support clearer and more reliable webcam streaming.
Before making any hardware upgrades, research and compare different options to find the best fit for your needs and budget. Consider consulting with professionals or trusted sources for recommendations based on your specific requirements.
Upgrading your hardware components can significantly improve the clarity and quality of your webcam’s output. However, it is important to weigh the costs and benefits of upgrading and ensure compatibility with your existing system.
Now that we’ve discussed the possibility of hardware upgrades, let’s conclude our discussion on improving webcam clarity.
Conclusion
Having a clear and sharp webcam image is essential for effective communication, whether you are participating in video conferences, online meetings, or simply connecting with friends and family. By addressing the factors that can affect webcam clarity and implementing the tips outlined in this article, you can significantly enhance the quality of your webcam’s output.
We explored several possible factors that can contribute to blurry webcam images, such as low resolution, poor lighting conditions, outdated drivers, dirty lenses, wrong focus settings, insufficient bandwidth, and hardware limitations. By understanding these factors, you can troubleshoot and take appropriate measures to improve the clarity and sharpness of your webcam’s image.
Adjusting webcam settings, optimizing lighting conditions, cleaning the lens, updating webcam drivers, checking focus settings, improving the internet connection, and considering hardware upgrades if necessary are all essential steps in enhancing webcam clarity.
Remember that it may take some experimentation and adjustment to find the perfect settings and setup for your specific environment and preferences. Regular maintenance and periodic checks of your webcam’s settings, cleanliness, and technology updates will help maintain optimal clarity and image quality.
Investing time and effort into improving your webcam clarity can greatly enhance the quality of your video interactions, ensuring that your messages are communicated clearly and professionally. So, follow these tips and techniques to unlock the full potential of your webcam and enjoy crystal-clear video experiences.