Introduction
Welcome to the world of 3D scanning! In this article, we will explore how to use Kinect as a 3D scanner. Kinect, originally developed for Xbox gaming consoles, is a motion-sensing input device that can be utilized for various applications beyond gaming. One of its powerful capabilities is its potential to transform into a 3D scanner.
Imagine being able to scan real-world objects and create digital replicas that you can manipulate, animate, or even 3D print. With Kinect, this is no longer just a possibility limited to specialized equipment or expensive software. By leveraging the power of Kinect and some software optimization, you can bring this amazing technology into your own hands.
But before we dive into the details, let’s take a step back and understand the basics of 3D scanning. Simply put, 3D scanning is the process of capturing the surface shape and details of an object in three-dimensional space. This can be done using various methods, such as laser scanning, photogrammetry, or structured light scanning. Kinect falls into the category of structured light scanning, which involves projecting a pattern of light onto the object and capturing its depth information based on the distortion of the pattern.
In this article, we will focus on using Kinect v2, which was released as an accessory for the Xbox One. However, it is important to note that the steps and techniques discussed here may not be applicable to earlier versions of Kinect or other 3D scanning devices.
So, if you are ready to embark on the exciting journey of 3D scanning with Kinect, let’s get started by setting up your Kinect device and installing the necessary software.
What is Kinect?
Kinect is a motion-sensing input device originally developed by Microsoft for their Xbox gaming consoles. It was first introduced in 2010 as a way to bring a new level of interactivity to gaming, allowing players to control their avatars and interact with the game environment using gestures, body movements, and voice commands.
At its core, Kinect is equipped with an RGB camera, an infrared emitter, and an infrared depth sensor. These components work together to track the movement and position of a player in real-time, creating a 3D representation of their body. By capturing depth information and analyzing it through various algorithms, Kinect is able to detect body joints and movements with remarkable precision.
However, Kinect’s potential doesn’t stop at gaming. As developers and enthusiasts began to explore its capabilities, it became evident that Kinect had the potential to be utilized in a variety of other applications. From virtual reality and augmented reality experiences to robotics and motion capture, the applications of Kinect extend beyond the gaming world.
One of the most exciting and creative uses of Kinect is as a 3D scanner. By leveraging its depth-sensing capabilities, Kinect can capture 3D data of real-world objects, allowing users to create digital replicas in a matter of minutes. This opens up a whole new world of possibilities, from creating 3D models for animation and visual effects to capturing and preserving cultural artifacts or even performing body scans for medical purposes.
With its relatively affordable price and wide availability, Kinect has become a popular choice for DIY 3D scanning enthusiasts and professionals alike. Its ease of use, combined with the power of modern 3D scanning software, allows anyone with a Kinect device to delve into the world of 3D scanning without the need for expensive specialized equipment.
Now that you have a better understanding of what Kinect is and its potential as a 3D scanner, let’s move on to the next step: learning the basics of 3D scanning.
The Basics of 3D Scanning
Before we dive into the intricacies of using Kinect as a 3D scanner, it’s important to grasp the fundamental concepts of 3D scanning. In simple terms, 3D scanning is the process of capturing the physical shape and details of an object to create a digital representation in three dimensions.
There are several methods used in 3D scanning, each with its own strengths and limitations. Some common techniques include laser scanning, photogrammetry, and structured light scanning.
Laser scanning involves the use of a laser beam to capture measurements of an object’s surface. As the laser scans across the object, it measures the distance between the laser and the surface at multiple points, creating a point cloud of data. This point cloud is then processed to create a 3D model.
Photogrammetry, on the other hand, relies on capturing multiple images of an object from different angles. Using specialized software, these images are analyzed and stitched together to create a 3D representation. This technique is often used in fields such as archaeology and architecture.
Structured light scanning, the technique we will focus on in this article, involves projecting a pattern of light onto the object and capturing its deformation using depth sensors. Kinect, with its infrared depth sensor and RGB camera, falls into this category.
When using Kinect as a 3D scanner, the device projects a pattern of infrared light onto the object. The depth sensor captures the pattern, allowing the device to calculate the distance between the sensor and each point on the object’s surface. By combining this depth information with the RGB camera data, Kinect is able to create a detailed 3D representation of the object.
It’s important to note that 3D scanning is not a one-size-fits-all solution. The choice of scanning method depends on various factors, such as the size and complexity of the object, the desired level of accuracy, and the available resources. Each technique has its own advantages and limitations, and understanding these factors will help you choose the most suitable method for your scanning needs.
Now that you have a basic understanding of 3D scanning techniques, it’s time to move on to setting up your Kinect device and installing the required software.
Setting Up Your Kinect
Before you can start using Kinect as a 3D scanner, you need to set it up properly. Follow these steps to ensure a smooth setup process:
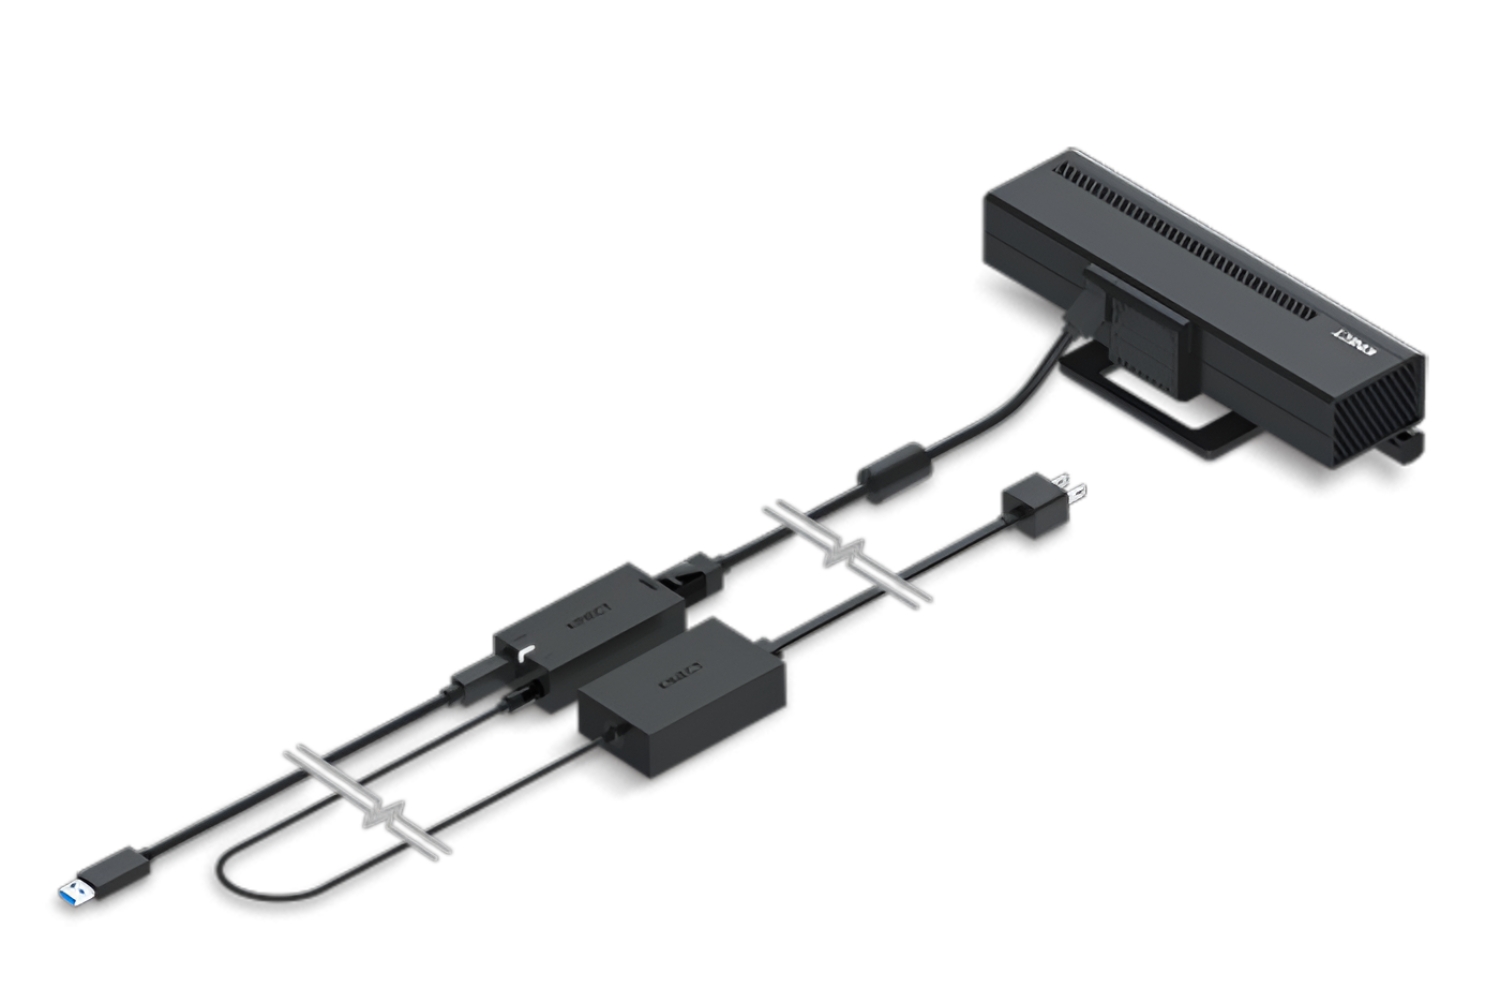
- Connect the Kinect: Start by connecting your Kinect device to your computer. Kinect v2 uses a USB 3.0 connection, so make sure you have a compatible USB port available. If your computer doesn’t have a USB 3.0 port, you may need to use an adapter.
- Install the Kinect SDK: Kinect requires the installation of the Kinect SDK (Software Development Kit) in order to communicate with your computer. You can download the SDK from the official Microsoft website. Follow the installation instructions provided by Microsoft to complete the setup.
- Position the Kinect: Proper positioning of the Kinect device is crucial for optimal scanning results. Place the Kinect on a stable surface, such as a tripod or a table, at a height where it can capture the entire object you want to scan. Angle the Kinect towards the object, ensuring that the depth sensor has a clear line of sight.
- Calibrate the Kinect: Kinect provides a calibration tool to ensure accurate measurements and tracking. Launch the calibration tool included with the Kinect SDK and follow the on-screen instructions to calibrate your Kinect device. This will help improve the accuracy of your scans.
- Set up proper lighting: Adequate lighting is essential for accurate scanning results. Ensure that the object you want to scan is well-lit and free from any shadows or reflections that could interfere with the depth sensing. Avoid bright or direct sunlight as it can affect the performance of the Kinect.
By following these setup steps, you’ll be well on your way to using Kinect as a 3D scanner. In the next section, we’ll explore the software requirements and how to install the necessary software to unlock the full potential of your Kinect device.
Installing the Software
Once you have set up your Kinect device, the next step is to install the required software in order to utilize it as a 3D scanner. Let’s walk through the process:
- Kinect for Windows SDK: The first software you need to install is the Kinect for Windows SDK. This software development kit provides the necessary drivers and APIs to communicate with your Kinect device. You can download the SDK from the official Microsoft website. Make sure to choose the correct version that corresponds to your operating system.
- 3D Scanning Software: There are various options available for 3D scanning software that is compatible with Kinect. Some popular choices include Skanect, ReconstructMe, and 3D Builder. Research and choose the software that best suits your needs. Download and install the software following the instructions provided by the respective developers.
- Additional Software: Depending on the specific scanning software you choose, you may need to install additional software components or libraries. These could include camera drivers, mesh processing tools, or plugins. Refer to the documentation and instructions provided by the software developers for any additional requirements.
- Software Configuration: After installing the required software, you may need to configure the settings to ensure proper communication with your Kinect device. Launch the scanning software and navigate to the device settings or preferences. Select the Kinect device as your input source and adjust any other necessary settings, such as resolution or frame rate.
It’s important to keep in mind that different scanning software may have varying setup requirements and configuration steps. Always refer to the documentation and support resources provided by the software developers for detailed instructions specific to the software you are using.
With the software installed and properly configured, you are now ready to move on to the next steps in the 3D scanning process, including calibrating the Kinect and positioning your object for scanning. These essential steps will ensure accurate and successful scans, which we’ll explore in the following sections.
Calibrating Your Kinect
Calibrating your Kinect device is an essential step to ensure accurate and precise 3D scanning results. Calibration helps optimize the alignment between the depth sensor and RGB camera, improving the accuracy of the scanned data. Follow these steps to calibrate your Kinect:
- Open the Calibration Tool: Most 3D scanning software includes a calibration tool. Launch the software and navigate to the calibration section or option. Look for the calibration tool provided by the software.
- Follow the Instructions: The calibration tool will guide you through the calibration process step-by-step. Follow the on-screen instructions carefully and make any necessary adjustments as directed.
- Position the Calibration Pattern: In order to calibrate the Kinect, you will need a calibration pattern. This can be a checkerboard pattern or a specific calibration target provided by the software. Hold the pattern in front of the Kinect device and position it within the field of view.
- Adjust the Position and Orientation: The calibration tool will instruct you to adjust the position and orientation of the calibration pattern so that it is visible to both the depth sensor and the RGB camera. Make sure the pattern is well-lit and easily detectable by the Kinect.
- Complete the Calibration: Once the pattern is properly positioned, the calibration tool will proceed with the calibration process. It may take a few moments to analyze and adjust the calibration parameters.
- Verify Calibration: After completing the calibration, the software should provide a verification step. It will display the results or ask you to perform a test scan to ensure that the calibration was successful.
It is important to recalibrate your Kinect device periodically, especially if you change its position, environment, or if you experience issues with the scanning quality. Calibration ensures the accuracy and reliability of your 3D scans, so don’t skip this crucial step in the scanning process.
Once your Kinect is calibrated, you are ready to start positioning and preparing your object for scanning. We will explore this next step in the following section.
Positioning and Preparing Your Object
Properly positioning and preparing your object is key to obtaining accurate and high-quality 3D scans with Kinect. Follow these guidelines to ensure successful scanning:
- Stable Surface: Place your object on a stable surface to minimize any movement during the scanning process. A turntable or tripod can be helpful for rotating the object, if necessary.
- Size and Distance: Consider the size and distance of your object in relation to the field of view of the Kinect device. Ensure that the entire object is within the depth sensor’s range and that it is not too close or too far away for optimal scanning results.
- Avoid Reflective Surfaces: Reflective or shiny surfaces can interfere with the depth sensor’s accuracy. If your object has reflective surfaces, apply a non-reflective coating or cover them with a matte material to improve scanning results.
- Provide Sufficient Lighting: Adequate lighting is crucial for capturing clear and detailed scans. Ensure that the object is well-lit with soft, diffuse lighting to minimize shadows and enhance the depth sensor’s performance.
- Consider Background: The background can affect the quality of your scans, especially if it contains patterns or textures that may interfere with the depth sensing. Choose a plain and contrasting background to help the software detect and distinguish the object from the surroundings.
- Remove Obstructions: Make sure there are no obstructions or objects blocking the view of the Kinect device. Any interference can affect the scanning accuracy, so clear the area around the object before starting the scan.
- Multiple Perspectives: For complex objects or better capturing of details, consider capturing scans from multiple perspectives. This can be done by rotating the object or moving the Kinect device around the object to ensure comprehensive coverage.
By following these guidelines, you can set up the ideal environment for scanning your object with Kinect. Once your object is positioned and prepared, you’re ready to move on to the exciting step of scanning! We’ll explore the scanning process in the next section.
Scanning Your Object
With your object properly positioned and prepared, it’s time to start the scanning process with Kinect. Follow these steps to capture a 3D scan of your object:
- Select Scanning Software: Launch the 3D scanning software you installed previously, ensuring that it is compatible with Kinect and configured to use it as the input device.
- Start the Scan: Locate the scanning feature or option within the software. Some software may have a dedicated scan button, while others may require you to navigate through menus or use keyboard shortcuts to initiate the scanning process.
- Move the Kinect Around the Object: In most scanning software, you will need to move the Kinect device around the object to capture different viewpoints. Slowly and smoothly move the Kinect in a circular or back-and-forth motion, keeping it at a consistent distance from the object.
- Follow Software Prompts: Pay attention to any prompts or instructions provided by the software during the scanning process. Some software may have specific guidance on the required movements or positions to capture the best quality scans.
- Continue Scanning from Different Angles: To ensure comprehensive coverage and capture all the necessary details of your object, continue scanning from different angles. This can involve multiple rotations or movements around the object to capture scans from all sides.
- Monitor Scan Quality: While scanning, keep an eye on the software interface to monitor the quality and progress of the scan. Most software will provide a visual representation or preview of the scanned data, allowing you to assess the quality in real-time.
- Complete the Scan: Once you have scanned the object from all desired angles and captured sufficient data, end the scanning process as instructed by the software. This will finalize the scan and allow you to proceed to the next steps in the 3D scanning workflow.
Remember to be patient and take your time while scanning. Smooth and consistent movements, coupled with multiple angles, will contribute to more accurate and detailed scans.
Once you have successfully scanned your object, it’s time to optimize and clean up your scans. We will explore these crucial steps in the next section.
Optimizing Your Scans
After scanning your object with Kinect, it’s important to optimize the resulting scans to ensure they are clean, accurate, and ready for further processing. Follow these steps to optimize your scans:
- Alignment: Depending on the scanning software you’re using, you may need to align multiple scans together to create a complete 3D model. Use the software’s alignment tools, which typically involve matching common features or points between scans and refining their positions.
- Merge Scans: If your object required multiple scans from different angles, use the software’s merging or stitching functions to combine the individual scans into a single cohesive 3D model. This will ensure proper alignment and accuracy of the final model.
- Mesh Cleaning: Inspect the mesh of your 3D model and identify any artifacts, holes, or unwanted elements. Use the software’s mesh cleaning tools to repair or fill these areas, ensuring a smooth and complete surface.
- Decimation: If your 3D model has a high number of polygons or is too large in file size, you can use the decimation feature in the software to reduce the number of polygons while preserving important details. This helps optimize the model for storage and further processing.
- Texture Mapping: If your scans captured color information, use the software’s texture mapping tools to apply the captured textures to the surface of the 3D model. This adds visual realism and detail to the model.
- Exporting: Once your scans are optimized, export the 3D model in a suitable file format, such as OBJ or STL. Consider the requirements of your intended use or further processing and choose an appropriate file format accordingly.
Optimizing your scans is an important step to ensure that the resulting 3D models are of high quality, accurate, and ready to be used or further processed. Take your time to thoroughly inspect and optimize your scans before proceeding to the next steps in the 3D scanning workflow.
Now that your scans are optimized, cleaned, and ready, it’s time to export and save them for future use or further processing. We’ll explore this step in the next section.
Cleaning up Your Scans
After scanning your object with Kinect and optimizing the resulting scans, it’s time to clean up any imperfections or artifacts that may have occurred during the scanning process. Cleaning up your scans will help ensure a polished and professional final 3D model. Here are some steps to clean up your scans:
- Inspecting the Scan: Carefully examine the 3D model for any artifacts, such as holes, noise, or unwanted protrusions. Use the software’s visualization tools to inspect the model from different angles and zoom levels.
- Filling Holes: If you notice any holes or gaps in the 3D model’s surface, use the software’s hole-filling tools to close these gaps. This will ensure a watertight and solid model without any missing surfaces.
- Smoothing: Sometimes, the captured scans may have rough surfaces or unwanted noise. Apply the smoothing tools available in the software to refine the surface and eliminate any irregularities or rough edges.
- Removing Unwanted Elements: If there are any unwanted elements or artifacts in the 3D model, such as stray polygons or disorganized parts, use the software’s selection and deletion tools to remove them. This will result in a cleaner and more focused model.
- Refining Details: Pay extra attention to small details, such as intricate features or delicate textures. Use the software’s sculpting or modeling tools to refine and enhance these details to achieve a higher level of realism and accuracy.
- Verifying the Cleaned Scan: After performing the cleaning actions, thoroughly examine the cleaned 3D model to ensure that all imperfections have been addressed and that the model is visually appealing and ready for further use.
Cleaning up your scans is a critical step in the 3D scanning process to ensure a quality final model. Take your time to meticulously clean and refine the scans, paying attention to both macro and micro details of the object.
Once you have cleaned up your scans, you can proceed to the next step of the 3D scanning workflow, which involves exporting and saving your scans for further processing or use. We’ll explore this step in the next section.
Exporting and Saving Your Scans
Now that you have optimized and cleaned up your scanned 3D model, it’s time to export and save it for future use or further processing. Follow these steps to export and save your scans:
- Select Export Format: Determine the appropriate file format for your specific requirements. Common file formats for 3D models include OBJ, STL, and PLY. Consider the compatibility with the software or platforms you will be using for further processing or viewing.
- Export Options: Many 3D scanning software will provide various options and settings for exporting your scans. These options may include adjusting the level of detail, selecting the file resolution, or specifying the file compression. Choose the settings that best suit your needs and project requirements.
- Specify File Name and Location: Give your exported file a descriptive and meaningful name. Select a folder or directory on your computer where you want to save the file. Consider organizing your files into appropriate folders to easily locate and manage them in the future.
- Save the Scan: Initiate the saving process according to the scanning software’s instructions. Wait for the export process to complete, which may take some time depending on the complexity of your model and the chosen export settings.
- Backup Your Scans: It’s highly recommended to create backups of your scanned models. Store copies of the exported files on external storage devices or cloud storage platforms to protect against accidental loss or corruption.
By following these steps, you will successfully export and save your cleaned and optimized 3D scans. This ensures that you have a digital replica of your object that can be further processed, 3D printed, or used in various other applications.
Now that you have exported and saved your scans, you can proceed to post-processing and editing your scans to refine them or prepare them for specific applications. We will explore this step in the next section.
Post-processing and Editing Your Scans
After exporting and saving your 3D scans, you may want to further refine and edit them to achieve your desired results. Post-processing and editing techniques can enhance the quality, appearance, and usability of your scans. Here are some steps to consider:
- Scaling and Resizing: Adjust the size and dimensions of your 3D model to match your desired scale or specific requirements. Use scaling tools available in your chosen software to accurately resize your scan without distorting its proportions.
- Mesh Editing: Manipulate the mesh of your 3D model to make modifications or improvements. This may involve smoothing out rough areas, sharpening edges, or refining specific details using mesh editing tools provided by your software.
- Texture Mapping: Fine-tune the texture mapping of your 3D model to ensure accurate and realistic color representation. Adjust the positioning, scale, or alignment of textures on the surface of your object to enhance its visual appearance.
- Adding or Removing Elements: Depending on your project requirements, you may want to add or remove elements from your 3D model. Use sculpting or modeling tools to add new features, fill gaps, or smooth out imperfections. Conversely, you can remove unwanted elements to achieve a cleaner and more focused object.
- Repairing Geometry: Check for any remaining geometric issues, such as non-manifold geometry or intersecting surfaces. Use the repair tools provided by your software to resolve these issues and ensure that the geometry of your 3D model is watertight and printable.
- Preparing for 3D Printing: If your ultimate goal is to 3D print your scanned object, take the necessary steps to prepare the model for printing. This may involve optimizing the mesh, hollowing out the object to save material, or adding support structures where needed.
Keep in mind that the specific editing and post-processing tools and techniques available may vary depending on the software you are using. Explore the features and capabilities of your chosen software to make the most of the post-processing and editing process.
Once you are satisfied with the post-processing and editing of your scans, it’s time to move on to the next steps in your project, whether it’s showcasing your model, incorporating it into a larger design, or preparing it for 3D printing.
Conclusion
Congratulations! You’ve now learned the basics of using Kinect as a 3D scanner. With Kinect’s powerful depth-sensing capabilities and the right software, you can capture real-world objects and transform them into digital 3D models with relative ease. This opens up a world of possibilities for various applications, from animation and visual effects to virtual reality experiences, cultural preservation, and more.
We started by understanding what Kinect is and how it functions as a motion-sensing input device. Then, we explored the fundamentals of 3D scanning and how Kinect falls into the category of structured light scanning. We walked through the setup process, installation of the necessary software, and calibration of your Kinect device. We also discussed the importance of positioning and preparing your object for scanning.
We covered the scanning process itself, from selecting the scanning software to capturing scans from different angles. We then moved on to optimizing and cleaning up your scans to ensure high-quality results. After that, we explored the steps involved in exporting and saving your scans in the desired file format.
In the final step of the process, we discussed post-processing and editing techniques that can further enhance and refine your scans. From scaling and resizing to mesh editing, texture mapping, and preparing for 3D printing, these editing techniques are crucial for achieving your desired outcomes.
By following the steps outlined in this guide and leveraging the capabilities of Kinect and 3D scanning software, you have the skills to create impressive 3D models. Whether you are a hobbyist, artist, designer, or professional in industries such as animation, architecture, or archaeology, the ability to use Kinect as a 3D scanner can greatly enhance your work and creative projects.
Now, take what you’ve learned, explore further, and experiment with different objects and scanning techniques. The more you practice and refine your skills, the better your 3D scanning results will become. So go ahead, unleash your creativity, and see what amazing things you can accomplish with Kinect as a 3D scanner!