Introduction
Welcome to the world of proxy servers on Android! In this digital age, where privacy and security are of utmost importance, using a proxy server has become increasingly popular. Whether you want to access geo-restricted content, protect your online identity, or improve your browsing speed, a proxy server can be a valuable tool in your Android device’s arsenal.
Before we delve into the details of setting up a proxy server on Android, let’s first understand what a proxy server is and why it is beneficial to use one.
What is a Proxy Server?
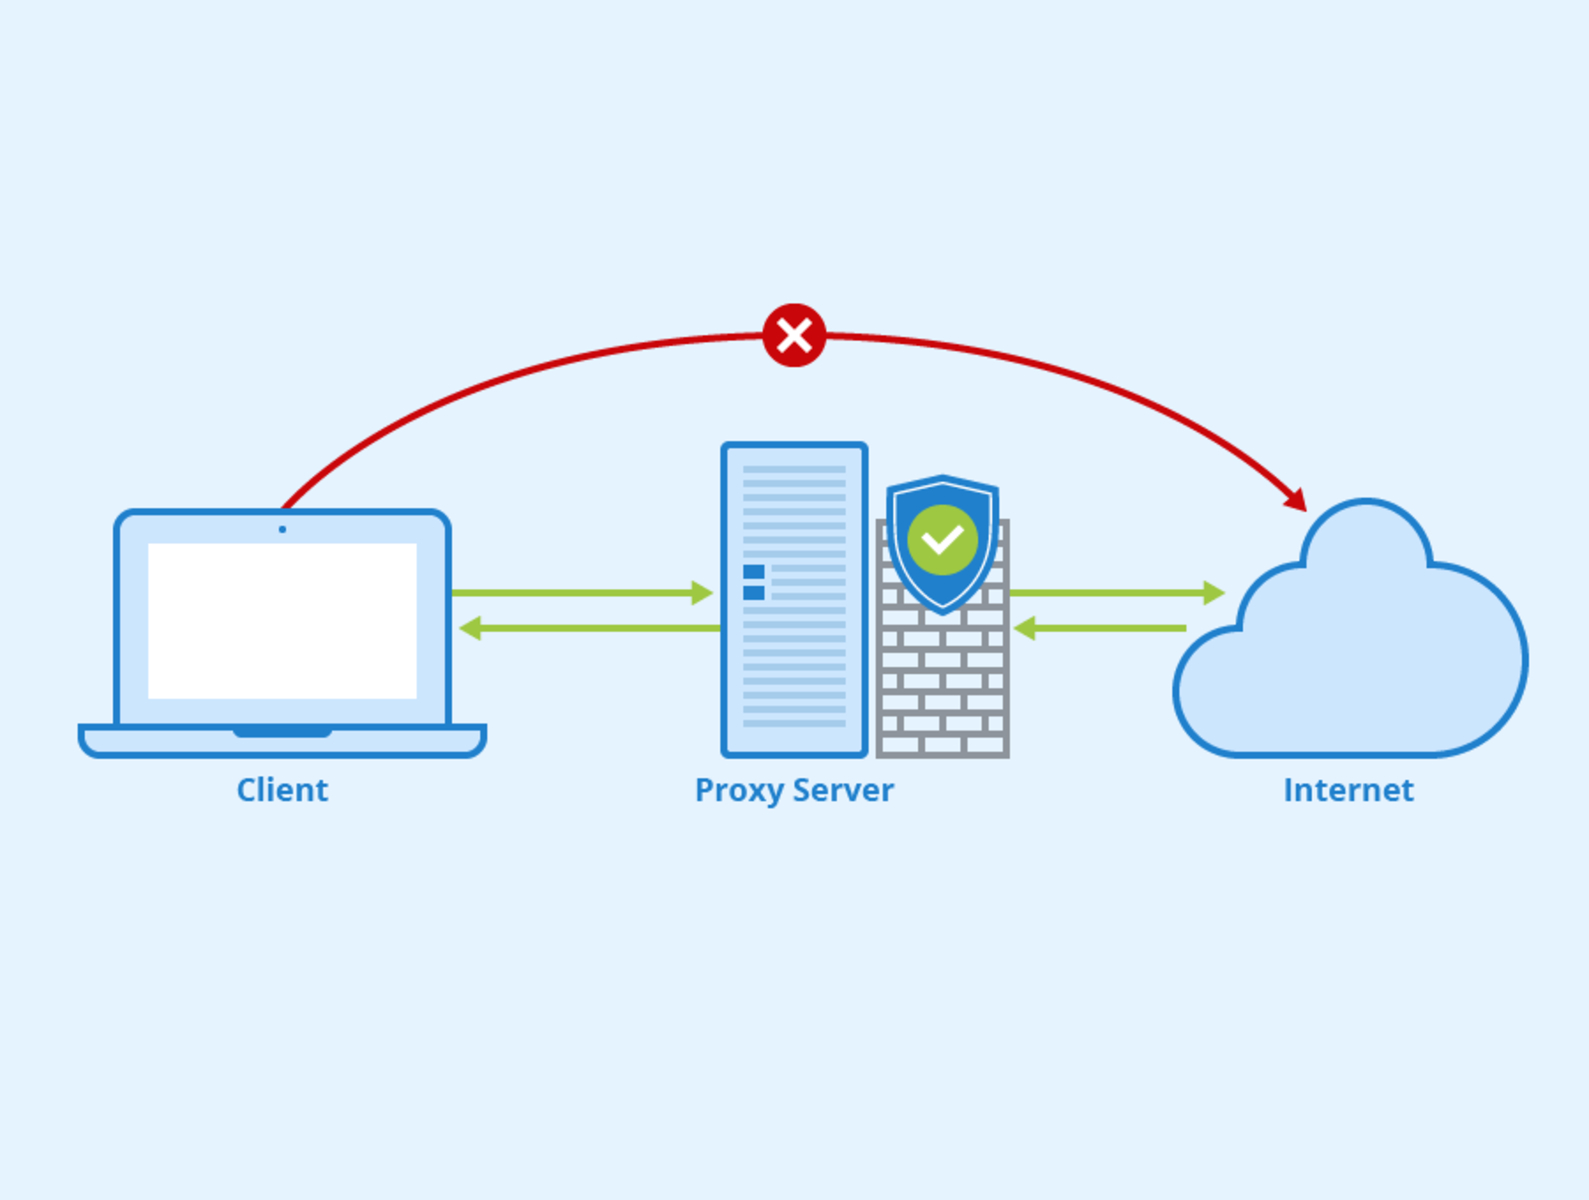
A proxy server acts as an intermediary between your device and the internet. When you make a request to access a webpage or any online resource, it is processed through the proxy server instead of directly connecting to the destination server. The proxy server then forwards the request on your behalf and sends back the response to your device.
Think of a proxy server as a middleman standing between you and the internet. It masks your IP address and provides you with a different one, making it appear as if you are accessing the internet from a different location. Additionally, a proxy server can cache webpages and other data, improving your browsing speed and reducing bandwidth usage.
Now that we have a basic understanding of what a proxy server is, let’s explore why using a proxy server on your Android device can be beneficial.
Why Use a Proxy Server on Android?
There are several compelling reasons to use a proxy server on your Android device:
- Privacy and Security: By connecting to the internet through a proxy server, your online activities and personal information are shielded from prying eyes. The proxy server acts as a barrier, making it difficult for malicious entities to track your IP address or monitor your online behavior.
- Access Geo-Restricted Content: Many websites and streaming platforms impose regional restrictions on their content. With a proxy server, you can bypass these restrictions and access content that is otherwise unavailable in your geographical location. By connecting to a server in a different country, you can unlock a whole new world of entertainment and information.
- Improved Browsing Speed: Proxy servers can cache webpages, images, and other online resources. When you access a cached resource, it is delivered to your device much faster since it does not need to be retrieved from the original server. This can greatly enhance your browsing speed, especially for frequently accessed websites or resources.
- Anonymity: If you prefer to browse the internet without revealing your true identity, a proxy server can help you achieve anonymity. By routing your internet traffic through a proxy server, your IP address is masked, making it difficult for websites or advertisers to track your online activities.
Now that we have explored the benefits of using a proxy server on your Android device, it’s time to learn how to set one up. There are several methods you can use, depending on your preferences and requirements. In the following sections, we will guide you through each method step-by-step to help you get started.
What is a Proxy Server?
A proxy server acts as a gateway between your device and the internet. When you send a request to access a website or any other online resource, it is first intercepted by the proxy server. The proxy server then evaluates the request and forwards it to the destination server on your behalf. Once the response is received, the proxy server sends it back to your device.
So how does a proxy server benefit you? Let’s take a closer look:
- Anonymity: When you connect to the internet through a proxy server, your IP address is masked. Instead of your real IP address, the proxy server assigns you a temporary one. This helps maintain your anonymity and protects your online identity.
- Access Control: Proxy servers can be set up to restrict access to certain websites or online content based on defined rules. This can be useful in environments such as schools, workplaces, or public Wi-Fi networks, where administrators may want to limit access to certain websites.
- Content Filtering: Proxy servers can be configured to filter web content based on specific criteria such as keywords, categories, or URLs. This allows organizations to control the type of content their users can access and helps prevent the spread of malware or other malicious activities.
- Bandwidth Optimization: Proxy servers can cache frequently accessed web content, such as images or web pages, and serve them directly to users without having to retrieve them from the original server each time. This can significantly reduce bandwidth usage and improve the overall browsing experience.
- Geo-blocking Bypass: Some online services and websites restrict access to their content based on the user’s geographic location. By connecting to a proxy server located in a different region, you can bypass these restrictions and access geo-blocked content.
Proxy servers come in different types, with each serving a specific purpose. Here are a few common types of proxy servers:
- HTTP Proxy: This type of proxy server is primarily used for accessing web pages and HTTP services.
- HTTPS Proxy: Similar to HTTP proxies, HTTPS proxies are specifically designed for secure connections, usually for accessing websites that require HTTPS encryption.
- SOCKS Proxy: SOCKS (Socket Secure) proxies are more versatile and can handle various types of network traffic, including HTTP, HTTPS, and FTP. They are commonly used for applications that require direct network connections, such as torrenting or online gaming.
- Transparent Proxy: Transparent proxies do not modify the request or response headers and are primarily used for caching purposes. They are often employed by internet service providers (ISPs) to improve browsing speed and reduce bandwidth usage.
Now that you have a better understanding of what a proxy server is and how it can benefit you, let’s explore how to set up a proxy server on your Android device.
Why Use a Proxy Server on Android?
Using a proxy server on your Android device can offer numerous benefits and enhance your online experience. Here are some compelling reasons why you should consider using a proxy server:
- Privacy and Security: When you connect to the internet through a proxy server, your IP address is hidden, and your online activities become more secure. By masking your IP address, a proxy server adds a layer of privacy and prevents websites, advertisers, and other third parties from tracking your online behavior.
- Access Geo-Restricted Content: Many websites and online services restrict access to certain content based on your geographical location. By using a proxy server, you can bypass these restrictions and access content that is otherwise unavailable in your region. With a proxy server, you can virtually appear as if you are browsing from a different location, giving you access to a broader range of content.
- Faster Browsing Speed: Proxy servers can cache frequently accessed web content, such as images, videos, and web pages. When you request these cached resources, they are delivered to your device faster since they don’t need to be retrieved from the original server. This caching mechanism significantly speeds up your browsing experience and conserves bandwidth.
- Anonymity: If you value your online privacy and want to browse the internet anonymously, a proxy server can help to conceal your identity. By using a proxy server, your requests are routed through an intermediary server, which means your IP address is masked. This makes it more challenging for websites, advertisers, or snooping individuals to track your online activities.
- Enhanced Security: Proxy servers can provide an additional layer of security when accessing the internet from your Android device. By filtering web content and inspecting network traffic, proxy servers can block malicious websites, prevent phishing attacks, and protect your device from malware and other online threats.
Whether you are concerned about your privacy, want to access blocked content, or simply want to improve your browsing speed and security, using a proxy server on your Android device can be an effective solution. It allows you to customize your online experience, protect your personal information, and explore the internet with more freedom.
Now that you understand the benefits of using a proxy server on Android, let’s explore various methods to set up and configure a proxy server on your device.
How to Set Up a Proxy Server on Android
Setting up a proxy server on your Android device is a straightforward process. There are several methods available, depending on your preferences and requirements. Let’s explore these methods step by step:
Method 1: Using the Android System Proxy Settings
The simplest way to set up a proxy server on your Android device is by using the built-in proxy settings in the Android system. Here’s how to do it:
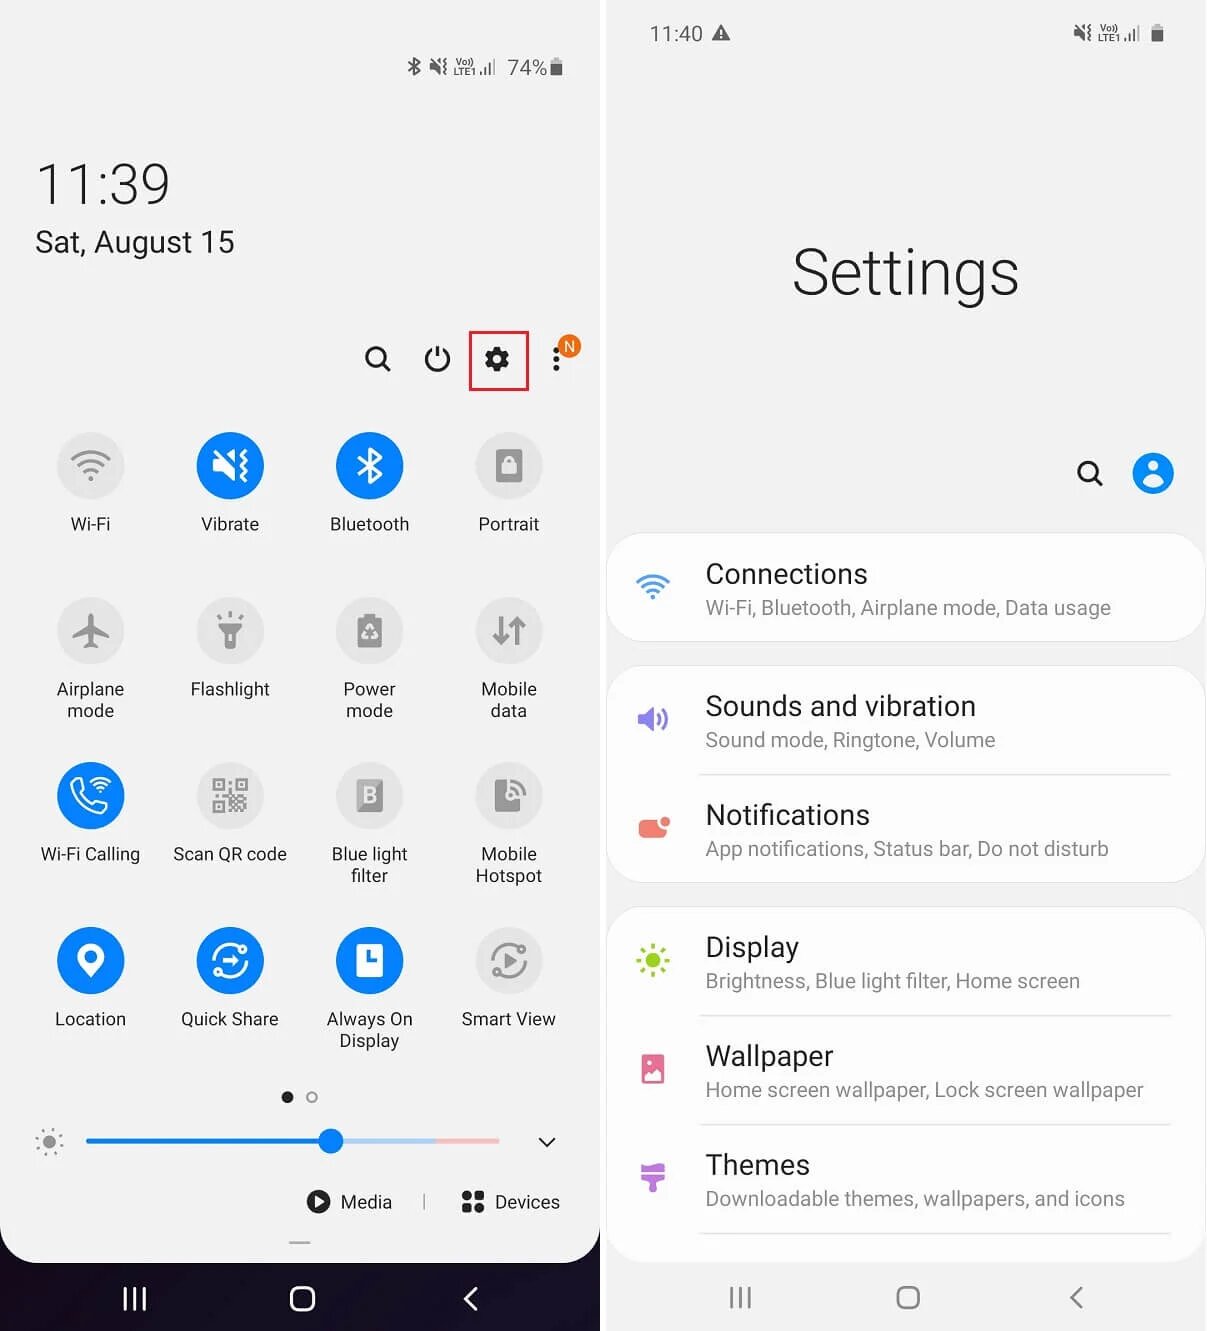
- Go to the “Settings” app on your Android device.
- Scroll down and tap on “Wi-Fi” or “Network & Internet,” depending on your device.
- Find the Wi-Fi network you are currently connected to and tap on it.
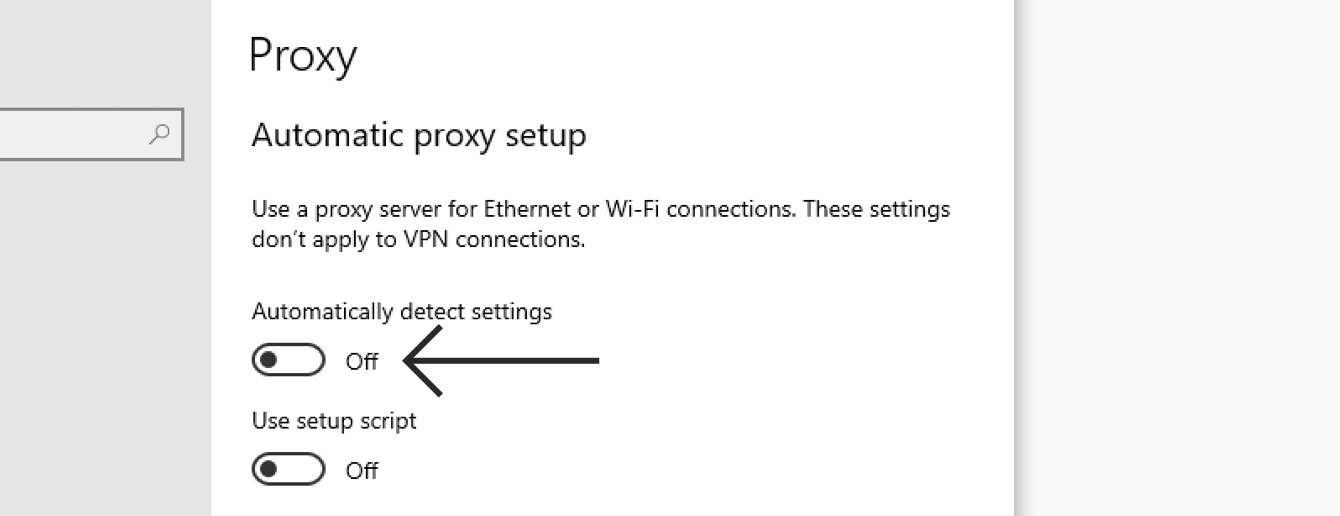
- Tap on “Advanced” or “Modify network,” then select “Proxy”
- Enter the proxy server address and port provided by your network administrator or proxy service provider.
- Tap “Save” to apply the proxy settings.
Once the proxy settings are saved, your Android device will use the specified proxy server for internet connectivity.
Method 2: Using a Proxy App from the Play Store
If you prefer a more user-friendly approach, you can use a dedicated proxy app from the Google Play Store. These apps simplify the process of setting up and managing proxy servers on your Android device. Here’s what you need to do:
- Open the Google Play Store app on your Android device.
- Search for a proxy app, such as “ProxyDroid,” “Orbot,” or “Hotspot VPN.”
- Select an app that suits your needs and has good reviews.
- Install the app on your device and follow the on-screen instructions to configure the proxy server settings.
- Once the app is set up, enable the proxy connection and start browsing through the app.
Using a dedicated proxy app can provide a more seamless and user-friendly experience, especially for those who are not familiar with manual proxy configuration.
Method 3: Configuring Proxy Settings for Wi-Fi Networks
If you frequently connect to specific Wi-Fi networks and want to use a proxy server for those networks only, you can configure proxy settings on a per-network basis. Follow these steps:
- Connect to the Wi-Fi network for which you want to set up the proxy server.
- Go to the “Settings” app on your Android device.
- Scroll down and tap on “Wi-Fi” or “Network & Internet.”
- Find the Wi-Fi network you are connected to and tap on it.
- Tap on “Manage network settings” or “Advanced” settings.
- Scroll down and tap on “Proxy.”
- Enter the proxy server address and port provided by your network administrator.
- Tap “Save” to apply the proxy settings for that Wi-Fi network.
- Repeat the process for other Wi-Fi networks if desired.
This method allows you to have granular control over which Wi-Fi networks use a proxy server and which do not.
Method 4: Setting Up a Proxy for Mobile Data
In some cases, you may want to use a proxy server specifically for mobile data connections. Here’s how to set it up:
- Go to the “Settings” app on your Android device.
- Scroll down and tap on “Network & Internet” or “Connections.”
- Tap on “Mobile network” or “Mobile data.”
- Scroll down and tap on “Access Point Names” or “APN.”
- Select your current mobile network provider’s APN settings.
- Scroll down and find the “Proxy” or “Proxy server” field.
- Enter the proxy server address and port provided by your network administrator.
- Tap “Save” to save the proxy settings.
This will configure your Android device to use the specified proxy server for internet connections using mobile data.
By following any of these methods, you can easily set up and configure a proxy server on your Android device. Determine which method works best for your needs and enjoy the benefits of enhanced privacy, geo-restricted access, and improved browsing speed.
Method 1: Using the Android System Proxy Settings
One convenient way to set up a proxy server on your Android device is by utilizing the built-in proxy settings in the Android system. This method allows you to configure the proxy server for all apps on your device that use an internet connection. Follow the steps below to set it up:
- Open the “Settings” app on your Android device.
- Scroll down and tap on “Wi-Fi” or “Network & Internet,” depending on your device.
- Find the Wi-Fi network to which your device is currently connected, and then tap on it to access the network settings.
- Tap on “Advanced” or “Modify network” to view additional settings for the selected Wi-Fi network.
- Scroll down and locate the “Proxy” option. Tap on it to configure the proxy settings.
- Choose either “None” to disable the proxy or “Manual” to enter the proxy server details manually.
- If you select “Manual,” enter the proxy server address and port provided by your network administrator or proxy service provider.
- Tap “Save” to apply the proxy settings to your Android device.
Once you have saved the proxy settings, your Android device will automatically route all internet traffic through the specified proxy server. This means that any app or browser you use will utilize the proxy server for its internet connections, providing you with enhanced privacy, access to geographically restricted content, and potentially improved browsing speed.
Keep in mind that if you switch to a different Wi-Fi network, you will need to repeat these steps to configure the proxy settings for that new network. Additionally, if you no longer want to use a proxy server, simply select “None” when configuring the proxy settings or choose the option to disable the proxy altogether.
Using the Android system proxy settings to set up a proxy server offers a convenient and system-wide approach. However, please note that some apps may not honor these system settings and may have their own separate proxy configurations. In such cases, you may need to configure the proxy settings within those specific apps.
Now that you know how to set up a proxy server using the Android system proxy settings, you can easily customize your device’s internet connectivity and enjoy the benefits that a proxy server provides.
Method 2: Using a Proxy App from the Play Store
If you prefer a more user-friendly approach to setting up a proxy server on your Android device, you can utilize dedicated proxy apps available on the Google Play Store. These apps simplify the process and provide an intuitive interface for configuring and managing proxy servers. Follow the steps below to use a proxy app:
- Open the Google Play Store app on your Android device.
- Search for a proxy app such as “ProxyDroid,” “Orbot,” or “Hotspot VPN.”
- Choose an app that suits your needs and has positive reviews and ratings.
- Install the selected app on your device by tapping the “Install” button.
- Once installed, open the proxy app.
- Follow the on-screen instructions to configure the proxy server settings within the app.
- Typically, you will need to enter the proxy server address, port, and any necessary authentication details.
- Save the settings and enable the proxy connection within the app.
- You can now browse the internet using the proxy server and enjoy the benefits it provides.
Proxy apps offer a user-friendly interface and additional features that enhance your proxy server experience. Depending on the app, you may have various options to choose proxy server locations, customize proxy settings for specific apps, or even enable automatic proxy switching based on your network conditions.
Be sure to choose a reputable proxy app from the Play Store and carefully follow the app’s instructions for setting up and configuring the proxy server. Some apps may require additional permissions or settings adjustments to function properly.
Using a dedicated proxy app simplifies the process of setting up and managing proxy servers on your Android device. It provides an intuitive interface, making it suitable for users who may not be familiar with manual proxy configuration or system settings.
Now that you know how to use a proxy app from the Play Store, you can easily set up and manage proxy servers on your Android device. Enjoy the added privacy, access to restricted content, and enhanced control over your internet connection.
Method 3: Configuring Proxy Settings for Wi-Fi Networks
If you frequently connect to specific Wi-Fi networks and want to use a proxy server for those networks only, you can configure proxy settings on a per-network basis on your Android device. This method allows you to have granular control over which Wi-Fi networks use a proxy server and which do not. Follow the steps below to configure proxy settings for Wi-Fi networks:
- Connect to the Wi-Fi network for which you want to set up the proxy server on your Android device.
- Go to the “Settings” app on your Android device.
- Scroll down and tap on “Wi-Fi” or “Network & Internet,” depending on your device.
- Find the Wi-Fi network you are currently connected to and tap on it.
- Tap on “Manage network settings” or “Advanced” settings to access additional options for the selected Wi-Fi network.
- Scroll down and tap on the “Proxy” option to configure the proxy settings for that specific Wi-Fi network.
- Depending on your device and Android version, you may see options like “None,” “Manual,” or “Proxy Auto-Config” for proxy configuration.
- Choose the appropriate proxy configuration option to set up the proxy server.
- If you select “Manual,” enter the proxy server address and port provided by your network administrator.
- Save the settings to apply the proxy configuration for that Wi-Fi network.
- Repeat these steps for other Wi-Fi networks if desired.
By configuring proxy settings on a per-network basis, you can specify different proxy server configurations for each Wi-Fi network you connect to. This way, you can selectively utilize proxy servers depending on your preferences or requirements.
It’s important to note that if you switch to a different Wi-Fi network, you will need to repeat these steps to configure the proxy settings for that new network. Additionally, if you no longer want to use a proxy server for a specific Wi-Fi network, you can simply choose the “None” option in the proxy settings for that network.
Configuring proxy settings for Wi-Fi networks allows you to have greater control over proxy server usage based on your Wi-Fi connections. This method ensures that you can use a proxy server only when connected to specific networks, while other networks can bypass the proxy altogether.
Now that you’re familiar with the method of configuring proxy settings for Wi-Fi networks, you can easily manage and set up proxy servers for specific Wi-Fi connections on your Android device.
Method 4: Setting Up a Proxy for Mobile Data
In some cases, you may want to use a proxy server specifically for mobile data connections on your Android device. By setting up a proxy for mobile data, you can route all your cellular internet traffic through the proxy server, providing you with added privacy, security, and control. Here’s how to set up a proxy for mobile data:
- Open the “Settings” app on your Android device.
- Scroll down and tap on “Network & Internet” or “Connections,” depending on your device.
- Tap on “Mobile network” or “Mobile data” to access the mobile data settings.
- Scroll down and tap on “Access Point Names” or “APN” to view the APN settings for your mobile network provider.
- Select your current mobile network provider’s APN settings.
- Scroll down and find the “Proxy” or “Proxy server” field.
- Enter the proxy server address and port provided by your network administrator into the respective fields.
- Tap “Save” to save the proxy settings for mobile data.
Once the proxy settings are saved, your Android device will route all mobile data traffic through the specified proxy server. This means that any app or browser that uses cellular data will use the configured proxy server for its connections.
Please note that the availability of proxy settings for mobile data may vary depending on your device and Android version. If you cannot find the proxy settings in the mobile network or APN settings, it is possible that your device or mobile network provider does not support configuring a proxy for mobile data.
Setting up a proxy for mobile data allows you to have comprehensive control over your device’s internet traffic. However, be aware that using a proxy for mobile data might impact your mobile data plan’s usage and may result in additional data consumption.
Now that you know how to set up a proxy for mobile data on your Android device, you can enjoy the benefits of enhanced privacy, security, and control when browsing the internet using your cellular data connection.
Conclusion
Setting up a proxy server on your Android device offers a range of benefits, including enhanced privacy, access to geo-restricted content, improved browsing speed, and added security. Whether you choose to utilize the Android system proxy settings, proxy apps from the Play Store, configure proxy settings for specific Wi-Fi networks, or set up a proxy for mobile data, each method provides flexibility and options to cater to your specific needs and preferences.
By using the Android system proxy settings, you can configure a system-wide proxy server that applies to all apps on your device. This method is ideal if you want a consistent proxy setup across all internet-connected applications. Alternatively, using a dedicated proxy app from the Play Store allows for a more user-friendly experience with additional customization features and ease of management.
Configuring proxy settings for individual Wi-Fi networks provides you with granular control, enabling you to specify proxy server usage for specific networks while bypassing the proxy for others. This method is especially useful when you frequently connect to different Wi-Fi networks with varying proxy requirements.
If you prefer using mobile data, setting up a proxy specifically for mobile data connections provides added privacy, security, and control over your cellular internet traffic. However, this option may not be available on all devices or supported by all mobile network providers.
Choose the method that best suits your needs, taking into account factors such as ease of setup, level of control, and specific requirements for accessing restricted content or improving browsing speed. Keep in mind that proxy servers can have limitations, such as potential compatibility issues or slower connection speed in some cases.
Now that you have a comprehensive understanding of how to set up a proxy server on your Android device, you can take advantage of the benefits these servers offer and customize your online experience according to your preferences. Whether it’s for added privacy, bypassing regional restrictions, or optimizing your internet connection, a proxy server can be a valuable tool for enhancing your Android device’s internet connectivity.