Introduction
In the world of computers and technology, the central processing unit (CPU) plays a crucial role in determining the overall performance of a system. The CPU is responsible for executing tasks, performing calculations, and running programs. Within the CPU, there are multiple processing units known as cores. The number of cores in a CPU can significantly impact its processing power and capabilities.
While most CPUs come with a set number of cores that are enabled by default, some CPUs have hidden or disabled cores that can be unlocked to increase performance. This process is known as CPU core unlocking. By unlocking the dormant cores, users can potentially enhance their system’s multitasking abilities and overall computing power without having to invest in a new CPU.
However, before attempting to unlock CPU cores, understanding the risks and benefits is essential. This article will provide a step-by-step guide on how to unlock CPU cores and discuss the reasons why someone might want to undertake this process. Additionally, we will explore the necessary tools for monitoring and testing unlocked CPU cores and highlight important considerations and potential risks.
What Is CPU Core Unlocking?
CPU core unlocking refers to the process of enabling or “unlocking” additional cores in a CPU that are typically disabled or hidden by the manufacturer. Most modern CPUs are manufactured with multiple cores, but not all of them are always enabled. This is often done to differentiate between different product lines and price points.
When a CPU is manufactured, each core goes through testing to ensure it meets the desired specifications. Sometimes, cores that do not meet the highest standards are disabled and locked by the manufacturer. This allows CPUs to be sold at lower prices or used for lower-tier product lines without losing the entire chip due to a faulty core.
Unlocking CPU cores involves accessing the system’s BIOS (Basic Input/Output System) and adjusting the settings to enable the disabled cores. This process can vary depending on the specific motherboard and BIOS version being used, as manufacturers may have different BIOS interfaces and options available.
It’s important to note that not all CPUs can have their cores unlocked. Not every CPU model or manufacturer provides the option to unlock cores, and even if the option is available, it doesn’t guarantee successful core unlocking. It’s crucial to research and check whether your CPU model supports core unlocking before attempting the process.
CPU core unlocking can be particularly beneficial for those who engage in tasks that require high-performance computing, such as video editing, 3D rendering, gaming, and running multiple virtual machines simultaneously. By unlocking additional cores, the CPU can distribute the workload across more cores, resulting in improved performance and reduced processing times.
Why Unlock CPU Cores?
Unlocking CPU cores can offer several advantages for users looking to optimize their computer’s performance without investing in a new CPU. Here are some compelling reasons to consider unlocking CPU cores:
1. Increased Multitasking Ability:
Unlocking CPU cores allows for better multitasking capabilities. Each core in the CPU can handle separate tasks simultaneously, so by unlocking additional cores, your computer can handle more tasks efficiently. This is particularly beneficial for power users who frequently run resource-intensive programs or perform tasks that require high processing power.
2. Improved Performance:
Unlocking CPU cores can significantly enhance your computer’s performance. With more cores available, the CPU can distribute the workload more evenly, resulting in faster and smoother operation. This can be particularly advantageous for demanding applications, such as video editing, gaming, and content creation, where every bit of processing power counts.
3. Cost-Effective Upgrade:
Unlocking CPU cores provides a cost-effective way to improve your computer’s performance. Instead of purchasing a new, more powerful CPU, unlocking the existing cores can yield noticeable performance gains without breaking the bank. This is especially beneficial for budget-conscious users looking to extend the lifespan and capabilities of their current system.
4. Flexibility for Overclocking:
Overclocking is the process of running a CPU at a higher clock speed than its default setting. When unlocking CPU cores, it can also provide greater flexibility for overclocking. This means you can potentially achieve higher clock speeds and better overall performance when pushing your system to its limits.
5. Learning Experience:
Unlocking CPU cores can be a fascinating and educational experience for computer enthusiasts. It allows you to delve into the inner workings of your system, gain a better understanding of hardware configurations, and experiment with different settings to optimize your computer’s performance. It can be a rewarding journey for those curious about computer hardware and willing to explore its capabilities.
While there are several benefits to unlocking CPU cores, it’s important to note that the outcome may vary depending on individual system configurations and CPU models. Not all CPUs can be successfully unlocked or yield significant performance improvements. It’s crucial to research and understand the specific capabilities of your CPU before attempting to unlock its cores.
Check Compatibility
Before attempting to unlock CPU cores, it is crucial to check the compatibility of your CPU and motherboard. Not all CPUs and motherboards support the core unlocking feature, and attempting to unlock unsupported cores can result in system instability or even damage to the hardware.
Here are some steps to check the compatibility:
1. Research Your CPU Model:
Start by researching your CPU model to determine if it supports core unlocking. Visit the manufacturer’s website or search for user forums and reviews to gather information about your specific CPU’s unlocking capabilities.
2. Verify Motherboard Support:
Check if your motherboard supports core unlocking. Visit the motherboard manufacturer’s website and look for your specific model. Look for BIOS update notes, user manuals, or compatibility lists that mention core unlocking as a supported feature. Make sure you have the latest BIOS version installed on your motherboard.
3. Check BIOS Options:
Access your system’s BIOS and navigate through the settings to find the option related to core unlocking. This option might be under different sections depending on your motherboard model. Look for terms like “Core Unlocking,” “Advanced CPU Configuration,” or “CPU Core Control.” If you cannot find any such option, it is likely that your motherboard does not support core unlocking.
4. Consult Technical Support:
If you are unsure about the compatibility of your CPU and motherboard or need further assistance, consider reaching out to the manufacturer’s technical support. They can provide guidance specific to your hardware setup and advise you on the feasibility of unlocking CPU cores.
It is important to note that core unlocking carries some risks, such as stability issues, system crashes, or voiding warranty. Therefore, it is recommended to proceed with caution and verify compatibility before attempting to unlock CPU cores. Always follow the manufacturer’s guidelines and instructions to ensure a safe and successful core unlocking process.
Steps to Unlock CPU Cores
If you have confirmed that your CPU and motherboard support core unlocking, you can proceed with the following steps to unlock the CPU cores:
Step 1: Access the BIOS
Restart your computer and enter the BIOS setup. This is typically done by pressing a specific key during the boot process, such as Del or F2. The key to enter the BIOS may vary depending on your motherboard manufacturer. Refer to your motherboard’s user manual or the manufacturer’s website for the correct key.
Step 2: Locate Core Unlocking Options
Navigate through the BIOS settings and look for the option related to core unlocking. This option is usually found under the Advanced CPU Configuration or a similar section. Depending on your motherboard, the option may be called Core Unlocking, Unlock CPU Cores, or something similar.
Step 3: Enable Core Unlocking
Select the core unlocking option and set it to Enabled. This will activate the hidden or disabled CPU cores. Depending on your motherboard and CPU, you may have the option to unlock all cores or specific ones. Read the instructions provided by your motherboard manufacturer for any specific guidance.
Step 4: Save and Exit BIOS
Once you have enabled the core unlocking option, navigate to the Save and Exit or a similar section in the BIOS. Select the option to save the changes you made and exit the BIOS setup.
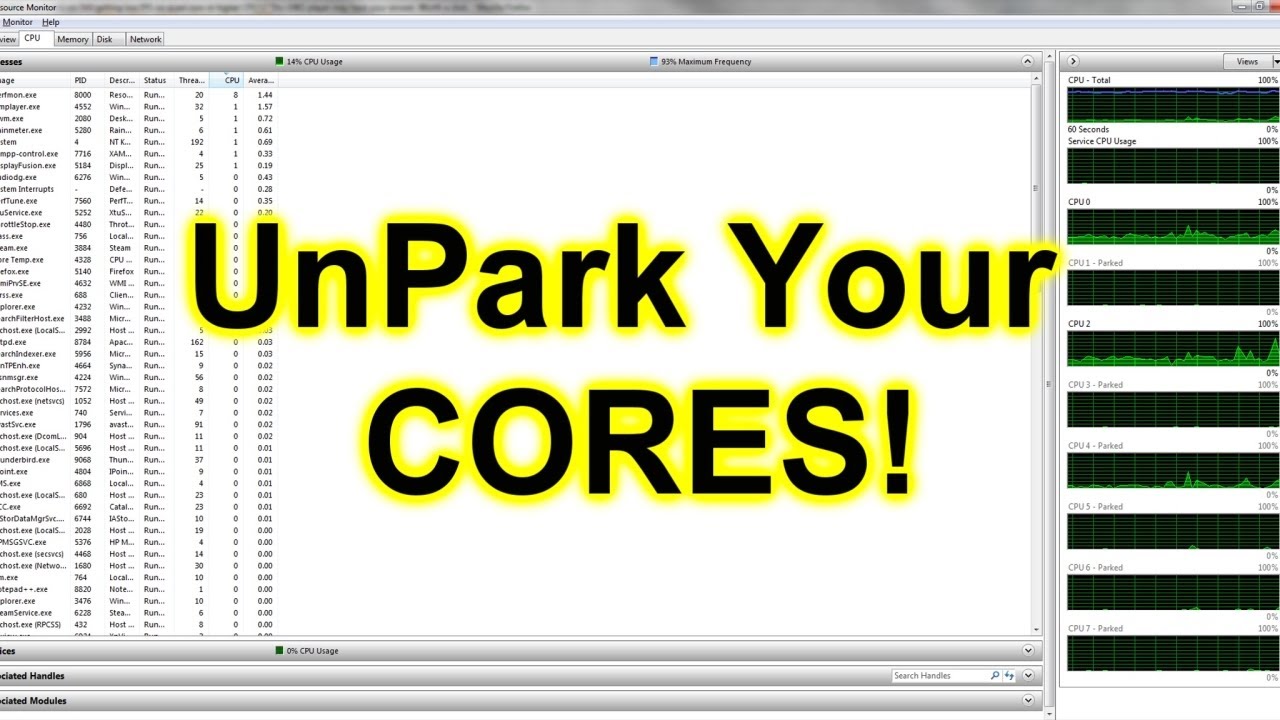
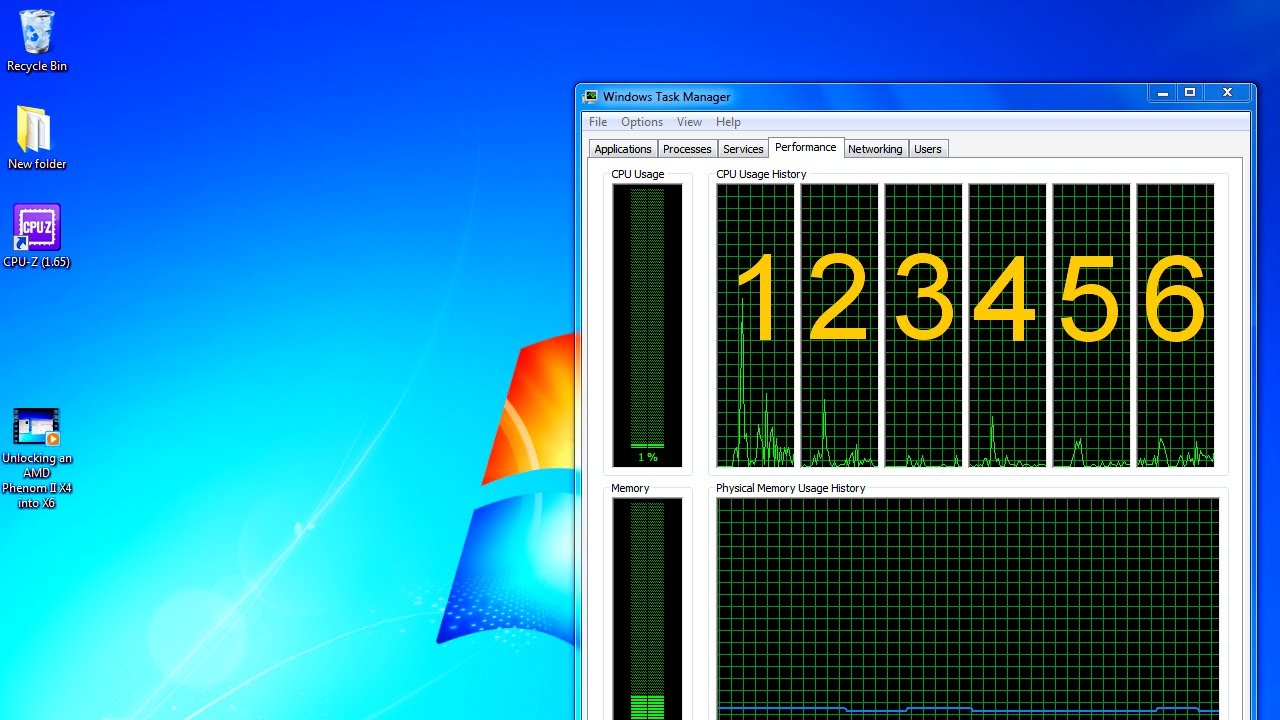
After you exit the BIOS, your system will restart, and the unlocked CPU cores should now be active. To confirm that the cores have been successfully unlocked, you can use system monitoring software or task manager to check the number of available cores.
Note that every motherboard BIOS interface is different, and the specific steps may vary. Always refer to your motherboard’s user manual or manufacturer’s documentation for detailed instructions on unlocking CPU cores specific to your setup.
Step 1: Access the BIOS
Accessing the BIOS is the first step in unlocking CPU cores. The BIOS (Basic Input/Output System) is a firmware interface that allows you to configure various hardware settings on your computer. To access the BIOS, follow these steps:
1. Restart Your Computer:
Start by restarting your computer. You can do this by clicking on the “Start” menu, selecting the “Power” option, and choosing “Restart.”
2. Enter the BIOS Setup:
During the boot-up process, you need to enter the BIOS setup. The key to access the BIOS may vary depending on your motherboard manufacturer. Common keys include Del (Delete), F2, F10, or Esc. Look for the key specified on your computer screen during the boot process. It is usually mentioned as “Press [key] to enter Setup” or a similar message. Press the designated key as soon as you see the message.
3. Navigate through the BIOS:
Once you have entered the BIOS setup, you will see a series of menus and options. Use the arrow keys on your keyboard to navigate through the BIOS interface. Each motherboard manufacturer has a slightly different BIOS setup, so the layout and options may vary.
4. Make Note of Current Settings:
Before making any changes in the BIOS, it is a good practice to make note of your current settings. This will allow you to revert back to the original configuration if needed. You can take pictures or write down the settings for reference.
5. Locate the Core Unlocking Options:
In the BIOS setup, look for the section related to CPU settings or advanced configuration. The exact location of the core unlocking options may vary depending on your motherboard. Look for terms like “Core Unlocking,” “CPU Configuration,” or “Advanced CPU Features.”
6. Access Core Unlocking Options:
Once you have found the core unlocking options, select them to access the settings. Some motherboards may have a sub-menu dedicated to CPU configuration, while others may have the options directly accessible within the main menu.
By following these steps, you will successfully access the BIOS setup on your computer. This will allow you to navigate to the core unlocking options and proceed with unlocking the CPU cores. Remember to always refer to your motherboard’s user manual or manufacturer’s documentation for specific instructions tailored to your motherboard model.
Step 2: Locate Core Unlocking Options
After accessing the BIOS setup, the next step in unlocking CPU cores is to locate the core unlocking options. These options can vary depending on your motherboard model and BIOS version. Here’s how to locate the core unlocking options:
1. Explore BIOS Menus:
Once you are in the BIOS setup, navigate through the menus using the arrow keys on your keyboard. Look for the menu that contains CPU-related settings. This menu is often labeled as “CPU Configuration,” “Advanced CPU Features,” or something similar. Keep in mind that the exact wording may differ based on your motherboard manufacturer.
2. Check Sub-Menus:
In some cases, the core unlocking options may be located within sub-menus rather than the main CPU menu. Explore each menu option to find additional settings related to the CPU. Look for terms like “Core Unlocking,” “CPU Cores,” “Unlock Cores,” or similar terminology.
3. Refer to the User Manual:
If you’re having difficulty locating the core unlocking options, consult your motherboard’s user manual. The manual provides detailed information about the BIOS interface and the location of specific settings. Look for the section that explains the BIOS settings related to the CPU or core unlocking.
4. Search for Online Resources:
If you don’t have the user manual or still need further guidance, search for your motherboard model and BIOS version online. You may find forums or websites that discuss the specific core unlocking options for your motherboard. Other users who have the same motherboard might share their experiences and provide instructions or screenshots on how to access the core unlocking settings.
Remember that not all motherboards have core unlocking options. If you cannot find any settings related to core unlocking, it’s possible that your motherboard does not support this feature.
By following these steps and exploring the BIOS menus on your motherboard, you will be able to locate the core unlocking options. Once you have found these options, you can proceed to the next step of enabling the core unlocking and unlocking the dormant CPU cores.
Step 3: Enable Core Unlocking
After locating the core unlocking options in the BIOS setup, the next step is to enable the core unlocking feature. Enabling this feature will activate the hidden or disabled CPU cores. Here’s how to enable core unlocking:
1. Select the Core Unlocking Option:
In the CPU or advanced configuration menu, navigate to the core unlocking options. These options may be labeled as “Core Unlocking,” “Unlock CPU Cores,” or something similar. Use the arrow keys on your keyboard to highlight the option.
2. Set the Option to “Enabled”:
Once you have selected the core unlocking option, change the value to “Enabled” using the arrow keys or the designated key mentioned in the BIOS interface. Some BIOS menus may provide a drop-down menu or a toggle switch to enable or disable the core unlocking feature. Make sure you save any changes before exiting the BIOS setup.
3. Adjust Additional Settings (if applicable):
Depending on your motherboard, there may be additional settings related to core unlocking. These settings could include enabling specific cores or adjusting core voltages. Read the motherboard’s documentation or consult online resources for specific instructions on any additional core unlocking settings.
4. Save and Exit the BIOS:
Once you have enabled the core unlocking options and adjusted any necessary settings, proceed to save your changes in the BIOS. Look for the “Save and Exit” option or similar wording within the BIOS setup. Press the designated key, usually F10, to save your changes and exit the BIOS.
After saving and exiting the BIOS, your computer will restart. The unlocked CPU cores should now be active. To confirm that the cores have been successfully unlocked, you can use system monitoring software or check the number of available cores in the operating system’s task manager.
Remember, the steps and options in the BIOS setup may vary depending on your motherboard model and BIOS version. Always refer to the motherboard’s user manual or manufacturer’s documentation for detailed instructions specific to your setup.
Step 4: Save and Exit BIOS
After making the necessary changes in the BIOS to enable core unlocking, the final step is to save your settings and exit the BIOS. Saving the changes ensures that the unlocked CPU cores are activated and ready for use. Here’s how to save and exit the BIOS:
1. Verify the Changes:
Before proceeding, take a moment to review the changes you made in the BIOS. Double-check that you have enabled the core unlocking feature and adjusted any necessary settings correctly.
2. Select “Save and Exit”:
In the BIOS setup, navigate to the “Save and Exit” or a similar option. This option is usually located at the bottom of the screen or in a separate tab. Use the arrow keys to highlight the “Save and Exit” option.
3. Confirm Saving Changes:
Once you have selected the “Save and Exit” option, you will typically be prompted to confirm saving the changes. Depending on your BIOS, you might see a message asking, “Save Changes and Exit?” or something similar. Press the designated key, usually Enter or Y, to confirm and save your settings.
4. Exit the BIOS:
After confirming the changes, the BIOS will save the settings and exit the setup. Your computer will then restart to apply the changes. During the restart process, the unlocked CPU cores will become active and ready for use.
5. Verify Unlocked Cores:
Once your computer has restarted, you can verify if the CPU cores have been successfully unlocked. Open the operating system’s task manager or use system monitoring software to check the number of available and active cores. You should see the additional unlocked cores listed and functioning.
It’s important to note that if you encounter any issues or instability after unlocking CPU cores, you may need to revisit the BIOS settings and disable the core unlocking feature. Always pay attention to your system’s performance and revert any changes if necessary.
By following these steps and saving the changes in the BIOS, you have successfully completed the core unlocking process. Enjoy the benefits of the unlocked CPU cores and the enhanced performance they bring to your computer.
Tools for Monitoring and Testing Unlocked CPU Cores
Once you have successfully unlocked the CPU cores, it’s important to monitor and test their performance to ensure stability and optimal functioning. Here are some useful tools you can use for monitoring and testing unlocked CPU cores:
1. Task Manager:
The built-in task manager in your operating system is a handy tool for monitoring CPU usage, core utilization, and overall system performance. It allows you to check if the unlocked CPU cores are properly recognized and being utilized by running processes and applications. Open the task manager and navigate to the performance tab to get a real-time view of CPU usage and core activity.
2. CPU-Z:
CPU-Z is a popular and lightweight tool that provides detailed information about your CPU, including core count, clock speed, voltage, and more. It can help you verify if the unlocked CPU cores are accurately detected by the system and running at the expected specifications. CPU-Z also provides a real-time monitoring feature that displays core utilization and clock speeds.
3. HWMonitor:
HWMonitor is a comprehensive hardware monitoring tool that provides detailed information about various components, including the CPU. It displays metrics such as temperatures, voltages, and fan speeds. HWMonitor can help you monitor the temperature and voltage of the unlocked CPU cores, ensuring they are operating within safe limits.
4. Prime95:
Prime95 is a popular tool for stress testing CPUs. It pushes the CPU to its maximum capabilities, helping you determine the stability and performance of your unlocked CPU cores. Running Prime95 for an extended period can help you identify any issues, such as system crashes or overheating, that may arise due to the unlocked cores.
5. AIDA64:
AIDA64 is a comprehensive system analysis and benchmarking tool that provides extensive information about your CPU and system. It includes a stress-testing module specifically designed to assess CPU stability. Using AIDA64, you can run stress tests on the unlocked CPU cores to evaluate their performance and check for any potential instability.
6. UserBenchmark:
UserBenchmark is a user-friendly benchmarking tool that measures the performance of your system, including the CPU. It provides comparative results against similar systems and allows you to assess the impact of unlocking CPU cores on overall performance. Run the benchmark both before and after unlocking the cores to gauge the performance improvements.
These tools are just a few examples of what’s available in the market. There are many other monitoring and testing tools, each with its own unique features and capabilities. Explore different tools to find the ones that best suit your needs and preferences.
Using these tools, you can ensure that the unlocked CPU cores are functioning properly, monitor their performance, and detect any potential issues that may arise. Regular monitoring and testing will help you optimize your system’s stability and performance with the unlocked CPU cores.
Risks and Considerations
While unlocking CPU cores can provide potential benefits, it’s important to be aware of the risks and considerations associated with this process. Here are some important points to keep in mind:
1. Stability and Compatibility:
Unlocking CPU cores may result in stability issues if the cores were originally disabled due to defects or incompatibility. Unlocked cores may not function as reliably as the default enabled cores, causing system crashes, blue screens, or other instability problems. It’s essential to thoroughly test the system for stability after unlocking the cores.
2. Overheating and Increased Power Consumption:
Unlocked CPU cores can generate more heat and consume more power, leading to higher temperatures and increased power requirements. Ensure that your cooling system is adequate to handle the additional heat generated by the unlocked cores. Overheating can potentially cause damage to the CPU or other components if not properly managed.
3. Voiding Warranty:
Unlocking CPU cores may void the warranty provided by the manufacturer. Modifying the CPU or making changes to the original specifications can result in the manufacturer refusing to provide warranty coverage for the CPU or any related issues that may arise in the future. Check your warranty terms and the manufacturer’s policies before proceeding with core unlocking.
4. Incompatibility with Software:
Some software applications may not be compatible with unlocked CPU cores. Certain programs may assume a specific number of cores or may not be optimized to utilize additional cores effectively. This can result in reduced performance or compatibility issues with certain software. It’s important to test various applications and ensure compatibility after unlocking the cores.
5. CPU Lifespan and Degradation:
Unlocking CPU cores can potentially accelerate the aging process and reduce the overall lifespan of the CPU. The additional stress placed on the unlocked cores and increased power consumption can contribute to earlier degradation. Regularly monitor temperatures, voltages, and overall CPU health to ensure that the cores are operating within safe limits and to prevent any long-term damage to the CPU.
6. CPU-Specific Limitations:
Not all CPUs can have their cores unlocked, and even if core unlocking is possible, the number of unlocked cores may be limited. Each CPU model has its own specific limitations, and success rates can vary. Research your specific CPU model and motherboard to understand the potential for core unlocking and the maximum number of cores that can be activated.
It’s important to consider these risks and factors before deciding to unlock CPU cores. While core unlocking can provide performance benefits, it’s not without its potential drawbacks. Proceed with caution, ensure proper monitoring and testing, and be prepared to revert back to the original configuration if any issues or concerns arise.
Conclusion
Unlocking CPU cores can be a viable option for users looking to enhance their computer’s performance without investing in a new CPU. By enabling hidden or disabled cores, you can potentially increase multitasking capabilities, improve performance in resource-intensive tasks, and extend the lifespan of your system.
Before attempting to unlock CPU cores, it’s essential to check the compatibility of your CPU and motherboard. Not all CPUs and motherboards support core unlocking, and attempting to unlock unsupported cores can result in instability or damage to your hardware.
Following the step-by-step process of accessing the BIOS, locating core unlocking options, enabling the feature, and saving the changes will unlock the dormant CPU cores. Monitoring and testing the performance of the unlocked cores using tools such as task managers, CPU monitoring software, and stress-testing applications help ensure stability and optimal functioning.
However, it’s crucial to be aware of the risks and considerations associated with core unlocking. Stability issues, overheating, increased power consumption, warranty voidance, software compatibility, and CPU lifespan degradation are some of the factors to consider. It’s essential to thoroughly test the system for stability, monitor temperatures, and be prepared to revert back to the original configuration if any issues arise.
Ultimately, unlocking CPU cores can offer a cost-effective upgrade and a valuable learning experience for computer enthusiasts. By understanding the risks and benefits, conducting proper research, and implementing careful testing and monitoring, you can make an informed decision about unlocking CPU cores and optimize your computer’s performance.