Introduction
Welcome to the world of Android development! If you’re an Android tablet user who wants to explore the hidden potential of your device, enabling Developer Mode is the first step towards unlocking a plethora of advanced features and customization options.
Developer Mode, as the name suggests, is designed for developers and tech-savvy users. It allows you to tinker with system settings, access debugging tools, and install custom software on your Android tablet. By enabling Developer Mode on your device, you gain control over various aspects of your device’s functionality, making it easier to optimize performance, debug apps, and even experiment with exciting new features.
Enabling Developer Mode may sound intimidating, but don’t worry! In this guide, we will walk you through the step-by-step process of enabling Developer Mode on your Android tablet. By the end of this tutorial, you’ll be able to navigate your device like a pro and take full advantage of its capabilities.
Before we dive into the steps, it’s important to note that enabling Developer Mode is intended for advanced users. Proceed with caution, as making incorrect changes to system settings can have unintended consequences, such as bricking your device or voiding your warranty. It’s always a good idea to back up your data before making any changes to your device’s settings.
Now that you’re aware of the risks and precautions, let’s get started on enabling Developer Mode on your Android tablet. With the necessary information at hand, you’ll be able to unleash the true potential of your device and elevate your Android tablet experience to new heights.
Why Enable Developer Mode?
Developer Mode offers a wealth of benefits and opportunities for Android tablet users who are willing to explore beyond the surface-level functionalities. Here are a few compelling reasons why you should consider enabling Developer Mode on your device:
- Customization: Developer Mode allows you to personalize your Android tablet to suit your preferences. You can tweak system settings and experiment with different themes, fonts, and icon packs to create a unique and personalized user interface.
- Debugging and Testing: If you’re an app developer or a beta tester, Developer Mode is an invaluable tool. It provides access to various debugging options, such as USB debugging, which allows you to connect your device to a computer and run test applications, track bugs, and analyze app performance.
- Performance Optimization: Developer Mode lets you fine-tune your device’s performance. You can adjust animation settings, limit background processes, and optimize resource allocation to ensure a smoother and faster user experience.
- Unlocking Hidden Features: Enabling Developer Mode unveils advanced features that are typically hidden from regular users. These features include access to developer options, such as mock locations, display metrics, and GPU rendering, which can be leveraged to enhance app development or modify system behavior.
- Install Custom Software: Developer Mode allows you to install custom ROMs and third-party apps that are not available through the Google Play Store. This opens up a world of possibilities, empowering you to customize your device beyond the limitations imposed by the manufacturer.
Enabling Developer Mode on your Android tablet may seem like a daunting task, but the rewards are well worth the effort. Whether you’re an aspiring developer, an avid tinkerer, or simply someone who loves to dig deeper into their devices, Developer Mode provides a gateway to endless opportunities for exploration, customization, and optimization.
Now that you understand the benefits of enabling Developer Mode, it’s time to delve into the step-by-step process of accessing this powerful mode on your Android tablet.
Step 1: Accessing the Settings Menu
The first step towards enabling Developer Mode on your Android tablet is accessing the Settings menu. Here’s how to do it:
- Start by locating the Settings app on your Android tablet. The icon typically resembles a gear or a set of sliders and can usually be found on the home screen or in the app drawer.
- Tap on the Settings app to open it. This will take you to the main settings screen, where you can manage various aspects of your device.
- Scroll through the settings options until you find the section labeled “System” or “About phone” (the specific name may vary depending on your device’s manufacturer and Android version).
- Once you locate the “System” or “About phone” section, tap on it to access the system settings.
By following these steps, you will successfully navigate to the system settings menu on your Android tablet. Now you’re ready to proceed to the next step, where we will explore how to access the specific option that enables Developer Mode.
Step 2: About Phone/Tablet
Once you have accessed the system settings menu on your Android tablet, the next step is to locate the “About phone” or “About tablet” option. This section contains essential information about your device and serves as the gateway to enabling Developer Mode. Here’s how to find it:
- Scroll through the system settings menu until you find the section labeled “About phone” or “About tablet.” The specific name may vary depending on your device’s manufacturer and Android version.
- Tap on the “About phone” or “About tablet” option to access detailed information about your device.
- In the “About phone” or “About tablet” section, you will find various details about your device, such as the model number, Android version, and kernel version.
It’s worth noting that different Android versions and device manufacturers may organize the system settings menu differently. In some cases, you may find the “About phone” or “About tablet” option directly in the main settings menu without any submenus.
By following these steps, you will successfully locate the “About phone” or “About tablet” option on your Android tablet. Now that you have accessed this section, we can move on to the next step, where we will unveil the hidden trick to enabling Developer Mode.
Step 3: Build Number
Now that you have accessed the “About phone” or “About tablet” section on your Android tablet, it’s time to uncover the hidden secret to enabling Developer Mode. This involves tapping on the build number, which is a secret option that developers use to enable this mode. Follow these steps:
- Within the “About phone” or “About tablet” section, look for an entry called “Build number.” This may be listed under a subheading or directly on the main screen.
- Tap on the “Build number” entry multiple times. To activate Developer Mode, you will typically need to tap it around seven times, but this can vary depending on your device.
- As you tap on the build number, you may see a message indicating how many taps are left to enable Developer Mode. Keep tapping until you see a message that says something like, “You are now a developer!” or “Developer mode has been enabled.”
Once you have successfully tapped on the build number the required number of times, you are well on your way to enabling Developer Mode on your Android tablet. The next step will guide you on how to enter this mode and explore its advanced options.
Step 4: Tapping the Build Number
Now that you have tapped on the build number multiple times in the “About phone” or “About tablet” section of your Android device, it’s time to take the next step towards enabling Developer Mode. Follow these instructions to proceed:
- After tapping on the build number multiple times, you should see a message on your screen indicating that you are now a developer or that Developer Mode has been enabled.
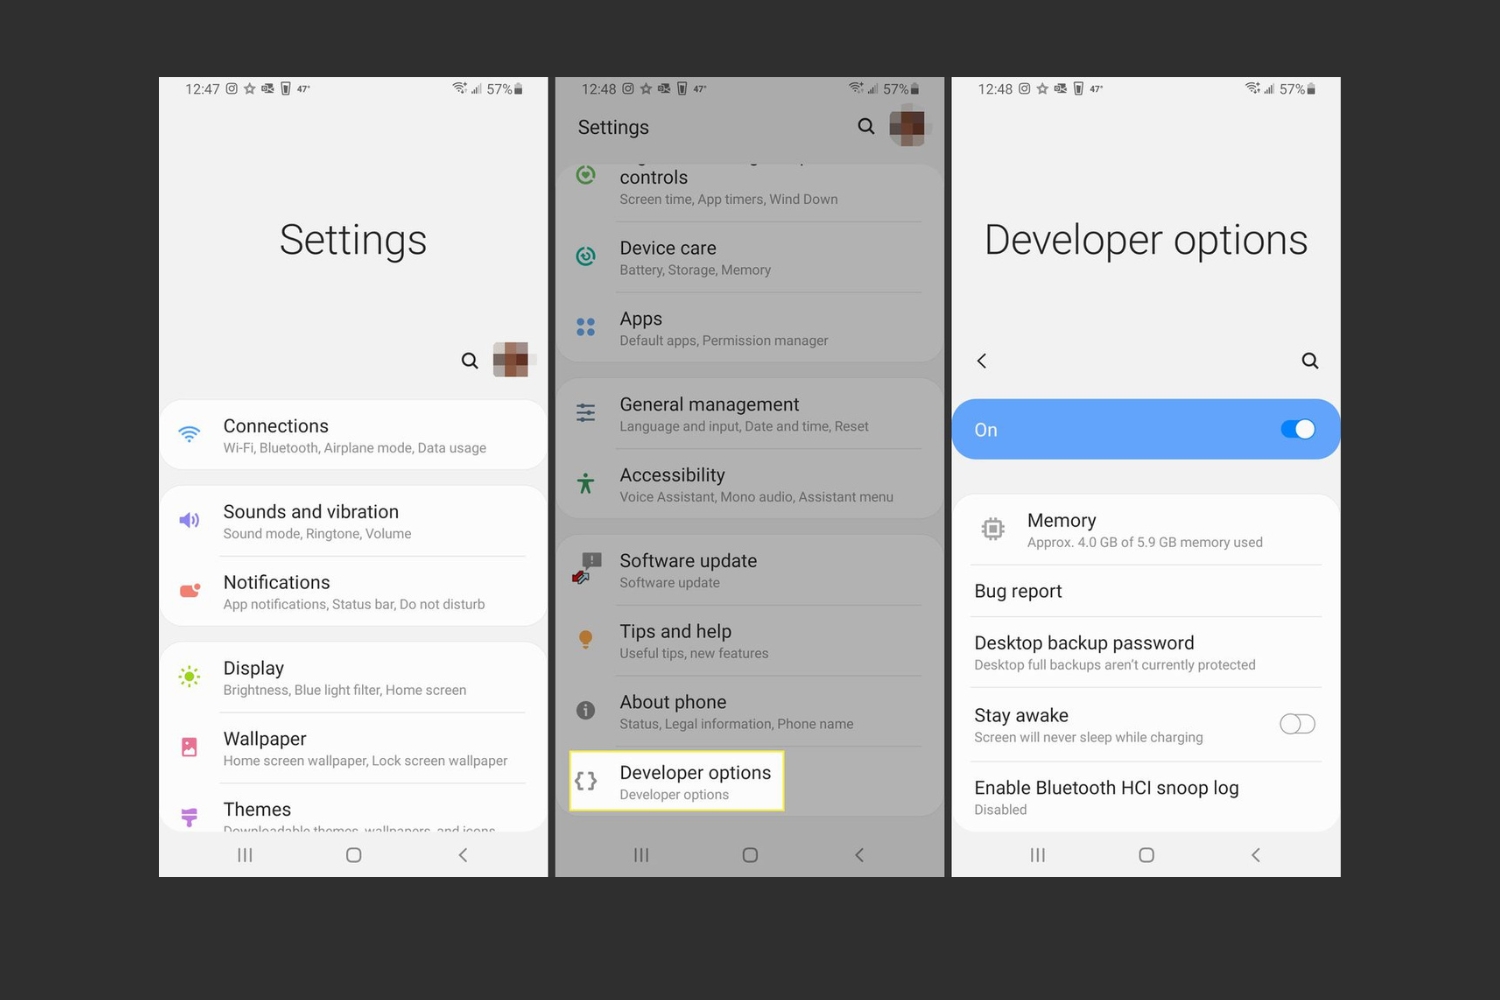
- At this point, go back to the main settings menu of your device. You should now see a new option called “Developer options” near the bottom of the list.
- Tap on “Developer options” to access the advanced settings and customization options available within Developer Mode.
Keep in mind that some Android versions and device manufacturers may require additional steps to access Developer Options. For example, you may need to enter a password or pattern, or toggle a switch to enable Developer Mode.
Congratulations! You have successfully tapped on the build number and accessed the Developer Options menu on your Android tablet. In the final step, we will guide you on how to enter Developer Mode and take advantage of its features.
Step 5: Entering Developer Mode
Now that you have accessed the “Developer options” menu on your Android tablet, it’s time to enter Developer Mode and unlock its full potential. Follow these steps to enter Developer Mode:
- In the “Developer options” menu, you will find a switch at the top of the screen. This switch controls the activation of Developer Mode.
- To enable Developer Mode, simply toggle the switch to the “On” position.
- Once you toggle the switch, you will receive a warning message informing you about the potential risks and consequences of enabling Developer Mode. Read the message carefully, as it outlines the implications of making changes to system settings and warns against unauthorized modifications.
- If you understand the risks involved and are willing to proceed, tap on “OK” or “Enable” to confirm enabling Developer Mode.
With these steps, you have officially entered Developer Mode on your Android tablet. Congratulations! You now have access to a wide range of advanced settings and customization options that were previously hidden from regular users.
Within the Developer Mode menu, you will find various options that allow you to fine-tune your device’s performance, debug applications, and even experiment with experimental features. It’s important to note that these options should be used with caution, as improper usage or modifications can have unintended consequences on the stability and functionality of your device.
Remember, Developer Mode is primarily intended for developers and advanced users who have a clear understanding of the potential risks and implications of making changes to their device’s settings. Take the time to explore the available options, learn about their functionalities, and use them responsibly to enhance your Android tablet experience.
Conclusion
Congratulations! You have successfully enabled Developer Mode on your Android tablet. By following the step-by-step instructions outlined in this guide, you have taken the first step towards unlocking the hidden powers of your device.
Enabling Developer Mode opens up a whole new world of customization, debugging, and advanced settings that can enhance your Android tablet experience. With Developer Mode, you can fine-tune performance, test and debug applications, and even install custom software not available through the official channels.
However, it’s important to approach Developer Mode with caution. Making incorrect changes to your device’s settings can have serious consequences, such as rendering your device inoperable or voiding your warranty. Always make sure to back up your data and carefully read any warning messages before proceeding with modifications.
Now that you are in Developer Mode, take the time to explore the various options available to you. Experiment with different settings, optimize performance, and unleash the true potential of your Android tablet. Embrace the freedom that Developer Mode offers, and let your creativity and technical prowess flourish.
Remember, Developer Mode is not just for developers; it’s for anyone who wants to take control of their device and push its capabilities to the limit. Enjoy the journey of customization, experimentation, and discovery as you harness the power of Developer Mode on your Android tablet.
Happy exploring!