Introduction
Logitech is a well-known brand for computer peripherals, including keyboards, mice, and gaming accessories. One of the key features found on Logitech mice is Angle Snapping, or sometimes referred to as Prediction or Correction. This feature allows for a smoother and more precise mouse movement, especially when performing precise tasks like graphic design or gaming.
Angle Snapping is designed to assist users in maintaining a consistent trajectory when moving the mouse. It automatically adjusts the mouse cursor’s path to ensure smooth movement, even if the user’s hand is slightly unsteady. This can be particularly useful in situations where precise control is necessary, but it may affect the overall accuracy in cases where fine control is required.
While some users prefer to have Angle Snapping enabled, others may find it hindering their accuracy and prefer to turn it off. Fortunately, Logitech provides a user-friendly software interface that allows you to customize your mouse settings, including enabling or disabling Angle Snapping.
In this article, we will guide you on how to turn on Angle Snapping on Logitech mice using the Logitech Gaming Software. Whether you are a professional graphic designer, a hardcore gamer, or simply someone looking to optimize their mouse settings, this guide will help you get the most out of your Logitech mouse.
What is Angle Snapping?
Angle Snapping, also known as Prediction or Correction, is a feature found in Logitech mice that aids in smoothing out mouse movements. It is especially useful for tasks that require precise control, such as photo editing or gaming. Angle Snapping works by automatically adjusting the cursor’s path to follow a straight line or a predefined angle, regardless of the actual movement of the mouse.
This feature can be helpful in scenarios where a user’s hand is slightly unsteady or when making long, sweeping motions. It creates a more fluid and consistent movement, allowing for smoother cursor tracking. However, in situations that require fine, precise control, such as pixel-level editing or aiming in First-Person Shooter (FPS) games, Angle Snapping might interfere with accuracy and lead to unintended cursor positioning.
Angle Snapping is implemented using advanced algorithms that analyze the motion data from the mouse. These algorithms predict the intended path of the user’s movement and make adjustments accordingly. By doing so, it helps users maintain a straight or predefined angle trajectory, compensating for any small jitters or deviations in hand movement.
While Angle Snapping can be a beneficial feature for some users, it’s important to note that not all Logitech mice have this capability. It’s typically found in higher-end models that are designed with precision and gaming in mind. If you are unsure whether your Logitech mouse supports Angle Snapping, you can refer to the product specifications or consult the manufacturer’s website.
Now that we understand what Angle Snapping is and how it works, let’s explore why you might want to enable this feature on your Logitech mouse.
Why would you want to turn on Angle Snapping?
Angle Snapping can be a useful feature to have enabled on your Logitech mouse, depending on the tasks you perform and your personal preferences. Here are a few reasons why you might want to consider turning on Angle Snapping:
- Enhanced precision: Angle Snapping helps in maintaining a consistent trajectory when moving the mouse, especially during long and sweeping movements. It can make it easier to control the cursor with more precision, which can be particularly beneficial for tasks such as graphic design, video editing, or CAD work.
- Smoother cursor movement: By following a straight line or predefined angles, Angle Snapping can create a smoother and more fluid cursor movement. This can be advantageous when navigating through menus, selecting objects, or performing general computer tasks.
- Fine-tuned control: While Angle Snapping may not be ideal for tasks requiring pixel-level accuracy, it can provide an advantage in games that involve broad movements or require quick reactions. Enabling Angle Snapping can assist you in maintaining a consistent movement pattern, making it easier to aim or execute certain maneuvers in games like first-person shooters or real-time strategy games.
- Compensating for unsteady hand movements: If you have a naturally unsteady hand or experience slight tremors, Angle Snapping can compensate for these small movements and help you achieve smoother cursor control. It can be particularly beneficial for individuals with conditions such as essential tremor or carpal tunnel syndrome.
It’s worth noting that the preference for Angle Snapping is subjective and can vary from person to person. Some users may find it invaluable for their specific tasks, while others may prefer to turn it off for more precise control. Ultimately, it’s a matter of personal preference and the type of work or activities you engage in with your Logitech mouse.
Now that we understand the potential benefits of using Angle Snapping, let’s dive into the step-by-step process of how to turn it on for your Logitech mouse using the Logitech Gaming Software.
How to Turn On Angle Snapping on Logitech Mice
If you have a Logitech mouse and you want to enable Angle Snapping, you can easily do so using the Logitech Gaming Software. Follow the step-by-step guide below:
- Step 1: Launch the Logitech Gaming Software
- Step 2: Select your Logitech mouse
- Step 3: Customize settings for your mouse
- Step 4: Enable Angle Snapping
- Step 5: Adjust the Angle Snapping level
- Step 6: Apply the changes
Start by launching the Logitech Gaming Software on your computer. If you haven’t installed it yet, you can download it from the Logitech website and follow the installation instructions.
Once the Logitech Gaming Software is open, it will detect your connected Logitech mouse. Select your mouse from the list of detected devices. If you have multiple Logitech devices connected, make sure to choose the correct one.
In the Logitech Gaming Software interface, you’ll have access to various customization options for your mouse. This includes customizing button assignments, DPI settings, and, of course, Angle Snapping.
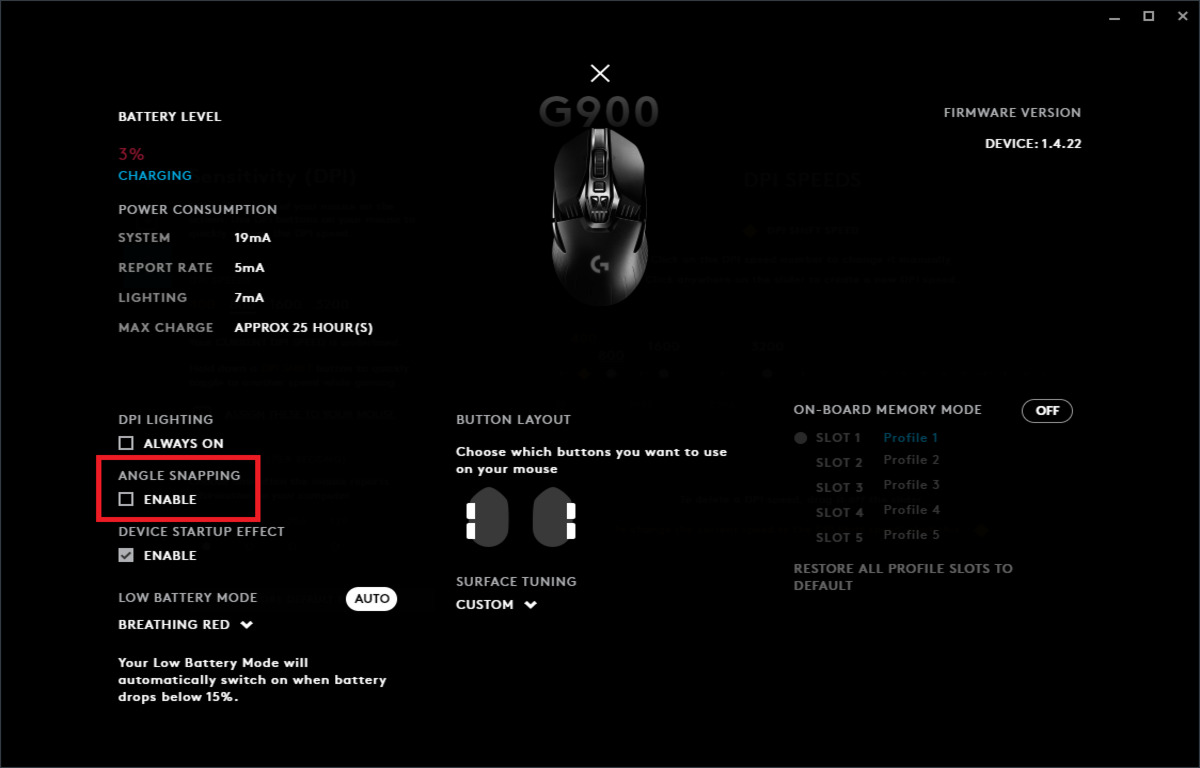
To enable Angle Snapping, navigate to the mouse settings tab in the Logitech Gaming Software. Look for the option that refers to Angle Snapping or Prediction. Depending on your mouse model and software version, the exact wording may vary. Enable the option by clicking on the corresponding checkbox or toggle switch.
Some Logitech mice may provide the ability to adjust the level of Angle Snapping. This allows you to fine-tune the amount of correction applied to your mouse movements. If you have this option available, you can experiment with different levels and see which one feels most comfortable for your needs.
After making the desired adjustments to the Angle Snapping settings, make sure to apply the changes. Look for an “Apply” or “Save” button in the Logitech Gaming Software interface, and click on it to save your settings.
That’s it! You have successfully enabled Angle Snapping on your Logitech mouse. You can now enjoy the benefits of smoother cursor movement and enhanced precision in your tasks or gaming sessions.
Now, let’s conclude our guide and summarize the key points covered.
Step 1: Launch the Logitech Gaming Software
The first step in turning on Angle Snapping on your Logitech mouse is to launch the Logitech Gaming Software. This software is specifically designed for Logitech gaming peripherals, enabling you to customize various settings and personalize your mouse experience.
If you have not installed the Logitech Gaming Software yet, you can download it from the Logitech website. Make sure to download the version that is compatible with your operating system.
Once the Logitech Gaming Software is installed on your computer, locate the software icon either on your desktop or in your program list. Double-click the icon to launch the application.
Upon launching the Logitech Gaming Software, you will be greeted with an intuitive and user-friendly interface.
If your Logitech mouse is already connected, the Logitech Gaming Software will automatically detect it and display the device information on the main screen. You will see the name and model of your mouse, and it may also show other models that the software supports.
If your mouse is not connected, please make sure to connect it to your computer using the provided USB cable or any wireless connection method supported by your Logitech mouse.
Once your mouse is connected and displayed in the Logitech Gaming Software, you are ready to proceed to the next step, which is selecting your Logitech mouse from the available devices.
By launching the Logitech Gaming Software, you have taken the first step in customizing your mouse settings, including enabling Angle Snapping. Now, let’s move on to the next step and select your Logitech mouse.
Step 2: Select your Logitech mouse
After launching the Logitech Gaming Software, the next step to turn on Angle Snapping on your Logitech mouse is to select your specific mouse model from the available devices listed in the software interface. This ensures that the settings you apply will be specific to your mouse and not affect any other connected Logitech devices.
In the Logitech Gaming Software interface, you will see a list of Logitech devices that are detected and supported by the software. Look for your mouse model in the list and click on it to select it.
If you have multiple Logitech devices connected, such as a keyboard or headset, make sure to choose the correct mouse from the list. The name and model of your mouse should be displayed in the software, making it easier to identify the correct device.
Once you have selected your Logitech mouse, you will have access to the customization options specifically tailored for that particular mouse model. These options may include button assignments, sensitivity settings, lighting effects, and, of course, Angle Snapping.
With the mouse selected in the Logitech Gaming Software, the software’s interface will update to display the settings and options applicable to your mouse. You will be able to modify and fine-tune various aspects of your mouse’s performance and functionality.
It’s important to note that the available customization options may vary depending on the specific features supported by your Logitech mouse model. Higher-end gaming mice typically offer more advanced settings and options compared to standard mice.
Now that you have selected your Logitech mouse in the Logitech Gaming Software, you are ready to customize the settings for Angle Snapping, which we will cover in the next step.
Step 3: Customize settings for your mouse
Once you have selected your Logitech mouse in the Logitech Gaming Software, the next step in enabling Angle Snapping is to customize the settings for your mouse. The software provides a range of options and features that allow you to personalize and optimize your mouse’s performance based on your preferences and needs.
In the Logitech Gaming Software interface, you will have access to various tabs or sections dedicated to different aspects of mouse customization. These may include options for button assignments, sensitivity settings, lighting effects, and more.
To customize the settings for Angle Snapping specifically, you need to navigate to the appropriate section or tab in the software. The exact location and name of this section may vary depending on the software version and your mouse model. Look for options related to mouse performance or advanced settings.
Once you have found the Angle Snapping settings, you will be able to make adjustments and enable or disable this feature. The software interface typically provides checkboxes, toggle switches, or drop-down menus to control Angle Snapping.
Take your time to familiarize yourself with the available options and read any descriptions or tooltips provided by the software. These can help you understand the purpose and effects of each setting, allowing you to make informed decisions about your mouse customization.
Aside from Angle Snapping, you may also find other useful settings in this section, such as polling rate, acceleration, or lift-off distance. These settings can further enhance your overall mouse experience and responsiveness.
Remember that customization is subjective, and each individual may have different preferences. It is recommended to experiment with the settings and find what works best for you. You can always adjust and fine-tune the settings later if you feel the need for further optimization.
With the settings section open and ready, you are now prepared to enable Angle Snapping, which we will cover in the next step.
Step 4: Enable Angle Snapping
With the customization settings for your Logitech mouse open in the Logitech Gaming Software, you are now ready to enable Angle Snapping. Follow the instructions below to activate this feature:
- Look for the option specifically labeled as Angle Snapping or Prediction in the customization settings. The exact wording may vary depending on your mouse model and software version.
- Click on the checkbox or toggle switch next to the Angle Snapping option to enable it. You may see the checkbox filled or the toggle switch toggled to the “On” position once enabled.
- By enabling Angle Snapping, your Logitech mouse will automatically adjust cursor movements to follow a straight line or predefined angles. This can enhance precision and control in certain tasks, such as graphic design or gaming.
- If desired, you can also adjust the level of Angle Snapping if your Logitech mouse supports this feature. Some mice provide the ability to fine-tune the amount of correction applied to your movements. Experiment with different levels to find what feels most comfortable and suits your specific needs.
- Remember to save your changes by clicking on the “Apply” or “Save” button within the customization settings. This ensures that your new settings are applied and active.
Enabling Angle Snapping may help enhance your mouse experience and make certain tasks more precise and fluid. However, it’s important to note that some users may prefer to disable Angle Snapping, especially when pixel-level accuracy is required or in specific gaming scenarios. Feel free to experiment and adjust the settings according to your personal preference and the demands of your work or gaming activities.
With Angle Snapping enabled, you are now one step closer to experiencing the benefits of this feature. Next, let’s proceed to the next step and adjust the Angle Snapping level, if available for your Logitech mouse model.
Step 5: Adjust the Angle Snapping level
If your Logitech mouse supports it, you have the option to adjust the level of Angle Snapping. This allows you to fine-tune the amount of correction applied to your mouse movements, providing a more personalized experience. Follow the steps below to adjust the Angle Snapping level:
- Within the customization settings of the Logitech Gaming Software, locate the option for adjusting the Angle Snapping level. This option may appear as a slider, a numerical input field, or a set of predefined levels.
- Experiment with different levels of Angle Snapping by dragging the slider, entering numbers, or selecting a level from the provided options. Higher levels tend to apply more correction to your movements, while lower levels offer less correction. Choose the level that feels most comfortable and suits your needs.
- As you adjust the Angle Snapping level, pay attention to how it affects your mouse movements. Take note of any changes in cursor behavior and consider how it impacts your ability to perform specific tasks, such as graphic design or gaming. Don’t hesitate to try different levels and spend some time finding the right balance for your needs.
- Remember to save your changes by clicking on the “Apply” or “Save” button within the customization settings. This ensures that your adjusted Angle Snapping level is applied and active.
It’s important to note that not all Logitech mice offer the option to adjust the Angle Snapping level. This feature is usually found on more advanced gaming mice that provide a high level of customization. If your mouse does not have this option, you can skip this step and proceed to the next step.
By adjusting the Angle Snapping level, you have the ability to fine-tune the precision and control offered by this feature. It allows you to personalize your mouse experience and find the optimal settings for your specific preferences and tasks.
Now that you have adjusted the Angle Snapping level (if applicable), let’s move on to the final step and apply the changes you have made.
Step 6: Apply the changes
After customizing the Angle Snapping settings on your Logitech mouse using the Logitech Gaming Software, the final step is to apply the changes you have made. This ensures that the new settings take effect and are active on your mouse. Follow the steps below to apply the changes:
- Within the customization settings of the Logitech Gaming Software, locate the “Apply” or “Save” button. This button is typically located at the bottom or top of the customization settings window, or it may be displayed as an icon.
- Click on the “Apply” or “Save” button to save the changes and apply them to your Logitech mouse. The software will update the settings on your mouse, enabling Angle Snapping and any other customization options you have selected.
- Wait for a few moments while the changes are applied. Depending on the complexity of the settings and the processing power of your computer, this process may take a few seconds.
- Once the changes have been successfully applied, you can close the Logitech Gaming Software. The customized settings will remain in effect until you decide to make further changes or restore the defaults.
By applying the changes, you ensure that the Angle Snapping feature is enabled on your Logitech mouse according to your desired settings. This allows you to experience the benefits of smoother cursor movement and enhanced precision, whether you are performing graphic design tasks, video editing, or engaging in gaming activities.
It’s important to note that whenever you make adjustments to your Logitech mouse settings, it’s recommended to test them out and ensure they meet your expectations. If you find that the changes you’ve made do not provide the desired results, you can always return to the Logitech Gaming Software and modify the settings accordingly.
Now that you have successfully applied the changes, you can start enjoying the enhanced mouse experience that Angle Snapping provides. Whether you’re a professional or a casual user, the ability to customize your Logitech mouse settings can greatly improve your productivity and overall comfort while using your computer.
Conclusion
Enabling Angle Snapping on your Logitech mouse can be a valuable feature that enhances your precision and control in tasks such as graphic design and gaming. By following the steps outlined in this guide, you can easily enable Angle Snapping and customize its settings using the Logitech Gaming Software.
Angle Snapping allows for smoother cursor movement by automatically adjusting the mouse’s path to maintain a straight line or predefined angles. This feature can be particularly useful for tasks that require consistent and precise control, eliminating any slight jitters or deviations in hand movement. However, it’s essential to note that Angle Snapping may not be ideal for all scenarios and personal preferences may vary.
To turn on Angle Snapping, you start by launching the Logitech Gaming Software and selecting your specific Logitech mouse. From there, you can customize the settings to enable Angle Snapping and adjust the level of correction if supported by your mouse model. Finally, it’s crucial to apply the changes to ensure they become active on your mouse.
If you find that Angle Snapping doesn’t align with your preferences or the specific tasks at hand, you can always revisit the Logitech Gaming Software and adjust or disable the feature. This flexibility allows you to find the perfect balance of control and accuracy for your workflow.
Remember that the Logitech Gaming Software offers various customization options beyond Angle Snapping, such as button assignments, DPI settings, and lighting effects. Take the time to explore and tailor these settings to further optimize your Logitech mouse experience.
By utilizing Angle Snapping and the Logitech Gaming Software, you can make the most out of your Logitech mouse, whether you’re a professional designer, an avid gamer, or simply someone looking to enhance their cursor control.
Now that you’re equipped with the knowledge and steps to enable Angle Snapping, go ahead and experiment with it to see how it can improve your mouse usage. Enjoy the accuracy, precision, and smooth cursor movement that this feature provides!