Introduction
Transferring files from your Asus tablet to your PC is essential for managing your data, backing up important files, or simply transferring media for easy access. Whether you want to transfer documents, photos, videos, or any other type of file, the process can be straightforward and hassle-free.
In this article, we will guide you through the step-by-step process of transferring files from your Asus tablet to your PC. By following these instructions, you will be able to seamlessly transfer your files in no time.
One of the most convenient ways to transfer files is by connecting your Asus tablet to your PC using a USB cable. This method ensures a stable and reliable connection between the devices, allowing for the quick and efficient transfer of data. By enabling file transfer mode on your tablet and utilizing the file explorer on your PC, you can easily locate, select, and copy the files you want to transfer.
Whether you need to transfer important work documents, memorable photos from your latest vacation, or your favorite music collection, the process is the same. So let’s dive into the step-by-step guide and learn how to transfer files from your Asus tablet to your PC.
Step 1: Connect the Asus Tablet to the PC
The first step in transferring files from your Asus tablet to your PC is to establish a physical connection between the two devices. To do this, you will need a USB cable that is compatible with both your tablet and your PC.
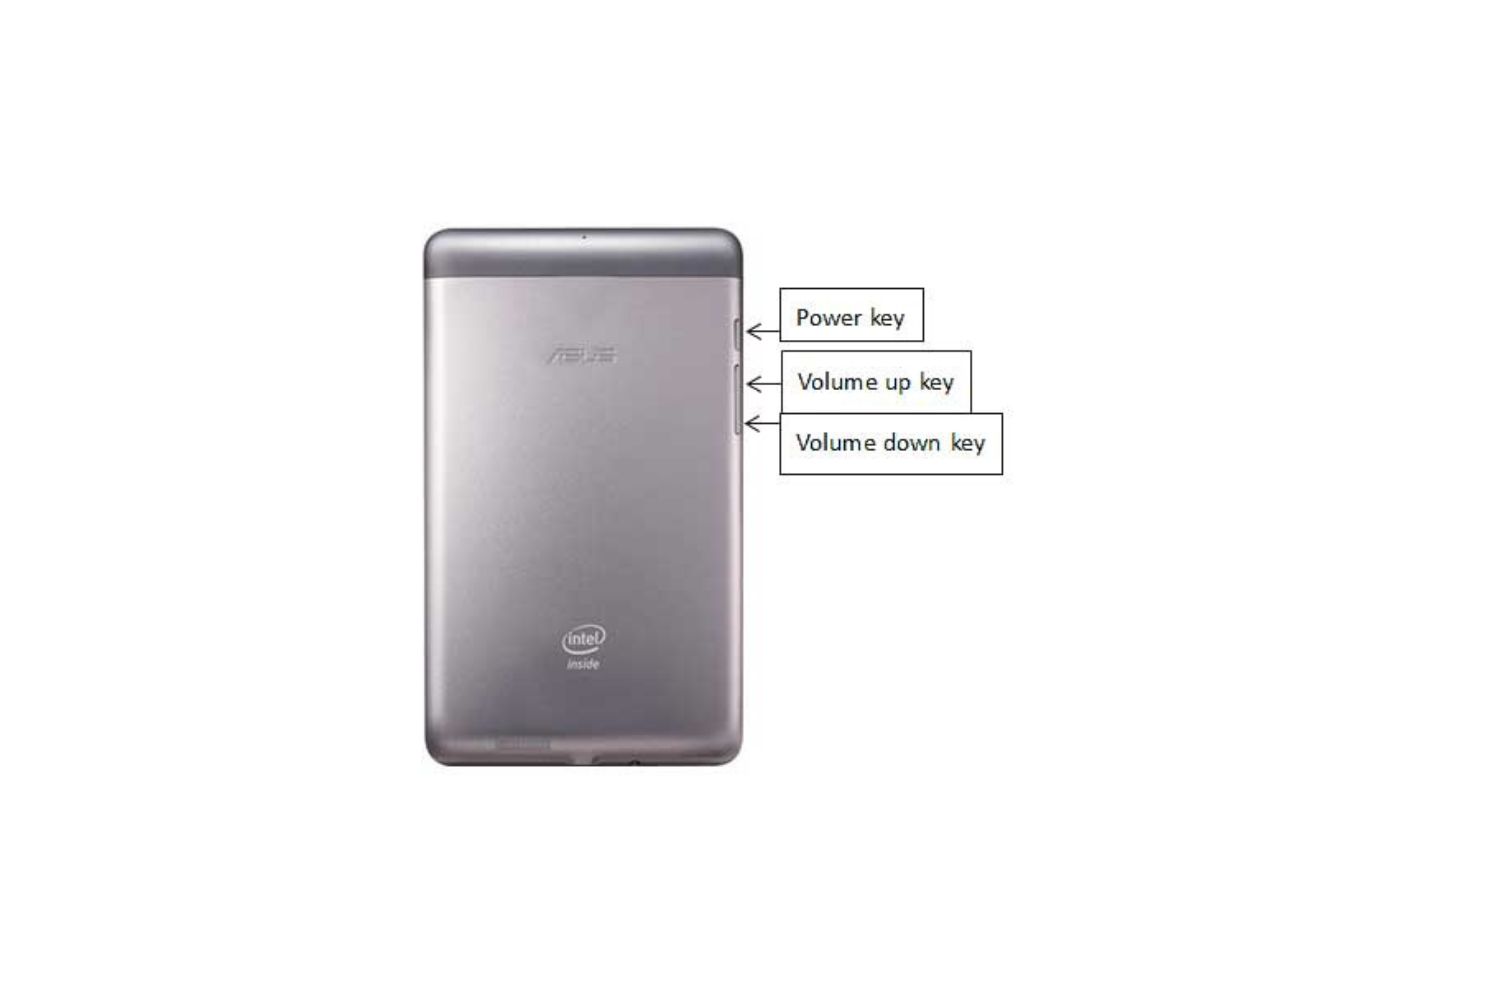
1. Locate the USB port on your Asus tablet. It is usually located on the side or at the bottom of the device.
2. Plug one end of the USB cable into the USB port on your Asus tablet.
3. Next, locate a USB port on your PC. Most PCs have multiple USB ports located either on the front or back of the CPU tower.
4. Plug the other end of the USB cable into the USB port on your PC.
5. Once the cable is securely connected, both your Asus tablet and your PC will recognize the connection.
6. Your tablet may display a notification indicating that it is connected as a media device.
Now that your Asus tablet is physically connected to your PC, you can proceed to the next step and enable file transfer mode on your tablet.
Step 2: Enable File Transfer Mode on the Tablet
Once you have connected your Asus tablet to your PC, you need to enable the file transfer mode on your tablet. This allows your PC to recognize your tablet as a storage device and grants you access to its files.
1. On your Asus tablet, swipe down from the top of the screen to open the notification panel.
2. Look for a notification that says “USB options” or “USB connection.” Tap on it to open the USB settings.
3. In the USB settings, you will see different options for connecting your tablet to your PC. Select the option that says “File Transfer” or “MTP (Media Transfer Protocol).” This option allows for the transfer of files between your tablet and your PC.
4. Once you have selected the appropriate option, your tablet will be in file transfer mode, and your PC will be able to access its files.
It’s important to note that the names of the options may vary depending on your Asus tablet’s model and operating system version. However, the general concept remains the same: enabling file transfer mode allows for seamless file transfer between your tablet and your PC.
Now that you have enabled file transfer mode on your tablet, it’s time to move on to the next step and open File Explorer on your PC.
Step 3: Open File Explorer on the PC
After enabling file transfer mode on your Asus tablet, the next step is to open File Explorer on your PC. File Explorer is a built-in file management tool in Windows that allows you to navigate through your computer’s files and folders.
Here’s how to open File Explorer on your PC:
1. Go to your PC’s desktop by minimizing or closing any open windows or applications.
2. Look for the File Explorer icon on the taskbar. The icon resembles a folder and is usually located at the bottom left corner of the screen.
3. Alternatively, you can press the Windows key + E on your keyboard to open File Explorer quickly.
4. Click on the File Explorer icon or press Enter after using the keyboard shortcut, and the File Explorer window will open on your PC.
Once File Explorer is open, you can see the various drives and folders on your PC’s storage. Now, it’s time to locate your Asus tablet in File Explorer so that you can access and transfer files from it to your PC.
Proceed to the next step to learn how to locate the Asus tablet in File Explorer.
Step 4: Locate the Asus Tablet in File Explorer
Once you have File Explorer open on your PC, the next step is to locate your Asus tablet within File Explorer. This will allow you to access the files and folders stored on your tablet and initiate the transfer process.
Follow these steps to locate your Asus tablet in File Explorer:
1. Look for the “This PC” or “My Computer” icon in the left-hand navigation pane of File Explorer. Click on it to expand the list of available drives and devices.
2. Scroll through the list of drives until you find your Asus tablet. It is typically displayed as a separate device with a recognizable name, such as “Asus Tablet” or the model name of your tablet.
3. Click on your Asus tablet’s name, and File Explorer will display the files and folders stored on your tablet.
4. If prompted, enter any necessary credentials or passwords to authenticate the connection between your tablet and PC.
Once you have successfully located your Asus tablet in File Explorer, you can proceed to the next step and select the files you want to transfer to your PC.
Note that the appearance and arrangement of devices within File Explorer may differ slightly depending on your PC’s operating system and configuration. However, the general process of finding and accessing your Asus tablet remains the same.
Step 5: Select and Copy Files from the Tablet to the PC
Now that you have located your Asus tablet in File Explorer, it’s time to select and copy the files you want to transfer from the tablet to your PC. This process allows you to choose specific files or entire folders for transfer.
Follow these steps to select and copy files from your tablet to the PC:
1. Navigate to the desired folder or location on your Asus tablet within File Explorer.
2. To select individual files, simply click on the file(s) you want to transfer. To select multiple files, hold down the Ctrl key on your keyboard while clicking on each file. Alternatively, to select all files in a folder, press Ctrl + A.
3. Once you have selected the files you want to transfer, right-click on one of the selected files and choose “Copy” from the context menu. Alternatively, you can press Ctrl + C on your keyboard.
4. Go back to File Explorer and navigate to the location on your PC where you want to transfer the files.
5. Right-click on an empty space within the folder and choose “Paste” from the context menu. Alternatively, you can press Ctrl + V on your keyboard.
6. The selected files will be copied from your Asus tablet to the specified location on your PC. Depending on the size and number of files, this process may take some time.
7. You can monitor the progress of the file transfer by checking the file copying dialog or progress bar that appears during the transfer process.
Once the file transfer is complete, you will have successfully copied the selected files from your Asus tablet to your PC. You can now access and manage these files on your PC as needed.
Step 6: Paste the Files in a Desired Location on the PC
After selecting the files from your Asus tablet, the next step is to paste them into a desired location on your PC. This allows you to organize and store the transferred files in a way that suits your preferences.
Follow these steps to paste the files into a desired location on your PC:
1. Open File Explorer on your PC if it’s not already open.
2. Navigate to the folder or location where you want to paste the transferred files.
3. Right-click on an empty space within the folder and choose “Paste” from the context menu. Alternatively, you can press Ctrl + V on your keyboard.
4. The selected files will be pasted into the specified location on your PC.
5. Depending on the number and size of the files, the pasting process may take some time. You can monitor the progress of the file paste operation by checking the file copying dialog or progress bar that appears during the process.
6. Once the files are successfully pasted, they will be available in the designated location on your PC. You can access and manage them just like any other file on your computer.
It’s worth noting that you can paste the files into existing folders or create new folders within the desired location to organize them. This allows for better file management and easy access in the future. Take the time to create a logical folder structure that makes sense for your transferred files.
Now that you have successfully pasted the transferred files into the desired location on your PC, you are ready to safely disconnect your Asus tablet from the PC. This is the final step in the file transfer process, which we will cover in the next section.
Step 7: Safely Disconnect the Asus Tablet from the PC
After successfully transferring files from your Asus tablet to your PC, it is important to safely disconnect your tablet to ensure that no data is lost or corrupted. Safely disconnecting the tablet helps prevent any potential damage to both the tablet and the files being transferred.
Follow these steps to safely disconnect your Asus tablet from the PC:
1. On your PC, locate the system tray located at the bottom right corner of the taskbar. This area displays various icons, including the system and device notification icons.
2. Look for the “Safely Remove Hardware and Eject Media” icon. It may appear as a USB device with a green checkmark or a similarly labeled icon.
3. Right-click on the icon and a menu will appear showing the connected devices.
4. Locate your Asus tablet in the menu and click on it to safely eject it from the PC.
5. Wait for a notification confirming that it is safe to remove the tablet. This ensures that all file operations are complete and any cached data is properly written to the tablet’s storage before disconnecting.
6. Once you receive the confirmation notification, carefully unplug the USB cable from both your tablet and PC.
By following these steps, you have safely disconnected your Asus tablet from the PC. It is important not to remove the USB cable abruptly without properly ejecting the device, as it may result in data corruption or loss.
Now you can safely use your Asus tablet or connect it to other devices for various purposes.
Conclusion
Transferring files from your Asus tablet to your PC is a simple and practical process that allows you to manage and access your files more conveniently. By following the step-by-step guide outlined in this article, you can seamlessly transfer documents, photos, videos, and other files from your tablet to your PC.
Starting with the physical connection between your Asus tablet and PC using a USB cable, you then enable file transfer mode on your tablet and open File Explorer on your PC. Locating your Asus tablet within File Explorer enables you to select and copy the files you want to transfer. Afterward, you paste the files into a desired location on your PC, ensuring easy access and organization.
Finally, it is crucial to safely disconnect your Asus tablet from the PC to prevent any data loss or damage. By following the steps outlined in this guide, you can ensure a smooth and successful file transfer process.
Remember to check for any system or device compatibility requirements when transferring files between your tablet and PC. Additionally, ensure that your devices are charged adequately and have sufficient storage space for the files you intend to transfer.
By utilizing these steps, you can efficiently manage your files between your Asus tablet and PC, enhancing productivity, and ensuring that your data is safely stored and accessible on multiple devices.