Introduction
Do you own a Galaxy S7 tablet and want to learn how to take a screenshot? Taking a screenshot is a useful feature that allows you to capture and save anything displayed on your tablet’s screen. It’s a handy way to preserve important information, share funny moments, or troubleshoot issues by capturing error messages. Luckily, taking a screenshot on your Galaxy S7 tablet is a simple process that can be done using various methods.
In this article, we will explore four different methods to capture screenshots on your Galaxy S7 tablet. Whether you prefer using physical buttons, the palm swipe gesture, the S Pen, or the quick settings panel, we’ve got you covered. Each method offers its unique advantages, so you can choose the one that suits your preferences and needs best.
So, without further ado, let’s dive into the various methods of taking a screenshot on your Galaxy S7 tablet. Whether you’re new to the device or just looking for a refresher, this guide will help you capture those important moments with ease.
Method 1: Using Physical Buttons
If you prefer the traditional method, using the physical buttons on your Galaxy S7 tablet is a quick and reliable way to capture a screenshot. Here’s how:
- Position your tablet screen to display the content you want to capture in the screenshot.
- Locate the Power button (located on the right side) and the Volume Down button (located on the left side) of your tablet.
- Press and hold both the Power and Volume Down buttons simultaneously for a brief moment.
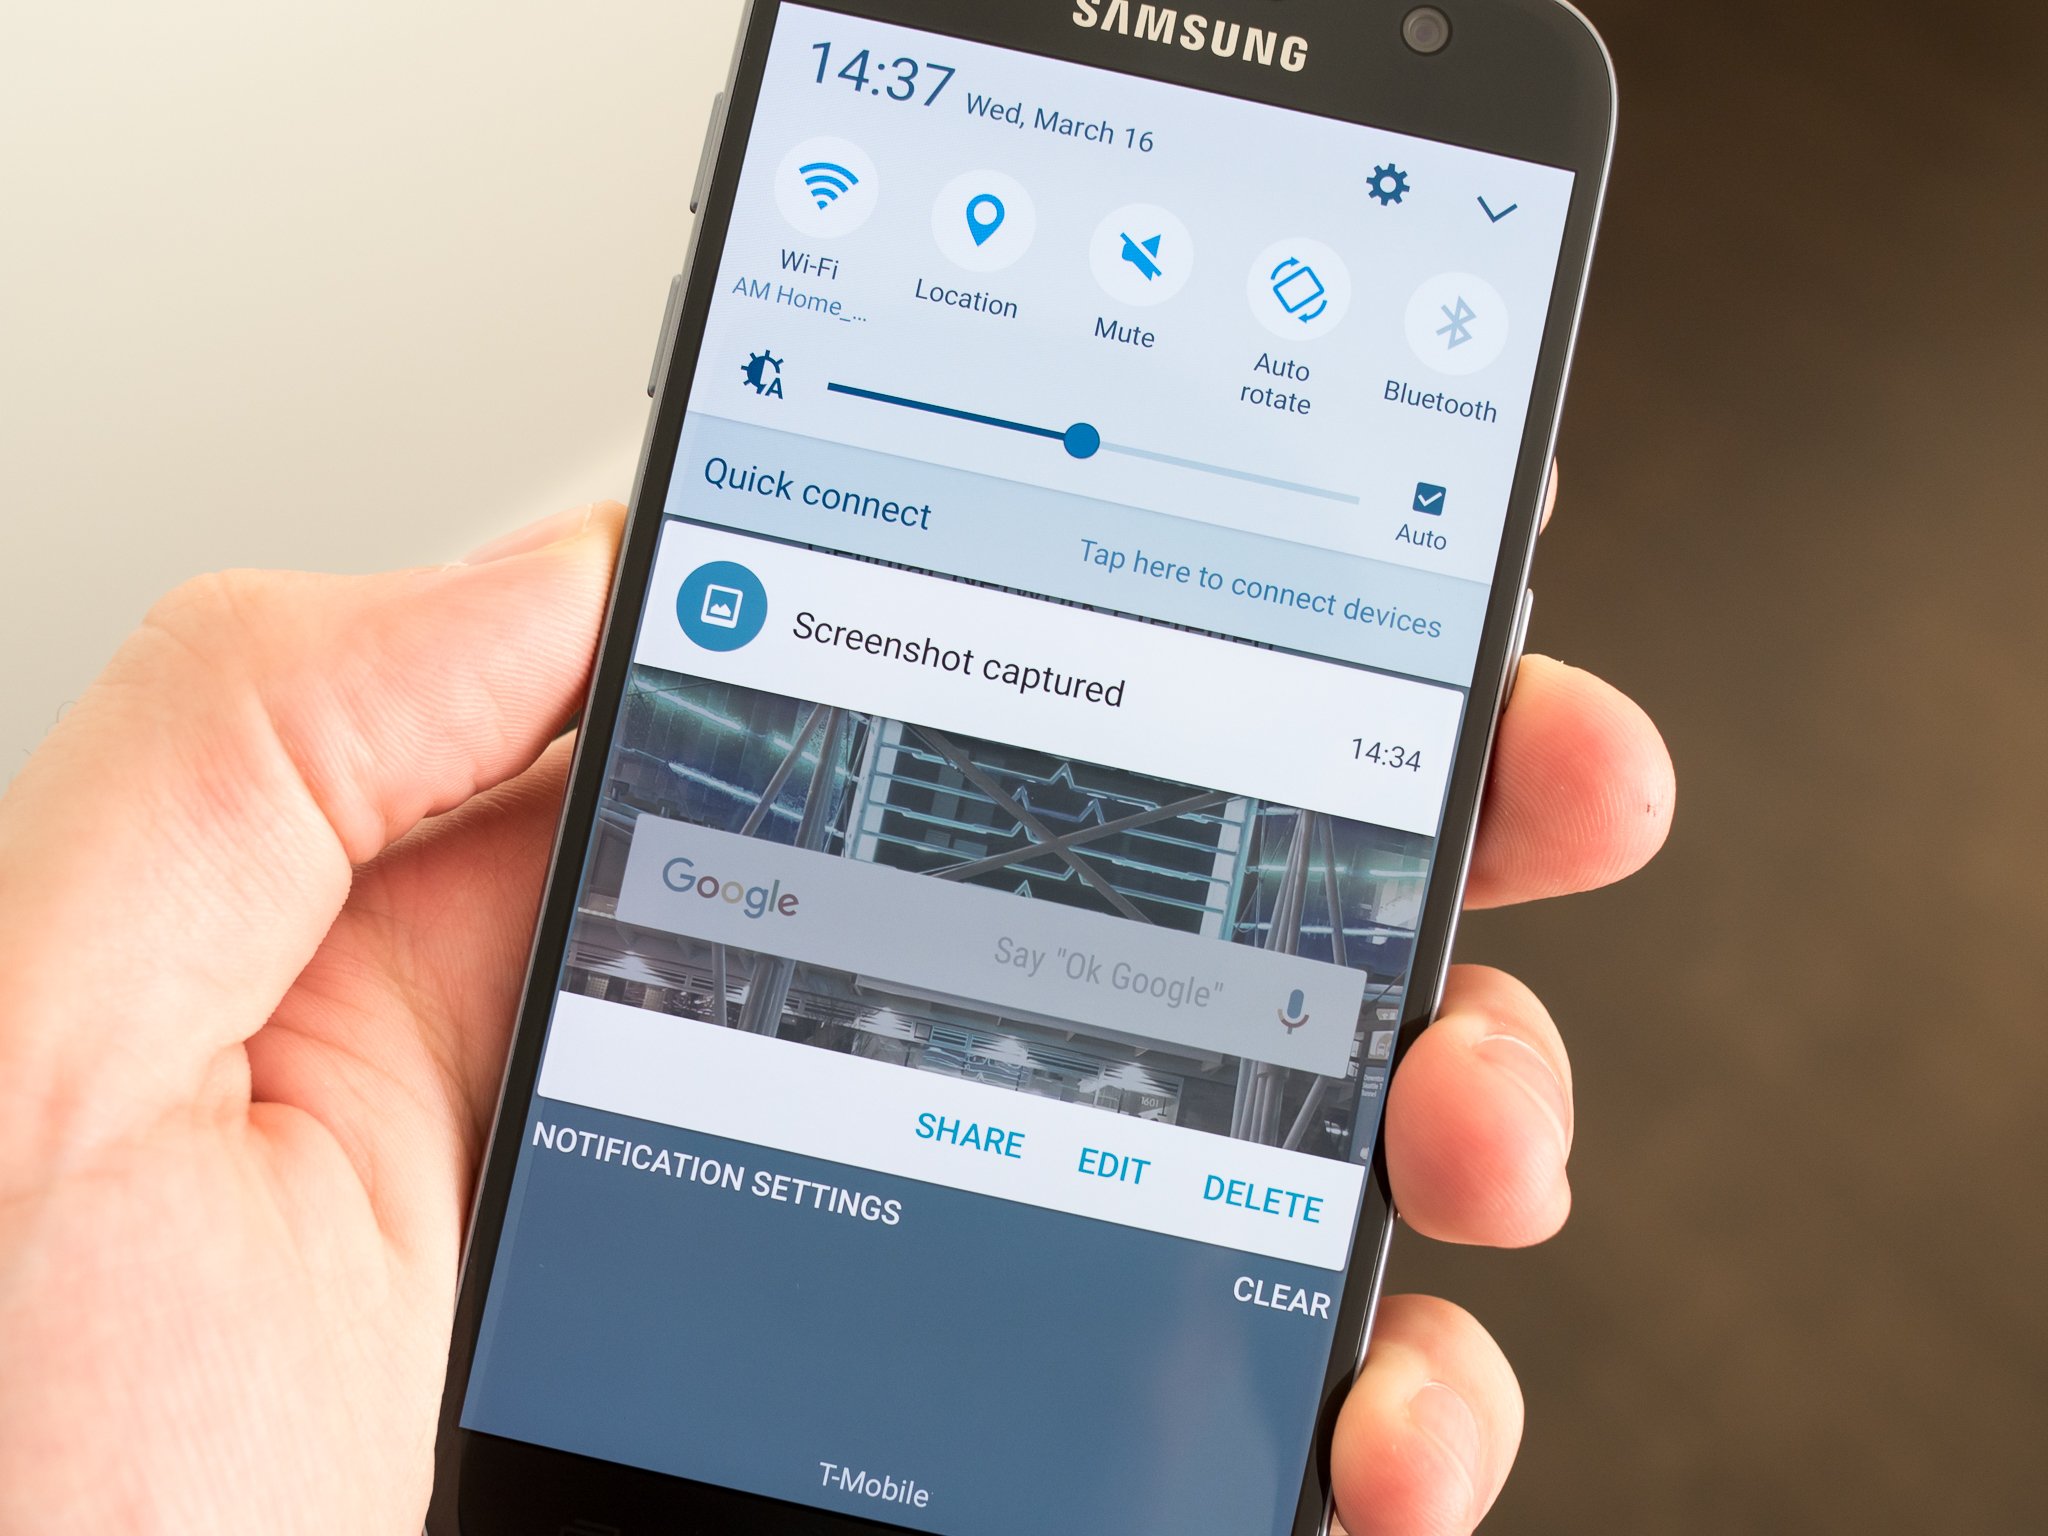
- You will hear a shutter sound or see a visual confirmation on the screen, indicating that the screenshot has been successfully taken.
- Access your saved screenshots by going to the Gallery app or the Screenshots folder in your device’s storage.
It’s important to note that the Power button and the Volume Down button must be pressed simultaneously and held for a second or two. Be careful not to release the buttons too quickly, as this can result in an incomplete screenshot.
The physical button method gives you a tactile feel of capturing a screenshot and is useful when you need to take a screenshot quickly, especially in situations where using other methods might be less convenient.
Now that you’ve learned how to capture a screenshot using the physical buttons on your Galaxy S7 tablet let’s move on to the next method: using the palm swipe gesture. Keep reading to find out how!
Method 2: Using Palm Swipe Gesture
If you prefer a hands-free approach, the palm swipe gesture method allows you to capture a screenshot on your Galaxy S7 tablet with a simple swipe of your hand. Here’s how to use this convenient feature:
- Make sure the Palm swipe gesture is enabled on your tablet. To do this, go to Settings > Advanced features > Motions and gestures > Palm swipe to capture, and toggle the switch on.
- Position your hand vertically, with your palm facing the side of the screen.
- Place the edge of your hand on one side of the screen, and swipe horizontally across the display, brushing your hand gently across the surface.
- You will hear a shutter sound or see a visual confirmation on the screen, indicating that the screenshot has been successfully taken.
- Similar to the physical button method, you can access your captured screenshots in the Gallery app or the Screenshots folder in your device’s storage.
The palm swipe gesture method provides a touchless and convenient way to capture screenshots, especially when you have your hands full or don’t want to use the physical buttons. It’s a great option if you find yourself frequently needing to capture screenshots on your Galaxy S7 tablet.
Keep in mind that the palm swipe gesture may not always work perfectly on the first try. Make sure your hand is properly aligned with the screen and try adjusting the speed and angle of your swipe if you encounter any difficulties.
Now that you’ve learned about capturing screenshots using the palm swipe gesture, let’s explore another method: using the S Pen. Continue reading to find out how!
Method 3: Using the S Pen
If you own a Galaxy S7 tablet with an S Pen, you have an additional method for capturing screenshots. The S Pen provides a precise and intuitive way to capture and annotate your screen. Here’s how to use it:
- Remove your S Pen from its slot, located at the top-right corner of your tablet.
- Position your tablet screen to display the content you want to capture.
- Hover the S Pen over the screen, slightly above the area you want to capture.
- Press the S Pen button and quickly tap the screen with the pen to capture the screenshot.
- The screenshot will be saved automatically, and you can find it in the Gallery app or the Screenshots folder.
Using the S Pen to capture screenshots offers the advantage of precision and control. It allows you to capture specific sections of the screen or draw annotations directly on the captured image, making it an excellent option for tasks like highlighting details, circling important information, or adding handwritten notes.
Keep in mind that the S Pen method is only available if your Galaxy S7 tablet comes with an S Pen. If you don’t have an S Pen, don’t worry; you still have other methods available to capture screenshots.
Now that you’re familiar with using the S Pen to capture screenshots on your Galaxy S7 tablet, let’s explore one last method: using the Quick Settings panel.
Method 4: Using the Quick Settings Panel
Another convenient and efficient way to capture screenshots on your Galaxy S7 tablet is by using the Quick Settings panel. This method allows you to access the screenshot feature with just a few taps. Here’s how to use it:
- Swipe down from the top of your tablet’s screen to open the Notification panel.
- Swipe down again on the Notification panel to expand it and reveal the Quick Settings tiles.
- Look for the “Screenshot” or “Capture” icon in the Quick Settings panel. It might be displayed directly or hidden within “More” or “Edit” options.
- Tap on the “Screenshot” or “Capture” icon to initiate the screenshot process.
- You will hear a shutter sound or see a visual confirmation on the screen, indicating that the screenshot has been successfully taken.
- The saved screenshot can be accessed in the Gallery app or the Screenshots folder.
The Quick Settings method offers a convenient way to capture screenshots without the need for physical buttons or gestures. It’s particularly useful if you prefer using the touchscreen interface and want quick access to the screenshot feature.
Depending on your tablet’s settings, the “Screenshot” or “Capture” icon may not be visible by default in the Quick Settings panel. In such cases, you can customize the Quick Settings tiles by tapping on the “Edit” or “More” option and adding the screenshot feature to the panel.
Now that you’re familiar with using the Quick Settings panel to capture screenshots on your Galaxy S7 tablet, you have four methods at your disposal to capture and save what’s happening on your screen. Choose the method that suits your needs and preferences best, and start capturing those important moments or troubleshooting issues effectively.
Conclusion
Taking a screenshot on your Galaxy S7 tablet is a simple and useful feature that allows you to capture and save anything displayed on your screen. Whether you prefer using the physical buttons, the palm swipe gesture, the S Pen, or the Quick Settings panel, you now have multiple methods at your fingertips to capture screenshots with ease.
The physical button method is a classic and reliable option, allowing you to capture screenshots by pressing the Power and Volume Down buttons simultaneously. It’s perfect for those who prefer a tactile feel and want to quickly capture their screen.
For a touchless approach, the palm swipe gesture method enables you to capture screenshots with a simple swipe of your hand across the screen. It’s a convenient option for situations where you may have your hands full or prefer not to use physical buttons.
If you own a Galaxy S7 tablet with an S Pen, you have the additional advantage of using the S Pen to capture screenshots. This method provides precision and allows you to annotate your screenshots with ease.
Lastly, the Quick Settings panel offers a streamlined way to access the screenshot feature with just a few taps. It’s an excellent option for those who prefer using the touchscreen interface and want quick access to the screenshot function.
Now that you’re familiar with these four methods, you can choose the one that suits your preferences and needs best. Whether you need to capture important information, save funny moments, or troubleshoot issues, capturing screenshots on your Galaxy S7 tablet has never been easier.
So go ahead and start capturing those precious moments or important details on your Galaxy S7 tablet with confidence!