Introduction
Setting up a Wi-Fi connection on your Epson printer allows you to print wirelessly from your computer, laptop, or mobile devices. This convenience eliminates the need for a physical connection, giving you the flexibility to print documents and photos from anywhere within your Wi-Fi network’s range.
Whether you recently purchased an Epson printer or want to upgrade your existing setup, this guide will walk you through the steps to set up Wi-Fi on your Epson printer. The process may vary slightly depending on the specific printer model you have, but the general steps remain the same.
Gone are the days of connecting your computer directly to the printer with cables and drivers. With a Wi-Fi connection, you can effortlessly print important files, school assignments, or memorable photos without the hassle of cables tangling and limited mobility. Once your printer is connected to Wi-Fi, you can send print commands wirelessly, saving you time and adding convenience to your everyday tasks.
Before we dive into the setup process, make sure you have the necessary information at hand. This includes your Wi-Fi network’s name (SSID) and the corresponding password. Additionally, ensure that your printer is within range of your Wi-Fi network, as the strength of the connection can affect the printing experience.
In the following steps, we will guide you through the process of connecting your Epson printer to Wi-Fi, taking you from gathering the necessary information to completing the setup successfully. So, let’s get started on setting up Wi-Fi on your Epson printer!
Step 1: Gathering the necessary information
Before you can begin setting up Wi-Fi on your Epson printer, it is essential to gather some key information. By having this information ready, you can ensure a smooth and efficient setup process. Here are the details you need:
1. Wi-Fi Network Name (SSID): Locate the name of your Wi-Fi network. This is the network to which you want to connect your Epson printer. The network name is usually displayed on your router or can be found in the network settings on your computer or mobile device.
2. Wi-Fi Network Password: Once you have the network name, you will also need the password associated with it. This is the security key that allows your devices to connect to the Wi-Fi network. If you are unsure of the password, refer to your router’s manual or contact your internet service provider.
3. Printer SSID: For some Epson printer models, there may be a separate SSID specifically for the printer’s built-in Wi-Fi Direct feature. If your printer supports Wi-Fi Direct, find the SSID information as you will need it during the setup process.
Having these details readily available will save you time during the setup process and ensure that you can proceed smoothly without any interruptions. Once you have gathered the necessary information, you are ready to move on to the next step.
Step 2: Connecting the printer to power
Before setting up the Wi-Fi connection on your Epson printer, it is important to ensure that the printer is properly connected to a power source. Follow these simple steps to connect your printer to power:
1. Locate the power cord: Find the power cord that came with your Epson printer. It is usually a thick, black cable with a plug at one end.
2. Connect the power cord: Insert one end of the power cord into the power port on the back of the printer. Make sure it fits securely and is fully inserted.
3. Plug into a power outlet: Connect the other end of the power cord into a nearby power outlet. Ensure that the power outlet is easily accessible and turned on.
4. Turn on the printer: Locate the power button on the printer. Press the button to turn on the printer. You should see lights and indicators illuminate on the printer’s control panel, indicating that it is receiving power.
By connecting your Epson printer to a power source, you are now ready to proceed with the setup process. Keep in mind that it is crucial to have the printer powered on before attempting to establish a Wi-Fi connection. This ensures that the printer is ready to be configured with your wireless network settings.
Now that your printer is connected to power, let’s move on to the next step in setting up Wi-Fi on your Epson printer.
Step 3: Turning on the printer
Now that your Epson printer is connected to the power source, it’s time to turn it on. Follow these steps to power on your printer:
1. Locate the power button: Look for the power button on the printer. It is typically located on the control panel or near the printer’s display screen.
2. Press the power button: Press the power button to turn on the printer. Wait for a few seconds while the printer initializes and prepares for operation.
3. Check the display: Depending on the printer model, you may have an LCD screen or LED lights to indicate the printer’s status. Ensure that the display is powered on and showing the printer’s settings and options.
Once your Epson printer is turned on, it is ready to be configured with the Wi-Fi settings. Ensure that the printer is powered on and displaying the relevant information before proceeding to the next step.
Having successfully turned on your printer, you are now ready to navigate through the printer menu to access the Wi-Fi settings. Let’s move on to the next step in setting up Wi-Fi on your Epson printer.
Step 4: Navigating the printer menu
After turning on your Epson printer, you will need to navigate through its menu to access the Wi-Fi settings. The process may vary slightly depending on the printer model, but here are the general steps to get you started:
1. Access the printer menu: Look for the menu button or an icon that resembles a settings or menu option. Press the button to access the printer’s menu.
2. Use the arrow keys: Once you are in the menu, use the arrow keys on the printer’s control panel to navigate through the options. Move up, down, left, or right to highlight different settings on the screen.
3. Find the Wi-Fi settings: Look for the Wi-Fi or Network settings in the menu. The exact name and location may vary depending on your printer model. Refer to your printer’s user manual if you need assistance finding the Wi-Fi settings.
4. Select Wi-Fi setup: Once you have accessed the Wi-Fi settings, select the option for Wi-Fi setup or similar. This will allow you to connect your Epson printer to your Wi-Fi network.
By successfully navigating through the printer menu, you can access the necessary settings to connect your printer to Wi-Fi. Take your time to explore the menu and familiarize yourself with the options available. Once you are ready, move on to the next step: selecting the Wi-Fi network.
Now that you know how to navigate the printer menu, let’s proceed to the next step in setting up Wi-Fi on your Epson printer.
Step 5: Selecting the Wi-Fi network
After accessing the Wi-Fi settings on your Epson printer, it’s time to select the Wi-Fi network you want to connect to. Here’s how you can do it:
1. Scan for available networks: Look for an option that allows your printer to scan for available Wi-Fi networks. This option may be labeled as “Scan for Networks” or “Search for Wi-Fi.” Select this option to initiate the scanning process.
2. Wait for the scan to complete: The printer will now scan for nearby Wi-Fi networks. Wait for a moment while the printer scans and detects the available networks.
3. Select your Wi-Fi network: Once the scan is complete, a list of available Wi-Fi networks will be displayed on the printer’s screen. Use the arrow keys or navigation buttons to scroll through the list and find your Wi-Fi network.
4. Highlight the network: Once you have found your Wi-Fi network, highlight it on the screen. This will allow you to select it as the network you want to connect your Epson printer to.
5. Confirm your selection: After highlighting your Wi-Fi network, press the confirm or select button on the printer’s control panel. This will confirm your choice and proceed to the next step.
By selecting your Wi-Fi network, you are one step closer to completing the Wi-Fi setup on your Epson printer. Make sure to choose the correct Wi-Fi network associated with your home or office network. Once you have confirmed your selection, it’s time to proceed to the next step: entering the Wi-Fi password.
Now that you have selected your Wi-Fi network, let’s move on to the next step in setting up Wi-Fi on your Epson printer.
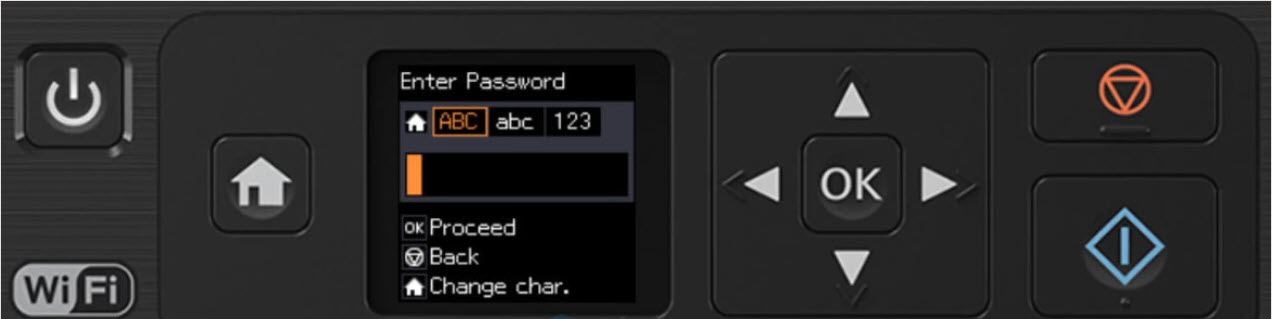
Step 6: Entering the Wi-Fi password
Entering the Wi-Fi password is a crucial step in setting up Wi-Fi on your Epson printer. Follow these steps to input the password correctly:
1. Display the password field: Once you have selected your Wi-Fi network, the printer will prompt you to enter the password. The password field will usually be displayed on the printer’s screen.
2. Use the alphanumeric keypad: The printer’s control panel should have an alphanumeric keypad. Use this keypad to enter the Wi-Fi password. Select the corresponding letters, numbers, or symbols one by one to input the password accurately.
3. Skip special characters: If your Wi-Fi password contains special characters such as asterisks (*) or exclamation marks (!), you may need to skip entering them, depending on the printer model. Refer to your printer’s user manual for specific instructions on handling special characters.
4. Double-check your entry: After entering the password, carefully review it on the printer’s screen to ensure there are no typos or mistakes. Use the arrow keys to move the cursor if you need to make corrections.
5. Confirm the password: Once you are confident in the entered password, select the confirm or OK button on the printer’s control panel. This will save and apply the password for your Wi-Fi network.
By accurately entering the Wi-Fi password, you are ensuring a secure and reliable connection between your Epson printer and your Wi-Fi network. Take your time to input the password correctly, as any mistakes may result in connectivity issues.
Now that the Wi-Fi password has been entered, it’s time to proceed to the final step: completing the setup process.
Step 7: Completing the setup process
After entering the Wi-Fi password, you are now in the final step of setting up Wi-Fi on your Epson printer. Follow these steps to complete the setup process:
1. Verify the Wi-Fi connection: Once you have entered the password, the printer will attempt to establish a connection to your Wi-Fi network. Wait for a moment while the printer verifies the connection.
2. Connection confirmation: If the printer successfully connects to your Wi-Fi network, it will display a message indicating a successful connection. This confirmation assures you that your Epson printer is now wirelessly connected to your network.
3. Test the connection: To ensure that the connection is stable and functioning correctly, you can perform a connection test. Send a test print command from your computer or mobile device to the Epson printer and verify that it prints successfully.
4. Print a configuration page: If you want a physical copy of your printer’s network settings and connection details, you can print a configuration page. This page will provide you with valuable information, such as the assigned IP address and other network settings.
By completing the setup process, you have successfully connected your Epson printer to your Wi-Fi network. Now, you can enjoy the convenience of wirelessly printing documents and photos without the need for a physical connection.
It is important to note that the setup process may vary slightly depending on your specific Epson printer model. Refer to your printer’s user manual for detailed instructions and any additional steps that may be required.
Now that you have completed the setup process, you are ready to start printing wirelessly from your Epson printer. Enjoy the freedom and flexibility that a Wi-Fi connection provides!
Conclusion
Setting up Wi-Fi on your Epson printer opens up a world of convenience and flexibility. With a wireless connection, you can easily print documents and photos from your computer, laptop, or mobile devices without the need for physical cables. In this guide, we have walked you through the step-by-step process of setting up Wi-Fi on your Epson printer.
Starting with gathering the necessary information, such as your Wi-Fi network name and password, you then connected the printer to power and turned it on. Navigating through the printer menu, you accessed the Wi-Fi settings and selected your Wi-Fi network. By entering the Wi-Fi password accurately, you ensured a secure connection between your printer and network.
Finally, you completed the setup process by verifying the Wi-Fi connection and testing it with a print command. You also had the option to print a configuration page for reference. Now, you can enjoy the convenience of wirelessly printing from your Epson printer within the range of your Wi-Fi network.
Remember, the specific steps may slightly vary depending on your Epson printer model, so do consult the user manual for detailed instructions. With Wi-Fi set up on your Epson printer, you can streamline your printing tasks and enjoy a hassle-free experience.
We hope this guide has been helpful in assisting you with setting up Wi-Fi on your Epson printer. Embrace the flexibility and convenience that wireless printing offers, and enjoy the freedom to print from anywhere within your network. Whether it’s important work documents or cherished memories captured in photos, your Epson printer is now ready to handle all your printing needs wirelessly.