Introduction
Welcome to this comprehensive guide on how to set up the DJI Ronin-SC, a compact and lightweight gimbal stabilizer designed for mirrorless cameras. Whether you are a professional filmmaker or an aspiring content creator, the Ronin-SC offers incredible stability and control, allowing you to capture smooth and cinematic footage.
Setting up the Ronin-SC may seem like a daunting task at first, but with the right knowledge and equipment, you’ll be up and running in no time. This guide will walk you through the entire setup process, from charging the Ronin-SC to customizing settings to suit your needs.
Before we dive into the details, let’s take a moment to understand the equipment you’ll need to get started. Firstly, you’ll obviously need the DJI Ronin-SC gimbal itself. Additionally, make sure you have a compatible camera that weighs no more than 2 kilograms (4.4 pounds). This includes popular mirrorless cameras from brands like Sony, Canon, and Nikon.
Next, you’ll need a smartphone or tablet to connect to the Ronin-SC and control its functions. The DJI Ronin app, available for both iOS and Android devices, is essential for unlocking the full potential of the gimbal.
Lastly, it’s always a good idea to have spare batteries for both the Ronin-SC and your camera, as well as memory cards with sufficient storage capacity. With these basics covered, let’s proceed to the setup process.
Equipment Needed
Before you begin setting up your DJI Ronin-SC, it’s important to ensure you have all the necessary equipment. Here’s a list of items you’ll need:
- DJI Ronin-SC: This is the main gimbal stabilizer that you’ll be setting up.
- Mirrorless Camera: Make sure you have a mirrorless camera that weighs no more than 2 kilograms (4.4 pounds). Popular mirrorless camera models from brands like Sony, Canon, and Nikon are compatible with the Ronin-SC.
- Smartphone or Tablet: You’ll need a smartphone or tablet to connect to the Ronin-SC and control its functions. Ensure that you have a compatible device running either iOS or Android.
- DJI Ronin App: Download and install the DJI Ronin app on your smartphone or tablet. This app is available for free in the App Store for iOS devices and the Google Play Store for Android devices.
- Batteries: It’s always a good idea to have spare batteries for both the Ronin-SC and your camera. This ensures you have enough power to keep shooting for extended periods of time.
- Memory Cards: Make sure you have sufficient storage capacity on your memory cards. You don’t want to run out of space while capturing those precious moments.
- Camera Plate and Mounting Accessories: Depending on your camera model, you may require specific mounting accessories such as a camera plate or lens support. Check the Ronin-SC compatibility list and ensure you have the necessary accessories for your setup.
- USB Cables: Prepare the appropriate USB cables to connect your smartphone or tablet to the Ronin-SC.
- Tripod or Monopod: While not mandatory, having a stable support like a tripod or monopod can greatly enhance the usability of the Ronin-SC, especially during long shooting sessions.
By gathering all the required equipment beforehand, you’ll have a smooth and hassle-free setup process when you start working with the DJI Ronin-SC. With everything ready, let’s move on to the next steps.
Charging the Ronin-SC
Before you can start using your DJI Ronin-SC, it’s important to ensure that it has a full charge. Here’s how you can charge the Ronin-SC:
- Locate the USB-C port on the Ronin-SC. It is usually located on the handle or the base of the gimbal.
- Take the USB-C cable provided with the Ronin-SC and connect one end to the USB-C port on the gimbal.
- Plug the other end of the USB-C cable into a power source, such as a USB wall adapter or a computer’s USB port.
- The Ronin-SC’s battery indicators will light up, showing the current battery level. It is recommended to charge the gimbal until all the battery indicators are solid white, indicating a full charge.
- The LED indicator on the Ronin-SC will turn off once the battery is fully charged.
It’s important to note that the charging time may vary depending on the remaining battery level. It is recommended to use the provided USB-C cable and a reliable power source to ensure a stable and efficient charging process.
While the Ronin-SC is charging, you can use this time to prepare your camera, mount, and other accessories. Once the gimbal is fully charged, you’ll be ready to move on to the next step of balancing your camera on the Ronin-SC.
Keep in mind that it’s always a good practice to charge your Ronin-SC regularly, especially before any important shooting sessions. This will ensure that you have enough power to capture smooth and stable footage throughout your entire shoot.
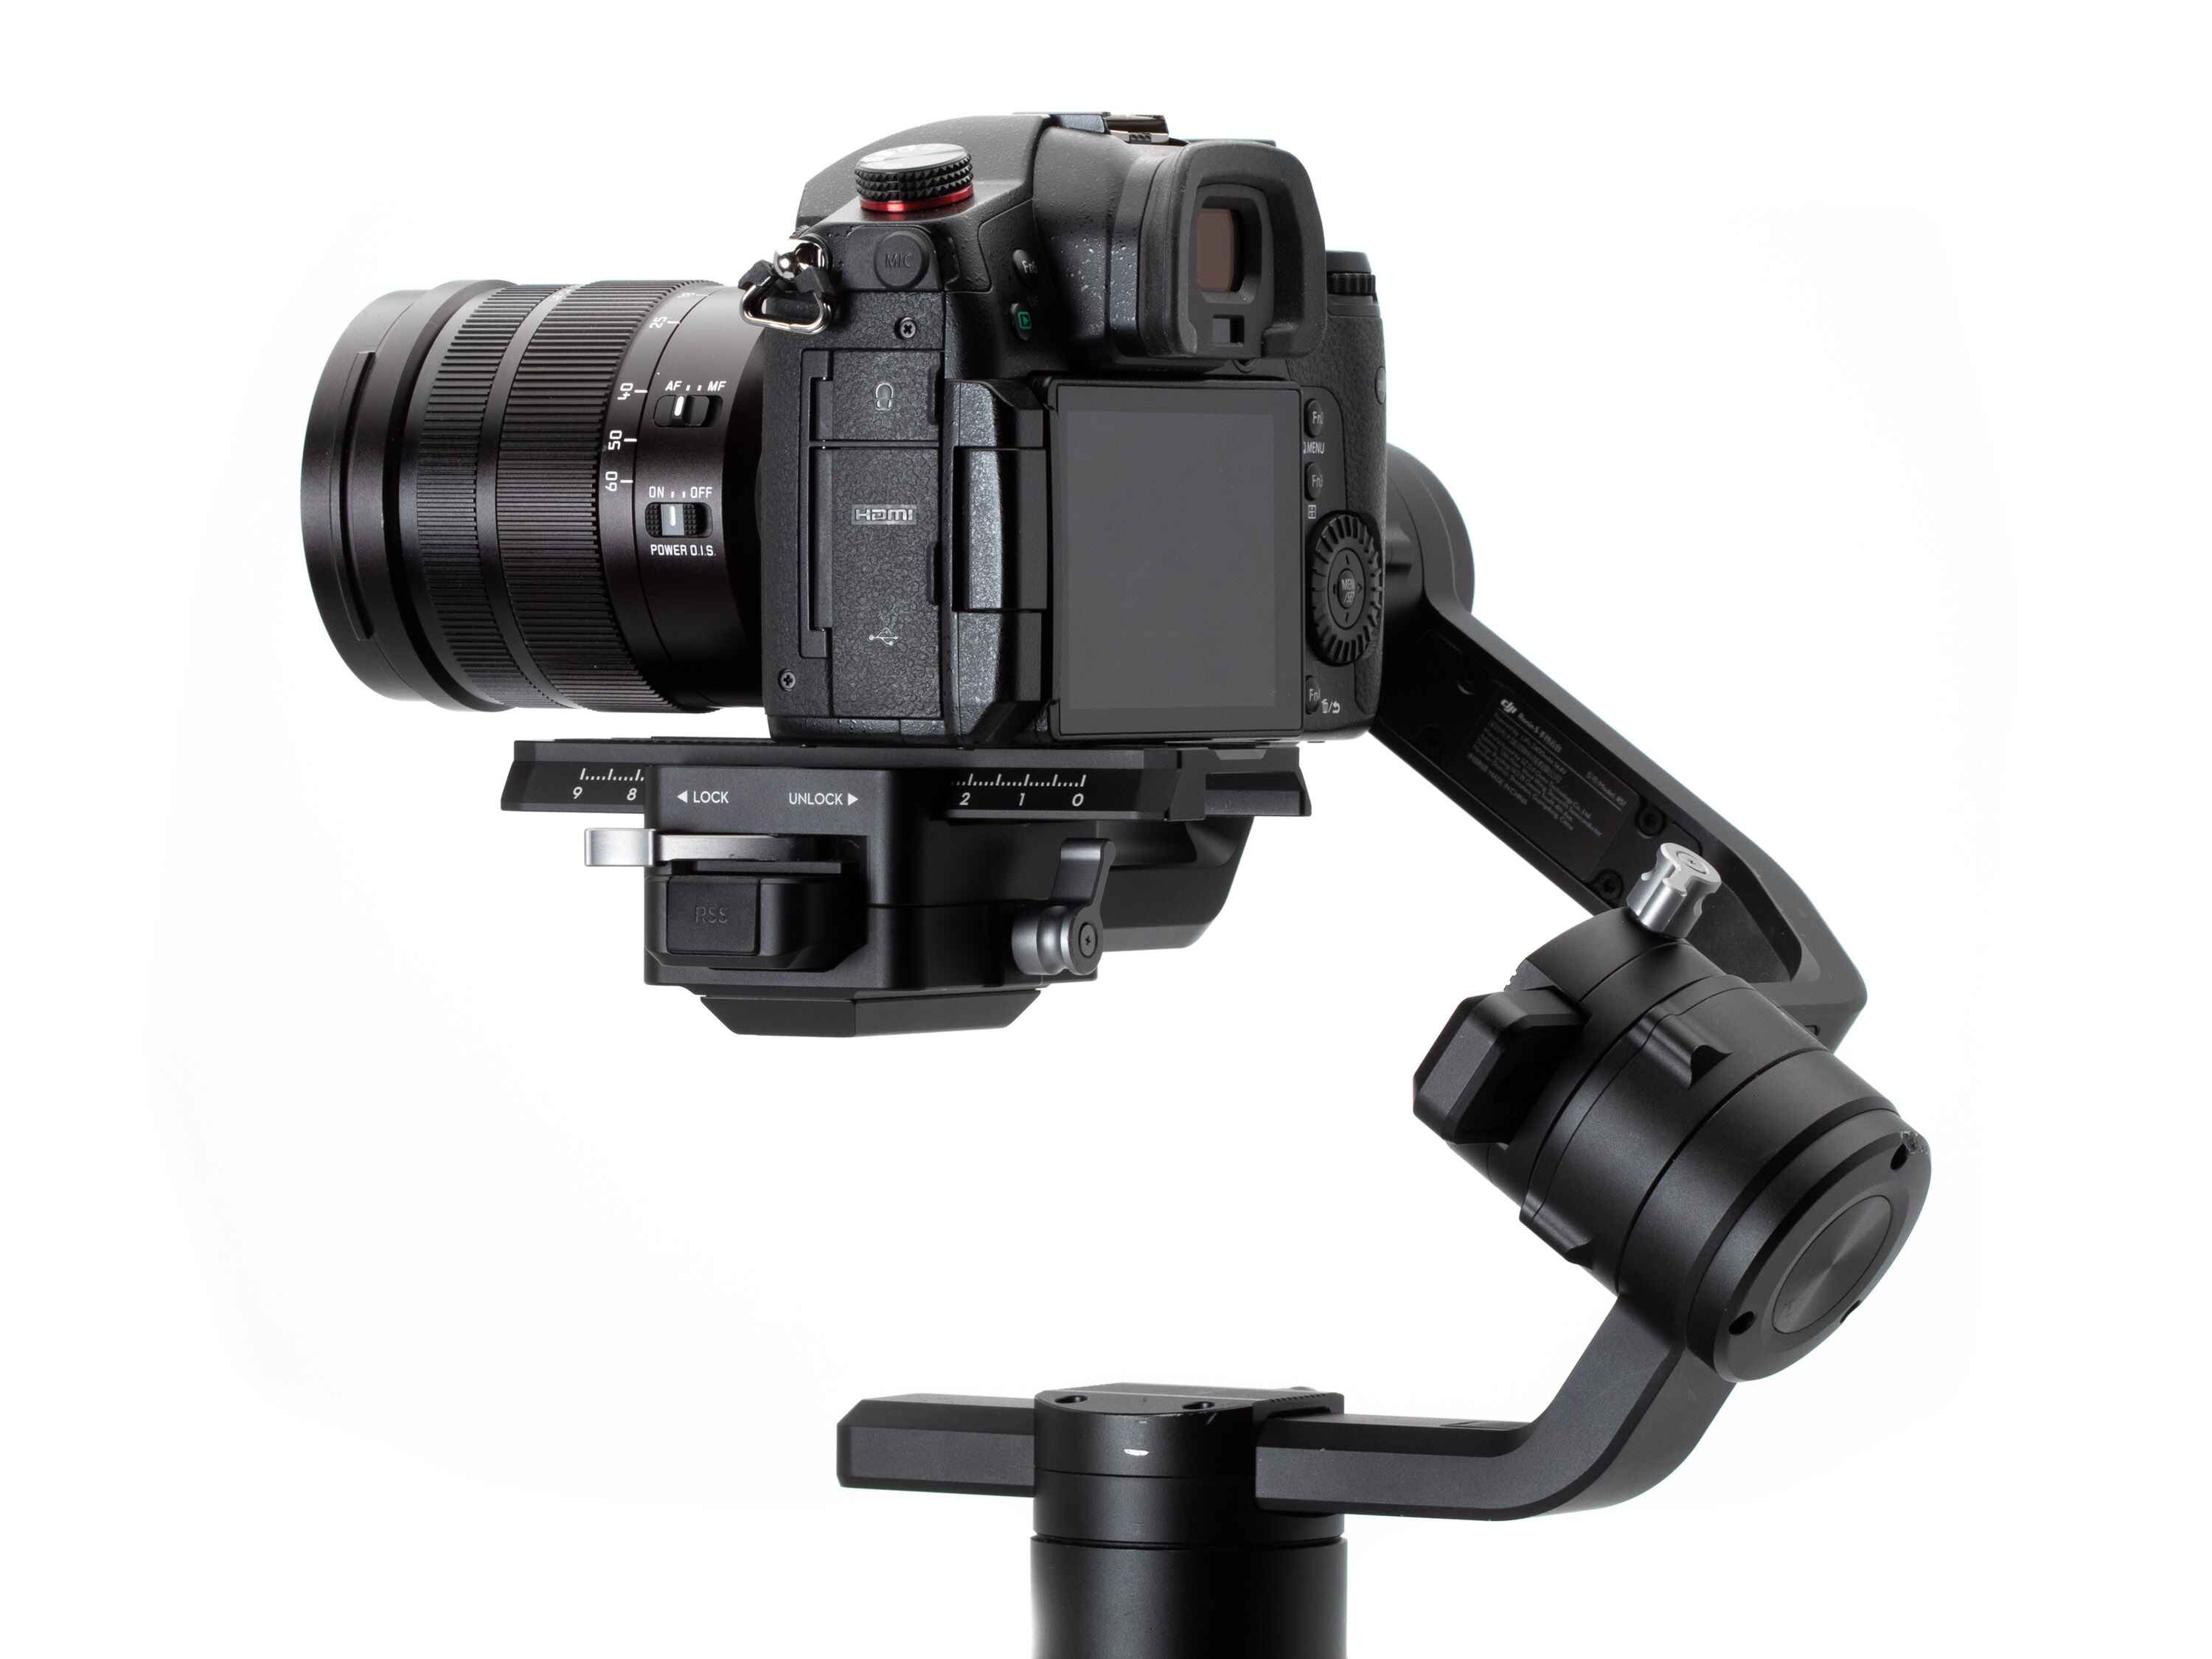
Balancing the Camera
Properly balancing your camera on the DJI Ronin-SC is crucial to ensure optimal stabilization and smooth operation. Follow these steps to balance your camera:
- Start by turning off the gimbal and placing it on a flat and stable surface.
- Unlock the gimbal motors by rotating the motor locks in a counterclockwise direction. This allows the gimbal to freely move and adjust.
- Attach the camera mounting plate to the bottom of your camera using the provided screws or quick-release mechanism. Make sure the plate is securely tightened.
- Place the camera with the mounting plate attached onto the Ronin-SC, ensuring that the lens is facing forward.
- Slide the camera forward or backward on the mounting plate to find the optimal balance point. The goal is to achieve a well-balanced setup where the camera stays level and does not tilt forward or backward.
- Once you find the approximate balance point, use the sliding arm on the Ronin-SC to make fine adjustments. Loosen the sliding arm by turning the knob counterclockwise, then slide the camera along the arm until it reaches a balanced position.
- Once the camera is balanced, tighten the sliding arm to secure the camera in place. Make sure it is firmly locked.
- Check the camera’s balance by releasing your grip on the gimbal handle. The camera should stay level and not tilt in any direction.
- If you notice any imbalance or instability, repeat the process and make further adjustments until you achieve a perfectly balanced setup.
Remember, achieving proper balance is essential for the Ronin-SC to function correctly and provide optimal stabilization. Taking the time to ensure your camera is properly balanced will result in smoother footage and reduce unnecessary stress on the gimbal motors.
Once you’ve successfully balanced your camera on the Ronin-SC, you’re ready to move on to the next step: mounting the camera onto the gimbal.
Mounting the Camera
Now that you have successfully balanced your camera on the DJI Ronin-SC, the next step is to mount the camera onto the gimbal. Follow these steps to securely attach your camera:
- Ensure that the Ronin-SC is turned off and the gimbal motors are still unlocked.
- Hold the Ronin-SC by the handle with one hand and carefully place the balanced camera onto the mounting plate.
- Align the mounting screw on the gimbal with the tripod socket on the bottom of the camera.
- Gently screw the camera onto the mounting plate, making sure it is attached securely.
- Once the camera is properly mounted, tighten the mounting screw to ensure it is securely fastened.
- If your camera has a lens with image stabilization, make sure to turn it off. The Ronin-SC’s stabilizing functions work best when the camera’s internal stabilization is disabled.
With the camera securely mounted on the Ronin-SC, you can now proceed to the next step of connecting the gimbal to your smartphone or tablet.
It’s important to always double-check that the camera is securely mounted before operating the Ronin-SC. A loose or improperly mounted camera can cause instability and potential damage to both the camera and the gimbal.
Now that your camera is securely mounted, let’s move on to the next step: connecting the Ronin-SC to your device.
Connecting the Ronin-SC to Your Device
In order to fully control and access the features of your DJI Ronin-SC, you need to connect it to your smartphone or tablet. To establish a connection, follow these steps:
- Ensure that both the Ronin-SC and your device are powered on.
- Launch the DJI Ronin app on your smartphone or tablet.
- On the app’s home screen, tap the “Connect” button to start the connection process.
- The app will scan for available Ronin devices. Once the Ronin-SC is detected, tap on it to initiate the connection.
- Follow the on-screen prompts to establish a Bluetooth connection between the Ronin-SC and your device.
- Once the connection is established, you’ll have full control over the Ronin-SC through the app, allowing you to adjust settings, access advanced features, and monitor the gimbal’s status.
It’s important to note that for certain camera models, you may also need to connect your camera to the Ronin-SC using the appropriate cables. This enables the gimbal to control the camera’s shutter, focus, and other functions. Consult your camera’s user manual or the DJI Ronin app for specific instructions on how to connect your camera.
By connecting your Ronin-SC to your smartphone or tablet, you unlock the full potential of the gimbal and gain access to a wide range of control options and features. Take some time to familiarize yourself with the DJI Ronin app and explore its capabilities to make the most out of your Ronin-SC.
Now that your Ronin-SC is successfully connected to your device, it’s time to move on to the next step: setting up the DJI Ronin app.
Setting Up the DJI Ronin App
The DJI Ronin app is an essential companion for controlling and configuring your DJI Ronin-SC gimbal. To get started with the app, follow these steps:
- Ensure that your Ronin-SC is connected to your smartphone or tablet as described in the previous section.
- Open the DJI Ronin app on your device.
- If prompted, sign in to your DJI account or create a new one.
- The app will automatically detect and connect to your Ronin-SC. You will see a live feed from your camera, indicating that the connection is successful.
- Take some time to explore the various menus and options in the app. Here are some key features you can access:
- Gimbal Control: Use the virtual joystick in the app to pan, tilt, and roll the Ronin-SC, providing smooth and precise control over your camera’s movements.
- Settings: Customize various gimbal parameters, such as motor strength, follow speed, and smoothness, to suit your shooting style and preferences.
- Focus Control (with compatible cameras): Adjust the focus of your camera directly from the app, providing seamless control over your shots. This feature may require an additional cable connection between the Ronin-SC and your camera.
- Intelligent Shooting Modes: Access a range of preset shooting modes, such as Panorama, Time-lapse, and Motion Control, to add creativity and dynamism to your footage.
- Firmware Updates: Keep your Ronin-SC up to date by checking for and installing the latest firmware updates through the app.
- Experiment with different settings and modes to familiarize yourself with the capabilities of the Ronin-SC and the DJI Ronin app. Don’t be afraid to try out new features and techniques to enhance your filmmaking or content creation.
The DJI Ronin app provides you with advanced control and customization options for your Ronin-SC gimbal. It’s essential to spend some time exploring the app and understanding its features to make the most out of your gimbal setup.
Now that you have set up the DJI Ronin app, you’re ready to move on to the next section, where we’ll discuss the basic operation of the Ronin-SC.
Basic Operation of the Ronin-SC
Operating the DJI Ronin-SC is a straightforward process once you familiarize yourself with the basic controls and functionalities. Here’s an overview of the key operations:
- Pan, Tilt, and Roll: Use the joystick on the Ronin-SC’s handle or the virtual joystick in the DJI Ronin app to control the pan (horizontal movement), tilt (vertical movement), and roll (sideways movement) of the gimbal. These controls allow you to frame your shots precisely and smoothly.
- Mode Switching: The Ronin-SC offers different modes to suit various shooting scenarios. Use the mode switch on the gimbal’s handle to switch between different modes, such as Pan Follow Mode, Lock Mode, and Follow Mode. Each mode provides a different level of stabilization and control over the camera’s movements.
- Trigger Button: Located on the front of the handle, the trigger button serves multiple purposes. Pressing it once will recenter the gimbal, aligning it with the current position. Double-pressing the trigger button will enter the Quick Roll mode, allowing you to quickly roll the camera 180 degrees for creative shots.
- Record Button (with compatible cameras): If your camera is connected to the Ronin-SC and supports remote recording, you can use the record button on the gimbal’s handle or within the DJI Ronin app to start and stop video recording without touching the camera.
These are the basic operations that will allow you to control the essential functions of the Ronin-SC and capture smooth and stable footage. Familiarize yourself with these controls and practice using them to gain confidence in operating the gimbal.
As you become more proficient with the basic operations, you can explore advanced features and techniques such as intelligent shooting modes, time-lapse photography, and motion control to further enhance the capabilities of the Ronin-SC.
Now that you have a good understanding of the basic operation of the Ronin-SC, let’s delve into the menu options and settings in the next section to help you customize the gimbal according to your preferences and shooting requirements.
Brief Overview of the Ronin-SC Menu
The DJI Ronin-SC features a user-friendly menu system that allows you to access and customize various settings and options to optimize your gimbal’s performance. Here’s a brief overview of the menu options:
- Control Stick Settings: In this menu, you can adjust the sensitivity of the control stick to your liking. You can customize the speed and responsiveness of the gimbal’s movements.
- Motor Parameters: This menu allows you to fine-tune the motor parameters, such as torque and speed, to suit different camera setups and shooting scenarios. Adjusting these parameters can help optimize the stabilization performance of the Ronin-SC.
- Follow Mode: In this menu, you can select the desired follow mode for the gimbal. The available options include Pan Follow, Pan and Tilt Follow, and All Axis Follow. These options determine how the gimbal follows your movements and the level of stabilization in different axes.
- Profile Settings: The Ronin-SC allows you to create and save custom profiles with different settings and configurations. This menu lets you access and manage these profiles, allowing you to quickly switch between different shooting setups.
- App Settings: Here, you can adjust various settings related to the DJI Ronin app on your smartphone or tablet. This includes options for controlling the gimbal, firmware updates, and connecting to additional accessories or devices.
- Gimbal Calibration: This menu provides options to calibrate the Ronin-SC for optimal accuracy and performance. You can perform a balance test, calibrate the IMU (Inertial Measurement Unit), and perform other necessary calibrations to ensure precise operation.
- System Settings: In this menu, you can make general system settings, such as enabling or disabling sound effects, adjusting screen brightness, and configuring power management options.
These are just a few examples of the menu options available on the DJI Ronin-SC. Each menu displays a range of settings and customization options that allow you to tailor the gimbal’s performance to your specific needs.
Take some time to explore the menus and familiarize yourself with the available options. Experiment with different settings and configurations to find the setup that works best for your shooting style and preferences.
Now that you have an overview of the Ronin-SC menu system, let’s move on to the next section, where we’ll discuss how to customize settings on the gimbal.
Customizing Settings
The DJI Ronin-SC offers a wide array of settings that can be customized to tailor the gimbal’s performance to your specific shooting needs and preferences. Here are some key settings you can customize on the Ronin-SC:
- Motor Parameters: Adjust the motor parameters such as torque and speed to optimize the stabilization performance of the gimbal. Higher torque can provide more stability, while adjusting the speed can help achieve smoother camera movements.
- Sensitivity: Customize the sensitivity of the control stick to your liking. You can adjust the responsiveness and speed of the gimbal’s movements based on your shooting style.
- Follow Speed: Set the follow speed to control how quickly the gimbal responds to your movements. Higher follow speed allows for faster tracking, while lower speeds provide more precise and controlled movements.
- Auto Calibration: Enable or disable the automatic calibration feature. When enabled, the Ronin-SC will automatically recalibrate the motors and sensors when turned on. Disabling this feature allows for faster startup but may require manual calibration if needed.
- Controller Type: Customize the behavior and response of the control stick based on your preference. You can choose between speed-based control or position-based control.
To customize these settings and more, access the respective menus on the DJI Ronin app. Experiment with different configurations to find the optimal setup for your shooting scenarios and creative vision.
It’s also worth noting that the DJI Ronin app provides access to additional advanced features and settings, such as intelligent shooting modes, time-lapse photography, and motion control. Explore these options to add creativity and dynamism to your shots.
Make sure to regularly review and fine-tune your customized settings as your shooting requirements may change. By adapting the Ronin-SC settings to your specific needs, you can maximize its capabilities and utilize it to its full potential.
Now that you have an understanding of how to customize the settings on the Ronin-SC, let’s explore some of the advanced features and functionalities in the next section.
Advanced Ronin-SC Features
The DJI Ronin-SC is equipped with numerous advanced features that can take your footage to the next level. These features allow for greater creativity and control over your shots. Here are some of the advanced features of the Ronin-SC:
- Intelligent Shooting Modes: The Ronin-SC offers a range of intelligent shooting modes to help you capture stunning footage with ease. Modes such as Time-lapse, Motion Control, and Panorama enable you to create dynamic and visually appealing shots.
- Force Mobile: When using the DJI Ronin app, you can enable Force Mobile mode, which allows you to control the gimbal’s movements by simply moving your mobile device. This feature provides a unique and intuitive way to operate the Ronin-SC.
- ActiveTrack 3.0 (with compatible cameras): With ActiveTrack 3.0, you can select a subject on your mobile device’s screen and have the Ronin-SC automatically track and follow it. This feature is especially useful for capturing moving subjects.
- Panorama: The Panorama mode enables you to create breathtaking panoramic photos by automatically capturing and stitching multiple photos together. Simply select the starting point and the direction, and the Ronin-SC will do the rest.
- Motion Control: With the Motion Control feature, you can program complex camera movements and timelapses using the DJI Ronin app. Set keyframes and define the desired path or movement, and the Ronin-SC will execute it precisely.
- Time-lapse: Capture beautiful time-lapse sequences with ease using the Time-lapse mode. Set the desired duration, interval, and exposure settings, and the Ronin-SC will capture a sequence of images to create stunning time-lapse videos.
These advanced features unlock endless creative possibilities and allow you to capture professional-grade footage using the DJI Ronin-SC. Take the time to explore and experiment with these features to add visual flair and originality to your content.
Remember to refer to the user manual and tutorials provided by DJI to maximize your understanding of these advanced features and utilize them effectively.
Now that you’re familiar with the advanced features of the Ronin-SC, let’s move on to the next section, where we’ll explore some troubleshooting tips for common issues you may encounter during your shooting sessions.
Troubleshooting Common Issues
While the DJI Ronin-SC is a reliable and powerful gimbal, you may encounter some common issues during your shooting sessions. Here are troubleshooting tips to address and resolve these issues:
- Gimbal Drift: If you notice that the gimbal is drifting or not holding its position, try calibrating the IMU in the Ronin app. Make sure the gimbal is on a stable surface and follow the on-screen instructions to complete the calibration process.
- Bluetooth Connection Issues: If you are experiencing difficulty establishing or maintaining a Bluetooth connection between the Ronin-SC and your device, try resetting the Bluetooth settings on both devices and re-establishing the connection.
- Battery Drain: If the battery of your Ronin-SC is draining faster than expected, check for any firmware updates for the gimbal and the camera. Outdated firmware can sometimes cause excessive power consumption. Also, make sure to disable any unnecessary features or settings that may be consuming power unnecessarily.
- Motor Overload: If you receive a motor overload error message or notice excessive strain on the gimbal motors, it may be due to an unbalanced camera setup. Rebalance the camera on the gimbal, ensuring that it is properly aligned and adjusted.
- App Connectivity Issues: If you’re having trouble connecting the Ronin app to the gimbal or experiencing frequent disconnections, make sure your device’s Wi-Fi and Bluetooth settings are enabled and properly configured. Also, check for any app updates and ensure that you are using the latest version of the DJI Ronin app.
- Stabilization Issues: If you notice shaky or unstable footage, double-check the balance of your camera on the gimbal. A well-balanced setup is crucial for optimal stabilization. Additionally, check the motor parameters in the app and adjust them for better performance based on your camera and shooting conditions.
If you have tried troubleshooting the issue and are still experiencing problems with your DJI Ronin-SC, it is recommended to refer to the official DJI support resources, such as the user manual, online forums, or contacting DJI customer support for further assistance.
By addressing and resolving common issues promptly, you can ensure a smooth and trouble-free shooting experience with your DJI Ronin-SC gimbal.
Now that we’ve covered common troubleshooting tips, let’s conclude this guide on setting up the DJI Ronin-SC and using its features effectively.
Conclusion
Congratulations! You have reached the end of this comprehensive guide on setting up and using the DJI Ronin-SC. With the knowledge and instructions provided in this guide, you are now equipped to unleash the full potential of your gimbal and capture smooth and cinematic footage.
Throughout this guide, we covered the essential steps, from charging and balancing the camera to connecting the Ronin-SC to your device and customizing settings. We also explored advanced features and troubleshooting tips to help you navigate common issues that may arise during your shooting sessions.
Remember, practice makes perfect! Spend time experimenting with different settings, modes, and techniques to develop your own unique style and take your shots to new creative heights. The DJI Ronin-SC offers a versatile and powerful toolset that can elevate your filmmaking and content creation to new levels.
Whenever you encounter difficulties or have questions about your Ronin-SC, refer to the user manual, online resources, or DJI’s support channels for further assistance. The DJI community is a great place to connect with fellow Ronin-SC users and exchange tips, tricks, and ideas.
Now it’s time to grab your DJI Ronin-SC, set up your camera, and embark on your next filmmaking adventure. Embrace the possibilities, unleash your creativity, and capture stunning footage like never before. Happy shooting!