Introduction
Welcome to the world of Clover, a powerful POS system that streamlines your business operations and enhances the overall customer experience. Whether you run a retail store, restaurant, or service-based business, Clover has a range of solutions designed to meet your unique needs. In this article, we will guide you through the process of setting up your Clover POS system, from selecting the right device to configuring your software and integrating it with other tools.
With Clover, you can expect a user-friendly interface, advanced features, and seamless payment processing, all in one compact device. Gone are the days of dealing with multiple devices and systems – Clover consolidates all your business management tasks into one convenient platform. Prioritizing ease of use without compromising on functionality, Clover provides a comprehensive solution that caters to businesses of all sizes.
Whether you’re starting from scratch or upgrading your existing POS system, the setup process can feel daunting. That’s where this guide comes in. We’ll break down each step, ensuring a smooth and successful implementation of your Clover POS system. From hardware setup to software configuration and integrations, we’ll cover everything you need to get your business up and running in no time.
So, if you’re ready to take your business to new heights with Clover, read on and learn how to set up your Clover POS system and optimize its features to boost productivity, streamline operations, and maximize profitability.
Clover Overview
Clover is a versatile point-of-sale (POS) system that offers a range of solutions for businesses in various industries. It combines state-of-the-art hardware with intuitive software, providing a comprehensive platform to manage sales, inventory, and customer relationships.
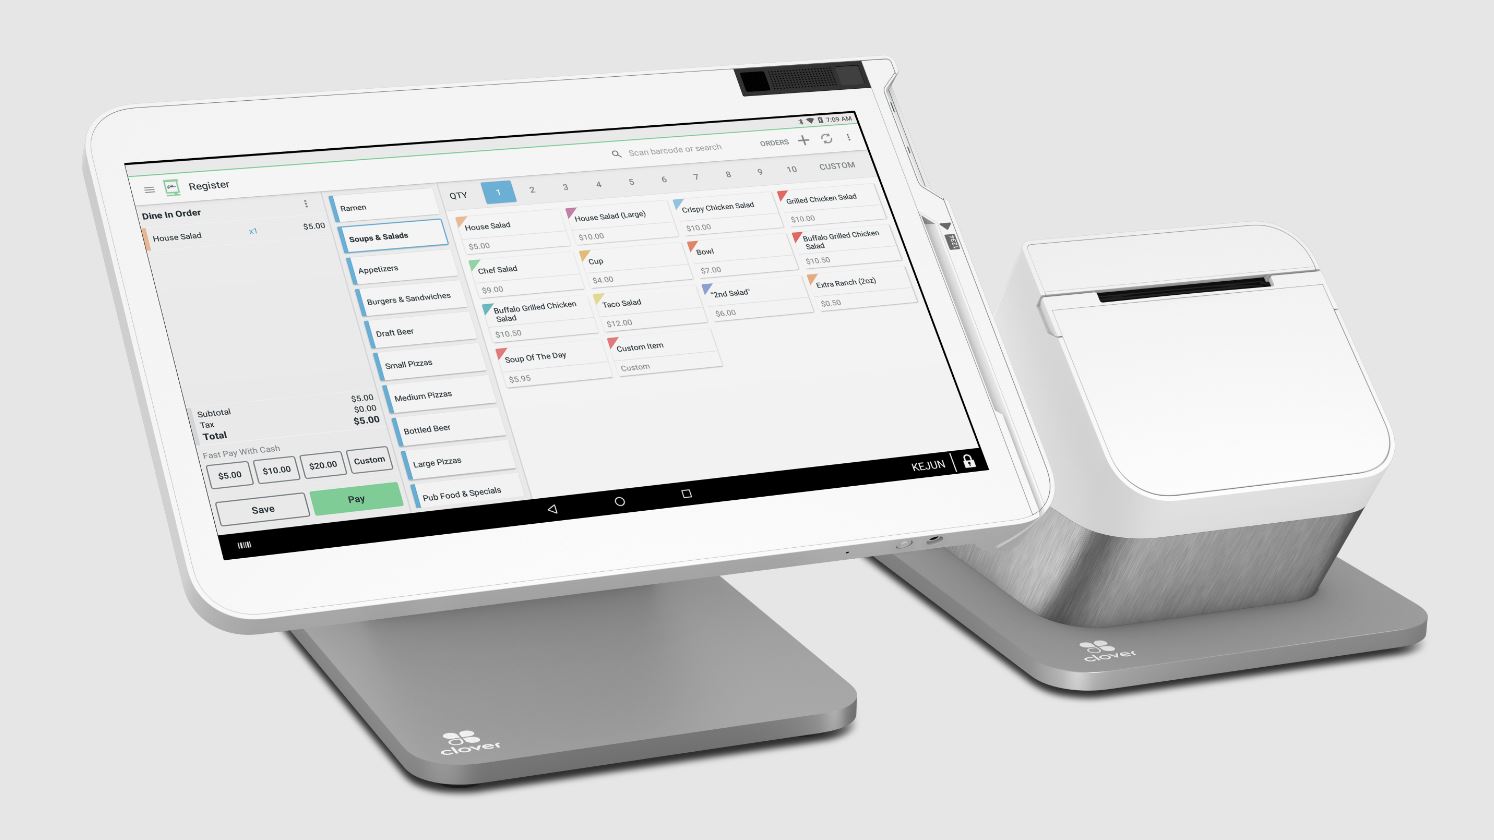
With Clover, you have the flexibility to choose the right system for your business needs. Whether you opt for the portable Clover Flex, the compact Clover Mini, or the full-featured Clover Station, each device is designed to enhance productivity and efficiency. Clover devices come equipped with touchscreens, card readers, and receipt printers, enabling seamless transaction processing.
In addition to the hardware, Clover’s software is a key component that enables businesses to customize and optimize their operations. The software provides a user-friendly interface, allowing merchants to manage inventory, track sales, and generate detailed reports. With built-in features like employee management, customer relationship management, and order management, Clover streamlines essential business tasks.
Clover also offers seamless payment processing with its integrated payment gateway. Merchants can accept various payment methods, including credit and debit cards, contactless payments, and mobile wallets. Clover’s payment processing solutions ensure data security, compliance with payment industry standards, and fast, reliable transactions.
One of the standout features of Clover is its ability to integrate seamlessly with other third-party tools and services. From accounting software to loyalty programs and online ordering platforms, Clover supports numerous integrations that help businesses streamline their operations and enhance customer experiences.
Overall, Clover provides a robust and flexible POS solution that can be tailored to meet the specific needs of businesses across industries. Its versatility, ease of use, and rich feature set make it an ideal choice for small businesses, as well as larger enterprises.
Choosing the Right Clover System for Your Business
When selecting a Clover system for your business, it’s important to consider your specific needs and requirements. Clover offers a range of devices, each with its own features and capabilities. Here are some factors to consider when choosing the right Clover system for your business:
1. Size and Type of Business: Consider the size and type of your business. If you have a small retail shop or a mobile business, the Clover Flex might be the best choice due to its portability. For a mid-sized business with moderate counter space, the Clover Mini is a suitable option. Larger businesses with high-volume transactions and multiple checkout points may find the Clover Station to be the most efficient choice.
2. Hardware Requirements: Evaluate your hardware requirements. Determine whether you need built-in capabilities like printers and customer displays or if you can rely on external peripheral devices. Clover devices come with various hardware options to suit different business needs.
3. Software Features: Consider the software features that are essential for your operations. Clover offers a range of software options that cater to different business needs. Ensure that the software package you select includes features such as inventory management, employee management, and reporting functionalities that align with your requirements.
4. Payment Processing: Evaluate your payment processing needs. Clover offers integrated payment processing solutions, but it’s important to consider factors like transaction fees, compatibility with your preferred payment processors, and support for various payment methods.
5. Scalability: Consider the future growth and scalability of your business. Choose a Clover system that can accommodate your business’s growth and can easily scale with additional devices and locations if needed.
6. Budget: Finally, consider your budget. Clover systems come with different price points, so it’s essential to choose one that fits your budget while still offering the necessary features and capabilities for your business.
By carefully evaluating these factors, you can choose the right Clover system that aligns with your business needs, helping you streamline operations, improve customer experiences, and ultimately drive growth and success.
Setting Up Your Clover Device
Once you have chosen the right Clover system for your business, the next step is to set up your device. Follow these steps to ensure a smooth and successful setup:
1. Unbox and Assemble: Start by unboxing your Clover device and ensure that you have all the necessary components, including the device itself, cables, power adapter, and any additional peripherals. Assemble the device as per the instructions provided.
2. Connect to Power: Plug in the power adapter and connect it to a power source. Ensure that the device is receiving power to turn it on.
3. Connect to the Internet: Clover devices require an internet connection to function properly. Connect your device to a stable and secure internet network using either the Ethernet port or the Wi-Fi option available on your device.
4. Log in or Create Account: Once your device is connected to the internet, follow the on-screen prompts to log in to your existing Clover account or create a new one. Provide the required information and follow the setup steps to proceed.
5. Update Firmware: After logging in, it’s essential to ensure that your device’s firmware is up to date. If there is a firmware update available, follow the prompts to update your device to the latest version. This step will ensure that your device has the latest features and enhancements.
6. Customize Settings: Explore the device settings to customize them according to your preferences. Set your time zone, language, and other essential settings to ensure accurate functionality.
7. Install Peripherals: If you have additional peripherals, such as a barcode scanner, cash drawer, or receipt printer, connect them to your Clover device. Follow the instructions provided with each peripheral to establish the proper connections.
8. Test Device and Peripherals: Once all the connections are established, perform a test run to ensure that your device and peripherals are working correctly. Test the barcode scanner, cash drawer, and receipt printer to ensure seamless integration.
9. Train Your Staff: If you have employees who will be using the Clover device, provide them with the necessary training on how to use the system effectively. Familiarize them with the features and functionalities to ensure smooth operations.
10. Secure Your Device: Lastly, take steps to secure your Clover device to protect sensitive customer data. Set up strong passwords, enable two-factor authentication, and educate your staff on best practices for maintaining security.
By following these steps, you can successfully set up your Clover device and ensure that it is ready for use in your business. Remember to refer to the manufacturer’s instructions and support resources for any specific device-related queries or troubleshooting steps.
Connecting Peripherals to Your Clover Device
Once you have set up your Clover POS device, the next step is to connect any necessary peripherals to enhance its functionality. Connecting peripherals allows you to expand the capabilities of your Clover device and streamline your business operations. Here’s a step-by-step guide on how to connect peripherals to your Clover device:
1. Identify Compatible Peripherals: Before connecting any peripherals, make sure they are compatible with your Clover device. Check the manufacturer’s guidelines and compatibility list to ensure proper integration.
2. Connect Peripheral Cables: Start by connecting the peripheral cables to your Clover device. Depending on the type of peripheral, you may need to use USB, Ethernet, or Bluetooth connections. Follow the manufacturer’s instructions for the proper cable connections.
3. Power Up Peripherals: Once the cables are connected, power up the peripherals. This may involve plugging them into power sources or turning them on using their power buttons.
4. Access Your Clover Settings: On your Clover device, access the Settings menu to configure the connected peripherals. Go to the Device section and select Connected Devices or Peripherals to view the list of connected devices.
5. Configure Peripheral Settings: In the Connected Devices or Peripherals section, you can customize the settings for each connected peripheral. This may include enabling or disabling certain features, setting up print options, or adjusting communication settings.
6. Test Peripherals: Once the peripheral settings are configured, it’s crucial to test each peripheral to ensure proper functionality. For example, if you connected a receipt printer, print a test receipt to verify that it is working correctly. Similarly, test barcode scanners, cash drawers, or any other peripherals to ensure seamless integration.
7. Adjust Placement and Wiring: While testing the peripherals, consider the placement and wiring to ensure a neat and organized setup. Arrange the peripherals in an ergonomic and easily accessible manner to optimize efficiency at the point of sale.
8. Train Employees: If you have employees who will be using the peripherals, provide them with proper training on how to operate and utilize the connected devices effectively. Familiarize them with the features, functionality, and troubleshooting processes to ensure smooth operations.
9. Regular Maintenance and Troubleshooting: As you start using the peripherals, it’s important to perform regular maintenance and troubleshooting. Clean and inspect the peripherals regularly and address any issues promptly. Refer to the manufacturer’s guidelines and support documentation for troubleshooting steps.
10. Stay Updated: Keep an eye on software updates and compatibility requirements for both your Clover device and connected peripherals. Update the firmware and software as needed to ensure optimal performance and compatibility.
By following these steps, you can successfully connect peripherals to your Clover device and leverage their capabilities to enhance your business operations. Remember to refer to the manufacturer’s instructions and support resources for any specific peripheral-related queries or troubleshooting steps.
Configuring Your Clover Software
After setting up your Clover device and connecting the necessary peripherals, it’s time to configure the software to tailor it to your business needs. Clover offers a range of software features that allow you to customize and optimize your POS system. Follow these steps to configure your Clover software:
1. Access Software Settings: On your Clover device, navigate to the Home screen and select the Settings app. This will give you access to various configuration options for your Clover software.
2. Set Up Tax Rates: In the Settings menu, locate the section for tax rates and enter the applicable tax rates for your business. This ensures that tax calculations are accurate during the checkout process.
3. Configure Payment Options: Customize your payment options by selecting the Payment Settings section. Here, you can set up various payment methods including credit cards, debit cards, and mobile wallets. You can also configure tipping options and enable or disable specific payment options as per your business requirements.
4. Customize Receipt Templates: Personalize your receipt templates by accessing the Receipt Settings section. Here, you can add your business logo, customize the layout and design, and include relevant information such as return policies or social media handles.
5. Set Up Discounts and Promotions: In the Discounts & Promotions section, you can create and manage various discounts and promotions for your customers. This includes percentage discounts, dollar amount discounts, buy-one-get-one (BOGO) offers, and more. Customize the settings to align with your marketing strategies and business goals.
6. Configure Inventory Management: If you plan to use Clover’s inventory management features, access the Inventory Settings section. Set up your product categories, units of measurement, stock levels, and low stock alerts. This will help you accurately track inventory and ensure that you never run out of stock.
7. Enable Loyalty Programs: If you want to implement a loyalty program for your customers, navigate to the Loyalty Settings section. Set up rewards, point schemes, and other loyalty program features. Encourage repeat business and incentivize customer loyalty.
8. Customize Employee Permissions: In the Employee Permissions section, you can create different user roles and assign permissions to each role. Determine which features and functions each employee can access and make necessary adjustments to ensure proper access control and security.
9. Integrate with Third-Party Apps: Clover supports integrations with various third-party apps and services. Access the App Market to explore and integrate tools such as accounting software, marketing platforms, or online ordering systems. Utilize these integrations to streamline your operations and enhance customer experiences.
10. Save and Update Settings: Once you have customized the different software settings, make sure to save your changes. Regularly check for software updates and install them to ensure you have the latest features and security enhancements.
By following these steps, you can configure your Clover software to align with your business needs and optimize the functionality of your POS system. Take the time to explore and experiment with the various settings to make the most out of your Clover software.
Customizing Your Clover Register
Customizing your Clover register allows you to create a personalized point-of-sale experience that aligns with your brand and business operations. Clover offers a range of customization options that enable you to tailor the appearance and organization of your register. Here are some key steps to customize your Clover register:
1. Access Register Settings: On your Clover device, navigate to the Home screen and select the Register app. This will allow you to access the settings specific to your register configuration.
2. Configure Button Layout: Customize the button layout on your register screen to reflect your menu or product offerings. You can add, remove, or rearrange buttons to optimize the efficiency of your checkout process. Group similar items together for easier navigation and streamline the ordering process.
3. Add Item Modifiers: If your business offers customizable options for certain products, utilize the item modifiers feature in the Register Settings. This enables you to add modifiers such as size, color, toppings, or special instructions, ensuring accurate order taking and minimizing errors.
4. Set Up Order Types: In the Register Settings, you can configure different order types such as dine-in, takeout, delivery, or catering. Tailor the settings for each order type, including specific options like table numbers for dine-in orders or delivery zones for delivery orders.
5. Customize Order Tickets: Make your order tickets easier to read and track by customizing their appearance. In the Register Settings, adjust settings such as font size, ticket layout, and order information displayed. Customize the order ticket format to suit the needs of your kitchen staff or other back-of-house operations.
6. Set Up Quick Access Buttons: Utilize the Quick Access Buttons feature in the Register Settings to create shortcuts for frequently used functions or popular menu items. Assign specific buttons to open cash drawer, apply discounts, or execute other actions to enhance efficiency during the checkout process.
7. Customize Receipts: Personalize your receipts by adding your business logo, contact information, and any additional details you want to include. Access the Receipt Settings to make these customizations and create a professional and branded receipt experience for your customers.
8. Implement Custom Pricing: If your business offers special pricing or discounts on certain days or specific customer groups, utilize the Custom Pricing feature in the Register Settings. Set up custom pricing rules to automatically apply discounts or adjust prices based on predefined parameters.
9. Test and Make Adjustments: After making customizations, it’s important to test the register functionality and ensure that everything is working as intended. Run test transactions and solicit feedback from your staff to identify any areas that may require adjustments or further customization.
10. Regularly Review and Update: As your business evolves, regularly review and update your register settings to keep up with any changes. This ensures that your register remains aligned with your current operations and provides an optimal experience for both your staff and customers.
By following these steps and taking advantage of the customizable features offered by Clover, you can create a tailored and efficient register experience that enhances your overall point-of-sale operations.
Setting Up Clover Payment Processing
Clover offers seamless integrated payment processing, allowing businesses to accept a wide range of payment methods and streamline transactions. Setting up Clover payment processing is crucial for ensuring smooth and secure transactions. Here are the key steps to set up and configure Clover payment processing:
1. Select Payment Processor: Clover integrates with various payment processors, so the first step is to choose the one that best fits your business needs. Research different payment processors, compare their pricing models, transaction fees, and features, and select the one that aligns with your requirements.
2. Set Up a Merchant Account: To process payments, you’ll need to set up a merchant account with your chosen payment processor. Provide the necessary information and complete their registration process. This step is crucial, as it establishes the connection between your business, Clover, and your chosen payment processor.
3. Configure Payment Gateway: Once you have set up your merchant account, you’ll need to integrate it with Clover’s payment gateway. Access the Payment Settings on your Clover device and follow the prompts to connect your merchant account to the Clover system. This integration ensures that payments are securely processed through your selected payment processor.
4. Test Payments: Before going live, it’s important to test the payment processing functionality. Run some test transactions using various payment methods to ensure that payment information is being processed correctly and that funds are being transferred to your merchant account. This allows you to identify and resolve any potential issues before accepting real customer payments.
5. Set Up Tipping Options: If you offer tipping options to customers, configure the tip settings in the Clover payment processing settings. Determine whether you want to offer percentage-based tips, predefined tip amounts, or customer-entered tip amounts. Customize these settings based on your business model and industry practices.
6. Enable Contactless Payments: Clover devices are equipped to accept contactless payments, such as Apple Pay or Google Pay, through NFC technology. Ensure that the contactless payment option is enabled in your Clover payment settings to provide a convenient and seamless payment experience for your customers.
7. Educate Staff on Payment Procedures: Properly train your staff on how to accept payments using the Clover device. Familiarize them with the payment process, different payment methods, and any specific policies or procedures that apply to your business. This ensures that your team is well-equipped to handle transactions efficiently and answer any customer payment-related inquiries.
8. Regularly Review Payment Reports: Clover offers robust reporting features, allowing you to track and analyze your payment data. Regularly review payment reports to gain insights into sales trends, transaction volumes, and customer payment preferences. This data can help you make informed business decisions and optimize your payment processing strategy.
9. Stay Compliant and Secure: Keep your payment processing procedures compliant with industry standards and regulations. Follow best practices for data security, including point-to-point encryption and adhering to Payment Card Industry Data Security Standards (PCI DSS). Regularly update your Clover device’s software and security patches to protect sensitive payment information.
10. Provide Excellent Customer Service: Finally, prioritize excellent customer service when it comes to payment processing. Ensure that your staff is attentive, knowledgeable, and able to assist customers with any payment-related inquiries or concerns. A smooth and hassle-free payment experience enhances customer satisfaction and fosters repeat business.
By following these steps, you can effectively set up and configure Clover payment processing, enabling secure, seamless transactions for your business while providing convenience and peace of mind for your customers.
Managing Inventory and Products on Clover
Managing inventory and products is a critical aspect of running a successful business, and Clover offers robust features to help you efficiently track and organize your inventory. Here are the key steps to effectively manage inventory and products on Clover:
1. Set Up Product Categories: Begin by organizing your products into categories. Create product categories in the Inventory Settings that align with your business, such as food items, apparel, accessories, or electronics. Properly categorizing products helps streamline inventory management and reporting.
2. Add Products to Inventory: Add your products to the Clover inventory, specifying relevant details such as product names, descriptions, SKUs, cost prices, and selling prices. You can also upload product images to enhance visual representation.
3. Set Stock Levels: Specify stock levels for each product to keep track of available quantities. This helps prevent overselling and enables you to promptly reorder items when stock levels are low. Clover can notify you when products reach a predetermined threshold.
4. Manage Variants and Options: If your products come in different variations or have customizable options (e.g., size, color), utilize Clover’s variant and option management features. Specify different SKUs, prices, and stock levels for each variant or option within a product.
5. Enable Low Stock Alerts: Enable low stock alerts to receive notifications when product quantities fall below specified thresholds. This ensures you stay informed and can take prompt action to replenish inventory and avoid stockouts.
6. Utilize Bulk Actions: Save time and effort by using Clover’s bulk actions feature to perform simultaneous updates on multiple products. You can update prices, stock levels, or other attributes for multiple items at once, saving you from manual updates for each product.
7. Set Up Modifiers: If your products have customizable options or add-ons (e.g., toppings, upgrades), utilize modifiers. Set up modifiers to allow customers to customize their orders and automatically adjust prices and inventory levels accordingly.
8. Run Inventory Reports: Regularly run inventory reports to gain insights into your stock levels, sales history, and product performance. Clover provides comprehensive inventory reporting that helps you make informed decisions about reordering, product promotions, and managing slow-moving items.
9. Perform Physical Inventory Counts: Conduct regular physical inventory counts to reconcile and validate the accuracy of your Clover inventory with the actual stock on hand. Update any discrepancies to ensure your inventory records remain accurate.
10. Integrate with Supplier Systems: Streamline the inventory management process by integrating Clover with your suppliers’ systems. This enables efficient inventory replenishment through automated purchase orders, real-time stock updates, and improved visibility into supplier inventory levels.
By following these steps and utilizing the inventory management features provided by Clover, you can effectively keep track of your products, control stock levels, and optimize inventory operations to ensure smooth business operations.
Adding Employee Profiles and Permissions
Managing employee profiles and permissions is an integral part of optimizing the operations of your business and ensuring proper access control within your Clover POS system. Clover offers features that allow you to add employee profiles and assign specific permissions to regulate their access to various functions. Here’s a step-by-step guide to adding employee profiles and permissions on Clover:
1. Access Employee Settings: On your Clover device, navigate to the Home screen and select the Employees app. This will allow you to access the settings specific to managing employee profiles.
2. Add Employee Profiles: Within the Employee Settings, you can add individual employee profiles. Provide the necessary details for each employee, including their name, contact information, and employee ID if applicable. This step creates a unique profile for each employee within your Clover system.
3. Assign Roles: Clover allows you to assign different roles to each employee based on their job responsibilities. Set up various employee roles that align with the tasks they will perform, such as cashier, manager, or server. Assign the appropriate role to each employee profile.
4. Customize Permissions: Once you have assigned roles, you can customize the permissions associated with each role. Define the access rights for each role by specifying which functions, features, or parts of the Clover system the employee can access. This ensures that employees can perform their duties without unnecessary access to sensitive data or functions.
5. Define Role-Based Access: With Clover, you can assign permissions based on roles instead of individual employees. It’s recommended to define role-based access to streamline permissions management. This allows you to assign or remove permissions for entire roles rather than adjusting access for individual employees.
6. Set Up Time Clock: If your business requires tracking employee hours, utilize Clover’s time clock feature. Access the Time Clock settings to enable this functionality and configure the settings associated with clocking in and out. This allows you to track employee attendance and generate accurate time-based reports.
7. Test and Review Permissions: After assigning roles and configuring permissions, test the system using employee profiles. Log in with each employee’s credentials and verify that the assigned permissions are working correctly. Make adjustments as needed to ensure that employees have the appropriate access required for their roles.
8. Update Employee Profiles as Needed: As employee information changes or new employees join your team, it’s important to regularly update employee profiles. Modify profiles with accurate information and assign them to the appropriate roles and permissions. This helps ensure that the information in your Clover system remains up to date.
9. Review and Audit Permissions Periodically: Conduct periodic reviews and audits of employee permissions to ensure they align with current roles and responsibilities. Remove or modify unnecessary permissions and adjust access as needed to maintain proper access control within your Clover system.
10. Train Employees on System Usage: Lastly, provide comprehensive training to your employees on how to use the Clover system within their assigned roles. Familiarize them with the functions they have access to and ensure they understand how to utilize the system effectively and securely.
By following these steps and effectively managing employee profiles and permissions on Clover, you can maintain a secure and efficient work environment while controlling access to sensitive data and functions within your POS system.
Understanding and Using Clover’s Reporting Features
One of the significant advantages of using Clover is its robust reporting features, which provide valuable insights into the performance and operations of your business. Understanding and utilizing Clover’s reporting capabilities can help you make data-driven decisions to improve efficiency, track sales, manage inventory, and identify business growth opportunities. Here’s a guide to understanding and effectively using Clover’s reporting features:
1. Sales Reports: Clover provides detailed sales reports that offer insights into your business’s overall performance. Analyze sales trends, track daily, weekly, monthly, or yearly sales figures, and compare performance across different periods. This allows you to identify peak sales hours, best-selling products, and opportunities for sales growth.
2. Inventory Reports: Utilize inventory reports to effectively manage your stock levels. Clover’s inventory reports provide information on stock levels, low stock items, and order fulfillment. Analyze inventory data to ensure optimal stock availability, track popular products, and make informed decisions on restocking and inventory optimization.
3. Employee Performance Reports: Gain insights into employee performance with Clover’s employee reports. Monitor sales performance, track clock-in and clock-out times, assess individual productivity, and identify top-performing employees. Use this information for performance evaluation, incentive programs, and training opportunities.
4. Customer Insights: Clover’s reporting features also provide valuable insights into your customers. Track customer demographics, preferences, and purchase patterns to identify loyal customers, understand their buying behavior, and tailor marketing strategies to target specific customer segments. This allows you to enhance customer experiences and build customer loyalty.
5. Payment Reports: Analyze payment reports to gain a deeper understanding of your customers’ payment preferences. Clover’s payment reports provide data on payment types, transaction volumes, and average transaction values. This information helps you optimize your payment processing strategies and identify opportunities to offer more convenient payment options.
6. Customized Reports: Customize reports in Clover to focus on specific metrics or insights that are crucial to your business. Create custom reports based on your unique requirements, such as specific product categories, discounts, or time periods. This allows you to analyze data relevant to your business goals and track key performance indicators effectively.
7. Export and Share Reports: Clover allows you to export reports to various file formats, such as Excel or PDF, for further analysis or sharing with stakeholders. Share reports with your team, accountants, or business partners to facilitate collaboration and data-driven decision-making.
8. Regularly Review Reports: Allocate time to review reports regularly, preferably at least weekly or monthly, to stay updated on your business’s performance. Use the data to identify areas for improvement, track progress toward goals, and make informed decisions to optimize operations and drive growth.
9. Schedule Automated Reports: Clover allows you to schedule automated reports, ensuring that you receive key data at predefined intervals. Set up email alerts or notifications to receive reports conveniently, saving time and effort in retrieving and analyzing data manually.
10. Leverage Insights for Business Growth: Finally, use the insights gained from Clover’s reporting features to drive business growth. Identify opportunities to enhance product offerings, optimize pricing strategies, streamline operations, or implement targeted marketing campaigns. Take advantage of the data at your disposal to make informed decisions that positively impact your business.
By understanding and effectively utilizing Clover’s reporting features, you can gain valuable insights into your business’s performance, optimize operations, fuel growth, and make informed decisions that drive your business toward success.
Integrating Clover with Other Tools and Services
Clover’s flexibility extends beyond its core features, as it offers seamless integration with a variety of tools and services. Integrating Clover with other applications and platforms can enhance productivity, streamline operations, and improve the overall customer experience. Here’s a guide to understanding and effectively integrating Clover with other tools and services:
1. Online Ordering Platforms: Integrate Clover with online ordering platforms to expand your reach and offer convenient ordering options for customers. Platforms like Chowly, DoorDash, or Uber Eats can sync with Clover, enabling seamless order processing directly through your POS system.
2. Accounting Software: Integrate Clover with accounting software such as QuickBooks or Xero to automate financial data syncing and streamline bookkeeping processes. This saves time and reduces the chances of manual errors in managing financial transactions.
3. Loyalty and CRM Systems: Connect your Clover system with loyalty and customer relationship management (CRM) platforms such as Clover Rewards, FiveStars, or Mailchimp. By integrating these systems, you can track customer loyalty, send targeted promotions, and build stronger relationships with your customer base.
4. Inventory Management Systems: Integrate Clover with inventory management systems like TradeGecko or Stitch Labs to synchronize inventory levels, streamline purchase orders, and automate stock updates. This ensures accurate inventory tracking and helps prevent stock-outs or overstocking.
5. Employee Management Platforms: Connect your Clover POS system with employee management tools like Homebase or Deputy to streamline employee scheduling, time tracking, and payroll processes. This integration simplifies workforce management and reduces administrative burden.
6. Marketing and Analytics Platforms: Integrate Clover with marketing platforms like Mailchimp, or analytics tools like Google Analytics, to gain insights into customer behavior, track marketing campaign effectiveness, and make data-driven marketing decisions.
7. E-commerce Platforms: If you have an online store, integrate Clover with e-commerce platforms like Shopify or WooCommerce to sync inventory, process online orders, and manage customer information seamlessly across different sales channels.
8. Payment Gateway Providers: Clover offers flexibility in choosing payment gateway providers. Explore options like First Data, Fiserv, or PayPal, and integrate them with your Clover system to ensure secure and reliable payment processing.
9. Reporting and Analytics Tools: Integrate Clover with reporting and analytics tools such as Tableau or Power BI to leverage advanced data visualization and in-depth reporting capabilities. This allows you to gain deeper insights into your business performance and make data-driven decisions.
10. Custom Integrations: For specific business needs, consider exploring custom integrations using Clover’s developer-friendly APIs. This allows you to create tailored solutions that meet your unique requirements or integrate with industry-specific tools and services.
By integrating Clover with other tools and services, you can maximize the functionality of your POS system, improve efficiency, and provide a seamless experience for both your customers and employees. Evaluate your business needs, research available integrations, and leverage the power of integration to optimize your overall business operations.
Troubleshooting Common Issues
While Clover offers a reliable and intuitive POS system, occasionally, you may encounter some common issues. Knowing how to troubleshoot these problems can help minimize downtime and ensure smooth operations. Here are some troubleshooting steps for common Clover issues:
1. Device Not Powering On: If your Clover device is not powering on, ensure that the power cable is securely connected. Try plugging it into a different power outlet or using a different power adapter. If the issue persists, contact Clover support for further assistance.
2. Connectivity Issues: If you are experiencing connectivity issues, check your internet connection. Make sure you are connected to a stable network and that the Wi-Fi or Ethernet settings on your Clover device are correctly configured. Restart your router or modem if necessary. If the problem persists, contact your internet service provider.
3. Printer Not Working: If your Clover printer is not functioning properly, check the printer’s connections and ensure that it has sufficient paper and ink. Restart the printer and make sure it is selected as the default printer in the Clover settings. If you continue to experience issues, refer to the printer’s user manual or contact technical support for further assistance.
4. Payment Processing Errors: If you encounter payment processing errors, ensure that your payment processor account is active and properly linked to your Clover system. Double-check that your internet connection is stable and that you are accepting valid payment methods. If the problem persists, contact your payment processor’s support team for assistance.
5. Software Freezing or Crashing: If the Clover software freezes or crashes, try restarting your device. Ensure that your software is up to date and that you have sufficient storage space available. Clearing the cache and temporary files can also help resolve software-related issues. If the problem persists, contact Clover support for further guidance.
6. Barcode Scanner Issues: If you are experiencing issues with your barcode scanner, check the connections and ensure that it is properly configured in the Clover settings. Clean the scanner lens and ensure that it has a clear line of sight to the barcode. If problems persist, refer to the scanner’s user manual or contact the manufacturer for support.
7. Inventory Discrepancies: If you notice discrepancies in your inventory, perform a physical count to cross-reference with the Clover system. Ensure that all stock movements, including sales, returns, and adjustments, are accurately recorded in the system. If issues persist, review your inventory management processes and consider implementing cycle counts or barcode scanning for greater accuracy.
8. Slow System Performance: If your Clover device is running slowly, try closing unnecessary apps or browser tabs to free up system resources. Ensure that you have sufficient storage space available and that your device’s software is up to date. If the issue persists, contact Clover support for assistance in optimizing system performance.
9. Error Messages: If you encounter error messages on your Clover device, note down the specific error code or message and refer to the Clover support resources. Often, error messages provide helpful information or steps to resolve the issue. If needed, reach out to Clover support with the information to assist them in diagnosing and resolving the problem.
10. Regular Software Updates: Many issues can be resolved or prevented by regularly updating your Clover software. Updates often include bug fixes, security patches, and feature enhancements. Keep your Clover device and software up to date to ensure you have the most stable and secure version.
By following these troubleshooting steps and reaching out to Clover’s support resources when needed, you can effectively address common issues, minimize disruptions to your business, and ensure a smooth and reliable Clover POS system experience.
Conclusion
Setting up and utilizing Clover’s POS system can greatly benefit your business by streamlining operations, improving customer experiences, and providing valuable insights into your performance. From selecting the right Clover system and configuring the software to integrating with other tools and troubleshooting common issues, each step plays a crucial role in maximizing the potential of your Clover POS system.
Clover offers a wide range of features and customization options, allowing you to tailor the system to meet your specific business needs. By understanding and leveraging these features, such as managing inventory, customizing your register, and analyzing reports, you can make data-driven decisions that drive growth and success.
Remember to regularly review and update your Clover software, hardware, and integrations to stay up to date with the latest features and security patches. Additionally, ensure that your employees are properly trained on using the Clover system to maximize efficiency and provide exceptional customer service.
In the event of any issues or challenges, utilize the troubleshooting steps provided and feel free to reach out to Clover support for additional assistance. They are there to help you overcome any obstacles and optimize your Clover experience.
By effectively utilizing the Clover POS system, you can streamline your operations, enhance customer experiences, and gain valuable insights into your business’s performance. Embrace the versatility and power of Clover to take your business to new heights of success.