Introduction
Welcome to the comprehensive guide on how to set up an Arris wireless router! If you’ve recently purchased an Arris router or are looking to upgrade your home network, you’ve come to the right place. Setting up a wireless router can seem daunting at first, but with the proper instructions and a little patience, you’ll have your network up and running in no time.
An Arris wireless router provides you with the capability to connect multiple devices to the internet without the need for messy cables. Whether you want to browse the web on your laptop, stream movies on your smart TV, or play online games on your gaming console, a wireless router is a convenient and reliable solution.
In this guide, we’ll walk you through the step-by-step process of setting up your Arris wireless router. We’ll cover everything from gathering the necessary equipment to troubleshooting common issues. By the end of this guide, you’ll have a secure and efficient wireless network that meets your needs.
It’s important to note that the specific steps may vary depending on the model of your Arris router. However, the general principles and settings discussed in this guide are applicable to most Arris router models. If you’re unsure about any specific details, please consult the user manual or visit the Arris support website for more information.
Now, without further ado, let’s get started with the first step: gathering the necessary equipment.
Step 1: Gather the necessary equipment
Before you begin setting up your Arris wireless router, make sure you have all the necessary equipment. Here’s what you’ll need:
- An Arris wireless router (specific model may vary)
- A power adapter for your router
- An ethernet cable (usually included with the router)
- A modem connected to your internet service provider (ISP)
- A computer or laptop with an ethernet port or Wi-Fi capability
It’s important to ensure that your modem is properly connected to your ISP and functioning correctly. Without a working modem, your router will not be able to establish an internet connection.
If any of the required equipment is missing or not functioning properly, please contact your ISP or the respective manufacturer for assistance or to purchase any necessary replacement parts.
Once you have gathered all the necessary equipment, you are ready to move on to the next step: connecting the router to the modem.
Step 2: Connect the router to the modem
Now that you have gathered all the necessary equipment, it’s time to connect your Arris wireless router to the modem. Follow these steps:
- Locate the ethernet port on the back of your modem. It is usually labeled “Ethernet,” “LAN,” or “Internet.”
- Take one end of the ethernet cable and plug it into the ethernet port on the modem.
- Connect the other end of the ethernet cable to the WAN or Internet port on the back of your Arris router.
- Make sure both ends of the cable are securely plugged in.
- Connect the power adapter to your Arris router and plug it into a power outlet.
- Turn on your modem by pressing the power button or plugging it into a power outlet, if it wasn’t already on.
- Wait for a few minutes to allow the modem and router to establish a connection.
During this process, the router will establish a connection with your modem and receive an IP address from your ISP. This IP address is important for your router to communicate with the internet.
After the connection is established, you’ll notice that the lights on your router and modem will start blinking. This indicates that they are communicating with each other and ready for the next step.
Congratulations! You have successfully connected your Arris wireless router to the modem. In the next step, we will discuss how to access the router settings.
Step 3: Access the router settings
After connecting your Arris wireless router to the modem, it’s time to access the router settings. This will allow you to customize and configure various options according to your preferences. Follow these steps to access the router settings:
- Make sure your computer or laptop is connected to the router either via an ethernet cable or through a Wi-Fi connection.
- Open a web browser of your choice, such as Google Chrome, Mozilla Firefox, or Microsoft Edge.
- In the address bar of the web browser, type the default IP address of your Arris router. The default IP address is usually “192.168.0.1” or “192.168.1.1.” Press Enter or Return on your keyboard.
- You will be directed to the Arris router login page. If prompted, enter the default username and password to log in. The default credentials are often “admin” for both the username and password. However, it’s worth noting that these credentials can vary depending on the specific model of your Arris router. Refer to the user manual or the label on the router for the correct login information.
- Once logged in, you will have access to the router’s web-based interface, which allows you to modify various settings.
It’s recommended to change the default username and password to enhance the security of your router. Look for the “Administration,” “Security,” or “User Management” section in the router settings to change the login credentials.
Remember to create a strong, unique password that includes a combination of uppercase and lowercase letters, numbers, and special characters. This will help protect your router from unauthorized access.
Congratulations! You have successfully accessed the router settings. In the next step, we will discuss how to configure the wireless network.
Step 4: Configure the wireless network
Now that you have accessed the router settings, it’s time to configure your Arris wireless network. Follow these steps to set up your wireless network:
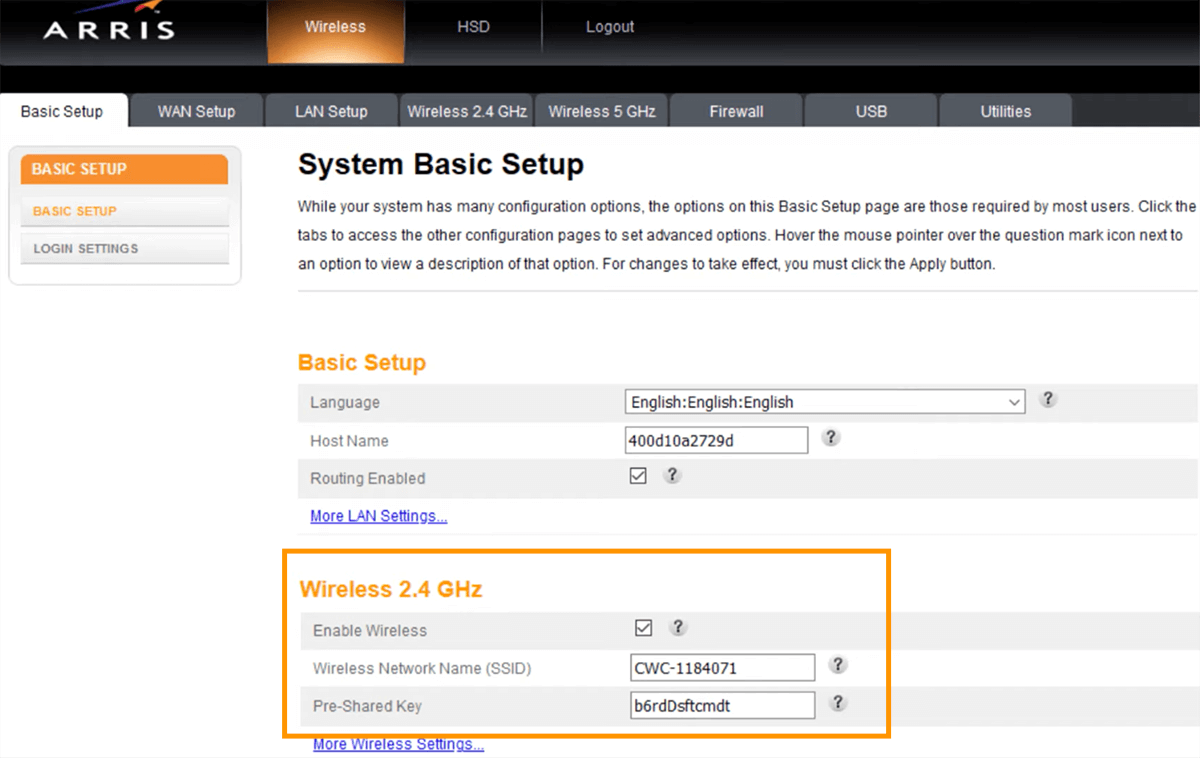
- In the router settings, locate the “Wireless,” “Wireless Settings,” or “Wi-Fi” tab. Click on it to access the wireless network configuration.
- Look for the option to enable the wireless network. It’s usually a checkbox or a toggle switch. Make sure it is turned on.
- Enter a unique name for your wireless network in the “SSID” or “Network Name” field. This is the name that will be visible to devices when they search for available networks.
- Select the appropriate security type for your wireless network. It is recommended to choose “WPA2” or “WPA3” for better security.
- Set a strong password in the “Passphrase” or “Network Key” field. This password will be required to connect to your wireless network. Ensure that it is a combination of uppercase and lowercase letters, numbers, and special characters.
- Save the changes and wait for the router to apply the wireless network settings.
By configuring your wireless network, you are ensuring that it is personalized, secure, and easily identifiable. The network name and password will be used to connect your devices, so make sure they are memorable but not easily guessable.
It’s a good practice to avoid using personal information or common words in your network name or password. This helps protect your network against potential unauthorized access.
Once the wireless network settings are configured and saved, your Arris router will broadcast the Wi-Fi signal, allowing devices to connect to it. In the next step, we will discuss how to customize the router settings further.
Step 5: Customize router settings
After configuring the basic wireless network settings of your Arris router, you may want to further customize and personalize the router’s settings according to your specific needs. Follow these steps to customize the router settings:
- Access the router settings by typing the default IP address of your Arris router into a web browser and logging in with your username and password.
- Explore the various tabs and sections of the router settings to familiarize yourself with the available customization options.
- Adjust the time and date settings to ensure accurate system time and synchronization.
- Configure the DNS settings if you wish to use custom DNS servers or prefer automatic DNS assignment.
- Customize the LAN (Local Area Network) settings if you want to modify the IP address range or enable DHCP (Dynamic Host Configuration Protocol).
- Enable or disable features such as Universal Plug and Play (UPnP), Quality of Service (QoS), and parental controls to suit your specific requirements.
- Check for firmware updates in the settings to ensure that your router’s software is up-to-date with the latest security and performance enhancements.
Customizing the router settings allows you to optimize your internet connection, prioritize certain devices or applications, and enhance the overall performance and security of your network.
Take your time to explore the various options available in the router settings. Refer to the user manual or consult online resources for detailed explanations of each setting if you are unsure about its purpose or function.
Remember to save any changes you make in the router settings and restart the router if prompted. This will ensure that the modifications take effect.
With the router settings customized to your preferences, you are now ready to move on to the next step: setting up wireless security.
Step 6: Set up wireless security
Wireless security is essential for protecting your network from unauthorized access and ensuring that your data remains secure. Follow these steps to set up wireless security on your Arris router:
- Access the router settings by typing the default IP address of your Arris router into a web browser and logging in with your username and password.
- Locate the “Wireless,” “Wireless Settings,” or “Wi-Fi Security” tab in the router settings.
- Select the appropriate security type for your wireless network. The recommended security types are “WPA2” or “WPA3.”
- Choose a strong encryption method such as AES (Advanced Encryption Standard) for better security.
- Set a strong password or passphrase for your wireless network. Ensure that it is a combination of uppercase and lowercase letters, numbers, and special characters.
- Save the changes and wait for the router to apply the new wireless security settings.
Setting up wireless security ensures that only authorized devices can connect to your network. The password or passphrase acts as a key to access your network, making it crucial to choose a strong and unique one. This will help prevent unauthorized users from gaining access to your network and potentially compromising your data.
It’s important to periodically change your wireless network password to maintain the security of your network. Additionally, avoid sharing your network password with unauthorized individuals to prevent potential security breaches.
By setting up wireless security, you can enjoy peace of mind knowing that your network is protected and your data is secure. In the next step, we will discuss how to connect devices to your wireless network.
Step 7: Connect devices to the wireless network
With your Arris wireless router set up and secure, it’s time to connect your devices to the wireless network. Follow these steps to connect devices to your network:
- On the device you want to connect, such as a laptop, smartphone, or tablet, go to the settings menu.
- Look for the Wi-Fi or wireless network settings and select it.
- A list of available wireless networks will appear. Locate and select your wireless network from the list.
- If prompted, enter the password or passphrase that you set up for your wireless network.
- Wait for the device to connect to the network. Once connected, you should see the Wi-Fi symbol or an indication that you are connected to the network.
Repeat these steps for each device you want to connect to your wireless network. You can connect multiple devices, including laptops, smartphones, tablets, smart TVs, gaming consoles, and more.
If you have a dual-band router, you may see two separate network names, one for the 2.4GHz band and one for the 5GHz band. Choose the appropriate network based on the capabilities of your device. The 5GHz band generally offers faster speeds and less interference, but some older devices may only support the 2.4GHz band.
Remember to save the wireless network name (SSID) and password in a safe place, as you may need them when connecting new devices or when reconnecting existing devices after a reset or power outage.
Congratulations! You have successfully connected your devices to your Arris wireless network. In the next step, we will discuss troubleshooting common issues you may encounter.
Step 8: Troubleshooting common issues
Even with proper setup, it’s possible to encounter some common issues when using an Arris wireless router. Here are some troubleshooting tips to help you resolve these issues:
- No internet connection: If you’re unable to connect to the internet, ensure that your modem is connected properly and turned on. Check the connection between the modem and the router, and restart both devices if necessary.
- Weak Wi-Fi signal: If you’re experiencing a weak Wi-Fi signal, try moving closer to the router or positioning the router in a central location within your home. You can also adjust the router’s antennas to optimize signal strength.
- Intermittent connection: If your connection keeps dropping or disconnecting frequently, check for possible sources of interference, such as cordless phones, microwave ovens, or other electronic devices. Adjust the channel or frequency settings on your router to minimize interference.
- Slow internet speed: If your internet speed is slower than expected, try restarting your router and modem, as well as any devices connected to the network. You can also contact your internet service provider to ensure that you’re receiving the expected speed based on your subscription.
- Forgotten router login credentials: If you’ve forgotten the username or password to access your router settings, you may need to perform a factory reset. Refer to the user manual or contact the manufacturer for instructions on how to reset your specific Arris router model.
- Device connectivity issues: If a specific device is having trouble connecting to the network, restart the device and ensure that the correct network name (SSID) and password are being used. If the issue persists, try forgetting the network on the device and reconnecting to it.
If you encounter any other issues or have questions regarding your Arris wireless router, consult the user manual or visit the manufacturer’s support website for further assistance. They may have specific troubleshooting guides or firmware updates available to help resolve any issues.
By following these troubleshooting steps, you can address common issues and ensure a smooth and uninterrupted wireless network experience.
Conclusion
Congratulations! You have successfully set up your Arris wireless router and configured your wireless network. By following the step-by-step guide, you have created a secure and efficient home network that allows you to connect multiple devices effortlessly.
We started by gathering the necessary equipment, including the router, power adapter, ethernet cable, modem, and a computer or laptop. Then, we connected the router to the modem and accessed the router settings to customize and configure various options, such as the wireless network name, password, and security settings.
Afterwards, we discussed how to customize the router settings further, including adjusting time and date settings, configuring DNS settings, and exploring additional features such as UPnP, QoS, and parental controls.
We emphasized the importance of setting up wireless security to protect your network from unauthorized access and outlined the steps to connect your devices to the wireless network using the network name and password you set up.
Lastly, we provided troubleshooting tips to help you address common issues that may arise, such as no internet connection, weak Wi-Fi signal, intermittent connection, slow internet speed, forgotten login credentials, and device connectivity issues.
Remember, the specific steps and options may vary depending on the model of your Arris router. It’s always recommended to consult the user manual or the manufacturer’s support website for detailed instructions and additional information specific to your router model.
With your Arris router properly set up and your wireless network secure, you can now enjoy the benefits of a reliable, high-speed internet connection across your devices. Whether you’re browsing the web, streaming movies, playing games, or working from home, your Arris wireless router will provide a seamless and efficient online experience.
Thank you for following this guide. If you have any further questions or need assistance, don’t hesitate to reach out to the Arris support team or consult additional resources available to you. Happy browsing!