Introduction
Welcome to the exciting world of the new iPhone 13! One of the standout features of this latest device is its advanced Face ID technology, which provides a secure and convenient way to unlock your iPhone and authenticate various functions. If you’re wondering how to set up Face ID on your new iPhone 13, you’ve come to the right place. In this guide, we will walk you through the step-by-step process to get Face ID up and running smoothly.
Gone are the days of entering passcodes or using fingerprint scanners to unlock your phone. With Face ID, your unique facial features become the key to unlocking your iPhone 13 and accessing its various features and functionalities. This cutting-edge technology analyzes over 30,000 invisible dots on your face to create a detailed facial map, enabling precise and secure facial recognition.
Not only does Face ID provide a seamless unlocking experience, but it also brings additional security benefits. Since every face is unique, the probability of someone else unlocking your iPhone with their face is incredibly low. Plus, Face ID adapts to changes in your appearance, such as a new hairstyle or wearing glasses, to maintain accurate recognition over time.
Setting up Face ID on your iPhone 13 is a straightforward process that only takes a few minutes. By following the steps outlined in this guide, you’ll be able to enjoy the convenience and enhanced security of Face ID.
So, without further ado, let’s dive into the step-by-step instructions to set up Face ID on your iPhone 13.
Step 1: Accessing the Settings Menu
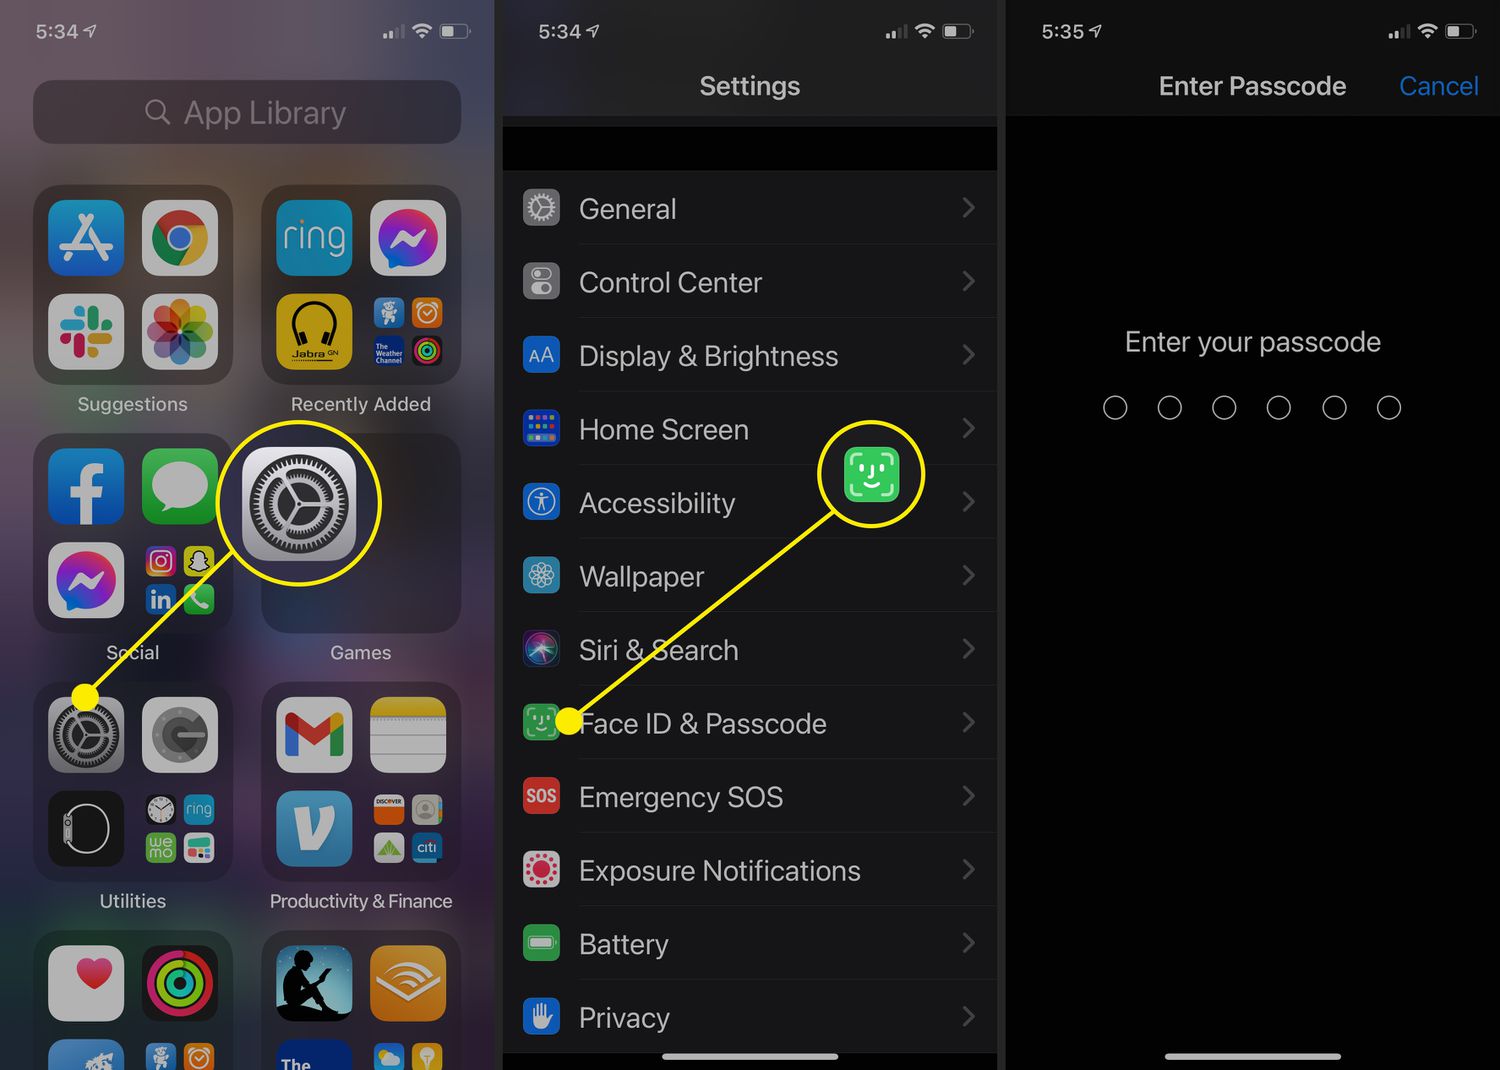
The first step to setting up Face ID on your iPhone 13 is accessing the Settings menu, where you’ll find all the necessary options to configure your device. To begin, unlock your iPhone and locate the Settings app. The app icon resembles a gear and can usually be found on the home screen or in your app drawer.
Once you’ve located the Settings app, tap on it to open it. The Settings menu is where you can customize various aspects of your iPhone’s functionality, including Face ID and passcode settings.
Scroll through the list of options and look for the Face ID & Passcode option. This is where you’ll be able to configure and manage your Face ID settings. Tap on it to proceed to the next step.
If prompted, you may need to enter your passcode to access the Face ID & Passcode settings. This additional security measure helps protect your Face ID configuration from unauthorized access.
With the Face ID & Passcode menu open, you’re now ready to move on to the next step of setting up Face ID on your iPhone 13.
Step 2: Selecting Face ID & Passcode
Now that you have accessed the Settings menu on your iPhone 13, it’s time to navigate to the Face ID & Passcode settings section. This is where you will configure and manage your Face ID settings.
Once you are on the Face ID & Passcode screen, you will see various options related to Face ID and passcode settings. This includes options for Enabling Face ID, iPhone Unlock, App and iTunes Store, Safari AutoFill, and more.
To continue setting up Face ID, select the “Set Up Face ID” option. This will launch the Face ID configuration process and guide you through the necessary steps to get started.
During this step, you may be prompted to enter your passcode as an added security measure. This ensures that only authorized users can make changes to your Face ID settings.
Once you have entered your passcode, you will be ready to move on to the next step of the Face ID setup process. It’s time to get your face scanned and registered for seamless authentication and unlocking on your iPhone 13.
Step 3: Entering Your Passcode
After selecting the “Set Up Face ID” option in the Face ID & Passcode settings, you may be prompted to enter your passcode. This is an important step as it adds an extra layer of security to your device and ensures that only authorized users can access and configure Face ID.
To proceed, simply enter your passcode using the on-screen keypad. Your passcode can be a combination of numbers, letters, or both, depending on your personal preference and security needs.
Make sure to choose a passcode that is easy for you to remember but not easily guessable by others. Avoid using common patterns or sequences, such as “1234” or “0000”. Opt for a unique and secure passcode that will protect your iPhone and its sensitive data.
Once you have entered your passcode, tap on “Continue” to move on to the next step. This will bring you closer to completing the Face ID setup process and enjoying the convenience of facial recognition on your iPhone 13.
Remember to keep your passcode private and avoid sharing it with anyone. By doing so, you maintain the security and integrity of your device and personal information.
Now that you have entered your passcode, you are ready to proceed to the next step, which involves setting up Face ID on your iPhone 13.
Step 4: Setting Up Face ID
With your passcode entered, it’s time to set up Face ID on your iPhone 13. This step will guide you through the process of capturing your facial data and creating a unique facial map for accurate recognition.
Hold your iPhone in front of your face at a comfortable distance, making sure your face is fully visible within the frame. A Face ID interface will appear on the screen, guiding you through the setup process.
Follow the on-screen instructions and position your face within the frame. You may be asked to move your head slowly to capture your face from different angles. This helps to create a comprehensive facial map that enhances the accuracy of Face ID.
While setting up Face ID, make sure to keep your face well-illuminated. Natural lighting or well-lit indoor environments work best for capturing clear facial data. Avoid excessive shadows or backlighting, as this can affect the accuracy of the facial recognition.
During the setup process, your iPhone will vibrate as it captures the facial data. This is normal and indicates that Face ID is analyzing and processing your unique facial features.
Continue following the prompts until your iPhone has successfully captured the necessary facial data. Once complete, you will move on to the next step, where you will ensure that your face is positioned correctly for accurate Face ID recognition.
Now that you’ve completed the setup, your iPhone 13 is ready to recognize your face using Face ID. Get ready to experience the convenience and security of unlocking your iPhone and accessing its features with just a glance!
Step 5: Positioning Your Face Correctly
Now that you have set up Face ID on your iPhone 13, it’s important to ensure that you position your face correctly for accurate facial recognition. Face ID works best when your face is in the optimal position within the frame.
When using Face ID, hold your iPhone in a natural and comfortable position, approximately 10 to 20 inches away from your face. Face ID uses the front-facing TrueDepth camera system to capture and analyze your facial features, so make sure your face is fully visible within the frame.
For the best results, look directly at your iPhone’s screen and align your eyes with the Face ID interface. Avoid tilting your head too much or covering any part of your face, as this may interfere with the facial recognition process.
If you wear prescription glasses, sunglasses, or contact lenses, Face ID is designed to work with them. However, certain types of eyewear, such as heavily tinted sunglasses or face-obscuring masks, may interfere with Face ID’s ability to recognize your face. In such cases, you may need to remove your glasses or mask temporarily for accurate facial recognition.
It’s also worth noting that Face ID adapts to changes in your appearance over time. If you have made significant changes to your facial features, such as growing a beard, cutting your hair, or wearing makeup, Face ID may need to relearn and update its facial recognition data. This process is typically seamless and happens automatically as you continue to use Face ID.
By positioning your face correctly and ensuring that it is within the frame, you can maximize the accuracy and efficiency of Face ID on your iPhone 13, making for a seamless and hassle-free unlocking experience.
Now that you know how to position your face correctly, let’s move on to the next step of completing the Face ID setup process.
Step 6: Completing the Face ID Setup
With your face properly positioned, you are nearing the end of the Face ID setup process on your iPhone 13. This step will guide you through the final stages to ensure that Face ID is fully configured and ready to use.
Once you have positioned your face correctly within the frame, your iPhone will confirm that Face ID is successfully set up. At this point, you have the option to enable additional features that utilize Face ID authentication, such as Apple Pay, App Store purchases, and more.
If you wish to enable these features, simply toggle the corresponding options in the Face ID settings menu to the “On” position. This ensures that Face ID will be used for authentication whenever these features are accessed.
After enabling the desired features, you have completed the final steps of the Face ID setup process. Your iPhone 13 is now configured to unlock using Face ID and leverage its advanced facial recognition capabilities for a seamless and secure user experience.
Keep in mind that while Face ID provides a high level of security, it is still recommended to have a backup passcode enabled on your iPhone. In cases where Face ID may not be available or fails to recognize your face, the passcode can be used as an alternative method of authentication to unlock your device.
Congratulations! You’ve successfully completed the Face ID setup on your iPhone 13. Get ready to enjoy the convenience and enhanced security that Face ID brings to your device.
Step 7: Testing Face ID Recognition
Now that you have completed the Face ID setup on your iPhone 13, it’s important to test the facial recognition capabilities to ensure it is working effectively. This will give you confidence that your device can reliably recognize your face for unlocking and authentication purposes.
To test Face ID recognition, simply lock your iPhone 13 by pressing the power button or allowing it to enter sleep mode. Once the screen is locked, wake up your device by tapping the screen or pressing the power button.
As soon as the screen comes to life, your iPhone 13’s front-facing TrueDepth camera system will actively scan for your face. A padlock icon or “Face ID” label will appear on the screen, indicating that Face ID recognition is active and ready for authentication.
Position your face within the frame and ensure that it is clearly visible to the front-facing camera. The padlock icon or “Face ID” label will animate to indicate that your face is being recognized.
If Face ID successfully recognizes your face, the padlock icon or “Face ID” label will transform into an unlocked symbol, and your iPhone will automatically unlock, granting you access to the home screen.
However, if Face ID fails to recognize your face, the padlock icon or “Face ID” label will remain locked, and you will be prompted to enter your passcode as an alternative method of authentication.
If you encounter any issues with Face ID recognition, double-check that your face is properly positioned within the frame and that the lighting conditions are optimal. Remember that Face ID adapts to changes in your appearance over time, so updating its recognition data through regular use can improve its accuracy.
By testing the Face ID recognition on your iPhone 13, you can ensure that the facial authentication feature is working as expected and enjoy the convenience of accessing your device with just a glance.
Now that you have successfully tested Face ID recognition, you are ready to fully enjoy the benefits of this advanced facial recognition technology on your iPhone 13. Unlocking your device and authenticating various functions will feel effortless and secure.
Conclusion
Congratulations! You have successfully set up Face ID on your iPhone 13. This cutting-edge facial recognition technology brings convenience and enhanced security to your device, allowing you to unlock it and authenticate various functions with just a glance.
Throughout this guide, we have walked you through the step-by-step process of setting up Face ID on your iPhone 13. From accessing the Settings menu to positioning your face correctly and completing the setup, you have learned how to configure Face ID and make the most of its advanced features.
Face ID not only provides a seamless unlocking experience but also brings additional security measures to protect your device and personal information. By analyzing and creating a detailed facial map, Face ID ensures that only your unique face can unlock your iPhone 13.
Remember to position your face properly within the frame, especially when using Face ID for authentication. Keeping your face well-illuminated and avoiding obstructions will maximize the accuracy and efficiency of Face ID recognition.
Furthermore, regularly testing Face ID recognition allows you to verify its performance and troubleshoot any issues that may arise. If Face ID fails to recognize your face, you can always rely on your passcode as an alternative method of authentication.
With Face ID successfully set up on your iPhone 13, you can now enjoy the convenience of unlocking your device and accessing its features with a simple glance. Say goodbye to passcodes and fingerprints, and say hello to the future of seamless authentication with Face ID.
So go ahead and embrace the cutting-edge technology of Face ID on your iPhone 13. Experience the ease, security, and futuristic capabilities that it brings to your everyday interactions with your device.
Thank you for following this guide, and we hope you have found it helpful in setting up Face ID on your iPhone 13. Enjoy the benefits of facial recognition and make the most of your iPhone’s advanced features!