Introduction
With the ever-increasing popularity of smartphones and the exponential growth of digital photography, it’s no wonder that Google Photos has become a go-to platform for millions of users to store and organize their treasured memories. Google Photos offers a convenient and user-friendly interface that allows you to sync and access your photos and videos across various devices.
In this article, we will guide you through the process of retrieving photos from Google Photos. Whether you want to download your photos onto your device or export them to another platform, we will show you how to do it step by step.
Google Photos not only serves as a digital photo album but also offers powerful features such as facial recognition and smart search functionality. By utilizing these features, you can easily locate specific photos based on people, objects, or locations. We will walk you through the process of searching for specific photos within your Google Photos library.
Furthermore, we will explain how to select and access the desired photos within Google Photos. Whether you are looking to retrieve individual photos or a collection of images, we will demonstrate how to navigate through your library and find the photos you want.
If you wish to save your photos to your device or computer, we will cover the steps to download photos from Google Photos. This process is simple and allows you to keep a local copy of your photos for offline access or external storage.
Additionally, we will explore the options available for exporting photos from Google Photos to other platforms. If you want to transfer your photos to another cloud storage service or share them on social media, we will provide instructions on how to do so.
Lastly, we will discuss techniques for archiving and organizing your Google Photos library. With the vast amount of photos we accumulate over time, it is essential to maintain a well-structured and easily searchable photo collection. We will provide tips on how to effectively manage your photos within Google Photos.
So, if you’re ready to retrieve your precious memories from Google Photos, let’s dive in and explore the step-by-step process together.
Background on Google Photos
Since its launch in 2015, Google Photos has quickly become one of the most popular photo storage and organization platforms worldwide. It offers users a convenient way to store, manage, and share their photos and videos in a secure online environment.
One of the key advantages of Google Photos is its generous storage policy. Users can upload an unlimited number of high-quality photos and videos for free, as long as they opt for the “High Quality” storage setting. This means that you can free up valuable space on your device by storing your media files in the cloud.
In addition to the ample storage space, Google Photos boasts a multitude of features designed to enhance the user experience. The platform utilizes advanced artificial intelligence and machine learning algorithms to automatically organize and categorize your photos. It can detect faces, recognize specific objects, and even identify landmarks or locations in your images.
Furthermore, Google Photos offers powerful search functionality. With a simple keyword or phrase, you can easily locate specific photos within your library, saving you valuable time and effort. Whether you’re searching for photos of a particular person, an event, or a specific location, Google Photos can quickly narrow down the results and display the relevant images.
Another notable feature of Google Photos is its ability to create interactive and shareable albums. You can effortlessly create collages, animations, and even movies from your photos and videos. These dynamic presentations enable you to relive your memories in a unique and engaging way, making it easy to share your experiences with friends and family.
Additionally, Google Photos offers seamless integration with other Google services and devices. You can access your photos on any device that has internet connectivity, whether it’s a smartphone, tablet, or computer. By logging into your Google account, your entire photo library is available at your fingertips, allowing you to view, edit, and share your photos from anywhere.
Overall, Google Photos provides a comprehensive and user-friendly platform for storing and organizing your digital memories. With its intuitive interface, robust search capabilities, and various customization options, it’s no wonder that Google Photos has become the go-to choice for millions of users worldwide.
Step 1: Logging into Google Photos
Before you can retrieve your photos from Google Photos, you need to log into your Google account and access the Google Photos platform. Here’s how you can do it:
1. Open your preferred web browser and go to https://photos.google.com.
2. If you are not already signed in to your Google account, click on the “Sign in” button located at the top-right corner of the page.
3. Enter your Google account email address or phone number, and click “Next”.
4. Enter your account password and click “Next” to proceed.
5. If you have enabled two-step verification for your Google account, you may be prompted to enter a verification code sent to your registered phone or email. Enter the code and click “Next”.
6. Once you have successfully logged in, you will be redirected to the Google Photos platform where you can access your stored photos and videos.
It’s important to note that you can also access Google Photos through the mobile app on your smartphone or tablet. Simply download the Google Photos app from the App Store (iOS) or Google Play Store (Android), and sign in with your Google account credentials.
By logging into Google Photos, you gain access to all the features and functionalities offered by the platform. You can now begin the process of retrieving your photos and enjoying the benefits that Google Photos provides.
Step 2: Navigating the Google Photos interface
Once you are logged into Google Photos, it’s time to familiarize yourself with the interface and navigation options. Understanding the layout of Google Photos will make it easier for you to retrieve and manage your photos. Here’s how you can navigate the Google Photos interface:
1. Library: The “Library” tab is where you can find all your photos and videos organized by date. It displays your media in a streamlined timeline format, making it easy to scroll through and locate specific moments.
2. Albums: The “Albums” tab allows you to view and access albums that you have created or that have been automatically generated by Google Photos. Albums help you organize your photos based on specific themes, events, or people.
3. For You: The “For You” tab provides curated highlights and suggestions based on your photos. Here, you can find collages, animations, and other creations that Google Photos has generated for you.
4. Sharing: The “Sharing” tab is where you can discover photos and albums that have been shared with you. You can also manage sharing settings and easily share your own photos and albums with others.
5. Search: The search bar at the top of the page allows you to search for specific photos based on keywords, people, locations, or even objects. Google Photos utilizes advanced image recognition technology to identify and categorize your photos, making it easier for you to find what you’re looking for.
6. Settings: By clicking on your profile icon at the top-right corner of the page, you can access the settings menu. Here, you can customize various preferences such as backup and sync options, storage settings, and album visibility.
7. Additional Features: Throughout the Google Photos interface, you will find additional features and options that enhance your photo management experience. These include the ability to edit photos, create collages and animations, print photo books, and more.
Navigating the Google Photos interface is intuitive and user-friendly. Spend some time exploring the different tabs and features to get comfortable with the layout. By understanding how to navigate the interface, you’ll be well-prepared to retrieve and manage your photos effectively.
Step 3: Searching for specific photos
Google Photos offers a powerful search functionality that allows you to quickly find specific photos within your library. Whether you’re looking for photos of a particular person, a specific location, or an event, the search feature can help you narrow down your results. Here’s how you can search for specific photos in Google Photos:
1. Start by clicking on the “Search” bar at the top of the Google Photos interface.
2. Enter a keyword or phrase related to the photos you are looking for. This can include names of people, places, or general descriptions such as “beach”, “birthday”, or “sunset”.
3. As you type, Google Photos will start displaying suggestions based on your search query. Click on one of the suggestions if it matches what you are looking for.
4. After performing the search, Google Photos will populate the results based on your query. The photos that match your search criteria will be displayed for you to browse through.
5. If you want to refine your search further, you can utilize the advanced search operators provided by Google Photos. These include filters such as “People & Pets”, “Places”, “Things”, “Types”, and “Dates”. By clicking on one of these filters, you can narrow down your search results even more.
6. You can also combine multiple search criteria to find specific photos. For example, you can search for “John in Paris” to find photos of your friend John in the city of Paris.
7. Google Photos also offers the option to search for specific photos using visual elements. You can upload a photo as a reference and use the “Search by Image” feature to find similar images in your library.
By utilizing the powerful search functionality of Google Photos, you can quickly locate specific photos within your collection. Whether you know exactly what you’re looking for or you want to browse through a specific category, the search feature simplifies the process and saves you valuable time.
Step 4: Selecting and accessing the desired photos
Once you have located the desired photos in Google Photos, it’s time to select and access them. Whether you want to view, edit, download, or share your photos, Google Photos provides easy-to-use options for accessing your desired photos. Here’s how you can select and access the photos you want:
1. Start by navigating to the album or search results where your desired photos are located.
2. To select a single photo, simply click on it. You can then view or perform various actions on the selected photo.
3. To select multiple photos, hold down the Ctrl key (Windows) or the Command key (Mac) and click on each photo you want to select. Alternatively, you can click and drag the mouse to select a range of photos.
4. Once you have selected the desired photos, the options for accessing them will appear at the top of the Google Photos interface. These options include viewing, editing, downloading, sharing, and more.
5. To view a selected photo, simply click on the “View” option. This will open the selected photo in a larger view where you can zoom in, view details, and navigate through other photos in the same album or search results.
6. To edit a selected photo, click on the “Edit” option. Google Photos offers basic editing features such as cropping, adjusting brightness and contrast, applying filters, and more. You can make adjustments to the selected photo and then save the changes.
7. To download a selected photo to your device, click on the “Download” option. This will save the photo to your default download location or prompt you to choose a specific folder where you want to save it.
8. To share a selected photo with others, click on the “Share” option. This will allow you to generate a shareable link that you can send to friends, family, or colleagues. You can also choose to share the photo directly to social media platforms such as Facebook, Twitter, or Instagram.
By selecting and accessing the desired photos in Google Photos, you can easily view, edit, download, and share your precious memories. The user-friendly interface and accessible options make it convenient to perform various actions on your photos, empowering you to make the most of your digital photo collection.
Step 5: Downloading photos from Google Photos to your device
If you want to have a local copy of your photos from Google Photos on your device, you can easily download them. Downloading photos allows you to have offline access to your favorite memories or transfer them to other devices or storage mediums. Here’s how you can download photos from Google Photos to your device:
1. Start by selecting the photos you want to download. You can either select individual photos by clicking on them or select multiple photos by holding down the Ctrl key (Windows) or the Command key (Mac) and clicking on each photo.
2. Once you have selected the desired photos, click on the “More” option that appears at the top of the Google Photos interface. It is represented by three vertical dots.
3. In the drop-down menu, select the “Download” option. This will initiate the download process.
4. Depending on your browser and its settings, the downloaded photos will either be saved to your default download location or you will be prompted to choose a specific folder where you want to save them. Select the appropriate location and click “Save” or “OK” to start the download.
5. Google Photos will create a separate folder for each photo album that you download. This ensures that your downloaded photos are organized and easily accessible.
6. Once the download is complete, you can navigate to the folder where you saved the photos and access them on your device.
It’s important to note that when downloading photos from Google Photos, the files are saved in their original resolution and quality. If you have opted to store your photos in the “High Quality” setting, the downloaded photos will be in high quality as well.
Downloading photos from Google Photos gives you the flexibility to have offline access to your photos and allows you to easily share them with others through file-sharing platforms or external storage devices. This feature enables you to have full control over your photos and ensures that you can enjoy them even when you do not have an internet connection.
Step 6: Exporting photos from Google Photos to another platform
If you want to transfer your photos from Google Photos to another platform or service, such as another cloud storage provider or a social media platform, you can easily export them. Exporting photos allows you to share your precious memories with others or store them in a different location. Here’s how you can export photos from Google Photos to another platform:
1. Start by selecting the photos you want to export. You can either select individual photos by clicking on them or select multiple photos by holding down the Ctrl key (Windows) or the Command key (Mac) and clicking on each photo.
2. Once you have selected the desired photos, click on the “More” option that appears at the top of the Google Photos interface. It is represented by three vertical dots.
3. In the drop-down menu, select the “Download” option. This will initiate the download process.
4. Depending on the platform or service you want to export the photos to, you may need to follow specific instructions provided by that platform. For example:
- If you want to export the photos to another cloud storage provider, such as Dropbox or OneDrive, you may need to upload the downloaded photos to that platform’s interface or use their integration with Google Photos.
- If you want to export the photos to a social media platform, such as Facebook or Instagram, you can upload the downloaded photos using the respective platform’s upload feature or utilize their integration with Google Photos.
- If you want to export the photos to a physical storage medium, such as a USB drive or an external hard drive, you need to save the downloaded photos to the desired storage device by connecting it to your computer.
5. Follow the instructions provided by the platform or service to complete the export process. Each platform may have specific requirements and steps to ensure a successful transfer of your photos.
By exporting your photos from Google Photos to another platform, you can share your memories with a wider audience, collaborate with others, or store your photos in multiple locations for added security. This flexibility allows you to utilize your photos in the way that best suits your needs.
Step 7: Archiving and organizing your Google Photos library
As your photo library grows in Google Photos, it’s important to maintain organization and keep your photos easily accessible. Archiving and organizing your Google Photos library helps you declutter and find specific photos more efficiently. Here are some steps you can take to archive and organize your Google Photos:
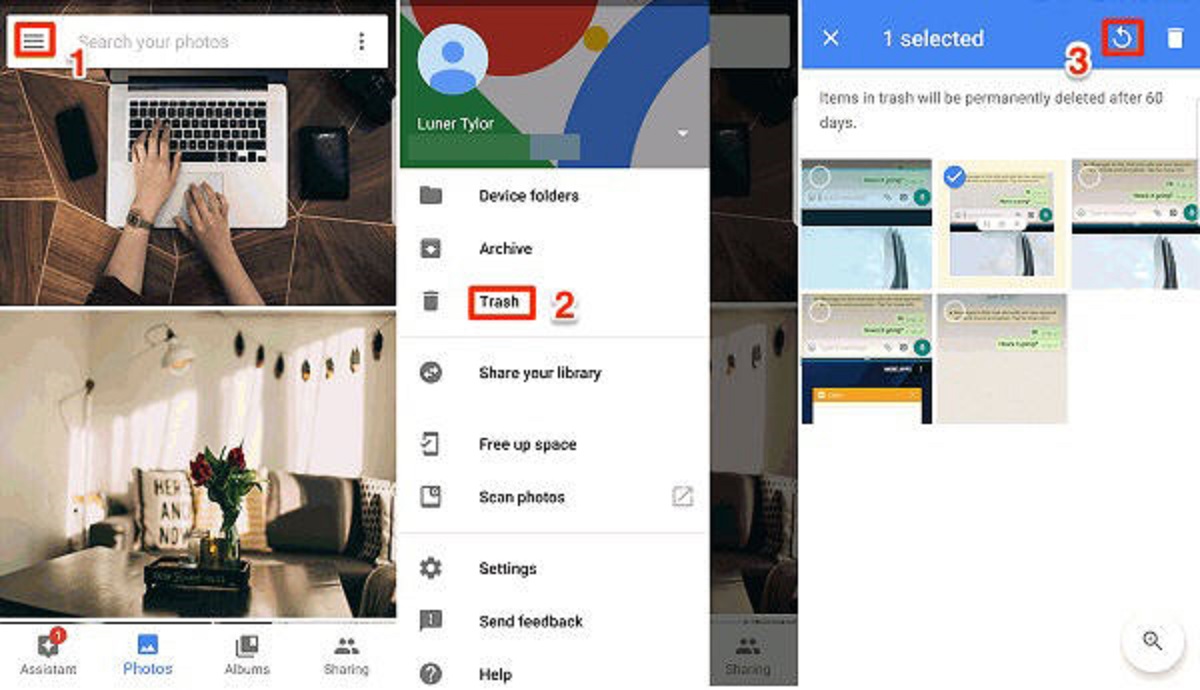
1. Identify and Archive: Start by identifying photos that you no longer need immediate access to, but still want to keep for future reference. These may include screenshots, memes, or duplicate photos. Select these photos by clicking on them or using the multi-selection method.
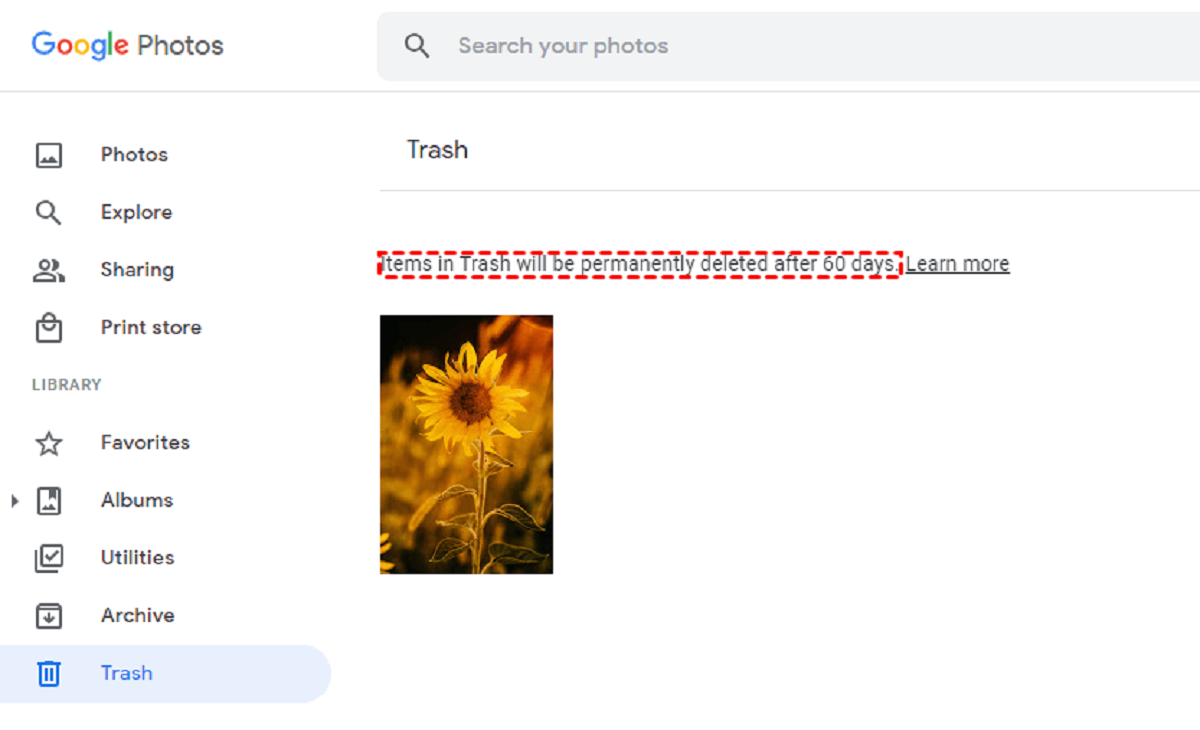
2. Archive Photos: Once you have selected the photos you want to archive, click on the “Archive” option. This action will remove the selected photos from the main library and move them to the Archive folder. Archived photos remain accessible, but they are not visible in the main library view.
3. Create Albums: To organize your photos further, consider creating albums based on specific themes, events, or people. Click on the “Albums” tab and select “Create Album”. Give your album a descriptive name and start adding relevant photos to it. This way, you can easily access and browse through specific groups of photos.
4. Add Photos to Existing Albums: If you have existing albums, you can add photos to them by selecting the desired photos and clicking on the “Add to Album” option. Choose the album to which you want to add the selected photos. This allows you to categorize and group your photos based on your preferences.
5. Utilize Tags and Descriptions: Take advantage of tagging and adding descriptions to your photos. This makes it easier to search for specific photos using keywords. Simply click on a photo, select the “Add a description” or “Add a person” option, and enter applicable information. You can then search for photos using these tags or descriptions.
6. Utilize the Assistant: The Assistant feature in Google Photos offers automatic suggestions for organizing your library. It may suggest creating albums, collages, or animations based on detected patterns or recurring events. Review these suggestions and use them to further streamline and enhance your photo organization.
By actively archiving and organizing your Google Photos library, you can keep it tidy and ensure easy access to your photos. This allows you to quickly find specific memories and enjoy a more organized and visually appealing photo browsing experience.
Conclusion
Retrieving your photos from Google Photos is a straightforward process that allows you to access, manage, and organize your digital memories. By following the steps outlined in this guide, you can confidently navigate the Google Photos interface, search for specific photos, select and access the desired photos, download them to your device, and even export them to other platforms.
Google Photos not only offers a user-friendly interface but also provides powerful features such as automatic organization, advanced search functionality, and seamless integration with other Google services. These features make it easier for you to retrieve and enjoy your photos, no matter where you are or what device you are using.
Additionally, archiving and organizing your Google Photos library ensures that your photos remain well-structured, easily accessible, and clutter-free. By archiving photos you don’t need immediate access to and creating albums based on specific themes or events, you can maintain a well-organized digital photo collection.
Whether you want to relive your memories, share your photos with others, or have offline access to your favorite moments, the steps outlined in this guide empower you to retrieve your photos from Google Photos with ease.
So, if you’re ready to retrieve and enjoy your cherished memories, go ahead and log into Google Photos, navigate the interface, search for specific photos, select and access them, download them to your device, and even export them to other platforms. With the power of Google Photos at your fingertips, you can revive your most precious moments anytime and anywhere.