Introduction
Welcome to this step-by-step guide on how to remove all tablet drivers from your computer. Whether you’re experiencing compatibility issues, want to upgrade to a newer driver version, or simply need to perform a clean reinstall, this article will walk you through the process.
Tablet drivers are software applications that allow your computer to communicate with and utilize the features of your graphic tablet. However, there are times when you may need to remove these drivers completely, either to troubleshoot problems or to prepare for a fresh installation.
The process of removing tablet drivers involves uninstalling the drivers from your system, removing any leftover files and folders, disabling tablet services, clearing registry entries, and finally, reinstalling the drivers.
We understand that this may sound complex, but fear not – we will guide you through each step and explain them in detail. By the end of this guide, you’ll have a clean slate to work with, ensuring the smooth functionality of your tablet once again.
Before we begin, make sure you have administrative privileges, and it’s recommended to create a backup of any important files or settings. Now, let’s dive in and learn how to remove tablet drivers from your computer.
Step 1: Uninstalling the Tablet Drivers
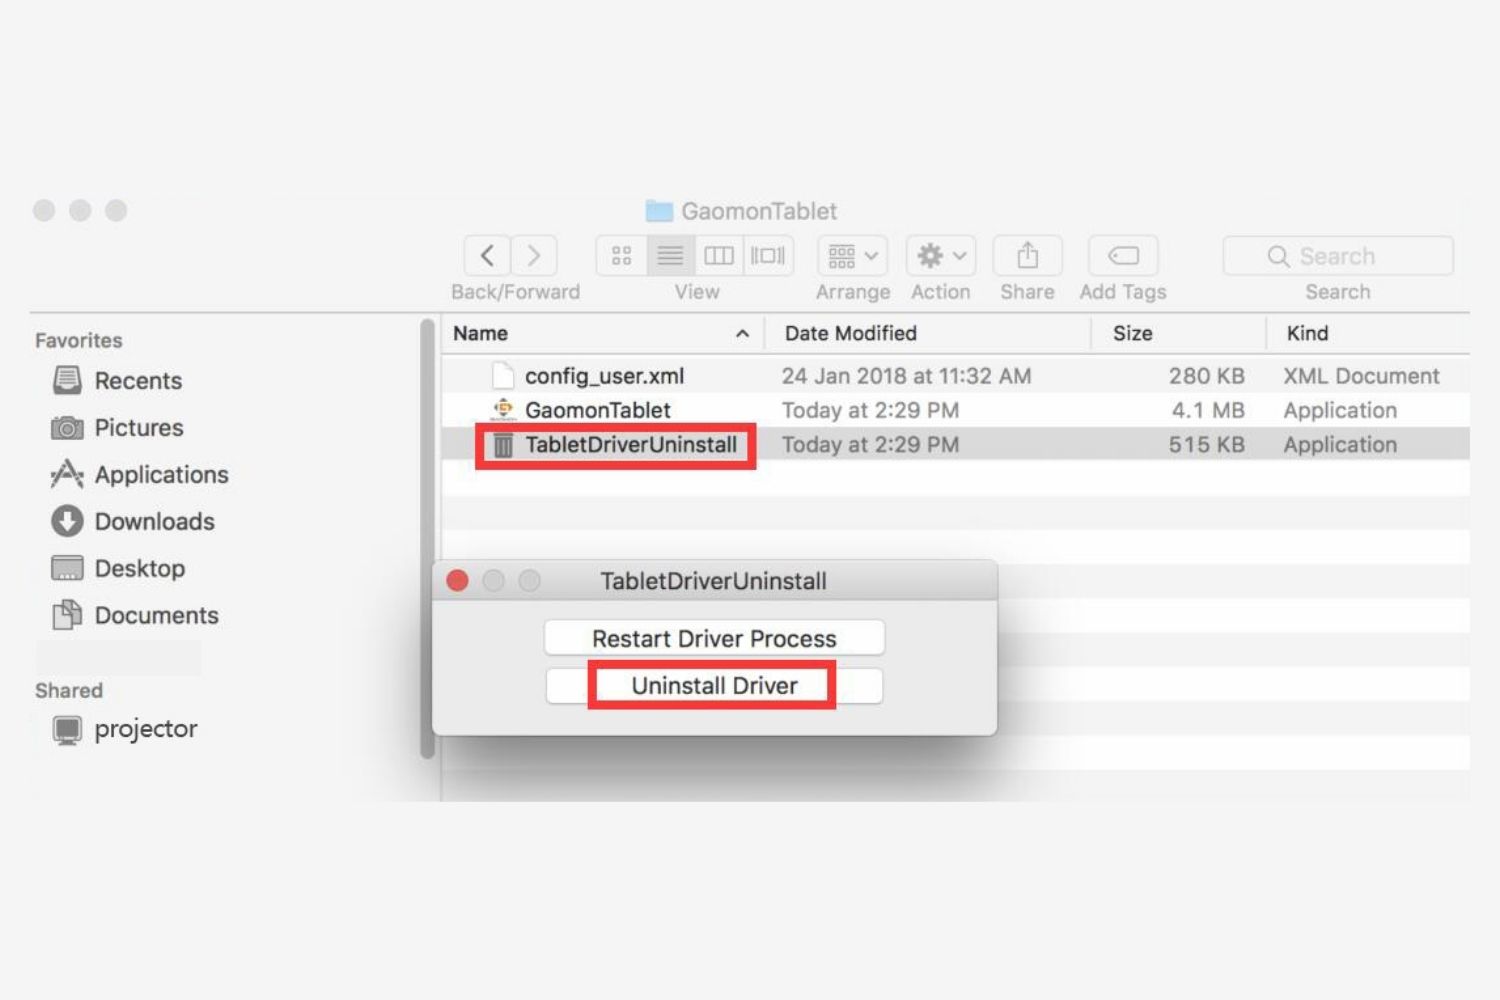
The first step in removing tablet drivers from your computer is to uninstall them. Follow these instructions:
- Go to the Control Panel on your computer. You can access it by searching for “Control Panel” in the Start Menu or by right-clicking on the Windows icon and selecting Control Panel.
- In the Control Panel, navigate to the “Programs” or “Programs and Features” section.
- Look for the software associated with your tablet drivers. It might be listed under the manufacturer’s name or the tablet model.
- Right-click on the software and select “Uninstall” from the dropdown menu. Follow any on-screen instructions that may appear to complete the uninstallation process.
- After the uninstallation is complete, restart your computer.
It’s important to note that different tablet manufacturers may have different software and uninstallation processes. If you’re unsure about the exact steps, refer to the user manual or support documentation provided by the manufacturer.
Once the tablet drivers are successfully uninstalled and you have restarted your computer, you have completed the first step in removing the tablet drivers from your system. In the next step, we’ll focus on removing any leftover files and folders associated with the drivers.
Step 2: Removing Leftover Files and Folders
After uninstalling the tablet drivers, there might be leftover files and folders on your computer that can interfere with a clean reinstall or cause compatibility issues. To ensure a thorough removal, follow these steps:
- Open File Explorer or Windows Explorer by pressing the Windows key + E on your keyboard.
- Navigate to the installation directory of the tablet drivers. This is typically located in the “Program Files” or “Program Files (x86)” folder.
- Look for any folders or files related to the tablet drivers, and right-click on them.
- Select “Delete” from the dropdown menu. If prompted for confirmation, click “Yes” to proceed.
- If you encounter any error messages stating that a file is in use or cannot be deleted, restart your computer and try again.
- Repeat the process for any other folders or files associated with the tablet drivers.
It’s important to note that deleting files and folders manually can be a sensitive task. Make sure to only delete files and folders that are explicitly related to the tablet drivers and not any other important system files.
Once you’ve finished removing the leftover files and folders, you’re ready to proceed to the next step where we will disable tablet services on your computer.
Step 3: Disabling Tablet Services
In this step, we will disable tablet services on your computer to ensure a clean removal of the tablet drivers. Here’s how you can do it:
- Open the Run dialog by pressing the Windows key + R on your keyboard.
- Type “services.msc” in the Run dialog and press Enter.
- The Services window will open, displaying a list of services running on your computer.
- Scroll down the list and look for any services related to your tablet drivers or manufacturer. These services might have names like “TabletService” or “TabletDriverService”.
- Right-click on each of these tablet-related services and select “Properties” from the context menu.
- In the Properties window, change the Startup Type to “Disabled”.
- Click on the “Apply” button, and then click “OK” to save the changes.
- Repeat this process for all tablet-related services.
Disabling the tablet services prevents them from starting up and running in the background, ensuring a clean removal of the drivers.
Once you have disabled all tablet services, you can move on to the next step where we will clear any registry entries related to the tablet drivers on your computer.
Step 4: Clearing Registry Entries Related to Tablet Drivers
In this step, we will focus on clearing any registry entries that are associated with the tablet drivers. Cleaning the registry ensures that there are no lingering traces of the drivers that could potentially cause conflicts or issues. Follow these instructions:
- Press the Windows key + R on your keyboard to open the Run dialog.
- Type “regedit” into the Run dialog and press Enter to open the Registry Editor.
- In the Registry Editor window, navigate to the following path:
HKEY_LOCAL_MACHINE\SOFTWARE - Look for any folders or keys related to the tablet drivers or its manufacturer. These might be named after the manufacturer or the specific tablet model.
- Right-click on each folder or key related to the tablet drivers and select “Delete” from the context menu.
- If prompted for confirmation, click “Yes” to proceed with the deletion.
- Continue this process for any other tablet-related folders or keys found within the
HKEY_LOCAL_MACHINE\SOFTWAREsection. - Once you have finished deleting the tablet-related registry entries, close the Registry Editor.
Please exercise caution when making changes to the registry as incorrect modifications can cause system instability. It’s recommended to create a backup of the registry or create a System Restore point before proceeding.
Now that you have cleared the registry entries related to the tablet drivers, it’s time to move on to the final step: restarting your computer and reinstalling the drivers.
Step 5: Restarting the Computer and Reinstalling Drivers
Now that you have completed the previous steps of removing tablet drivers, it’s time to restart your computer and reinstall the drivers. Following these instructions will ensure a fresh installation and optimal performance:
- Close any open applications and save your work.
- Click on the Start button and select “Restart”.
- Allow your computer to fully restart, ensuring all changes take effect.
- After the restart, download the latest version of the tablet drivers from the manufacturer’s official website.
- Once downloaded, run the installer and follow the on-screen instructions to install the drivers.
- Make sure to select any specific options or preferences as needed during the installation process.
- Once the installation is complete, restart your computer one more time to finalize the driver setup.
- After the restart, your tablet drivers should be successfully reinstalled and ready to use.
It’s essential to install the latest version of the tablet drivers to ensure compatibility with your operating system and take advantage of any improved features or bug fixes. Refer to the manufacturer’s website or documentation for any specific installation instructions or troubleshooting steps.
Congratulations! You have successfully followed the steps to remove tablet drivers from your computer, clear any leftover files and folders, disable tablet services, delete registry entries, and reinstall the drivers. Your tablet should now function properly without any conflicts or issues.
Conclusion
Removing tablet drivers from your computer can be necessary for various reasons, such as troubleshooting issues or performing a clean reinstall. By following the steps outlined in this guide, you can ensure a thorough removal and set the stage for a fresh installation of your tablet drivers.
Throughout this guide, we covered the essential steps to uninstall the tablet drivers, remove any leftover files and folders, disable tablet services, clear registry entries, and reinstall the drivers. These steps, when followed carefully, can help resolve compatibility issues, improve performance, and ensure a smooth functioning of your tablet.
Remember, it’s important to exercise caution when making changes to your computer’s settings and registry. Always create a backup of important files and settings before proceeding, and refer to the manufacturer’s documentation or support resources for any specific instructions or troubleshooting steps related to your tablet model.
By removing and reinstalling the tablet drivers, you can provide your computer with a clean slate, allowing for optimal performance and functionality. Whether you’re an artist, designer, or simply someone who relies on a tablet for work or leisure, this guide has provided you with the necessary steps to maintain a seamless experience.
We hope that this guide has been helpful in assisting you with removing tablet drivers and preparing for a fresh installation. If you have any further questions or need additional assistance, feel free to reach out to the manufacturer’s support team or consult online forums for further guidance.