Introduction
Welcome to the world of technology where anything seems possible. Have you ever wondered if it’s possible to put Windows on an Android tablet? Well, you’re in luck because in this article, we will guide you through the steps to make it happen. By installing Windows on your Android tablet, you can unlock a whole new range of possibilities and get the best of both worlds.
Before we get started, it’s important to note that not all Android tablets are compatible with this process. Some hardware and software limitations may prevent a seamless installation. However, if your tablet meets the necessary requirements, you’re in for an exciting journey. It’s worth mentioning that performing these steps may void your warranty, so proceed at your own risk.
In this comprehensive guide, we will walk you through each step involved in putting Windows on your Android tablet. From preparing your device to flashing the Windows image, we’ve got you covered. But before we dive into the technicalities, it’s vital to back up all your important data. This step ensures that any unforeseen issues won’t result in permanent data loss.
Additionally, it’s crucial to enable Developer Options on your Android tablet. This setting grants you access to advanced system functions and allows you to make the necessary changes during the installation process. We will provide detailed instructions on how to enable this option and install USB drivers for establishing a connection between your tablet and computer.
Furthermore, we will guide you through unlocking the bootloader, a necessary step to bypass the restrictions imposed by the manufacturer. With an unlocked bootloader, you can then proceed to install a custom recovery, which is a vital tool for flashing the Windows image onto your device.
Once you have everything set up, we will show you where to download the Windows image specifically designed for Android tablets. After downloading the image, we will walk you through the process of flashing it onto your tablet using the custom recovery. This step is essential to ensure a successful installation without any glitches.
In the final step, we’ll help you finalize the installation and make any necessary adjustments to optimize the performance of your tablet running Windows. With a bit of patience and following the steps outlined in this guide, you’ll soon be able to enjoy the familiar interface and functionality of Windows on your Android tablet.
So, are you ready to embark on this exciting adventure? Let’s begin the process of putting Windows on your Android tablet!
Step 1: Check Compatibility
Before you proceed with installing Windows on your Android tablet, it’s crucial to check if your device is compatible with this process. Not all tablets will be able to support running Windows, as it requires specific hardware and software compatibility.
To determine if your tablet is compatible, you need to consider the following factors:
- Processor: Windows requires a compatible processor architecture, such as x86 or x64. Most Android tablets use ARM-based processors, which are not compatible with Windows. However, there are a few tablets available in the market that come with Intel or AMD processors, which can support running Windows.
- RAM and Storage: Windows requires a certain amount of RAM and storage space to run smoothly. Check if your tablet meets the minimum requirements specified by the version of Windows you plan to install.
- Graphics: Windows relies on graphics drivers for proper display output. Ensure that your tablet’s graphics capabilities are compatible with Windows.
- BIOS/UEFI: The tablet’s BIOS or UEFI should support booting from external sources. Some tablets have locked bootloaders or restrictive firmware that prevent installing alternative operating systems.
To gather detailed information about your tablet’s technical specifications, you can consult the manufacturer’s website or the user manual. Look for specifications related to the processor, RAM, storage, and graphics capabilities. Additionally, you can search online forums and communities to see if anyone has successfully installed Windows on a tablet similar to yours.
If you find that your tablet meets the necessary requirements, congratulations! You can proceed to the next steps. However, if your tablet doesn’t meet the compatibility criteria, we recommend exploring other options or considering a tablet specifically designed to run Windows.
Remember, it’s essential to thoroughly evaluate your tablet’s compatibility before proceeding with the installation process. Taking this step will help you avoid potential issues during the installation and ensure a smoother, more successful experience.
Step 2: Backup
Before embarking on the process of installing Windows on your Android tablet, it is crucial to back up all your important data. This step ensures that in the event of any unforeseen issues or data loss during the installation, you have a copy of your valuable files and settings.
There are several ways to create a backup of your tablet’s data:
- Cloud Storage: Use cloud storage services such as Google Drive, Dropbox, or OneDrive to upload your important files and documents. This method ensures that your data is securely stored and accessible from any device.
- External Storage: Connect an external storage device, such as a USB flash drive or an external hard drive, to your tablet and copy your files manually. Make sure to organize and label your folders for easy retrieval.
- PC/Mac: Connect your tablet to your computer using a USB cable and transfer your files directly to your computer’s hard drive. This method allows for easy access and retrieval of your data in case of any data loss.
In addition to backing up your files, it’s a good idea to take screenshots of your tablet’s home screen, app arrangement, and settings. This will make it easier for you to restore your device to its original state after the installation process is complete.
Furthermore, make note of any installed applications and their respective settings. This will help you reinstall and configure them correctly once Windows is installed on your tablet.
Remember to double-check your backup to ensure that all the necessary files, folders, and settings are included. A comprehensive backup ensures that you can easily restore your data and settings if anything goes wrong during the installation process.
Once you have completed the backup, verify that your files are accessible and intact. With a secure backup in place, you can proceed with the installation process without the worry of losing your important data.
Step 3: Enable Developer Options
Enabling Developer Options on your Android tablet is a crucial step to access advanced settings and enable features necessary for installing Windows. By enabling Developer Options, you gain the ability to make changes to your tablet’s system settings and unlock additional functionality.
To enable Developer Options on your Android tablet, follow these steps:
- Open the Settings app on your tablet. You can usually find the Settings app in the app drawer or by swiping down from the top of the screen and tapping on the gear-shaped icon.
- Scroll down and locate the “About tablet” or “About device” option. Tap on it to access the device information.
- Locate the “Build number” or “Build version” option in the device information. Tap on it repeatedly, around seven times, until a message appears saying that you are now a developer.
- Once the developer mode is enabled, go back to the main Settings menu and you will find a new option called “Developer options.”
- Tap on “Developer options” to access a list of advanced settings and features.
- Scroll down and look for the “USB debugging” option. Enable it, as this will allow your tablet to communicate with your computer during the installation process.
Enabling Developer Options grants you access to various advanced settings that are typically hidden from regular users. However, it’s important to exercise caution when making changes to these settings, as incorrect modifications can potentially cause issues with your tablet’s performance or stability.
Now that you have successfully enabled Developer Options and USB debugging, your tablet is ready to establish a connection with your computer and proceed with the next steps of the installation process.
Step 4: Install USB Drivers
Installing USB drivers on your computer is an essential step to establish a proper connection between your Android tablet and your computer during the installation process. USB drivers allow your computer to recognize and communicate with your tablet, enabling data transfer and device control.
Here’s how you can install USB drivers for your Android tablet:
- Open a web browser on your computer and search for the official website of the tablet’s manufacturer. Look for a support or downloads section where you can find the necessary USB drivers for your specific tablet model.
- Download the appropriate USB drivers for your tablet and save the file to a location on your computer where you can easily access it.
- Once the download is complete, locate the downloaded file and double-click on it to run the installation wizard.
- Follow the on-screen instructions provided by the installation wizard to install the USB drivers on your computer. Make sure to read any prompts or notifications carefully.
- Once the installation is complete, restart your computer to ensure that the changes take effect.
It’s important to note that different Android tablet manufacturers may have different USB driver installation procedures. Some manufacturers provide a separate driver installation package, while others may include the drivers as part of their PC suite software.
If you’re having trouble finding the correct USB drivers or encountering issues during the installation process, you can also try using universal USB driver software such as “Universal ADB Driver” or “PDANet+”. These tools can automatically install the necessary USB drivers for various Android devices.
After successfully installing the USB drivers, you’re one step closer to connecting your tablet to your computer and proceeding with the installation of Windows.
Step 5: Unlock Bootloader
Unlocking the bootloader on your Android tablet is an important step in the installation process as it allows you to bypass the restrictions imposed by the manufacturer and gain the ability to install custom software and modifications. By unlocking the bootloader, you can proceed with flashing the necessary files to install Windows on your tablet.
Before you begin, keep in mind that unlocking the bootloader will erase all the data on your tablet. Therefore, it’s important to back up your important files and settings before proceeding with this step.
The process of unlocking the bootloader may vary depending on the manufacturer and tablet model. However, the general steps are as follows:
- Enable Developer Options on your tablet by following the steps outlined in Step 3: Enable Developer Options.
- Once Developer Options is enabled, go to the Developer Options menu in Settings.
- Look for an option called “OEM unlocking” or “Allow bootloader unlocking.” Enable this option.
- Power off your tablet and enter bootloader mode. The method to enter bootloader mode varies depending on the tablet model. It typically involves pressing a combination of volume and power buttons.
- Once your tablet is in bootloader mode, connect it to your computer using a USB cable.
- Open a command prompt or terminal window on your computer and navigate to the folder where the Android Debug Bridge (ADB) is located. ADB is a command-line tool used for communication between your computer and Android devices.
- Type the command “adb devices” in the command prompt or terminal to verify if your tablet is detected by the computer. If your device is listed, you can proceed to the next step.
- Type the command “adb reboot bootloader” to reboot your tablet into bootloader mode.
- Once your tablet is in bootloader mode, type the command “fastboot oem unlock” and press Enter. This command will unlock the bootloader on your tablet.
- Follow the on-screen instructions displayed on your tablet’s screen to confirm the bootloader unlock process.
After executing the “fastboot oem unlock” command and confirming the bootloader unlock process, your tablet’s bootloader should be successfully unlocked. This will give you the freedom to install custom software, including Windows, on your tablet.
Keep in mind that unlocking the bootloader can have its risks, and it may void your warranty. Proceed with caution and ensure you understand the implications before unlocking the bootloader on your tablet.
Step 6: Install Custom Recovery
Installing a custom recovery on your Android tablet is an essential step in the process of installing Windows. A custom recovery provides you with additional features and tools for installing custom ROMs, making backups, and flashing various system modifications. With a custom recovery installed, you can proceed with flashing the Windows image onto your tablet.
The most commonly used custom recovery for Android tablets is TWRP (Team Win Recovery Project). Here’s how you can install TWRP custom recovery on your tablet:
- Download the TWRP recovery image for your specific tablet model from the official TWRP website or from trusted third-party sources.
- Place the downloaded recovery image file in the same folder where the Android Debug Bridge (ADB) tools are located on your computer. This will make it easier to execute commands in the following steps.
- Connect your tablet to your computer using a USB cable.
- Open a command prompt or terminal window on your computer and navigate to the folder where the ADB tools are located.
- Type the command “adb devices” to ensure that your tablet is detected by the computer. If your device is listed, you can proceed to the next step.
- Type the command “adb reboot bootloader” to reboot your tablet into bootloader mode.
- Once your tablet is in bootloader mode, type the command “fastboot flash recovery [recovery_image].img” and press Enter. Replace “[recovery_image]” with the actual name of the TWRP recovery image file you downloaded.
- Wait for the flashing process to complete. Once finished, type the command “fastboot reboot” to reboot your tablet.
After rebooting your tablet, the TWRP custom recovery should be installed and ready for use. To access the custom recovery, power off your tablet and enter the bootloader mode by pressing the appropriate key combination. From there, you can navigate to the recovery option using the volume keys and select it with the power button.
Having a custom recovery installed is crucial for the next steps of installing Windows on your tablet. It allows you to perform important tasks such as wiping partitions, flashing custom ROMs, and installing the Windows image.
Remember to exercise caution while using a custom recovery, as performing incorrect actions or flashing incompatible files can potentially cause issues with your tablet’s functionality.
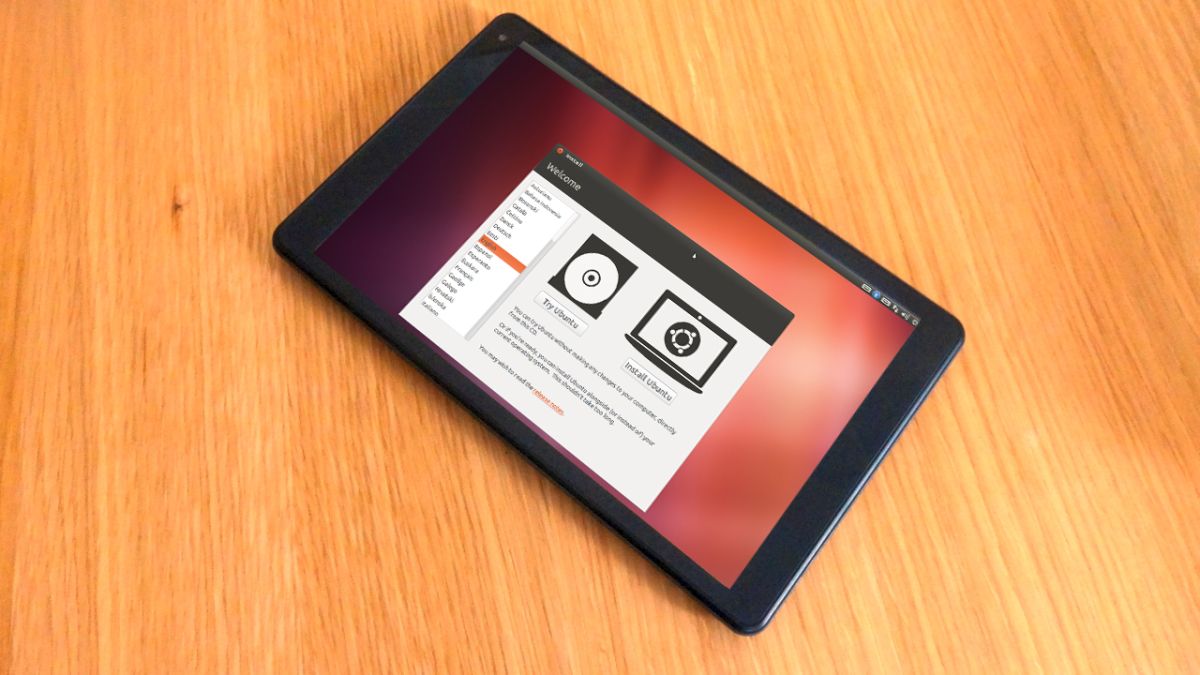
Step 7: Download Windows Image
In order to install Windows on your Android tablet, you will need to download the Windows image specifically designed for your tablet model. This image contains the necessary files and system components required for running Windows on your tablet.
Here are the steps to download the Windows image:
- Search for the official website or trusted sources that provide the Windows image for your tablet model. It’s important to ensure that you download the correct image, as using an incompatible image can lead to issues during the installation process.
- Navigate to the website or source and locate the download link for the Windows image. Make sure that the version of Windows is compatible with your tablet’s hardware and specifications.
- Click on the download link to initiate the download process. The file size of the Windows image can vary depending on the version and customization. It’s recommended to have a stable and reliable internet connection to ensure a smooth download.
- Save the downloaded Windows image file to a location on your computer where you can easily access it. It’s a good practice to create a specific folder for storing all the files related to the installation process to keep everything organized.
It’s important to download the Windows image from a trusted and reputable source to avoid any potential risks or security issues. Always verify the authenticity and integrity of the downloaded file by checking the file size and comparing it with the information provided on the official website.
Once the Windows image is downloaded and saved on your computer, you are ready to proceed with the next steps of flashing the image onto your Android tablet.
Note: Some Windows images may require additional files or drivers specific to your tablet model. Make sure to read the instructions provided by the Windows image source to ensure a smooth installation process.
Step 8: Flash Windows Image
Flashing the Windows image onto your Android tablet is a critical step in the installation process. This step involves replacing the existing operating system on your tablet with the Windows image, effectively transforming it into a Windows-powered device.
Here’s how you can flash the Windows image onto your tablet:
- Ensure that your tablet is powered off and connected to your computer via a USB cable.
- Boot your tablet into the custom recovery mode. This can usually be done by pressing a specific key combination, such as the volume up and power buttons, depending on your tablet model.
- In the custom recovery menu, select the option to “Wipe” or “Format” the necessary partitions on your tablet. This step will delete the existing operating system and prepare your tablet for the Windows installation.
- Once the wipe or format process is complete, go back to the main menu of the custom recovery and select the option to “Install” or “Flash” the Windows image.
- Navigate to the location where you saved the downloaded Windows image file on your computer and select it in the custom recovery.
- Follow the prompts or instructions provided by the custom recovery to initiate the flashing process. This process may take some time, so be patient and allow it to complete.
- Once the flashing process is finished, go back to the main menu of the custom recovery and select the option to “Reboot” or “Restart” your tablet.
After the reboot, your Android tablet should now be running the Windows operating system. You will be greeted with the familiar Windows setup screen, where you can configure your language, region, and other initial settings.
It’s important to note that the flashing process may vary depending on the custom recovery you are using and the specific instructions provided by the Windows image source. Pay close attention to any additional steps or requirements mentioned by the custom recovery or the Windows image source to ensure a successful installation.
Once you have successfully flashed the Windows image onto your tablet, you can start exploring the features and functionalities of Windows on your Android tablet.
Step 9: Finalize Installation
Now that you have successfully flashed the Windows image onto your Android tablet, there are a few final steps to complete the installation process and optimize the performance of your tablet running Windows.
Here’s what you need to do:
- Follow the on-screen instructions in the Windows setup wizard to configure your language, region, keyboard layout, and other preferences. This will personalize your Windows experience and ensure that it matches your preferences.
- Connect your tablet to a stable Wi-Fi network to ensure that it can download and install any necessary updates for Windows. Updating your tablet with the latest Windows updates will improve security, stability, and performance.
- Install any necessary drivers specific to your tablet model. Some features or hardware components may require specific drivers to work properly. Visit the tablet manufacturer’s website or the Windows Device Manager to check for and install any missing drivers.
- Transfer your files and data back to your tablet from the backup you created before the installation process. This includes documents, photos, music, and other important files. You can use cloud storage, external storage, or your computer to transfer the files back to your tablet.
- Reinstall the applications you were using on your Android tablet. Visit the Microsoft Store or the official websites of the applications to download and install them on your tablet running Windows. Take note of any specific settings or configurations you had in the Android version of the applications and adjust them accordingly.
- Customize your Windows desktop, start menu, and other settings to your preference. This includes organizing your desktop icons, pinning your favorite apps to the taskbar, and setting up a wallpaper that suits your style.
- Take some time to explore and familiarize yourself with the Windows interface and its features. Use the built-in Windows Help and Support system or online resources to learn more about the functionality and capabilities of Windows.
By following these final steps, you will ensure that your tablet running Windows is fully optimized and ready for use. Enjoy the seamless integration of Windows with your tablet’s hardware, and make the most out of the versatility and features it offers.
Remember, installing Windows on your Android tablet comes with its own set of advantages and limitations. Be aware of any specific requirements or considerations for running Windows on your tablet, and keep your device up to date with the latest updates and security patches provided by Microsoft.
Conclusion
Congratulations! You have successfully completed the process of putting Windows on your Android tablet. By following the steps outlined in this guide, you have transformed your tablet into a versatile device that offers the best of both worlds – the familiarity and functionality of Windows on a portable Android device.
Throughout this journey, we discussed the importance of checking compatibility, backing up your data, enabling Developer Options, installing USB drivers, unlocking the bootloader, installing a custom recovery, downloading the Windows image, flashing the image, and finalizing the installation. Each step played a crucial role in ensuring a successful transition from Android to Windows.
While the process may have been challenging at times and voided your warranty, your tablet now opens up a wide range of possibilities. You can take advantage of the vast Windows application ecosystem, access productivity tools, browse the web, enjoy multimedia, and more. With Windows installed, your tablet can become a powerful tool for work, entertainment, and creativity.
Keep in mind that running Windows on your Android tablet may come with specific hardware and software limitations. Some features may not be fully supported or optimized, and you may encounter occasional compatibility issues. It’s essential to stay updated with the latest Windows updates and drivers to ensure the best performance and stability.
If you ever decide to revert to the original Android operating system, check whether the manufacturer provides official tools or firmware to restore your tablet. Be prepared to follow a similar set of steps to unlock the bootloader, install a custom recovery, and flash the Android image back onto your tablet.
Thank you for joining us on this journey to install Windows on your Android tablet. We hope that this guide has been helpful in achieving your goal. Enjoy exploring the possibilities and making the most out of your newly transformed tablet running Windows!