Introduction
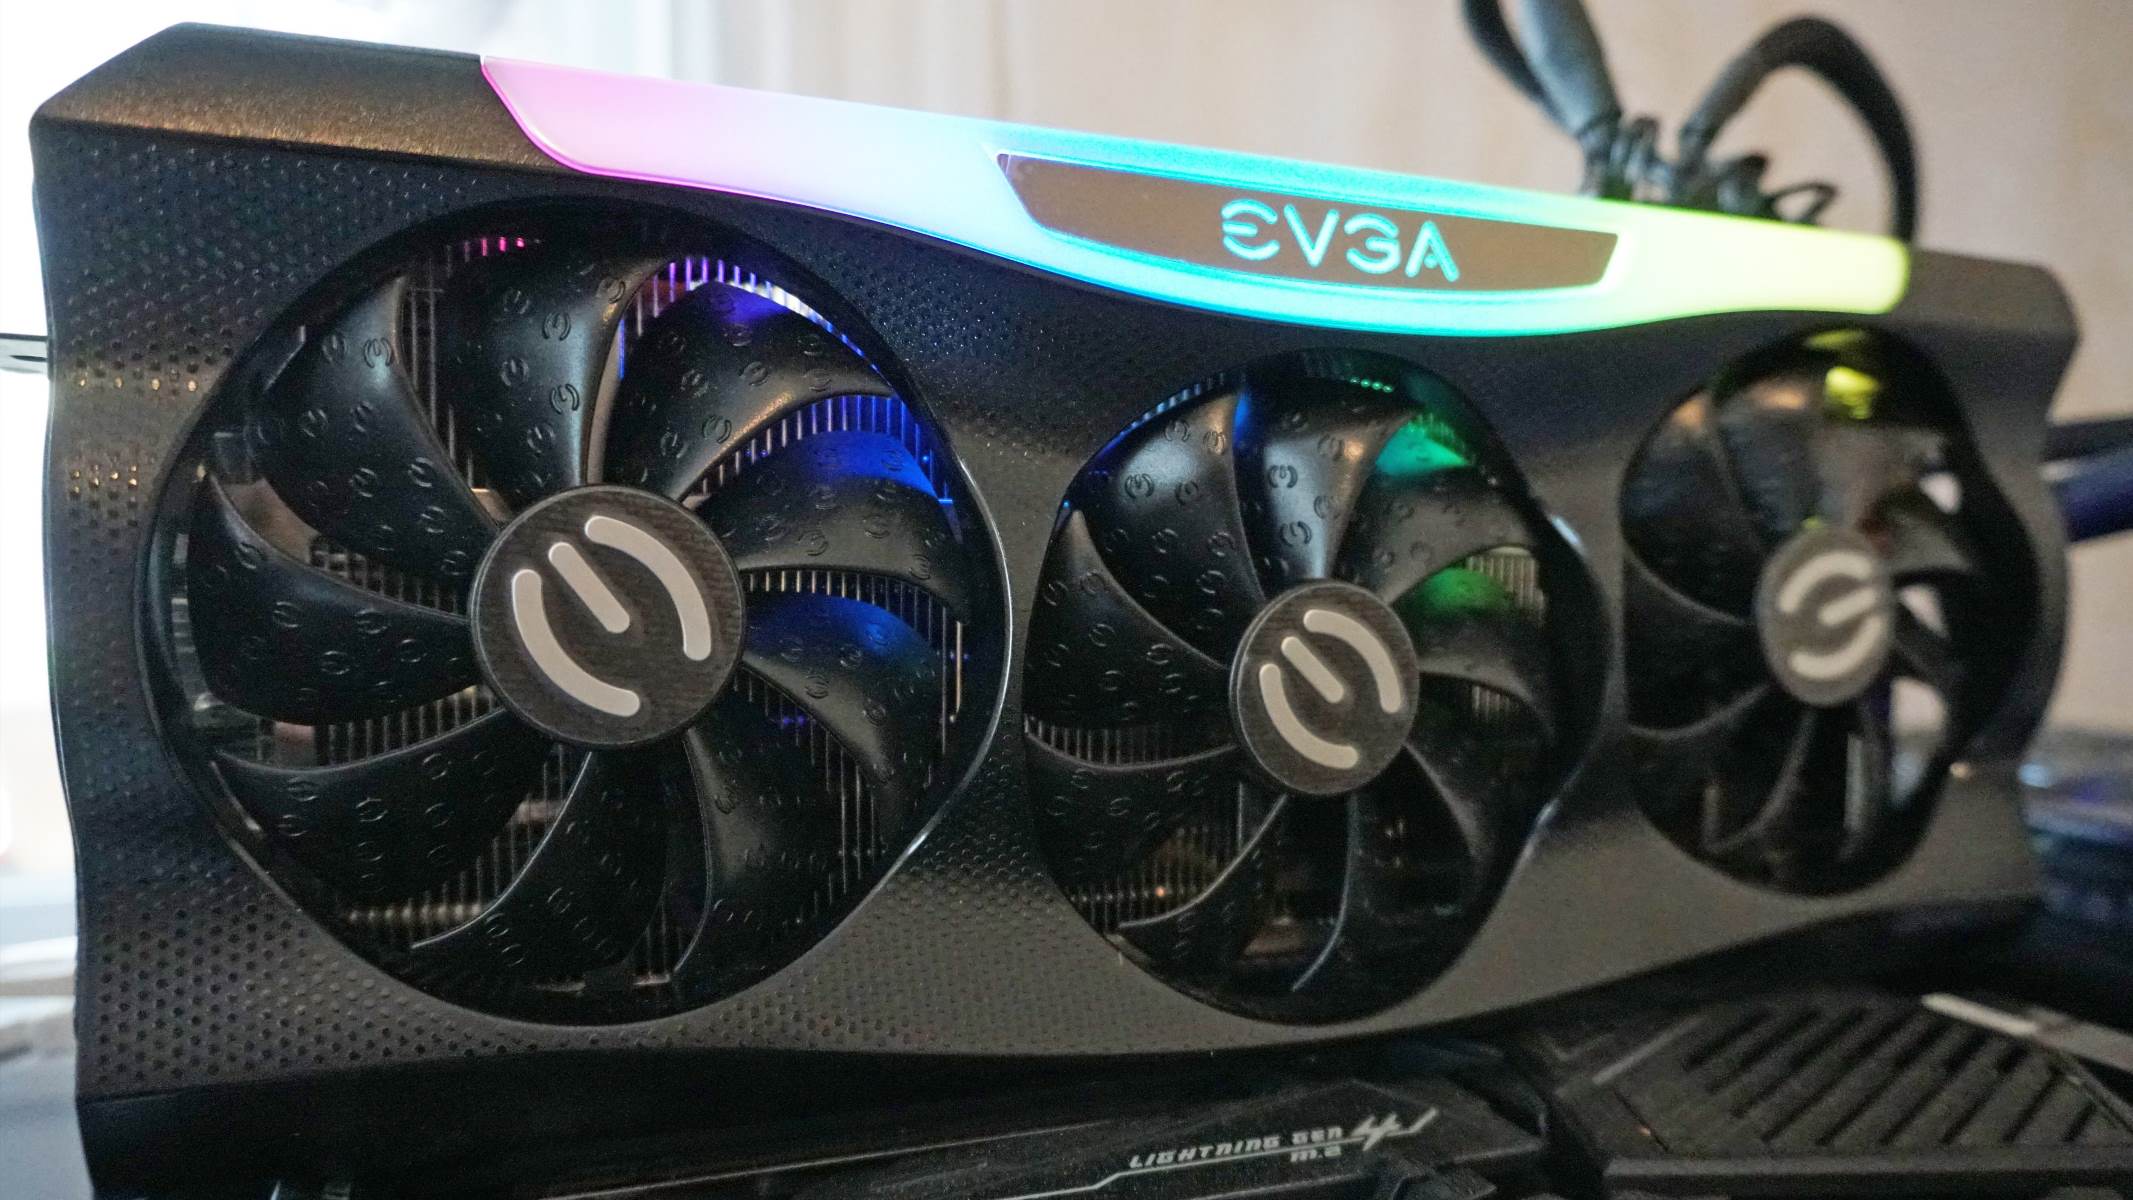
Welcome to the world of GPU overclocking! If you’re looking to maximize the performance of your graphics card, one of the most effective ways is to overclock it. By increasing the clock speeds of the GPU core and memory, you can squeeze out extra frames per second and achieve smoother gameplay. One popular tool for GPU overclocking is EVGA Precision X, a powerful software that allows you to fine-tune your graphics card settings.
In this guide, we will walk you through the process of overclocking your GPU using EVGA Precision X. Whether you’re a seasoned overclocker or a beginner, we will provide step-by-step instructions along with some useful tips and tricks to help you get the most out of your graphics card.
Before we dive into the technicalities, it’s important to note that overclocking your GPU involves increasing the voltage and clock speeds, which can generate more heat. Therefore, it’s crucial to have proper cooling measures in place, such as a well-ventilated PC case and a reliable aftermarket GPU cooler. Always monitor your temperatures during the overclocking process to prevent overheating and instability.
Keep in mind that overclocking voids the warranty of your graphics card, so proceed at your own risk. However, when done correctly and with caution, overclocking can significantly enhance your gaming experience and give you that extra edge in demanding applications.
Now that you have a basic understanding of GPU overclocking and the precautions to take, let’s move on to the first step: downloading and installing EVGA Precision X.
Step 1: Downloading and Installing EVGA Precision X
The first step in overclocking your GPU with EVGA Precision X is to download and install the software. EVGA Precision X is available for free on the EVGA website and is compatible with most NVIDIA graphics cards. Here’s how you can get started:
- Open your web browser and navigate to the EVGA website.
- Search for “EVGA Precision X” in the search bar or locate the software in the downloads section of the website.
- Select the appropriate version of EVGA Precision X for your operating system and click on the download link to initiate the download.
- Once the download is complete, locate the setup file on your computer and double-click on it to start the installation process.
- Follow the on-screen instructions to install EVGA Precision X. Make sure to carefully review and accept the license agreement before proceeding.
- Choose the installation location for EVGA Precision X. You can stick with the default location or select a different directory if desired.
- Once the installation is complete, launch EVGA Precision X by double-clicking on the desktop shortcut or finding it in your Start menu.
It’s worth noting that EVGA Precision X also allows you to monitor various aspects of your GPU’s performance, including temperature, fan speeds, and voltage. This real-time monitoring capability can be incredibly useful during the overclocking process, as it helps you keep track of the changes in your GPU’s behavior.
Now that EVGA Precision X is successfully installed on your system, you’re ready to move on to the next step: understanding GPU overclocking.
Step 2: Understanding GPU Overclocking
Before diving into the process of overclocking your GPU, it’s essential to have a solid understanding of what GPU overclocking entails. GPU overclocking involves increasing the clock speeds of your graphics card to achieve better performance. This can result in higher frame rates and smoother gameplay, making it a popular technique among gamers and enthusiasts.
Every graphics card comes with a base clock speed and a boost clock speed, which determine its default performance. Overclocking allows you to push these clock speeds beyond their rated limits, effectively squeezing out more power from your GPU.
However, it’s important to note that not all graphics cards are created equal. Each individual GPU has its own unique potential for overclocking, known as the “silicon lottery.” Some GPUs may overclock significantly higher than others, while some may have stricter limits.
When overclocking your GPU, there are a few key factors to consider:
- Core Clock: The core clock determines the speed at which the GPU processes graphics data. Increasing the core clock can lead to higher frame rates and better overall performance.
- Memory Clock: The memory clock controls the speed at which the GPU’s memory operates. Higher memory clock speeds can result in smoother gameplay, especially in memory-intensive tasks.
- Voltage: Increasing the voltage supplied to the GPU can help stabilize higher clock speeds. However, increasing the voltage also generates more heat, so it’s crucial to monitor temperatures closely.
It’s important to note that GPU overclocking should be approached with caution. Pushing your graphics card beyond its limits can lead to instability, crashes, and potential hardware damage. It’s recommended to start with conservative overclocking settings and gradually increase them while monitoring stability and temperatures.
Now that you have a solid understanding of GPU overclocking, it’s time to move on to the next step: customizing your overclocking profile with EVGA Precision X.
Step 3: Customizing your Overclocking Profile
Now that you have EVGA Precision X downloaded and installed on your system, it’s time to customize your overclocking profile. EVGA Precision X provides a user-friendly interface that allows you to adjust various settings and fine-tune your GPU’s performance.
Here’s how you can customize your overclocking profile with EVGA Precision X:
- Launch EVGA Precision X by double-clicking on the desktop shortcut or finding it in your Start menu.
- Once opened, you’ll see an overview of your GPU’s current settings and performance metrics.
- Click on the “Settings” button located at the bottom right of the window to access the settings menu.
- In the settings menu, you can customize various options to suit your preferences. For example, you can choose to enable or disable the OSD (On-Screen Display) to see real-time performance metrics while gaming.
- Next, click on the “Profiles” tab to access the overclocking profile settings.
- In the profiles tab, you can create multiple custom profiles for different scenarios or games. This allows you to easily switch between different overclocking settings depending on your needs.
- To create a new profile, click on the “Add” button and give your profile a descriptive name.
- Once your profile is created, you can start adjusting various settings, such as core clock, memory clock, fan speed, and voltage.
- Take note that it’s crucial to make incremental adjustments and thoroughly test each change for stability.
Customizing your overclocking profile allows you to fine-tune the performance of your GPU and find the optimal settings for your specific system. Remember to proceed with caution and monitor temperatures closely to prevent any potential overheating issues.
With your overclocking profile customized, you’re now ready to move on to the next step: adjusting the core clock and memory clock.
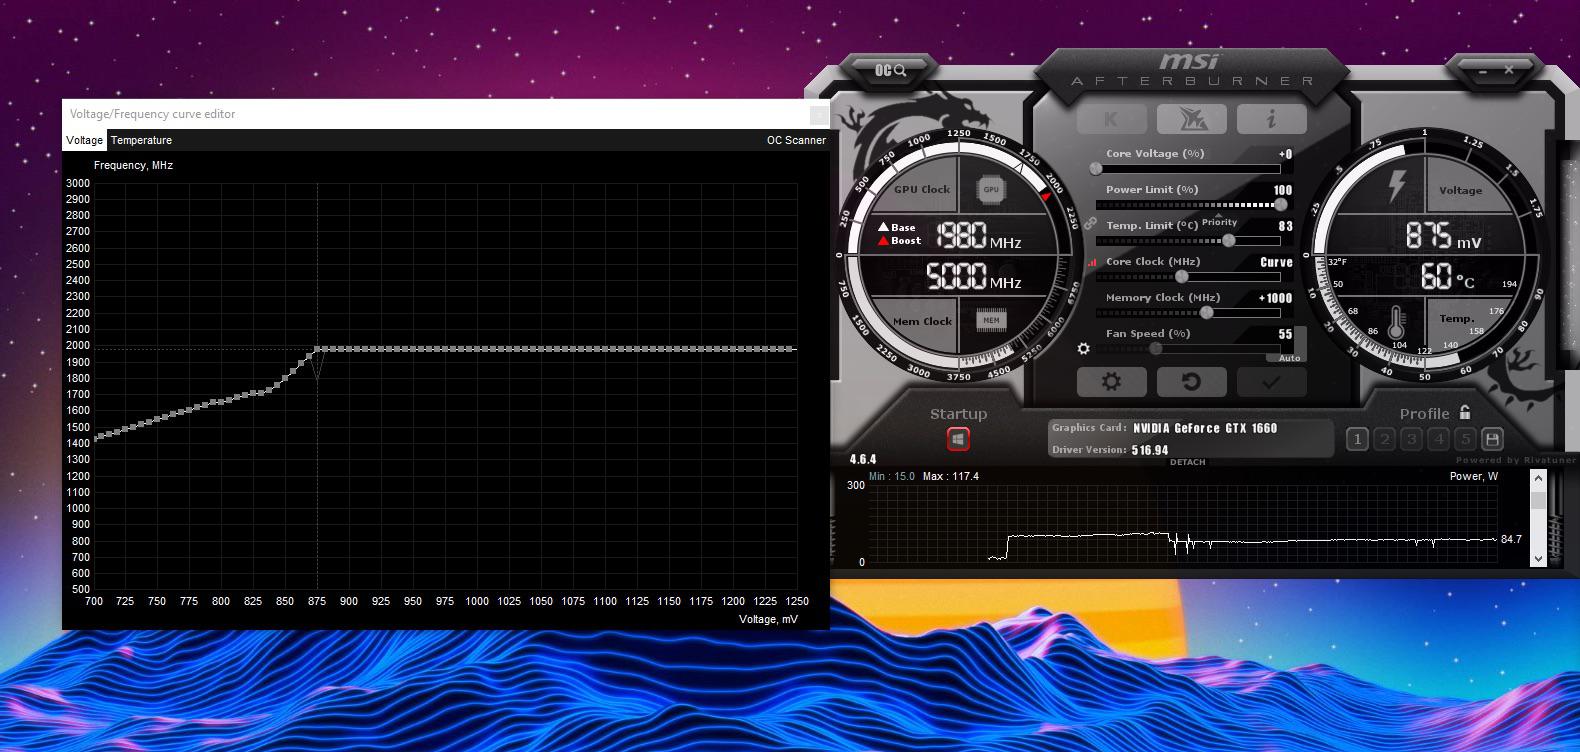
Step 4: Adjusting Core Clock and Memory Clock
Adjusting the core clock and memory clock is a crucial aspect of GPU overclocking. These settings directly affect the performance of your graphics card, allowing you to achieve higher frame rates and improved overall gameplay. In this step, we will explore how to adjust the core clock and memory clock using EVGA Precision X.
Follow these steps to adjust the core clock and memory clock:
- Launch EVGA Precision X and navigate to the profile you want to modify.
- Locate and adjust the core clock slider. Moving the slider to the right increases the core clock speed, while moving it to the left decreases it.
- Make small, incremental adjustments to the core clock, such as +10 MHz or +25 MHz, to find the stable limit for your GPU. Test for stability after each adjustment.
- Similarly, locate and adjust the memory clock slider. Again, make small adjustments to the memory clock, gradually increasing or decreasing it to find the optimal speed. Test for stability after each adjustment.
- Remember that stability is the key. If your system becomes unstable, experiences artifacts, or crashes, it’s a sign that you have pushed the clock speeds too high. In that case, dial back the clock speeds to a stable level.
It’s important to note that every GPU has a different overclocking potential, so the maximum stable core clock and memory clock speeds may vary. Take your time to find the optimal settings for your specific graphics card.
Additionally, keep a close eye on the temperatures while adjusting the core clock and memory clock. Higher clock speeds generate more heat, so monitoring temperature is essential to avoid overheating and potential damage to your GPU.
Once you have fine-tuned the core clock and memory clock settings to your satisfaction, it’s time to move on to the next step: testing stability and checking thermal performance.
Step 5: Testing Stability and Thermals
After adjusting the core clock and memory clock of your GPU, it’s crucial to test for stability and monitor the thermals to ensure that your overclock is reliable and safe. In this step, we will discuss how to test stability and check the thermal performance of your graphics card.
Here are the steps to test stability and monitor thermals:
- Launch a demanding application or game that will put your GPU under heavy load. This will help in stressing the graphics card and exposing any stability issues resulting from the overclocking settings.
- Observe the performance of your system during the test. Pay attention to any signs of instability, such as graphical artifacts, screen flickering, or crashes. These indicate that your overclocking settings might be too aggressive, and you need to adjust them accordingly.
- While testing for stability, keep an eye on the temperatures of your GPU. EVGA Precision X provides real-time temperature monitoring, allowing you to monitor how the thermal performance is affected by your overclock. Watch out for temperatures exceeding safe thresholds for your graphics card.
- If you encounter stability issues or high temperatures, it’s necessary to make adjustments to your overclocking settings. Dial back the clock speeds slightly and retest for stability and thermals.
- Keep in mind that stability and thermals go hand in hand. It’s crucial to find the right balance where your GPU maintains stable performance under heavy load without overheating.
Repeat the testing process several times, gradually increasing the duration of the stress-test to ensure long-term stability. It’s important to note that even if your GPU passes the initial stability test, it’s recommended to perform an extended stress-test to ensure the overclock is sustainable in the long run.
By testing for stability and monitoring thermals, you can fine-tune your overclocking settings and ensure the longevity of your graphics card. Once satisfied with the stability and thermal performance, you can proceed to the next step: monitoring performance in real-time.
Step 6: Monitoring Performance in Real-Time
Monitoring the performance of your GPU in real-time is crucial to stay informed about its behavior and ensure that your overclocking settings are delivering the desired results. EVGA Precision X provides various tools and features to help monitor performance metrics while you are using your computer or playing games. In this step, we will explore how to monitor your GPU’s performance in real-time using EVGA Precision X.
Follow these steps to monitor performance in real-time:
- Launch EVGA Precision X and ensure that your GPU is overclocked with your desired settings.
- Click on the “Monitoring” button located at the bottom right of the EVGA Precision X window.
- In the monitoring settings, you can choose which performance metrics you want to monitor in real-time. This can include GPU temperature, GPU usage, core clock speed, memory clock speed, fan speed, and more.
- Select the metrics you are interested in and enable them for monitoring.
- Once enabled, the selected performance metrics will be displayed in the EVGA Precision X overlay, allowing you to monitor them in real-time while using your computer or playing games.
- You can also customize the appearance and position of the overlay to suit your preference by adjusting the settings in the “Overlay” tab of EVGA Precision X.
- Keep a close eye on the performance metrics while your GPU is under load or during demanding tasks. This will help you assess the impact of your overclocking settings and make any necessary adjustments.
Monitoring performance in real-time allows you to keep track of how your GPU is performing and helps you spot any issues or anomalies that may arise. By closely monitoring the performance metrics, you can optimize your overclocking settings and ensure that your GPU is running efficiently and within safe limits.
With the ability to monitor performance metrics in real-time, you can now move on to the next step: fine-tuning the power target and voltage.
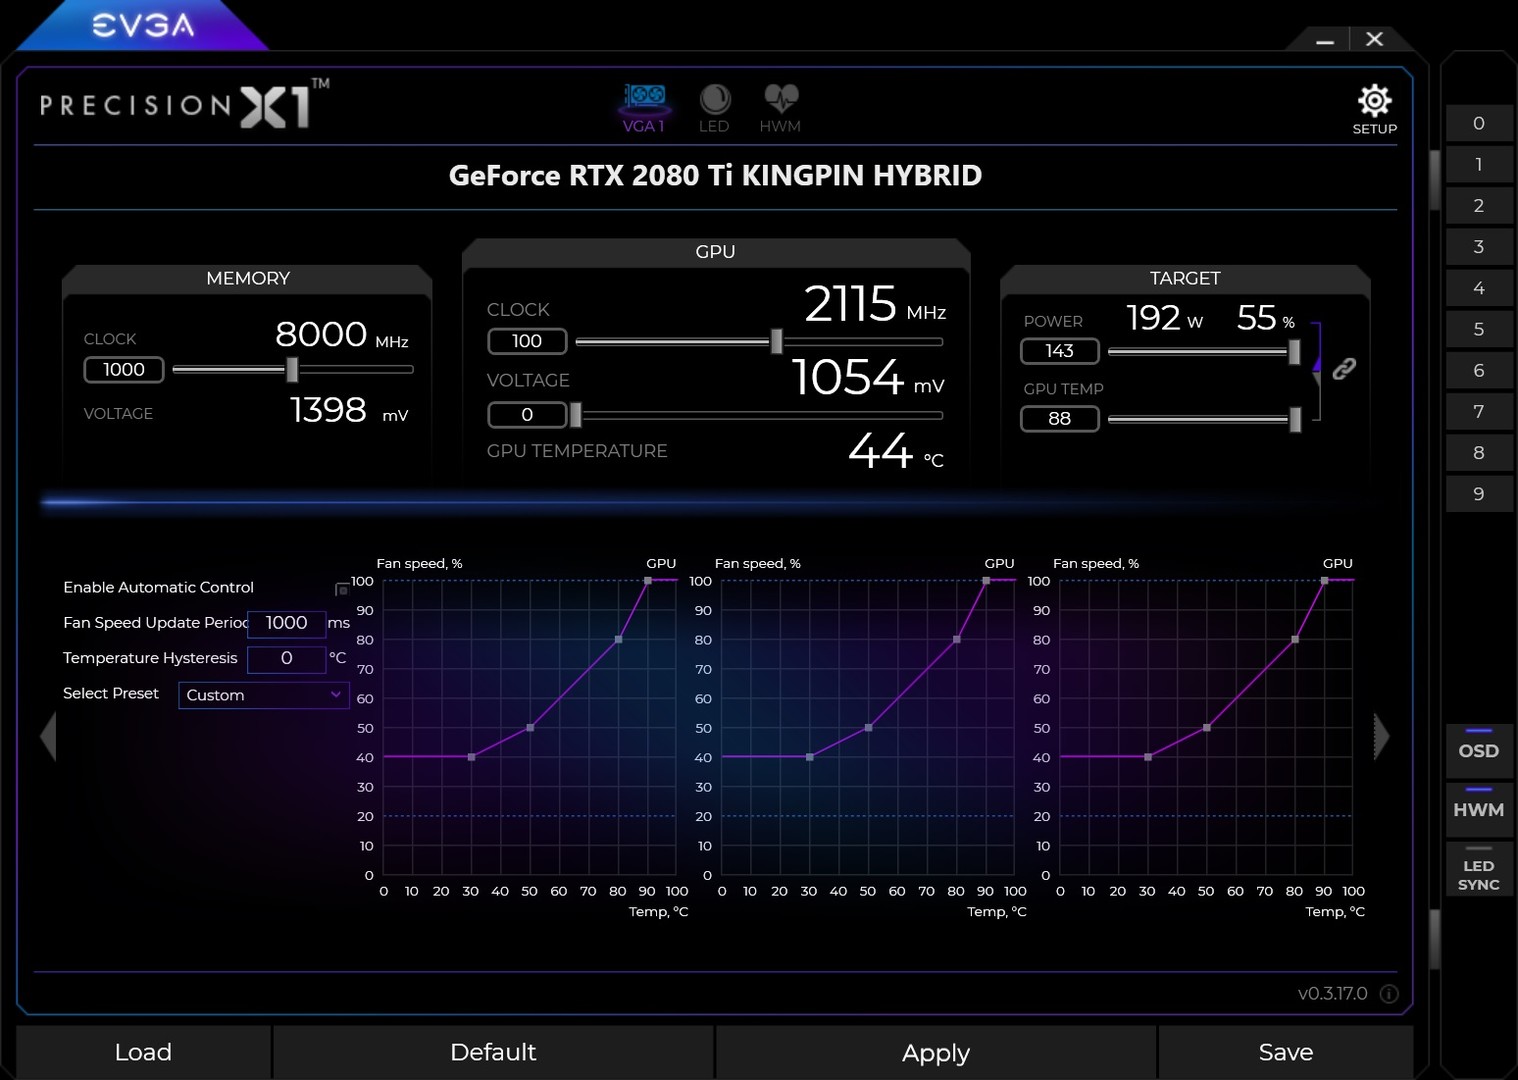
Step 7: Fine-Tuning the Power Target and Voltage
To further optimize your GPU overclocking and maximize performance, fine-tuning the power target and voltage settings is essential. Adjusting the power target allows you to control the maximum power consumption of your graphics card, while tweaking the voltage can help stabilize higher clock speeds. In this step, we will explore how to fine-tune the power target and voltage using EVGA Precision X.
Follow these steps to fine-tune the power target and voltage:
- Launch EVGA Precision X and ensure that your GPU is overclocked with your desired settings.
- Click on the “Voltage” button located at the bottom right of the EVGA Precision X window.
- Adjust the voltage slider to increase or decrease the voltage supplied to your GPU. Higher voltages can help stabilize higher clock speeds, but they also generate more heat, so be cautious.
- Next, click on the “Fan Curve” button to access the fan curve settings. Adjusting the fan curve allows you to fine-tune the fan speed based on temperature, helping to maintain optimal cooling during overclocking.
- Experiment with different fan curve settings to find the right balance between cooling and noise levels. It’s important to maintain proper cooling to prevent overheating.
- After adjusting the voltage and fan curve, click on the “Power Target” button. Adjusting the power target allows you to control the maximum power consumption of your GPU.
- Increasing the power target can provide more headroom for your overclocking settings, but it may also result in higher temperatures. Monitor your GPU’s temperatures closely while adjusting the power target.
- Make small incremental adjustments to the voltage, fan curve, and power target and test stability and thermals after each change. This will help you find the optimal settings for your GPU.
Remember that fine-tuning the power target and voltage requires careful attention to stability and thermals. Monitor your GPU’s behavior closely and adjust the settings accordingly to achieve the best balance between performance and temperature.
With the power target and voltage fine-tuned, you are now ready to move on to the next step: enabling the fan curve and tuning the fan speed.
Step 8: Enabling Fan Curve and Tuning Fan Speed
Proper cooling is crucial when overclocking your GPU, and one way to enhance cooling performance is by enabling the fan curve and tuning the fan speed. By adjusting the fan speed based on temperature, you can maintain optimal cooling while keeping the noise levels in check. In this step, we will explore how to enable the fan curve and tune the fan speed using EVGA Precision X.
Follow these steps to enable the fan curve and tune the fan speed:
- Launch EVGA Precision X and ensure that your GPU is overclocked with your desired settings.
- Click on the “Fan Curve” button located at the bottom right of the EVGA Precision X window.
- Enable the fan curve by checking the box next to “Enable fan curve.”
- Depending on your preference, you can choose to create a custom fan curve or use the default fan curve provided by EVGA Precision X.
- To create a custom fan curve, click on the “Add Point” button and adjust the temperature and fan speed values to your liking.
- Make small adjustments to the fan speed based on temperature to strike the right balance between cooling and noise levels. Higher fan speeds will provide better cooling but may increase noise.
- Test your custom fan curve by putting your GPU under load and monitoring temperatures. Ensure that the fan speeds are adjusting according to the temperature changes.
- Refine the fan curve as needed to achieve optimal cooling performance while maintaining acceptable noise levels.
Enabling the fan curve and tuning the fan speed is essential for proper temperature management during overclocking. By customizing the fan curve, you can ensure that your GPU remains at optimal operating temperatures, reducing the risk of overheating and maintaining stable performance.
Remember to regularly monitor temperatures and adjust the fan curve if necessary, especially when pushing the limits of your overclocking settings. This will help you keep the GPU cool and extend its lifespan.
With the fan curve enabled and the fan speed tuned, you are now ready to move on to the next step: creating profiles for different games or applications.
Step 9: Creating Profiles for Different Games or Applications
Creating profiles for different games or applications is a great way to optimize your GPU overclocking settings based on specific requirements. Each game or application may have different demands on your graphics card, so customizing profiles allows you to fine-tune your settings for optimal performance. In this step, we will explore how to create profiles for different games or applications using EVGA Precision X.
Follow these steps to create profiles for different games or applications:
- Launch EVGA Precision X and ensure that your GPU is overclocked with your desired settings.
- Click on the “Profiles” tab located at the top left of the EVGA Precision X window.
- Click on the “Add” button to create a new profile.
- Give your profile a descriptive name, such as the name of the game or application you want to create a profile for.
- Within the profile, adjust the GPU settings to your desired values, including core clock, memory clock, voltage, and fan curve.
- Save the profile by clicking on the “Save” button.
- Repeat the process for each game or application you want to create a profile for.
- To use a specific profile, simply select it from the profiles list in EVGA Precision X before launching the corresponding game or application.
By creating profiles for different games or applications, you can easily switch between different overclocking settings that are tailored to the specific demands of each. This ensures that you get the best performance possible without having to manually adjust the settings every time you switch tasks or launch a different game.
Make sure to regularly update and tweak your profiles as you encounter new games or applications that have different requirements or performance characteristics. This will help you stay on top of your GPU overclocking and continue to optimize your settings for the best experience.
With profiles created for different games or applications, you have now completed the process of overclocking your GPU with EVGA Precision X. Enjoy the enhanced performance and smoother gameplay!
Conclusion
Congratulations! You have successfully learned how to overclock your GPU using EVGA Precision X. By following the steps outlined in this guide, you now have the knowledge and tools to unleash the full potential of your graphics card and enhance your gaming experience.
Throughout the process, we covered essential steps such as downloading and installing EVGA Precision X, understanding GPU overclocking, customizing your overclocking profile, adjusting the core clock and memory clock, testing stability and thermals, monitoring performance in real-time, fine-tuning the power target and voltage, enabling the fan curve and tuning fan speed, and creating profiles for different games or applications.
Remember, overclocking your GPU comes with certain risks and considerations. It’s vital to proceed with caution, monitor temperatures closely, and gradually adjust the overclocking settings while testing for stability. Overclocking voids the warranty of your graphics card, so always take responsibility and be aware of any potential risks.
Regularly monitor the temperatures and performance of your GPU to ensure it remains within safe limits and maintains stable operation. Keep in mind that each GPU is unique, and finding the perfect overclocking settings might take some trial and error to achieve.
Ultimately, the goal of overclocking is to enhance your gaming experience by achieving higher frame rates, smoother gameplay, and improved performance in demanding applications. Take the time to fine-tune your settings and find the ideal balance between performance and temperature management to get the most out of your graphics card.
Thank you for following this guide, and we hope that your GPU overclocking journey with EVGA Precision X proves to be an exciting and rewarding one. Now, go out there and enjoy the enhanced performance that comes with overclocking!