Introduction
With the rise of remote work and virtual meetings, Zoom has become an essential tool for staying connected with colleagues, friends, and family. One of the standout features of Zoom is the ability to customize your background, allowing you to transform your surroundings into a virtual backdrop of your choice. Whether you want to showcase your personality, hide a messy room, or add a touch of professionalism to your video calls, creating a custom Zoom background is a fun and creative way to make your video meetings more engaging.
In this article, we will explore various methods for making a Zoom background that suits your style and needs. We will cover everything from choosing the right background to designing and uploading your own custom images. So, if you’re ready to add a touch of personalization to your virtual meetings, read on to discover the steps involved in creating a captivating Zoom background.
Before we delve into the technical aspects, it’s important to note that to make a Zoom background, you will need a computer, a webcam, and a stable internet connection. Additionally, make sure you have the latest version of Zoom installed on your device, as older versions may not support the background feature.
Now, let’s dive into the exciting world of Zoom backgrounds and discover how you can turn your simple video calls into visually stunning experiences!
Choosing a Background
When it comes to choosing a background for your Zoom meetings, the possibilities are endless. The right background can set the tone for your video calls and reflect your personality or the purpose of the meeting. Here are a few things to consider when selecting a background:
- Professional or Personal: Determine whether you want a professional-looking background to maintain a formal atmosphere or a more casual background that showcases your interests and personality.
- Image or Video: Decide whether you want a static image or a dynamic video background. Both can be impactful, but videos tend to draw more attention and create a vibrant ambiance.
- Branding or Neutral: If you’re representing a company or organization, consider using a background that incorporates your brand colors and logo. Alternatively, you can choose a neutral background that won’t distract from the main focus of the meeting.
- Image Quality: Opt for high-resolution images or videos to ensure a clear and crisp background. Blurry or pixelated backgrounds may give a negative impression to others on the call.
- Relevance: Consider the purpose of the meeting and choose a background that aligns with the topic or theme. For example, if you’re discussing beach vacations, a beach-themed background would be fitting.
There are several resources where you can find pre-made backgrounds specifically designed for Zoom. Websites like Unsplash, Pexels, and Zoom Virtual Backgrounds offer a wide selection of free-to-use images and videos. You can also create your own custom background using graphic design tools like Adobe Photoshop, Canva, or even PowerPoint. This allows you to add a personal touch and tailor the background to your exact preferences.
Remember, the key is to choose a background that enhances your video call without being too distracting or overwhelming. It should complement your presence and create a visually appealing backdrop that reflects your style and the purpose of the meeting.
Creating a Custom Zoom Background
If you want to add a personal touch to your Zoom meetings and stand out from the crowd, creating a custom Zoom background is the way to go. Here’s how you can do it:
- Gather your resources: Start by collecting the images, graphics, or videos you want to include in your background. You can use your own photographs, illustrations, or download elements from stock image websites.
- Choose a design tool: Select a design tool that suits your preference and expertise. Adobe Photoshop, Canva, and PowerPoint are popular choices for creating custom Zoom backgrounds.
- Set the dimensions: Determine the ideal dimensions for your background. The recommended size for Zoom backgrounds is 1920 x 1080 pixels (16:9 aspect ratio), but you can adjust it based on your needs.
- Add your elements: Start adding your chosen images, graphics, or videos to the design tool. Arrange them in a visually pleasing way, taking into consideration the placement of your video feed within the frame.
- Customize the background: Get creative with filters, overlays, text, and other effects to make your background unique. Experiment with colors, fonts, and visual elements that align with your personal style or the purpose of the meeting.
- Preview and refine: Once you’re satisfied with the design, preview how the background looks against your video feed. Make any necessary adjustments to ensure the elements are properly aligned and visible.
- Save your custom background: Export or save your custom background as an image or video file, depending on the format supported by your design tool and Zoom.
Remember to follow Zoom’s guidelines when it comes to file formats and sizes. For images, use JPEG or PNG, and for videos, use MP4 or MOV. Keep the file size under 5MB to ensure smooth uploading and loading during your meetings.
Creating a custom Zoom background allows you to express your creativity and make a lasting impression in your virtual meetings. It’s a fantastic way to showcase your personal style or promote your brand while adding a touch of professionalism to your video calls.
Using Adobe Photoshop to Make a Zoom Background
Adobe Photoshop is a powerful and widely-used graphic design software that offers extensive features for creating and editing images. If you’re familiar with Photoshop or willing to learn the basics, you can leverage its capabilities to make a stunning Zoom background. Here’s how:
- Open Photoshop: Launch Photoshop on your computer and create a new document with the dimensions suitable for a Zoom background, typically 1920 x 1080 pixels.
- Import your resources: Import the images, graphics, or videos you want to include in your background. You can drag and drop the files directly into the Photoshop workspace.
- Arrange your elements: Use the layers panel to organize and arrange the imported elements on the canvas. Adjust their positioning, size, and opacity as needed.
- Apply filters and effects: Experiment with Photoshop’s filters, blending modes, and adjustments to enhance the overall look of your background. Play with color corrections, gradients, or textures to add depth and visual interest.
- Add text and overlays: If desired, include text overlays or graphic elements to convey a specific message or promote your brand. Utilize the text tools and layer styles to customize the appearance of text and overlays.
- Preview and fine-tune: Take a moment to preview how your background looks against your video feed. Make any necessary adjustments to ensure the elements are properly positioned and visible.
- Save your custom background: Once you’re satisfied with the design, save the final image as a JPEG or PNG file. Keep the file size under 5MB for optimal performance during your Zoom meetings.
Adobe Photoshop provides a wide range of possibilities to create intricate and visually appealing Zoom backgrounds. You can explore advanced techniques like layer masks, gradients, and advanced selection tools to take your designs to the next level.
Remember to save your Photoshop project files (.PSD) as well, so you can easily make adjustments or create variations of your background in the future.
By using Adobe Photoshop, you have complete control over the design process, allowing you to create custom Zoom backgrounds that perfectly align with your personal style or brand identity.
Utilizing Canva to Create a Zoom Background
Canva is a user-friendly online graphic design tool that offers a variety of templates and design elements, making it an excellent choice for creating a Zoom background without extensive design experience. Follow these steps to create a Zoom background using Canva:
- Create a Canva account: Sign up on the Canva website and log into your account.
- Select the Zoom background template: Once you’re logged in, search for “Zoom background” in the Canva template library. Choose a template that best suits your needs or start with a blank canvas.
- Customize the background: Use the drag-and-drop feature to add images, graphics, or videos to the Canva workspace. You can upload your own resources or explore Canva’s extensive library of free and paid assets.
- Arrange and edit elements: Move, resize, and rotate the elements until you achieve the desired composition. Canva provides various editing tools, such as filters, text options, and layer effects, to personalize your background.
- Add text and graphics: If desired, include text overlays, shapes, or other graphic elements to enhance your background. Canva offers a wide range of fonts and graphic elements to choose from.
- Preview and refine: Take advantage of Canva’s preview feature to see how your background will appear against your video feed. Make any necessary adjustments to ensure the visibility and overall aesthetic appeal.
- Download and save your background: Once you’re satisfied with the design, click on the “Download” button and choose the appropriate file format (JPEG or PNG). Keep the file size under 5MB for optimal performance.
Canva simplifies the design process by providing intuitive tools and ready-to-use templates, making it accessible to individuals with varying levels of design expertise. Whether you want a simple background or a more elaborate one with multiple elements, Canva offers a user-friendly interface to bring your vision to life.
Additionally, Canva allows you to collaborate on designs, making it a great option for teams working remotely. You can share your Canva design link with colleagues or clients, enabling them to provide feedback or make revisions.
By utilizing Canva, you can create eye-catching Zoom backgrounds that reflect your unique style and captivate your Zoom meeting participants.
Designing a Zoom Background with PowerPoint
PowerPoint, known for its presentation capabilities, can also be used to design custom Zoom backgrounds. Follow these steps to create a Zoom background using PowerPoint:
- Open PowerPoint: Launch PowerPoint on your computer and create a new presentation slide with the dimensions suitable for a Zoom background, typically 1920 x 1080 pixels.
- Add your elements: Use the insert options in PowerPoint to add images, graphics, or videos to the slide. You can choose to insert your own resources or explore PowerPoint’s built-in clip art and shape options.
- Arrange and format elements: Arrange the elements on the slide in a visually pleasing way. Use PowerPoint’s formatting tools to adjust the size, position, and appearance of the added content.
- Apply backgrounds and effects: Experiment with different PowerPoint backgrounds and effects to enhance your design. You can choose from custom colors, gradients, textures, and even add transparency to create a professional and appealing background.
- Include text and overlays: If desired, add text or overlay elements to the slide to convey a specific message or promote your brand. Customize the font, size, and placement to ensure it complements the overall design.
- Preview and fine-tune: Use PowerPoint’s presentation mode to preview your design against a video feed. Make any necessary adjustments to ensure visibility and readability.
- Save your custom background: Once you’re satisfied with the design, save the slide as a JPEG or PNG image. This will allow you to use the slide as your Zoom background by uploading it to the Zoom application.
While PowerPoint may not be specifically designed for graphic design, it offers a user-friendly interface and familiar tools that make it accessible to many individuals. It’s a practical option if you’re already familiar with PowerPoint or prefer working within its environment.
PowerPoint also provides the advantage of easy collaboration and sharing. You can collaborate with teammates, clients, or friends by sharing your PowerPoint file, enabling them to provide feedback or make changes.
With PowerPoint, you can unleash your creativity and design impressive Zoom backgrounds that elevate your video calls to the next level.
Uploading and Setting Up Your Zoom Background
Now that you have created your custom Zoom background, it’s time to upload and set it up in Zoom. Follow these simple steps to get your background ready for your next video call:
- Open Zoom and access settings: Launch the Zoom desktop application and sign in to your account. Once you’re logged in, click on the “Settings” icon located at the top right corner of the application window.
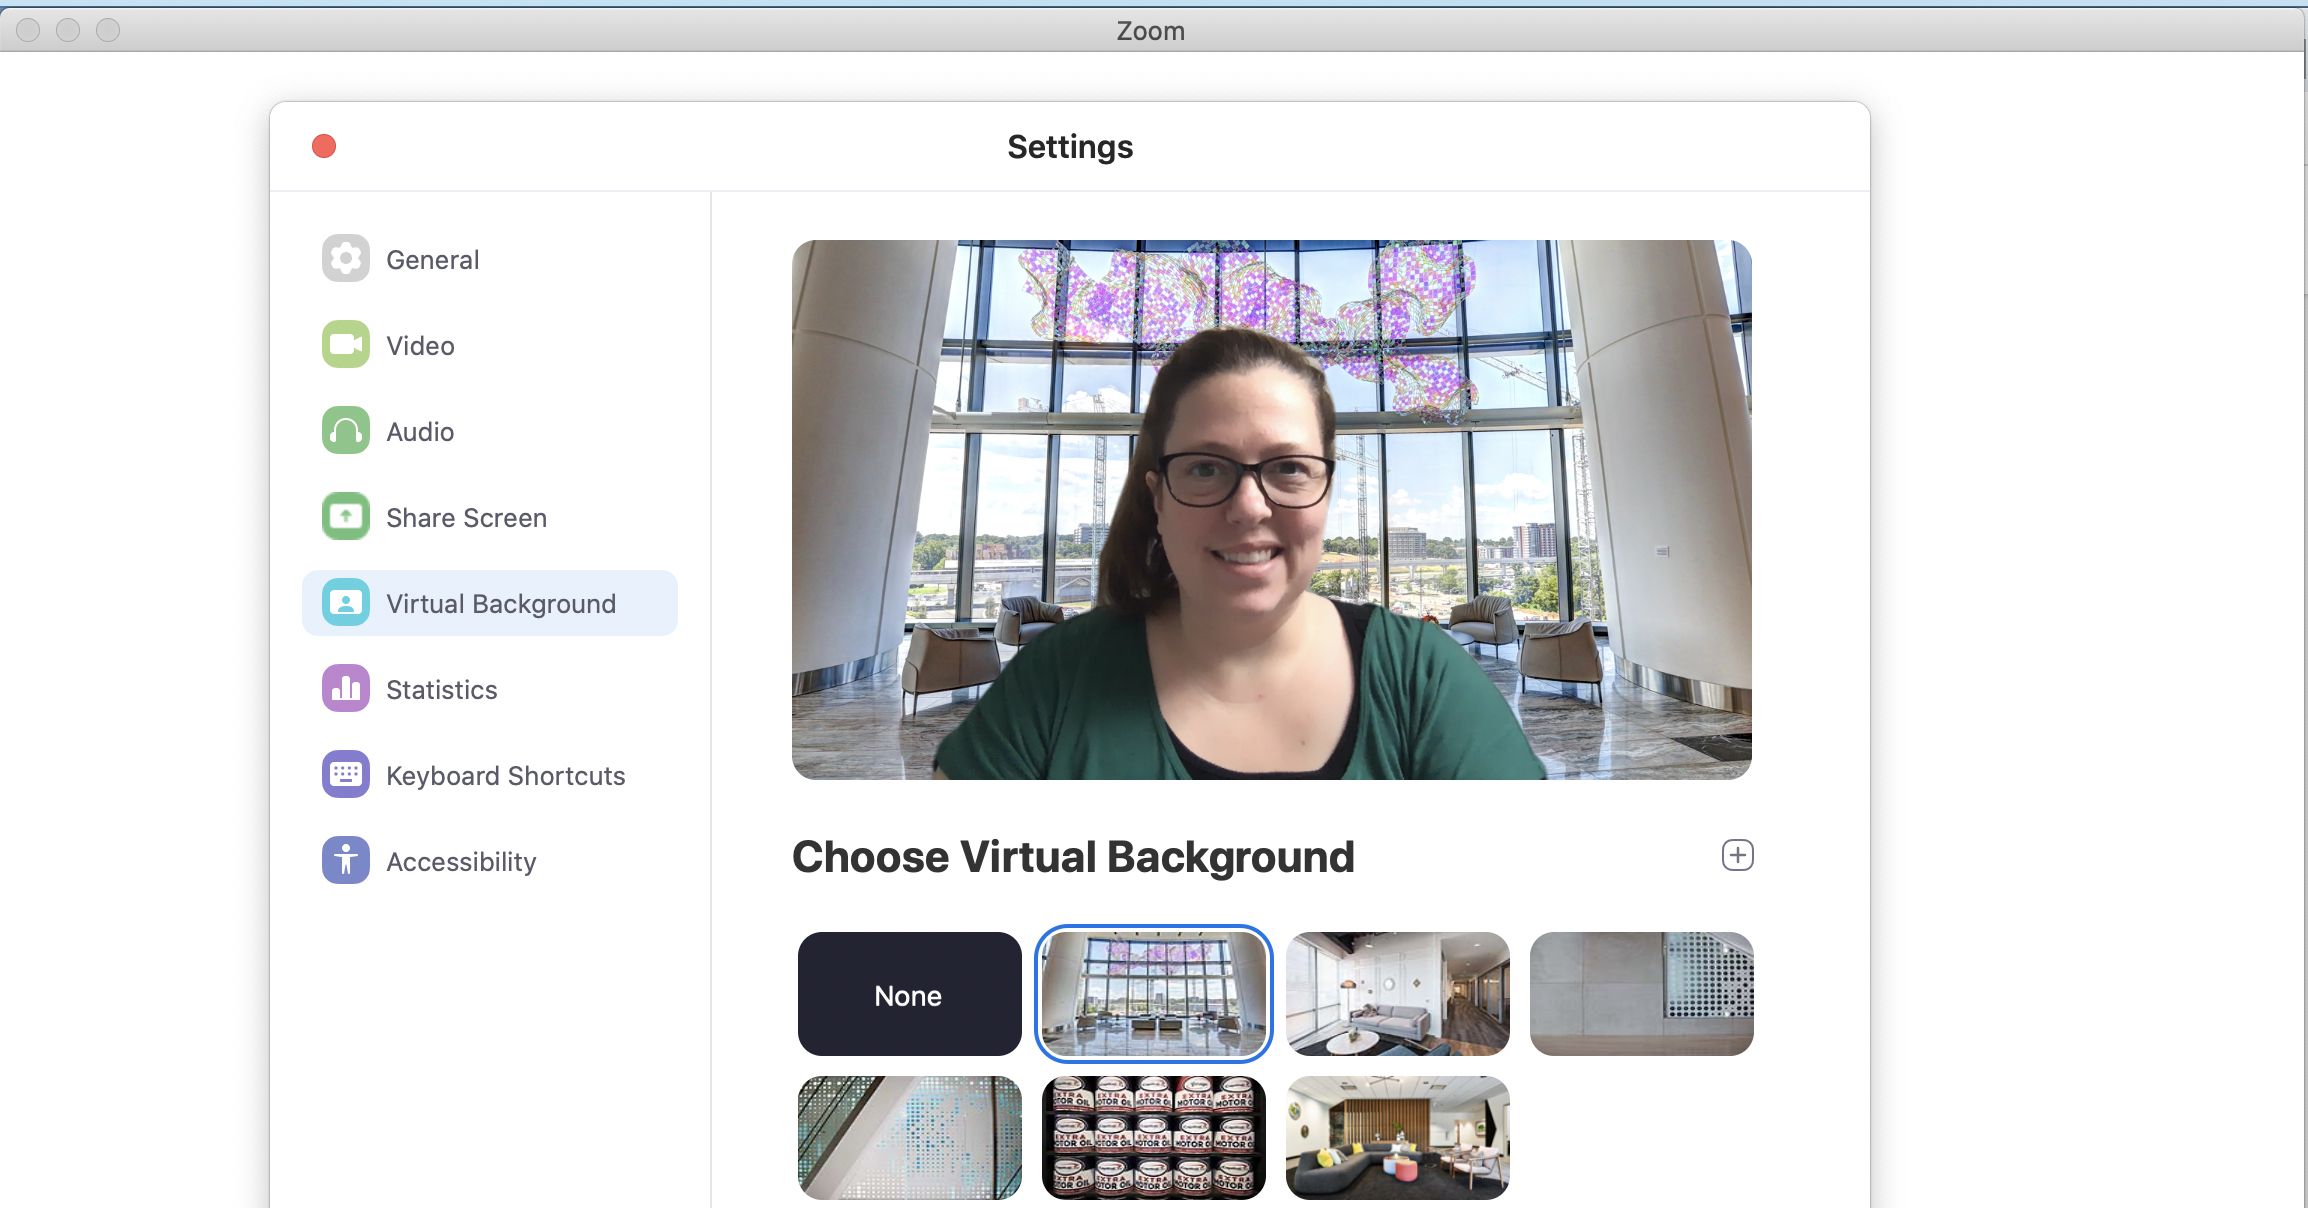
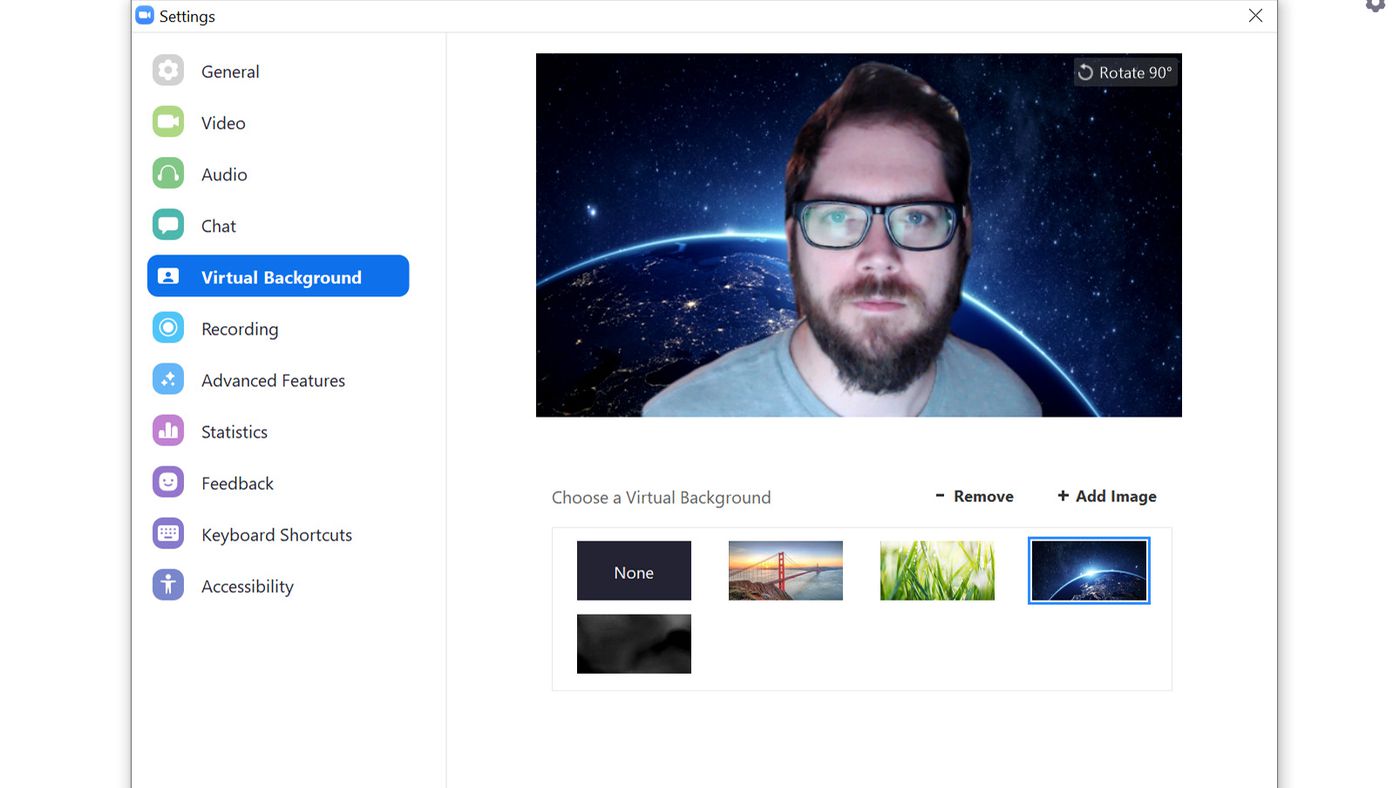
- Go to the Virtual Background section: In the settings menu, navigate to the “Virtual Background” tab. This tab allows you to choose and upload your own custom background.
- Choose your background: In the Virtual Background tab, you will see a list of pre-loaded Zoom background options. To upload your custom background, click on the “+” button to the right of the background list.
- Select your custom background: A file explorer window will open, allowing you to browse your computer for the image or video file of your custom Zoom background. Select the file and click “Open” to upload it to Zoom.
- Preview and adjust: Zoom will display a preview of your custom background. Take a moment to ensure that it looks as expected and that there are no issues with visibility or alignment. Make any necessary adjustments to your camera positioning or lighting if needed.
- Activate your background: Once you’re satisfied with the preview, click on the checkbox that says “I have a green screen” if you have a green screen setup, or “Mirror my video” if you want to mirror the video feed. This will provide the best results for your custom background.
- Start your video call: With your custom background selected, you’re ready to start your video call. Your virtual background will now be applied to your video feed, creating a unique and personalized look for your Zoom meetings.
Remember that for the best results, ensure that you have proper lighting and a solid, contrasting background behind you. This will help the virtual background appear more seamless and natural.
If you encounter any issues with your custom background, such as visual glitches or compatibility problems, try using a different file format (JPEG or PNG for images, or MP4 or MOV for videos) or ensure that you have the latest version of Zoom installed.
Enjoy showcasing your creativity and personality with your custom Zoom background and make your video calls more visually captivating and enjoyable!
Conclusion
Customizing your Zoom background is a simple yet effective way to add a personal touch and enhance the visual appeal of your video calls. Whether you choose to showcase your personality, incorporate branding elements, or set a specific theme, creating a custom Zoom background allows you to express yourself and make your meetings more engaging and memorable.
In this article, we explored various methods for making a Zoom background, including using design tools like Adobe Photoshop, Canva, and PowerPoint. Each method offers unique features and flexibility, catering to different skill levels and preferences.
Remember to consider factors such as professionalism, relevance, image quality, and your specific goals when selecting and designing your Zoom background. Choose backgrounds that align with the purpose of your meetings and create a visually appealing backdrop that captivates your audience without causing distractions.
Finally, don’t forget to upload and set up your custom background in the Zoom application. The ability to easily switch between different backgrounds adds versatility and fun to your video calls.
So, whether you want to represent your brand, showcase your creativity, or simply add a touch of professionalism to your virtual meetings, creating a custom Zoom background is a great way to stand out and make an impression. Embrace your creativity, experiment with different designs, and enjoy the visually captivating experience of video conferencing with your custom Zoom background.