Introduction
When you have multiple monitors connected to your Windows 10 computer, it’s convenient to be able to open specific programs on a particular monitor. This allows for better organization and productivity, as you can allocate different tasks to different screens. Whether you have a dual-monitor setup or a more expansive multi-monitor configuration, being able to control where your programs open can save you time and effort in rearranging windows.
Fortunately, Windows 10 provides built-in options to directly control which monitor a program opens on. In addition, there are third-party software solutions available that offer more advanced features and customization options. In this article, we will explore different methods to make a program open on a specific monitor in Windows 10.
Before we dive into the specific methods, it’s important to note that the ability to open a program on a specific monitor requires your computer to be already set up with multiple monitors. This can typically be achieved by connecting additional monitors to your graphics card or using a docking station if you are using a laptop.
Now, let’s explore the various methods you can use to make a program open on a specific monitor in Windows 10. These methods range from using Windows Settings to utilizing third-party software options, giving you the flexibility to choose the option that suits your needs best.
Why do you need to open a program on a specific monitor?
Opening a program on a specific monitor can provide several benefits, especially if you have multiple monitors connected to your Windows 10 computer. Here are a few reasons why you may want to consider this option:
- Improved Organization: When you work with multiple programs simultaneously, it’s easy for windows to get cluttered across all your screens. By opening a program on a specific monitor, you can keep related tasks and applications together. For example, you can have your email client always open on your left monitor while your web browser and document editor open on your right monitor.
- Enhanced Productivity: Having the ability to open a program on a specific monitor enables efficient multitasking. You can allocate specific tasks to different screens, allowing you to work on different projects or workflows concurrently. This can help streamline your workflow and maximize productivity by avoiding the need to constantly rearrange windows.
- Optimized Workflows: Many professionals, such as graphic designers, video editors, and software developers, often require multiple monitors to view projects, code, or timelines simultaneously. By assigning specific programs to designated monitors, you can optimize your workflow and seamlessly switch between different tasks. This can lead to a smoother and more efficient working experience.
- Personalized User Experience: Some individuals may prefer a specific display setup based on personal preference or physical factors. For example, if one of your monitors has better color accuracy, you may want to open image editing software on that monitor to ensure accurate color representation. Tailoring program placement based on personal preferences can enhance your overall user experience and make your computer setup more enjoyable to use.
These are just a few examples of why opening a program on a specific monitor can be advantageous. Whether it’s for organization, productivity, optimized workflows, or personalized user experience, being able to control where your programs open can greatly improve your Windows 10 multitasking capabilities. With the various methods available, you can easily configure your system to meet your specific needs and preferences.
Method 1: Using Windows Settings
Windows 10 provides built-in options that allow you to designate a specific monitor for a program to open on. This method requires accessing the application properties through the Windows Settings. Here’s how you can do it:
- Right-click on the program’s shortcut or executable file and select “Properties” from the context menu.
- In the Properties window, navigate to the “Compatibility” tab.
- Under the “Settings” section, click on the “Change high DPI settings” button.
- In the High DPI scaling override section, enable the “Override high DPI scaling behavior” checkbox.
- From the “Scaling performed by:” drop-down menu, select “Application”.
- Click on the “OK” button to save the changes and close the Properties window.
- Repeat the above steps for each program you want to open on a specific monitor.
By following these steps, you ensure that when you launch the designated program, it opens on the monitor you have specified, providing a consistent and tailored user experience. Keep in mind that not all programs will have these settings available, as it depends on how the program is designed. If the program does not have a “Compatibility” tab or the necessary options, you may need to explore alternative methods.
It’s worth noting that this method may not work for all situations or programs, as it relies on the program respecting the DPI scaling settings. However, for programs that do support DPI scaling overrides, this method can be a simple and effective solution to open them on a specific monitor. If you encounter any issues, consider exploring the next methods, which offer more flexibility and customization options.
Method 2: Using Display Settings
Windows 10 also provides an alternative method to open a program on a specific monitor by using the Display Settings. This method allows you to configure the default display for a specific program. Here’s how you can do it:
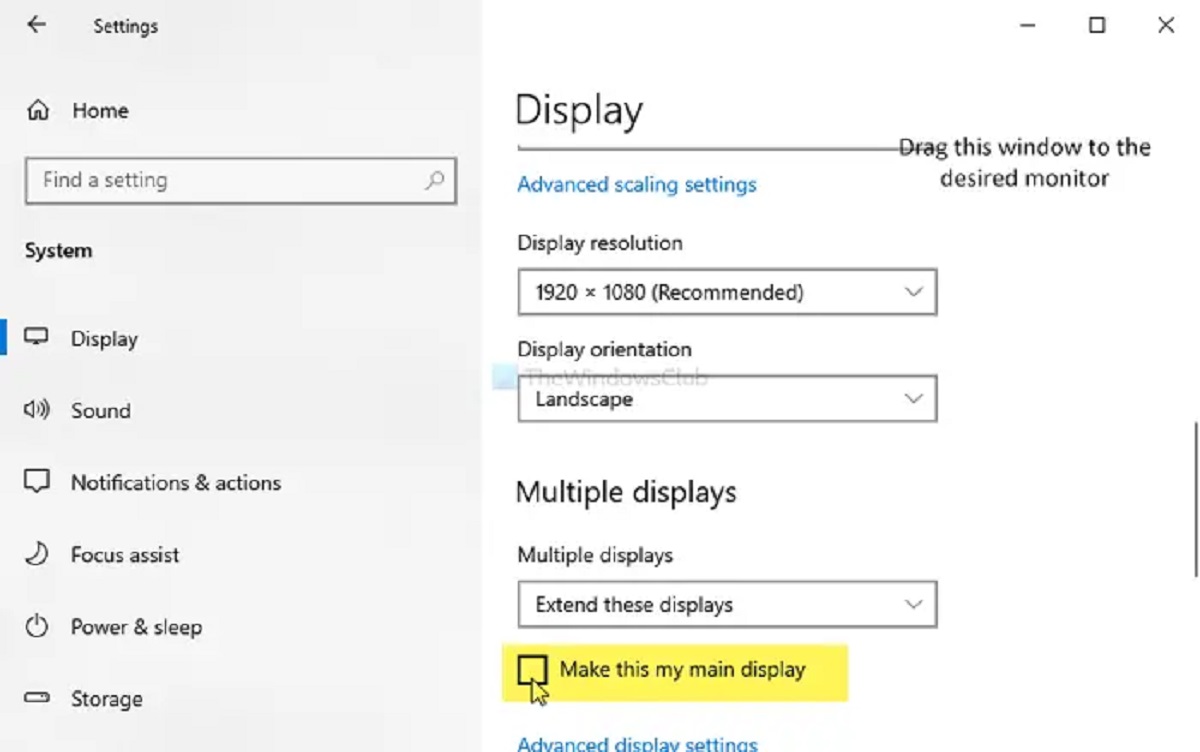
- Right-click on an empty area of the desktop and select “Display settings” from the context menu.
- In the Display Settings window, scroll down to the “Multiple displays” section and locate the monitor you want to set as the default for the program.
- If the monitor you want to set as the default is not detected, click on the “Detect” button to allow Windows to identify it.
- Scroll further down and click on the “Graphics settings” link.
- In the Graphics settings window, click on the “Browse” button under the “Select an app to set preference” section.
- Navigate to the program’s executable file (.exe), select it, and click on the “Add” button.
- Once the program is added, click on the program’s entry in the “Graphics performance preference” list.
- Click on the “Options” button.
- In the Options window, select the “Power saving” option to set the program to always use the default display.
- Click on the “Save” button to apply the changes.
- Repeat the above steps for each program you want to open on a specific monitor.
Using the Display Settings method allows you to specify the default display for a program, ensuring that it always opens on the designated monitor. This can be useful when the program does not have the compatibility settings mentioned in the previous method or when you want to define specific program preferences without affecting other programs.
Remember, not all programs may be compatible with this method, and some may override the default display settings. If you encounter any issues or limitations, you can explore the next method, which involves using third-party software to manage program placements on specific monitors.
Method 3: Using Third-Party Software
If the previous methods do not meet your specific requirements, or if you’re looking for more advanced features and customization options, there are third-party software solutions available that can help you open programs on specific monitors in Windows 10. These software tools offer more flexibility and allow you to fine-tune program placements according to your preferences. Here are a few popular options:
- DisplayFusion: DisplayFusion is a comprehensive multi-monitor management tool that allows you to create customized profiles for different monitor setups. It offers features such as assigning programs to specific monitors, creating window layouts, and managing wallpaper settings. DisplayFusion also includes keyboard shortcuts and taskbar customization for enhanced multitasking capabilities.
- Actual Multiple Monitors: Actual Multiple Monitors provides a range of tools to enhance the user experience on multiple monitors. You can set specific programs to open on desired monitors, create individual taskbars for each monitor, and configure different window management options. The software also supports virtual desktops and offers various customization options to suit your preferences.
- Ultramon: Ultramon is another popular choice for managing multiple monitors. It offers features like customizing wallpaper settings, taskbar extensions, and hotkey support. Ultramon allows you to allocate programs to specific monitors and provides additional options for window management, such as moving windows between monitors and maximizing them to a specific monitor.
These are just a few examples of the many third-party software options available. Each software solution may offer different features and pricing options, so it’s recommended to explore their websites to find the one that best fits your requirements. By using third-party software, you can have greater control over program placements and tailor your multi-monitor setup to suit your workflow and preferences.
Keep in mind that installing third-party software introduces additional complexity and may require a learning curve to utilize the offered functionalities effectively. Therefore, it’s important to research and choose a reputable software solution that is compatible with your Windows 10 system and provides the features you need. Additionally, some third-party software options may come with a cost, so evaluate the pricing options and trial versions before making a purchase decision.
Conclusion
Configuring programs to open on specific monitors in Windows 10 can greatly enhance your multitasking capabilities and improve overall productivity. By organizing your programs across multiple screens, you can streamline your workflows, optimize task allocation, and personalize your user experience.
In this article, we explored three methods to make a program open on a specific monitor in Windows 10. You can use Windows Settings to modify compatibility options for individual programs, ensuring they open on the desired monitor. The Display Settings method allows you to set default displays for specific programs, offering more control over program placements. For advanced features and customization options, third-party software like DisplayFusion, Actual Multiple Monitors, and Ultramon can provide a more comprehensive multi-monitor management experience.
When choosing a method, consider factors such as program compatibility, ease of use, and the level of customization you require. Experiment with different methods and find the one that suits your needs and preferences best. Remember to check the compatibility of any third-party software with your Windows 10 version and compare pricing options if necessary.
Opening programs on specific monitors can significantly improve your efficiency and create a more organized and enjoyable working environment. Take advantage of the available options to take control of your screen real estate and unlock the full potential of your multi-monitor setup in Windows 10.


