Introduction
Welcome to the world of DIY phone projectors! Are you looking for a fun and innovative way to enjoy your favorite videos and movies on a larger screen without breaking the bank? Look no further – a homemade phone projector might be just what you need.
With a few simple materials and some creativity, you can transform an ordinary shoebox into a mini cinema experience. Imagine gathering your friends and family, dimming the lights, and projecting your favorite content onto a blank wall. It’s the perfect way to enjoy movie nights, game days, or even share your latest vacation photos as a slideshow.
In this step-by-step guide, we’ll walk you through the process of creating your very own phone projector. Don’t worry if you’re not a tech expert or a DIY guru – this project is beginner-friendly and can be completed in just a few hours. So grab your materials, roll up your sleeves, and let’s turn your smartphone into a magical movie projector!
Before we dive into the how-to, let’s quickly go over the materials you’ll need. Make sure you have everything on hand before you get started to ensure a seamless DIY experience.
Materials Needed
Before you embark on your phone projector journey, it’s important to gather all the necessary materials. Each item plays a crucial role in bringing your DIY projector to life. Here’s a list of what you’ll need:
- A shoebox: Choose a shoebox that is large enough to fit your smartphone screen comfortably. A rectangular box is ideal for this project.
- A magnifying lens: Look for a convex lens with a focal length of around 50mm. You can find suitable lenses online or repurpose one from old optical devices like magnifying glasses or cameras.
- A ruler or measuring tape: This will come in handy when marking and measuring the necessary dimensions on your shoebox.
- A craft knife or scissors: You’ll need a sharp tool to cut holes and create openings in the shoebox. Exercise caution and adult supervision if working with younger DIYers.
- A marker or pen: To mark measurements and guidelines on the shoebox.
- Some black construction paper: This will be used to line the interior of the shoebox to improve the projection quality by reducing light leakage.
- Duct tape or glue: Depending on your preference, you’ll need one of these adhesive options to secure the lens holder and other components to the shoebox.
- A tripod or phone stand: This is optional, but having a stable and adjustable platform to hold your phone will make it easier to position and align the device with the projector.
These are the core materials required to build your phone projector. It’s always a good idea to gather all the components before starting the project to ensure a smooth and uninterrupted DIY process. Once you have everything ready, we can move on to the step-by-step instructions to bring your projector to life.
Step 1: Gather your materials
Before you jump into building your phone projector, take a moment to gather all the necessary materials. Having everything prepared and within reach will make the DIY process much smoother. Here’s a checklist to help you ensure you have everything you need:
- A shoebox: Find a shoebox that is large enough to accommodate your smartphone’s screen. A rectangular box typically works best for this project.
- A magnifying lens: Look for a convex lens with a focal length of around 50mm. You can purchase one online or repurpose a lens from an old magnifying glass or camera.
- A ruler or measuring tape: This will come in handy for marking and measuring dimensions on the shoebox.
- A craft knife or scissors: You’ll need a sharp tool to cut holes and create openings in the shoebox. Be cautious and seek adult supervision if younger DIYers are involved.
- A marker or pen: Use a marker or pen to mark measurements and guidelines on the shoebox.
- Black construction paper: Line the interior of the shoebox with black construction paper to improve projection quality by reducing light leakage.
- Duct tape or glue: Choose either duct tape or glue to secure the lens holder and other components to the shoebox.
- A tripod or phone stand (optional): Having a stable and adjustable platform to hold your phone will make it easier to position and align the device with the projector.
Once you have all the necessary materials in one place, you’re ready to move on to the next step of building your homemade phone projector. Remember, patience and attention to detail are key to creating a successful projector. So, take your time and enjoy the process. Soon, you’ll be enjoying your favorite movies and videos on a larger screen!
Step 2: Prepare your phone
Now that you have gathered all the necessary materials, it’s time to prepare your phone for the projector setup. Here are the steps to follow:
- Disable auto-rotate: To prevent your phone’s screen from rotating during projection, disable the auto-rotate feature. This can usually be done by swiping down on your screen to access the quick settings menu, then tapping the auto-rotate icon to turn it off.
- Adjust brightness: Set your phone’s brightness to a medium or lower level. This will help enhance the visibility and clarity of the projected image.
- Enable “Do Not Disturb” mode: To avoid interruptions during your viewing experience, enable “Do Not Disturb” mode or silence your phone. This will ensure that calls, messages, and notifications do not disrupt the projection.
- Orientation lock: If your phone has an orientation lock feature, activate it to prevent the screen orientation from changing accidentally.
- Clean your phone’s screen: Wipe the screen of your phone clean to remove any smudges, fingerprints, or dust. A clear screen will result in a better projection quality.
By following these steps, you are preparing your phone to work seamlessly with the projector setup. Once your phone is ready, we can move on to preparing the shoebox for the projector assembly.
Step 3: Prepare the shoebox
With your phone ready, it’s time to prepare the shoebox for the projector assembly. Follow these steps to get started:
- Remove the lid: Take off the lid of the shoebox and set it aside. You’ll only need the main body of the box for this project.
- Measure your phone: Place your phone horizontally on the shoebox and position it roughly in the center. Mark the length and width of your phone on the box using a marker or pen. Leave a little extra space around the edges for easy positioning.
- Mark the lens position: Now, measure and mark the position of the lens on the shorter side of the shoebox. Make sure the mark is aligned with the center of the phone’s width, as this will determine the projection angle.
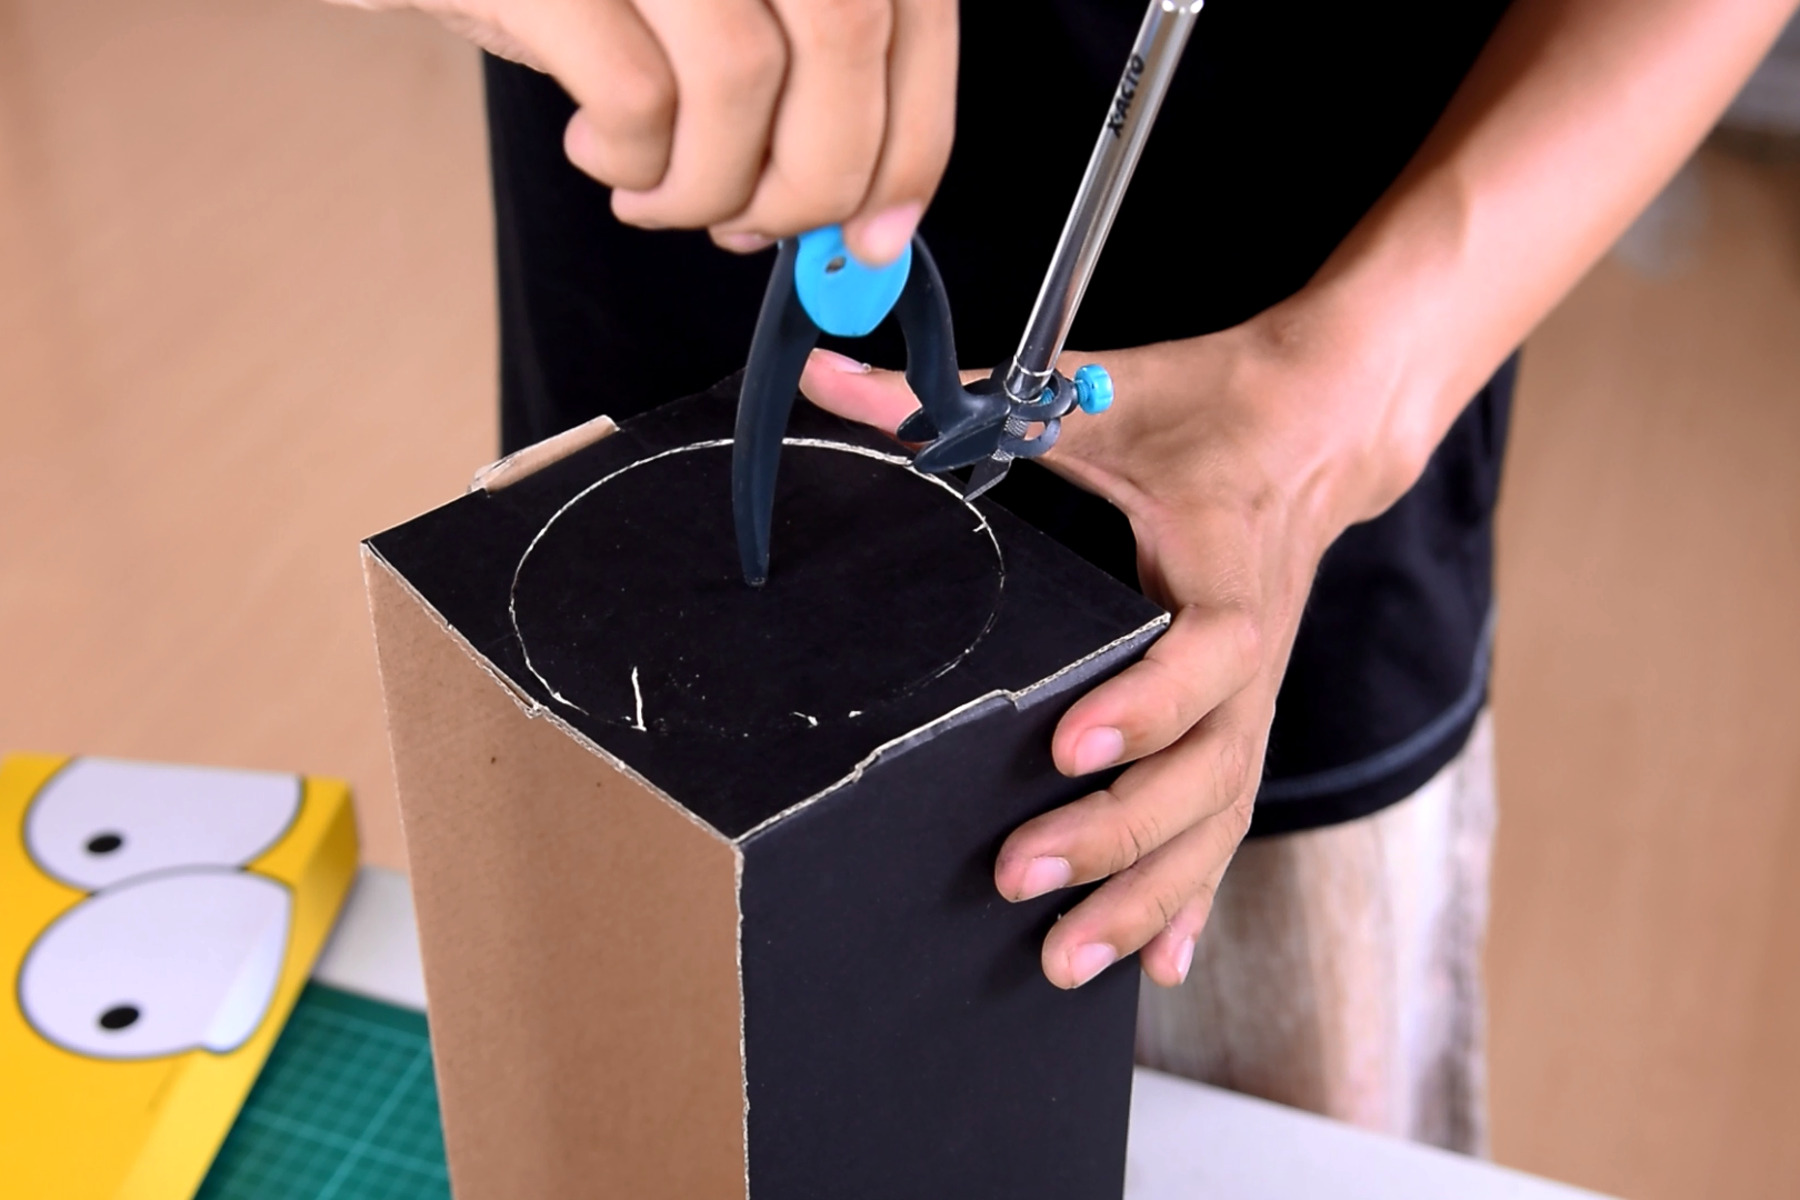
- Cut out the holes: Using a craft knife or scissors, carefully cut out the marked phone area on the top panel of the shoebox. This hole will serve as the projection opening.
- Line the interior: Cut a piece of black construction paper to fit the interior of the shoebox. Attach it using glue or double-sided tape to improve the projection quality by preventing light leakage.
Once you’ve completed these steps, your shoebox is now ready to be transformed into a projector. The next step involves creating a lens holder to securely hold the magnifying lens in place.
Step 4: Create a lens holder
In this step, you’ll create a lens holder to securely hold the magnifying lens in place. Follow these steps to proceed:
- Measure the diameter of the lens: Using a ruler or measuring tape, determine the diameter of your magnifying lens.
- Draw a circle: On a piece of thick cardstock or any sturdy material, draw a circle with a diameter slightly smaller than the lens. This will serve as the base of your lens holder.
- Cut out the circle: Carefully cut along the drawn circle, making sure to have a neat and precise shape.
- Create support wings: Cut two rectangular strips from the remaining cardstock, each approximately 1 inch wide and 2 inches long. These will serve as support wings to hold the lens in place.
- Attach the wings: Glue or tape the support wings vertically onto the backside of the circular base. The wings should be aligned in a way that allows the lens to sit securely between them.
- Secure the lens holder: Attach the lens holder to the inside of the shoebox, positioning it over the hole you cut out earlier. Make sure the lens holder is centered and secure it with glue or duct tape.
By creating a lens holder, you’ll ensure that the magnifying lens remains perfectly positioned for optimal projection. With this step completed, it’s time to move on to the next step: attaching the lens to the holder.
Step 5: Attach the lens holder to the box
With the lens holder created, it’s time to attach it securely to the shoebox. Follow these steps to proceed:
- Position the lens holder: Place the lens holder onto the box, aligning it with the hole you cut out earlier. Ensure that the lens holder is centered and parallel to the base of the shoebox.
- Secure the lens holder: Use glue or duct tape to attach the lens holder firmly to the inside of the shoebox. Make sure to apply enough adhesive to hold it securely in place.
- Double-check the alignment: Before moving on, check that the lens holder is properly aligned and level. Adjust if necessary to ensure that the lens will be perfectly centered over the hole.
Attaching the lens holder to the shoebox is a crucial step in ensuring the stability and accuracy of the projection. Once you’ve securely attached the lens holder, it’s time to move on to the next step: inserting the magnifying lens.
Step 6: Insert the lens
Now that the lens holder is securely attached, it’s time to insert the magnifying lens. Follow these steps to proceed:
- Place the lens in the holder: Carefully place the magnifying lens in the circular slot of the lens holder. Ensure that the lens is positioned convex side facing outwards, as this will help focus and enlarge the projected image.
- Check the alignment: Double-check to make sure the lens is centered within the holder. Adjust if necessary to achieve optimal positioning.
- Secure the lens: If needed, use a small amount of glue or tape around the edges of the lens to hold it securely in place within the holder. Be careful not to cover the lens surface.
By properly inserting the magnifying lens into the lens holder, you’re ensuring that the projected image will be clear and focused. With the lens securely in place, it’s time to move on to the next step: securing your phone within the shoebox.
Step 7: Secure the phone
Now that your lens is in place, it’s time to secure your phone within the shoebox to ensure stable and consistent projection. Follow these steps to proceed:
- Prepare the phone position: Position your phone horizontally within the shoebox, aligning it with the projection hole. Make sure the screen is facing towards the lens.
- Mark the phone position: Use a marker or pen to trace an outline around your phone on the interior side of the shoebox. This will serve as a guide for placing your phone in the correct position each time.
- Create phone wedges (optional): To hold your phone in place more securely, you can create small wedges from folded paper or use small pieces of foam. Place these wedges on either side of your phone to prevent it from moving or sliding during projection.
- Secure the phone: Use duct tape or small clamps to hold your phone in place within the shoebox. Attach the tape or clamps to the edges of the shoebox, ensuring a snug and stable fit for your phone.
By securing your phone within the shoebox, you’ll prevent any unwanted movement or shifting during the projection. This step is important for maintaining a steady and clear image. With your phone securely in place, it’s time to move on to the next step: adjusting the focus of your projector.
Step 8: Adjust the focus
Now that your phone is secured in the projector, it’s time to fine-tune the focus for optimal projection quality. Follow these steps to adjust the focus:
- Position the projector: Set up your projector in a dark room or dimly lit area. Position it at a suitable distance from the projection surface, ensuring that the image will be projected at the desired size.
- Turn on your phone’s flashlight: Open a bright image or a white screen on your phone, and activate the flashlight feature. This will provide a clear reference point for focusing.
- Move the phone closer or farther: Adjust the distance between the lens and your phone by carefully sliding your phone back and forth within the shoebox. Observe the projected image and aim for a clear and focused display.
- Experiment with distance and focus: Gradually move your phone closer or farther from the lens to find the optimal position that produces the sharpest and clearest image. Take your time to fine-tune the focus until you’re satisfied with the projection quality.
Adjusting the focus is crucial for achieving a sharp and clear projection. Remember that small movements can have a significant impact on the quality of the image. Once you’re confident with the focus adjustment, you’re ready to move on to the next step: setting up a dark room for the best viewing experience.
Step 9: Set up a dark room
Creating a dark room environment is essential to maximize the quality of your projected image. Follow these steps to set up a dark room for the best viewing experience:
- Close curtains and blinds: Start by closing the curtains, blinds, or any window coverings in the room. This will help minimize external light interference.
- Turn off ambient lights: Switch off any unnecessary lights in the room, including overhead lights, desk lamps, or table lamps. Dimming the room as much as possible will enhance the visibility and clarity of the projected image.
- Block light leaks: Inspect the room for any sources of light leaks. Seal off any cracks or gaps in the windows, doors, or walls using blackout curtains, blankets, or cardboard. This will prevent external light from seeping into the room and affecting the projection quality.
- Create a screen: If you don’t have a blank wall available for projection, you can create a makeshift screen using a white sheet or a large white poster board. Hang it on a wall or attach it to a flat surface for a clean and smooth projection surface.
By setting up a dark room, you’ll be able to fully immerse yourself in the projected images without any distractions or interference. Enjoy a cinema-like experience in the comfort of your own home with a properly darkened room. Once the room is prepared, it’s time to proceed to the final step: testing your phone projector!
Step 10: Test your phone projector
After all the hard work and preparation, it’s time to put your phone projector to the test! Follow these steps to ensure a successful projection:
- Turn off the lights: Make sure the room is as dark as possible to enhance the projected image visibility.
- Position the projector: Set up your projector on a stable surface and aim it towards the projection screen or wall.
- Turn on your phone: Open a video, movie, or any content you want to project on your phone.
- Align the phone: Adjust the position of your phone within the shoebox, ensuring that the screen aligns with the projection hole and the image fills the screen.
- Adjust the focus: Fine-tune the focus by moving your phone slightly closer or farther from the lens. Aim for a sharp and clear image.
- Start the projection: Once everything is aligned and in focus, start playing the content on your phone. Enjoy the projected image on the screen or wall as it comes to life.
- Make additional adjustments if necessary: If the image appears dim or blurry, double-check the focus, distance, and the darkness of the room. Make any necessary adjustments to optimize the projection quality.
Take the time to experiment and try out different content on your phone projector. Watch movies, videos, or even showcase a photo slideshow. Invite friends and family to enjoy the experience with you. The possibilities are endless with your homemade phone projector!
Remember, practice makes perfect. If you encounter any issues or feel unsatisfied with the projection quality, don’t hesitate to readjust the focus or make small changes to improve the experience. Enjoy your newfound DIY phone projector and let it bring endless entertainment to your home.
Conclusion
Congratulations! You’ve successfully created your very own phone projector from a simple shoebox. With just a few materials and some creativity, you’ve transformed your smartphone into a powerful tool for projecting movies, videos, and photos onto a larger screen. It’s a cost-effective and fun way to enjoy a cinematic experience from the comfort of your own home.
Throughout this DIY journey, you’ve learned how to gather the necessary materials, prepare your phone, and transform a shoebox into a projector. You’ve mastered the art of adjusting focus, setting up a dark room, and testing the projector to ensure optimal performance.
Now, it’s time to sit back, relax, and enjoy your favorite content like never before. Whether you’re having a cozy movie night with loved ones, sharing memorable photos from your latest excursion, or immersing yourself in thrilling gameplay, your homemade phone projector will enhance the experience.
Remember, this project allows for creativity and personalization. Don’t hesitate to tinker and experiment with different materials or techniques to further improve your projector. The possibilities for customization are endless, and you can continue to refine your setup to achieve the best results for your specific needs.
We hope you’ve enjoyed this DIY adventure and that your new phone projector brings countless hours of entertainment and enjoyment. So, dim the lights, grab some popcorn, and let your homemade projector transport you to a world of big-screen magic!