Introduction
Welcome to the world of blazing-fast storage! If you’ve been struggling with slow boot times and sluggish performance on your laptop, it’s time to consider upgrading to a solid state drive (SSD). In this guide, we’ll take you through the step-by-step process of installing an SSD in your laptop to boost its speed and overall performance.
With the increasing demand for faster and more efficient storage solutions, solid state drives have become the go-to choice for many users. Unlike traditional hard drives that rely on spinning disks and moving parts, SSDs utilize flash memory technology to store data. This not only results in faster read and write speeds but also enhances durability and energy efficiency.
Upgrading to an SSD can make a world of difference in your computing experience. You’ll notice drastically reduced boot times, faster application launches, and overall snappier performance. But before we delve into the installation process, let’s discuss a few important preparations to ensure a smooth and successful upgrade.
Whether you’re a tech enthusiast or a beginner, this guide will walk you through each step in detail, ensuring that you can confidently install a solid state drive in your laptop. So, let’s dive in and give your laptop the speed boost it deserves!
Preparing for the Installation
Before diving into the installation process, it’s essential to take a few preparatory steps to ensure a smooth and hassle-free upgrade.
1. Research and Compatibility: Start by researching your laptop model and its compatibility with solid state drives. Check the manufacturer’s website or user manual to determine whether your laptop supports SSD installation. You can also consult online forums or communities for user experiences with similar laptop models.
2. Backup Your Data: It’s crucial to back up all important data on your existing hard drive before proceeding with the installation. This step ensures that you don’t lose any critical files during the process. You can use an external hard drive, a cloud storage service, or a backup software to create a copy of your data.
3. Check Available Storage Space: Take a look at the available storage space on your existing hard drive. SSDs can be of various capacities, so consider your usage requirements and select an SSD with sufficient storage capacity to meet your needs.
4. Obtain Necessary Tools: Gather the necessary tools for the installation process. These typically include a screwdriver, an anti-static wrist strap to prevent static discharge, and any additional tools specific to your laptop model. Refer to the laptop’s user manual or online resources to determine the required tools.
5. Update Firmware and BIOS: Check for any available firmware or BIOS updates for your laptop. Updating these components prior to the installation can enhance compatibility and performance, ensuring a smooth installation process.
6. Create a Clean Workspace: Clear a clean and well-lit workspace to perform the installation. Use a soft cloth or an anti-static mat to protect your laptop and components from any static electricity or debris.
By following these preparatory steps, you’ll be well-equipped and ready to proceed with the installation process. Remember, thorough preparation is key to ensuring a successful SSD upgrade for your laptop.
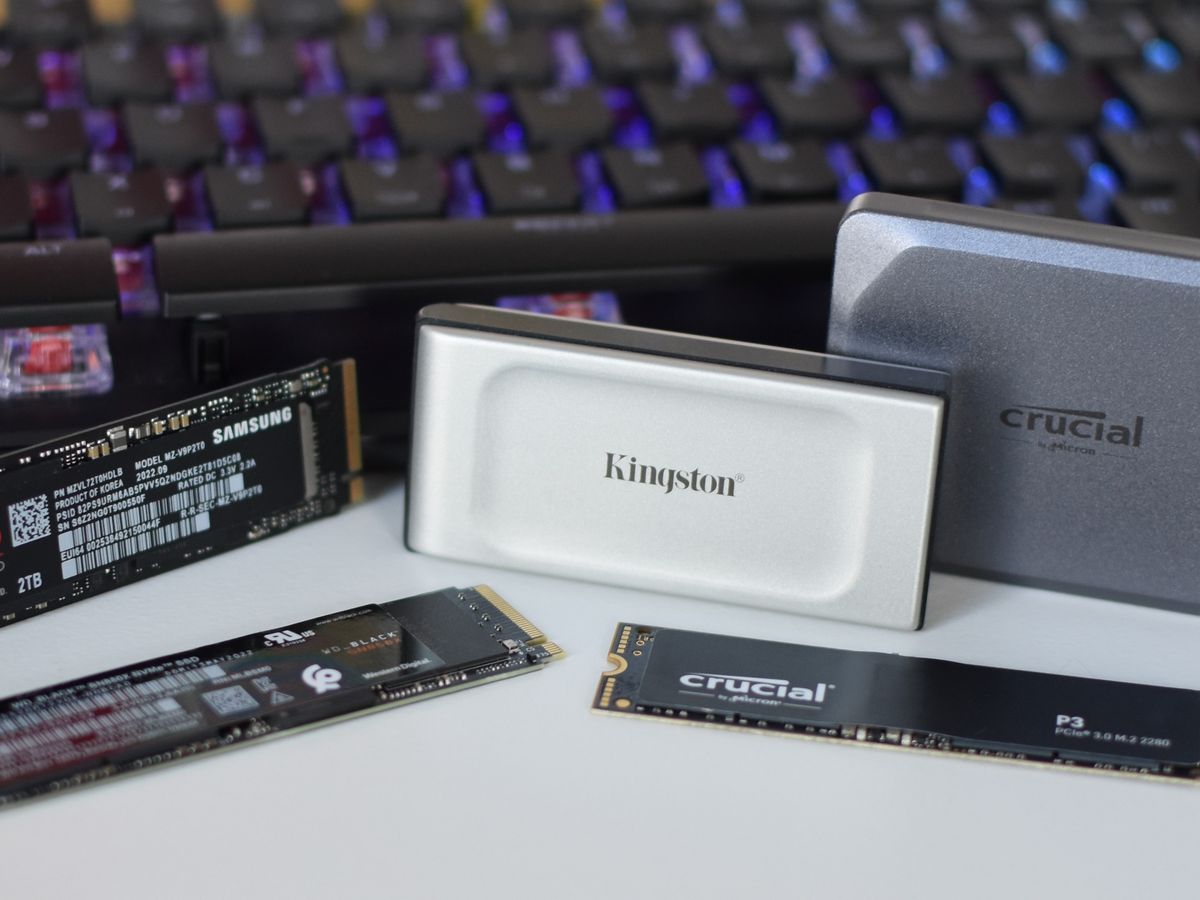
Choosing the Right Solid State Drive
When it comes to selecting the right solid state drive (SSD) for your laptop, there are a few key factors to consider. These considerations will help you make an informed decision and ensure that the SSD meets your specific needs and requirements.
1. Storage Capacity: Determine the amount of storage capacity you require. SSDs are available in various capacities ranging from 128GB to several terabytes. Consider your usage habits and the types of files you typically work with to determine the appropriate capacity for your needs.
2. Form Factor: Check the form factor supported by your laptop. Common form factors include 2.5-inch and M.2. Ensure that the SSD you choose is compatible with your laptop’s form factor to ensure a proper fit.
3. Read and Write Speeds: Pay attention to the SSD’s read and write speeds. Higher speeds indicate faster data transfer, resulting in improved performance. If you regularly work with large files or require faster data access, consider opting for an SSD with higher read and write speeds.
4. Interface: Consider the interface compatibility of the SSD. SATA (Serial ATA) is the most common interface for laptop SSDs, available in SATA II, SATA III, and the latest SATA III versions. Ensure that your laptop supports the interface of the SSD you intend to purchase.
5. Budget: Set a budget for your SSD upgrade. SSD prices vary based on capacity, brand, and performance. Determine a balance between your requirements and budget to find the best SSD that meets your needs without stretching your finances.
6. Brand and Warranty: Select a reputable brand that offers reliable products and good customer support. Check for warranty information as well, as a longer warranty period indicates the manufacturer’s confidence in their product’s longevity.
Taking these factors into account will help you choose an SSD that is compatible with your laptop and provides the performance and capacity you desire. Do some research, read reviews, and compare options to make an informed decision that will benefit your laptop in the long run.
Backing Up Your Data
Before proceeding with the installation of a solid state drive (SSD) in your laptop, it’s crucial to back up all your important data. This ensures that you don’t lose any valuable files during the upgrade process. Here’s a step-by-step guide on how to backup your data:
1. Determine the Backup Method: Choose the backup method that suits your needs. You can use an external hard drive, a cloud storage service, or backup software. Consider the amount of data you need to backup and the convenience of each method.
2. Organize and Prioritize Your Data: Take some time to organize your files and identify the important ones that need to be backed up. This will help streamline the backup process and ensure that you don’t miss any crucial data.
3. External Hard Drive Backup: If you have an external hard drive, connect it to your laptop. Use the backup software or manually copy and paste the files and folders you want to backup onto the external drive. Make sure to create a folder structure that is easy to navigate and locate your files in the future.
4. Cloud Storage Backup: If you prefer cloud storage, sign up for a reliable service such as Dropbox, Google Drive, or Microsoft OneDrive. Install the necessary software/applications on your laptop, and follow the instructions to sync your files to the cloud. Make sure to select the appropriate folders and files to be backed up.
5. Backup Software: If you opt for backup software, install the software on your laptop and configure the backup settings. Customize the backup schedule, select the files and folders to be backed up, and choose a destination for the backups to be saved.
6. Verify Your Backup: Once the backup is complete, take a few moments to verify that all your important files have been successfully backed up. Double-check the folders and files in your backup destination to ensure they are intact and can be easily accessed.
Remember, backing up your data is crucial before making any changes to your laptop’s storage. It ensures that your files are safe and can be restored in case of any unforeseen issues during the SSD installation process. So, take the time to back up your data and have peace of mind throughout the upgrade process.
Gathering the Necessary Tools
Before you start the process of installing a solid state drive (SSD) in your laptop, it’s important to gather all the necessary tools. Having the right tools on hand will ensure a smooth and efficient installation process. Here are the tools you’ll likely need:
1. Screwdriver: Most laptops require a Phillips or Torx screwdriver to open the case and remove the hard drive. Check the user manual or online resources for your laptop model to determine which type of screwdriver is needed.
2. Anti-Static Wrist Strap: To prevent any static discharge from damaging your laptop’s components, use an anti-static wrist strap. This will ground you and minimize the risk of static electricity damaging sensitive electronics.
3. SSD Mounting Bracket: Depending on the form factor of your SSD and the slot available in your laptop, you may need an SSD mounting bracket or adapter. This ensures that the SSD stays securely in place inside the laptop.
4. SATA Cable (if required): If your laptop uses a different interface than the SSD you’ve chosen, you may need a SATA cable to connect the SSD to the appropriate slot inside the laptop.
5. Cleaning Cloth: A soft, lint-free cleaning cloth is handy for wiping down the laptop’s exterior and removing any dust or debris that may have accumulated. Keeping your laptop clean will help prevent any dirt from entering the internal components during the installation process.
6. USB Flash Drive: If you plan to install a fresh operating system on your new SSD, you may need a USB flash drive to create a bootable installation drive. Check the operating system’s official website for instructions on creating a bootable USB drive.
7. User Manual and Online Resources: Make sure to have the user manual for your laptop model readily available. In addition, bookmark online resources such as video tutorials or forum threads that provide step-by-step guidance for your specific laptop model.
8. External Hard Drive (optional): If you’ve already backed up your data, having an external hard drive to transfer your files back onto the newly installed SSD can be helpful. This allows for a seamless transition and easy access to your files.
By gathering these tools before starting the installation process, you’ll have everything you need to successfully replace the hard drive in your laptop with a new solid state drive. It’s worth taking the time to ensure you have the right tools to avoid any unnecessary disruptions or delays during the installation process.
Opening the Laptop Case
Before you can replace the existing hard drive with a solid state drive (SSD) in your laptop, you’ll need to open the laptop case. This process may vary slightly depending on your laptop model, but the general steps are as follows:
1. Power Off and Disconnect: Make sure your laptop is turned off and disconnected from any power source or peripherals. This step is crucial to prevent any electrical accidents or damage to the internal components.
2. Locate the Access Panel: Some laptops have a designated access panel on the bottom or side, while others require removing the entire bottom cover. Consult the user manual or research online to determine the exact location of the access panel for your laptop model.
3. Remove Screws: Use the appropriate screwdriver to remove the screws securing the access panel. Set the screws aside in a safe place to ensure they don’t get misplaced during the installation process. Some laptops may have different-sized screws, so keep track of which screws go where.
4. Remove the Access Panel: Once the screws are removed, carefully lift or slide off the access panel. Be gentle to avoid putting too much pressure on any internal components. If there are any clips or additional screws holding the panel in place, ensure they are also released.
5. Ground Yourself: To prevent any static discharge that could damage the laptop’s internal components, wear an anti-static wrist strap or regularly ground yourself by touching a metal surface. This step is especially important if you’re working on a carpeted or static-prone workspace.
6. Locate the Hard Drive: Locate the existing hard drive inside the laptop. It is typically located in a drive bay or secured with screws or brackets. Take note of the cables and connections attached to the hard drive.
7. Disconnect Cables: Carefully disconnect any cables or connectors attached to the hard drive. There may be a SATA data cable and a power cable that need to be gently detached. Take note of their orientation for future reference.
8. Remove the Hard Drive: Once the cables are disconnected, remove any screws or brackets securing the hard drive in place. Carefully lift the hard drive out of the drive bay, ensuring that you don’t damage any of the surrounding components or cables.
By following these steps, you will successfully open the laptop case and gain access to the existing hard drive. Remember to take your time and be gentle during this process to avoid any damage to the laptop’s internal components. Once the case is open, you can proceed to the next steps in replacing the hard drive with the new SSD.
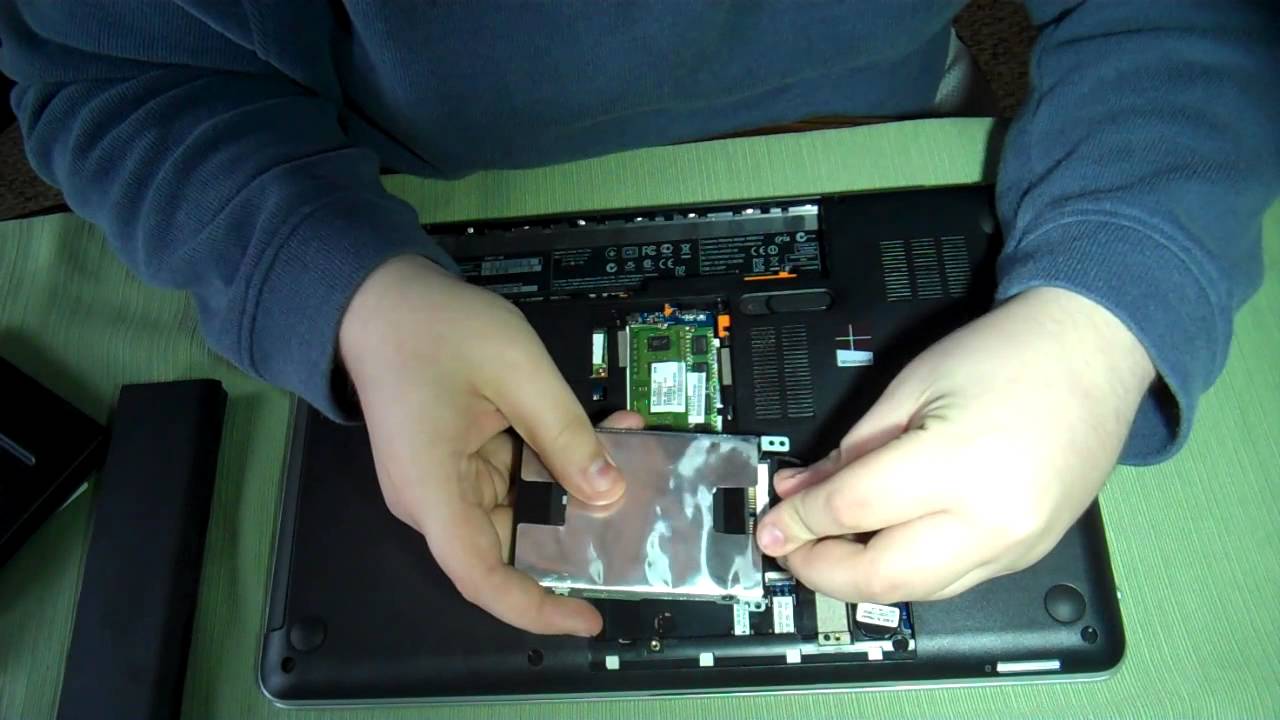
Removing the Existing Hard Drive
Now that you have successfully opened the laptop case, it’s time to remove the existing hard drive and make way for the new solid state drive (SSD). Follow these steps to safely remove the old hard drive:
1. Disconnect remaining cables: Double-check for any remaining cables connected to the hard drive. Depending on your laptop model, there may be additional cables or connectors that need to be disconnected. Take note of their location and orientation before detaching them.
2. Remove mounting brackets or screws: Look for any mounting brackets or screws that secure the hard drive in place. Carefully remove these screws or brackets, ensuring that you keep them in a safe place for later use. Take note of the number and arrangement of the screws, as it may vary depending on your laptop model.
3. Gently slide out the hard drive: Once all cables and mounting hardware are detached, gently slide or lift the hard drive out of the drive bay. Be cautious not to apply excessive force or damage any surrounding components in the process. If the hard drive is secured by rails or brackets, carefully unhook or unscrew them.
4. Set aside the old hard drive: Set the removed hard drive aside in a safe location, ensuring that it is protected from any physical damage. If you plan to reuse the hard drive or extract data from it, handle it with care to avoid any static or physical damage.
Removing the existing hard drive requires attention to detail and careful handling of delicate components. Take your time and proceed methodically to ensure that the removal process goes smoothly. With the old hard drive now removed, you are ready to install the new solid state drive in your laptop and experience improved performance and faster data access.
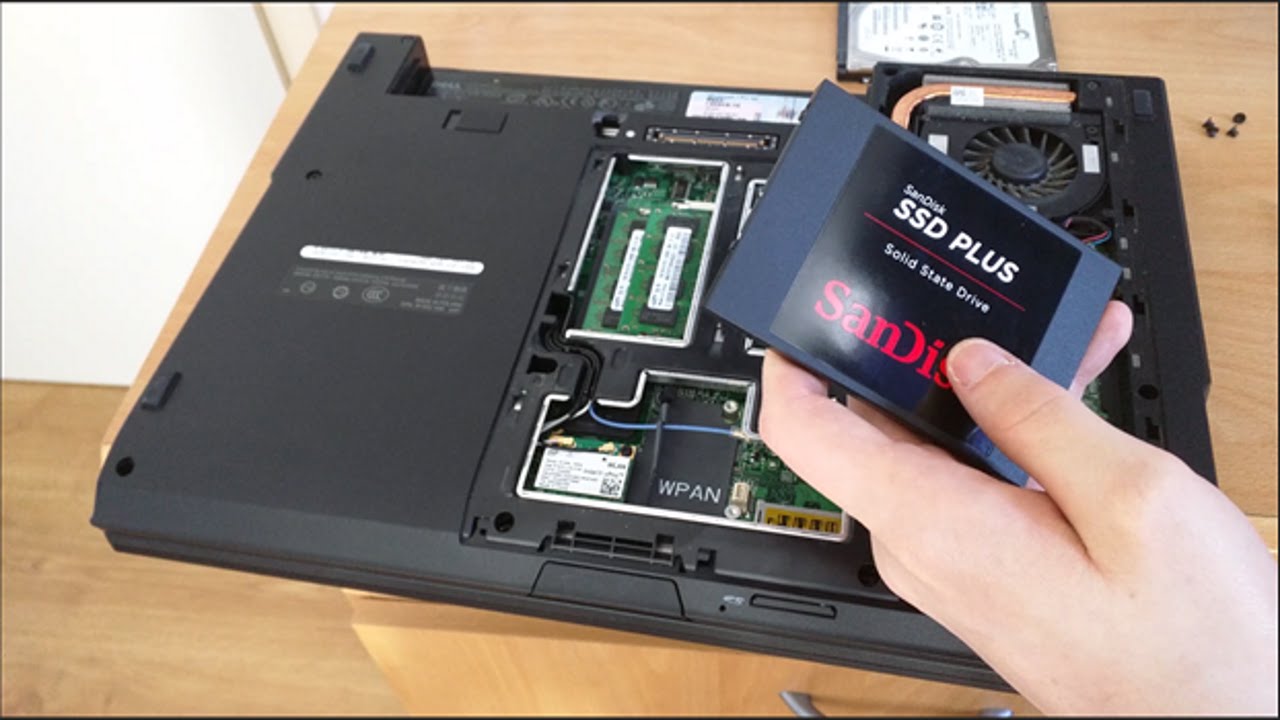
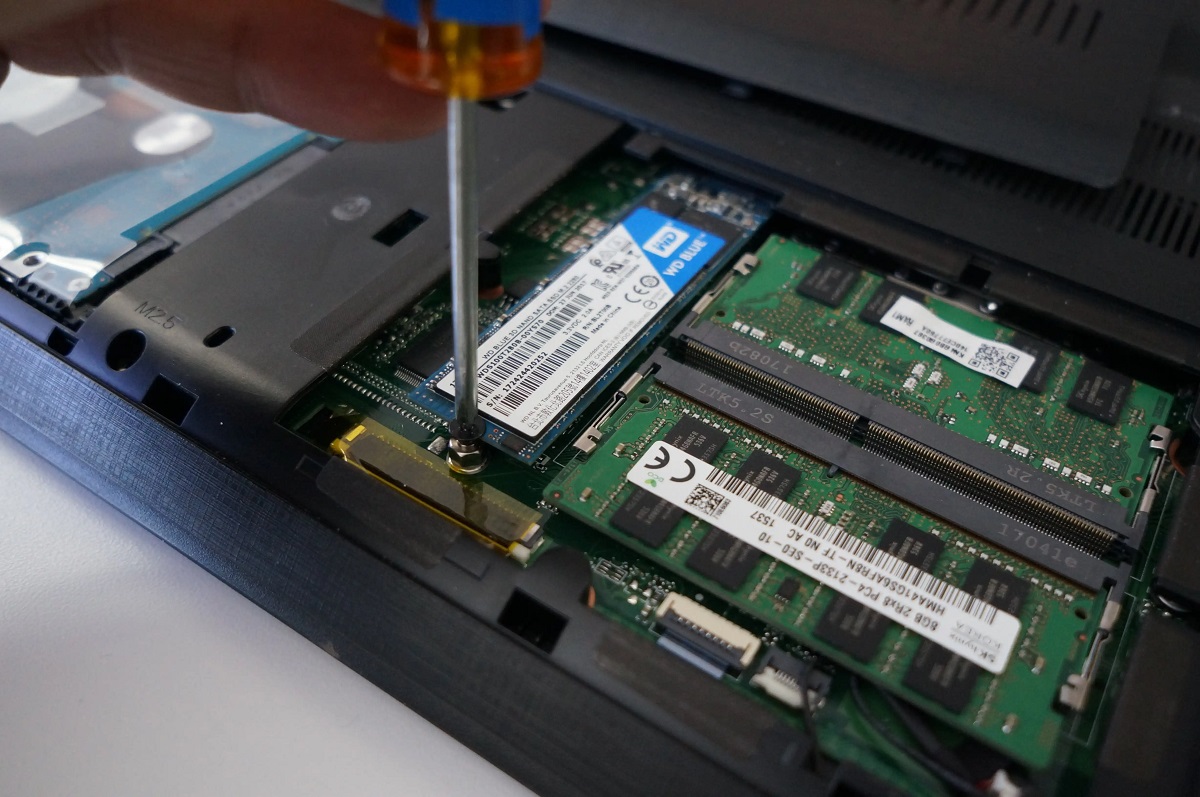
Installing the Solid State Drive
With the old hard drive removed, it’s time to install the new solid state drive (SSD) into your laptop. Follow these steps to ensure a successful installation:
1. Position the SSD: Take the new SSD and position it correctly in the drive bay. Align the SATA interface on the SSD with the corresponding connector in the laptop. If using a mounting bracket or adapter, ensure that it is securely attached to the SSD.
2. Secure the SSD: Depending on your laptop model, you may need to use mounting screws or brackets to secure the SSD in place. Carefully insert and tighten the screws or secure the brackets to ensure that the SSD is firmly held and doesn’t move during operation.
3. Connect the SATA Data Cable: Attach one end of the SATA data cable to the SSD and the other end to the corresponding SATA connector in the laptop. Ensure a snug connection without applying excessive force. Double-check the orientation of the cable and connector to make sure they align correctly.
4. Connect the Power Cable: Connect the power cable to the power connector on the SSD. This provides the necessary power for the SSD to operate. Again, ensure a secure and proper connection without applying excessive force.
5. Replace any brackets or screws: If you removed any brackets or screws from the drive bay during the removal of the old hard drive, reattach them to secure the SSD in place. Confirm that all screws are tightened properly, but be careful not to overtighten them.
6. Close the laptop case: Carefully reattach the access panel or bottom cover of your laptop to close the case. Align the edges properly and use the previously removed screws to secure the panel in place.
By following these steps, you will successfully install the new solid state drive in your laptop. Ensure that all connections are secure, and the SSD is firmly attached to the drive bay. Once the installation is complete, you are ready for the next steps of setting up the operating system and transferring data onto the new SSD.
Closing and Securing the Laptop Case
After successfully installing the new solid state drive (SSD) in your laptop, it’s time to close and secure the laptop case to ensure everything is in place. Follow these steps to properly close and secure the laptop case:
1. Align the Access Panel: Place the access panel or bottom cover back onto the laptop, aligning it with the screw holes on the laptop’s chassis. Ensure that it fits snugly without any gaps or misalignment.
2. Reinsert the Screws: Take the screws that you previously removed and carefully reinsert them into the corresponding screw holes on the laptop case. Start by loosely screwing them in before tightening them gradually in a diagonal pattern to ensure even tension.
3. Test the Case Closure: Gently press down on the laptop case to ensure that it is securely closed and there are no loose or protruding parts. The case should be flush with the laptop’s edges and provide a secure enclosure for the internal components.
4. Verify Screw Placement: Double-check that all the screws are in the correct locations and properly tightened. Ensure that no screws are missing and that they are all snugly secured. This will prevent any loose screws from interfering with the laptop’s functionality.
5. Power On and Confirm Stability: Power on the laptop and pay attention to any unusual noises or movements. If everything seems stable and there are no issues, it indicates that the laptop case is securely closed and the SSD is properly installed.
6. Perform a Functionality Test: To ensure that the laptop is functioning optimally, test its performance by running some basic operations, such as opening applications and accessing files. If the laptop operates smoothly and the SSD functions without any issues, it indicates a successful installation.
By carefully following these steps, you will effectively close and secure the laptop case after installing a new solid state drive. Properly securing the case ensures the safety and stability of the internal components and provides an optimal environment for the SSD to deliver its improved performance benefits.
Installing the Operating System
After successfully installing the solid state drive (SSD) in your laptop, the next step is to install the operating system (OS) onto the new drive. Here’s a step-by-step guide to help you with the installation process:
1. Create a Bootable Installation Media: If you don’t already have a bootable USB drive or DVD with the OS installation files, you’ll need to create one. Visit the official website of your chosen operating system and follow the instructions to create a bootable media. This step may involve downloading and running a media creation tool.
2. Boot from the Installation Media: Insert the bootable installation USB drive or DVD into your laptop. Restart the laptop and access the BIOS settings by pressing the designated key (usually F2, F12, or Del) during startup. Configure the BIOS to boot from the installation media.
3. Start the Installation Process: Once the laptop boots from the installation media, follow the on-screen instructions to start the OS installation process. Select your preferred language, time zone, and keyboard layout. Choose the option to perform a “Custom” or “Advanced” installation.
4. Select the SSD as the Installation Destination: During the installation process, you will be prompted to choose the installation destination. Select the SSD as the destination drive. If necessary, format the SSD to ensure a clean installation. Be cautious when selecting the drive to avoid accidentally formatting any other drives.
5. Follow the On-Screen Prompts: Continue following the on-screen prompts to complete the installation process. This may involve configuring user settings, creating a username and password, and selecting optional preferences such as privacy and security settings.
6. Complete the Installation and Updates: Once the installation is complete, the laptop will restart, and you’ll be prompted to log in to your newly installed operating system. Connect to a network and check for any available updates for the OS. Install these updates to ensure that your system is up to date with the latest security patches and improvements.
By following these steps, you’ll be able to install the operating system on your newly installed SSD. Remember to save any necessary drivers or applications that you may need during or after the installation. Enjoy the improved performance and responsiveness that the new SSD brings to your laptop!
Transferring Data from the Backup
Once you have installed the operating system on your new solid state drive (SSD), it’s time to transfer your data from the backup onto the SSD. Follow these steps to ensure a smooth and successful data transfer:
1. Connect the Backup Storage: If you backed up your data to an external hard drive or cloud storage, connect the storage device to your laptop. Make sure it is recognized by the operating system and accessible.
2. Locate Your Backed Up Data: Navigate to the location where you stored your backed-up data. This may be a specific folder on the backup storage device or a cloud storage service. Locate and open the folder that contains your data.
3. Transfer Data Manually: If you backed up your data manually by copying and pasting files, you can now transfer them to the appropriate folders on your SSD. Open the destination folder on the SSD and drag and drop the files from the backup storage onto the SSD. Repeat this process for each folder or file you want to transfer.
4. Restore Data using Backup Software: If you used backup software to create the backup, open the software and follow the instructions to restore your data. Most backup software provides a simple interface with options to select the files and folders you want to restore. Choose the desired data and initiate the restoration process.
5. Organize and Verify: Once the data transfer is complete, take some time to organize your transferred files and folders on the SSD. Ensure that they are in the correct locations and that any necessary settings, such as file permissions or access rights, are properly configured. Verify that all your important data is present and accessible on the SSD.
6. Delete the Backup: After confirming the successful transfer of your data, you can delete the backup files from the external hard drive or cloud storage, if desired. This will help free up storage space and ensure that you are working with the most up-to-date data on your SSD.
By following these steps, you will be able to transfer your data from the backup onto your new SSD. Take your time to carefully transfer and organize your files, ensuring that everything is in its proper place. With your data successfully transferred, you can now enjoy the improved speed and performance of your laptop with the new SSD.
Troubleshooting Tips
While installing a solid state drive (SSD) in your laptop can greatly improve its performance, you may encounter some common issues or challenges during the installation process. Here are a few troubleshooting tips to help you overcome any potential hurdles:
1. Check Compatibility: Ensure that the SSD you have chosen is compatible with your laptop model. Double-check the form factor, interface, and other specifications before making a purchase.
2. Verify Connections: If your laptop doesn’t recognize the SSD or you encounter connectivity issues, double-check that all the cables and connectors are securely attached. Sometimes, a loose connection can cause problems.
3. Update Firmware and Drivers: Update the firmware of the SSD to ensure compatibility and optimal performance. Additionally, make sure that your laptop’s BIOS and drivers are up to date, as outdated firmware or drivers can cause issues.
4. Ensure Proper Power Supply: Confirm that the SSD is receiving adequate power. Some older laptops may require a BIOS update to support the power requirements of newer SSDs.
5. Perform a Clean Installation of the Operating System: If you encounter stability issues or the SSD is not recognized during the OS installation, attempt a clean installation. This involves formatting the SSD and starting the installation process from scratch.
6. Check for Drive Recognition: If the SSD is not recognized in the BIOS or by the operating system, double-check the drive connections, including both data and power cables. If necessary, try connecting the SSD to a different port.
7. Ensure Proper BIOS Settings: Verify that the BIOS settings are correctly configured to support the new SSD. Check the SATA mode (AHCI or RAID) and ensure it is set to the appropriate mode for your specific SSD. Refer to your laptop’s user manual or online resources for guidance.
8. Seek Professional Assistance: If you are unable to resolve the issues or encounter more complex problems, consider seeking assistance from a professional technician or the customer support of the SSD or laptop manufacturer.
Remember, troubleshooting can be a trial-and-error process, and it’s important to approach it with patience and persistence. By following these troubleshooting tips, you’ll be better equipped to overcome any challenges you may encounter during the SSD installation process and ensure a successful upgrade for your laptop.
Conclusion
Congratulations! By following this guide, you have successfully learned how to install a solid state drive (SSD) in your laptop. Upgrading to an SSD can have a significant impact on your laptop’s performance, providing faster boot times, improved application loading speeds, and overall snappier performance.
We started by emphasizing the importance of thorough preparation, including researching compatibility, backing up your data, and gathering the necessary tools. We then walked you through the step-by-step process of opening the laptop case, removing the existing hard drive, and installing the new SSD. We also covered the crucial steps of closing and securing the laptop case, installing the operating system, and transferring your data from the backup.
Additionally, we provided troubleshooting tips to help you overcome any potential challenges you may encounter during the installation process. It’s important to approach troubleshooting with patience and seek professional assistance if needed.
By performing this upgrade, you have given your laptop a new lease on life, boosting its performance and responsiveness. Enjoy the benefits of faster data access and improved overall efficiency as you navigate your daily tasks and activities.
Thank you for choosing to follow this guide, and we hope it has provided you with the knowledge and confidence to successfully install an SSD in your laptop. With your laptop now equipped with a high-speed SSD, you can enjoy a smoother computing experience for years to come.