Introduction
Adding subtitles to a movie can greatly improve its accessibility and reach a wider audience. Whether you’re creating a video for educational purposes, expanding your global reach, or making your content more inclusive for individuals with hearing impairments, hardcoding subtitles into a movie is a valuable skill to have.
Hardcoding subtitles involves permanently embedding the text into the video itself, ensuring that the subtitles will always be visible regardless of the platform or device used to view the movie. This eliminates the need for separate subtitle files and allows viewers to enjoy the movie with subtitles enabled, even if they don’t have access to external subtitle files.
In this article, we will guide you through the process of hardcoding subtitles into a movie. We will cover the necessary steps, from preparing the subtitles to exporting the final video with hardcoded subtitles. You don’t need to be an expert in video editing to follow these steps; with a little patience and the right tools, you’ll be able to successfully add subtitles to your movies.
Before we dive into the step-by-step process, it’s important to note that you will need a video editing software that supports adding subtitles. There are various software options available, both free and paid, so you can choose one that best suits your needs and preferences.
Additionally, make sure you have your subtitle file ready. Subtitles usually come in formats like SRT (SubRip Subtitle), which is widely supported by most video editing software. If your subtitle file is in a different format, don’t worry—we’ll cover how to convert it to a compatible format in one of the upcoming steps.
Now, let’s delve into the exciting world of hardcoding subtitles into a movie and empower you to enhance your videos with this valuable skill.
Step 1: Prepare Your Subtitles
Before you can begin the process of hardcoding subtitles into your movie, it’s important to ensure that your subtitle file is properly prepared. Here are the necessary steps to get your subtitles ready:
1. Review and edit the subtitle file: Open your subtitle file using a text editor or a dedicated subtitle editing software. Carefully review the subtitles for accuracy, spelling, and timing. Make any necessary edits, ensuring that the subtitle files align correctly with the spoken dialogue in the movie.
2. Ensure compatibility: Verify that your subtitle file is in a format that is compatible with your video editing software. As mentioned earlier, the SRT format is widely supported. If your subtitle file is in a different format, you may need to convert it to SRT or another compatible format. There are online subtitle converter tools available that can help you with this process.
3. Save the subtitle file: Once you have reviewed and edited the subtitle file, save it with a recognizable name and keep it in a location that is easily accessible. You will need to import this file into your video editing software in the following steps.
4. Optional: Translate subtitles if needed: If you’re targeting a multilingual audience, you may want to consider translating your subtitles into different languages. There are professional translation services available that can help ensure accurate and fluent translations. You can also use online translation tools, but be cautious as they may not always provide the most accurate results.
By taking the time to thoroughly review, edit, and prepare your subtitle file, you will help lay the foundation for a successful integration of subtitles into your movie. With your subtitles ready, it’s time to move on to the next step of the process: converting the subtitles to a compatible format.
Step 2: Convert Subtitles to a Compatible Format
Once you have prepared your subtitles, it’s important to ensure that they are in a format that is compatible with your video editing software. Here’s how you can convert your subtitles to a compatible format:
1. Identify the current format: Determine the format of your subtitle file. It can usually be found in the file extension, such as .srt, .sub, .ass, or .vtt. This information will help you determine the appropriate conversion method.
2. Choose a conversion tool: There are numerous online tools and software available that can convert subtitle files to different formats. Look for a reliable and user-friendly tool that supports the conversion from your current subtitle format to the desired compatible format.
3. Upload the subtitle file: Open the chosen conversion tool and upload your subtitle file. Follow the instructions provided by the tool to ensure a successful upload.
4. Select the output format: Choose the format that is compatible with your video editing software. If you’re unsure, refer to the documentation or official website of your software for information regarding supported subtitle formats.
5. Start the conversion process: Initiate the conversion process by clicking on the appropriate button or option within the tool. Depending on the size of your subtitle file, the conversion may take a few moments to complete.
6. Download the converted subtitle file: Once the conversion process is finished, download the converted subtitle file to your computer. Ensure that you save it in a location that is easily accessible for future use.
7. Test the compatibility: Open your video editing software and import the converted subtitle file. Check if the subtitle file is properly recognized and if the subtitles are displayed correctly within the software.
By converting your subtitles to a compatible format, you ensure that they can be seamlessly integrated into your video editing software. With your converted subtitle file ready, you are now ready to proceed to the next step and begin creating a new video file with the hardcoded subtitles.
Step 3: Create a New Video File
Once you have your prepared and converted subtitle file, it’s time to create a new video file that will serve as the base for adding hardcoded subtitles. Creating a new video file allows you to merge the subtitles seamlessly with the visuals of your movie. Here’s how you can create a new video file:
1. Open your video editing software: Launch your preferred video editing software and create a new project. Familiarize yourself with the software’s interface and controls if you’re new to it.
2. Import your original video file: Locate and import the original video file that you want to add hardcoded subtitles to. Depending on your software, you can usually do this by clicking on the “import” or “add media” button and navigating to the location of your video file.
3. Determine the resolution and aspect ratio: Choose the desired resolution and aspect ratio for your new video file. This should match the resolution and aspect ratio of your original video file to maintain the visual consistency of the movie.
4. Set the project timeline: Adjust the project timeline to match the duration of your original video file. This will ensure that the new video file aligns perfectly with your original footage.
5. Choose the output format and settings: Select the output format and settings that are suitable for your project. Consider the intended platform or device where the final video will be viewed. Popular video formats include MP4, AVI, and MOV.
6. Name and save the new video file: Give your new video file a recognizable name and choose a suitable location on your computer to save it. It’s wise to create a separate folder for the project to keep all the files organized.
7. Check the video settings: Verify that the settings for the new video file match the desired resolution, aspect ratio, and quality. Double-check that the subtitles are enabled and set to appear on-screen as desired.
By creating a new video file in your video editing software, you establish the foundation for seamlessly integrating your hardcoded subtitles. With the new video file ready, you can now move on to the next step and import both the video and subtitle files into your software.
Step 4: Import Video and Subtitles into a Video Editing Software
With your new video file created, it’s time to import both the video and subtitle files into your chosen video editing software. Importing these files will allow you to combine them and begin the process of adding hardcoded subtitles. Here’s how to import video and subtitles into a video editing software:
1. Open your video editing software: Launch your video editing software and open the project where you created the new video file.
2. Locate the import function: Look for the import option within the software’s interface. It is often located in the toolbar or under the “File” menu. Click on the import option to access the import panel.
3. Import the video file: Navigate to the location of your new video file and select it for import. You may need to specify the desired resolution and aspect ratio if it is different from the default settings.
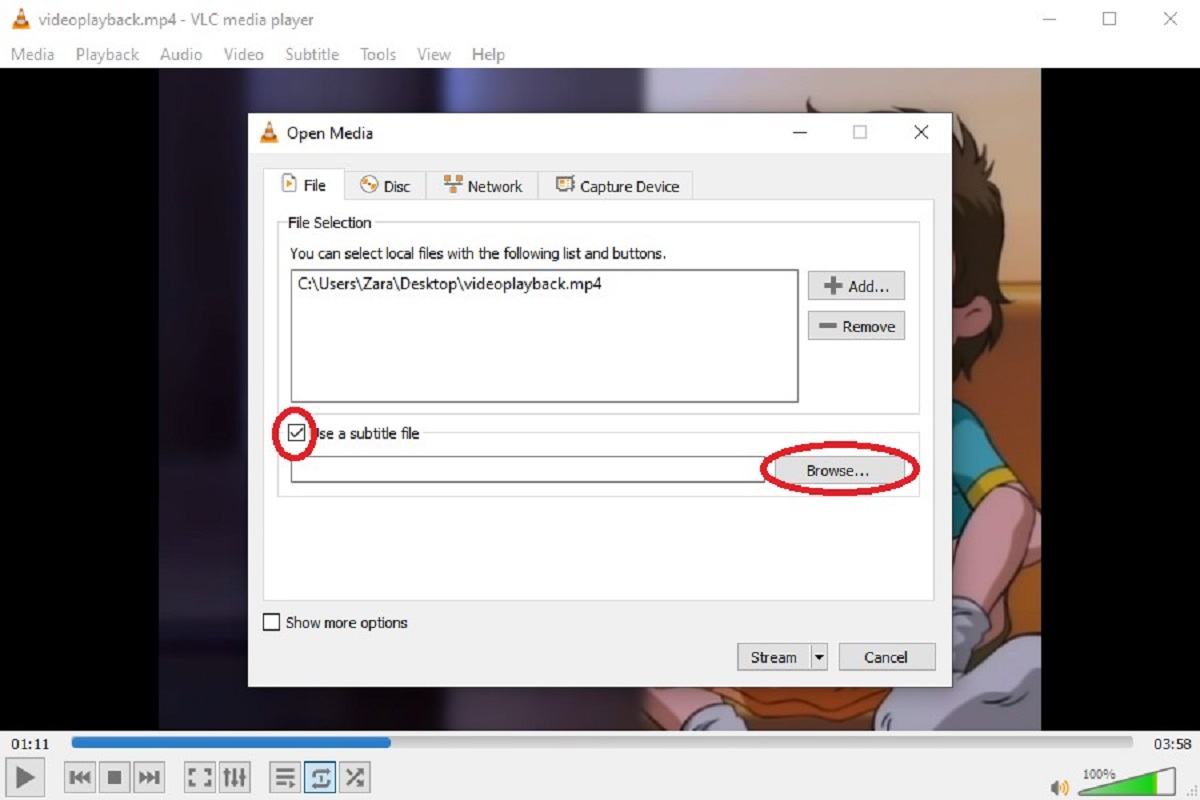
4. Import the subtitle file: Locate the option to import subtitle files within the import panel. Browse to the location of your prepared and converted subtitle file, and select it for import. Make sure to choose the correct subtitle file that corresponds to the video file.
5. Verify the import: After importing the video and subtitle files, ensure that they appear correctly in the video editing software’s timeline. The video file should be displayed in the video track, while the subtitle file should have its own separate track.
6. Arrange the subtitle track: Position the subtitle track below the video track in the timeline to ensure that the subtitles appear on top of the video during playback. Adjust the length of the subtitle track to match the duration of the video file.
7. Preview the video with subtitles: Play back the video within the software to preview how the subtitles are displayed on the video. Take note of any adjustments that may be needed, such as subtitle positioning or timing.
By successfully importing both the video and subtitle files into your video editing software, you’re now ready to proceed to the next step of adding subtitles to your video.
Step 5: Add Subtitles to the Video
With the video and subtitle files imported into your video editing software, it’s time to add the subtitles to the video itself. This step involves positioning and styling the subtitles so that they appear correctly and enhance the viewer’s experience. Follow these steps to add subtitles to your video:
1. Select the subtitle track: Locate the subtitle track in your video editing software’s timeline. Ensure that it is selected, allowing you to make modifications specific to the subtitles.
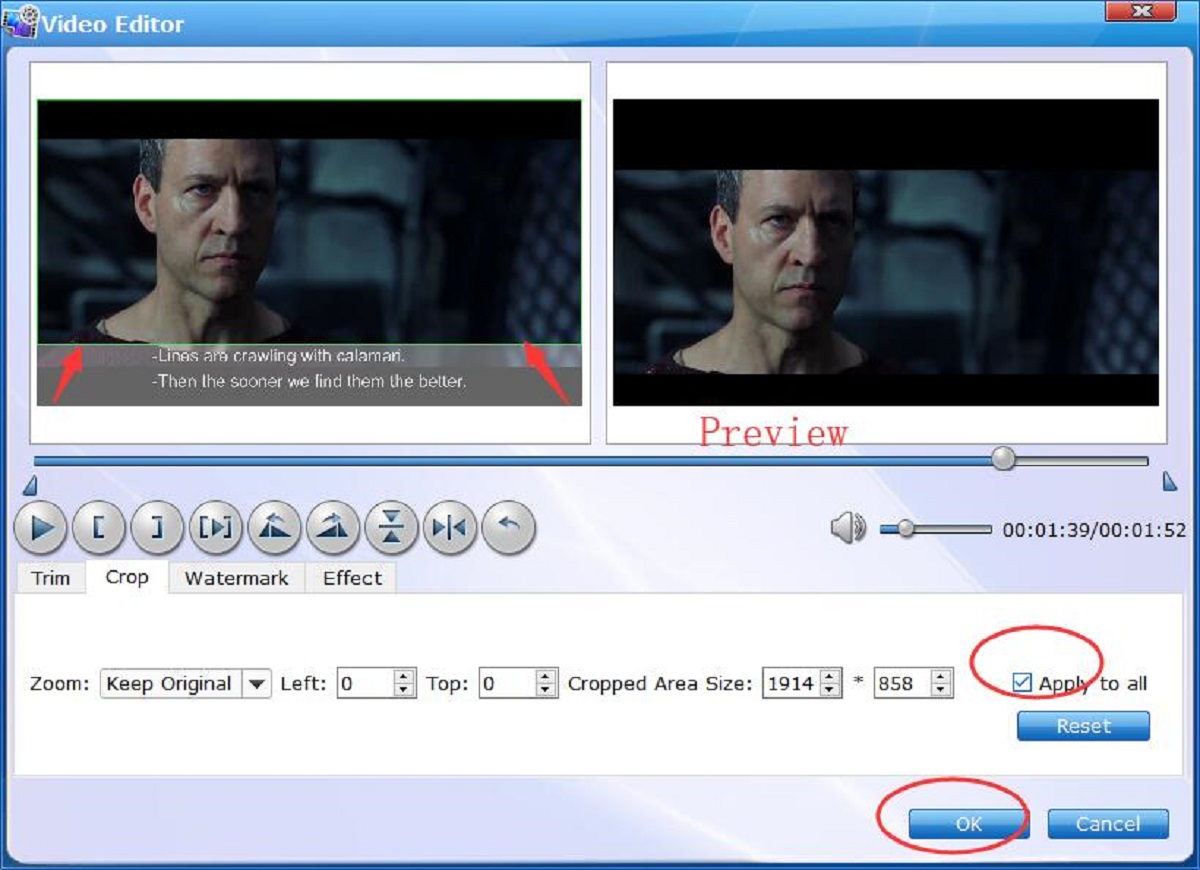
2. Adjust the subtitle position: Use the software’s tools or controls to adjust the positioning of the subtitles on the video. This could involve dragging the subtitle track to a desired location or using numerical input to specify the position on the screen.
3. Customize the subtitle appearance: Depending on your video editing software, you may have options to customize the subtitle appearance, such as font, size, color, and style. Choose settings that make the subtitles readable and complement the overall visual aesthetics of the video.
4. Set the subtitle timing: Ensure that the subtitle timings align accurately with the corresponding spoken dialogue or on-screen action. Use the software’s controls to adjust the timing, either by dragging the subtitle events on the timeline or entering the specific timing values.
5. Preview the subtitled video: Play back the video within the software to preview how the subtitles appear and interact with the video content. Make any necessary adjustments to the subtitle positioning or timing based on your observations.
6. Fine-tune subtitle visibility: Pay attention to the contrast between the subtitles and the video background. If needed, you can add a background box or adjust the opacity to enhance the readability of the subtitles, particularly when they appear over complex or busy scenes.
7. Save your progress: It’s crucial to save your work as you make modifications to ensure that your progress is not lost. Regularly save your project to avoid any unexpected data loss.
By adding subtitles to your video, you make the content more accessible and enable viewers to follow along with the dialogue or narration. With the subtitles positioned, styled, and timed appropriately, your video is now ready for the next step—adjusting the subtitles’ position and timing.
Step 6: Adjust Subtitles Position and Timing
After adding the subtitles to your video, it’s essential to fine-tune their position and timing to ensure they align accurately with the dialogue or on-screen action. By adjusting the subtitles, you can enhance their visibility and synchronization with the video. Follow these steps to adjust the subtitles’ position and timing:
1. Select the subtitle track: Locate the subtitle track in your video editing software’s timeline. Ensure that it is selected to make modifications specific to the subtitles.
2. Position the subtitles: Use the software’s tools or controls to adjust the position of the subtitles on the video. You can drag the subtitle events on the timeline or use numerical input to specify the exact position on the screen. Experiment with different positions to find the one that offers the best readability without obstructing important visuals.
3. Preview and fine-tune: Play back the video within the software and pay close attention to the subtitles’ position. Check for any overlapping with on-screen text or important elements. Make necessary modifications to ensure the subtitles do not obstruct any critical content and are easily readable by viewers.
4. Adjust the subtitle timing: Review the timing of the subtitles in relation to the spoken dialogue or the on-screen action. Use the software’s controls to adjust the timing by dragging the subtitle events on the timeline or entering the precise timing values. Ensure the subtitles appear and disappear at the appropriate moments.
5. Preview and synchronize: Play back the video again to observe the synchronization between the subtitles and the corresponding audio or visual content. Make any necessary adjustments to fine-tune the timing so that the subtitles perfectly align with the spoken words or on-screen events.
6. Review for readability: Ensure that the chosen position and timing of the subtitles do not hinder readability. Consider factors such as font size, color contrast, and background clarity. Optimize these aspects, if needed, to make the subtitles easily readable for viewers.
7. Consistency throughout the video: Ensure that the position and timing adjustments for subtitles remain consistent throughout the entire video to provide a seamless viewing experience. Maintain a uniform style to avoid any distractions or confusion for the audience.
By carefully adjusting the position and timing of the subtitles, you enhance the overall viewing experience and make it easier for viewers to follow along with the video’s content. With the subtitles precisely positioned and timed, your video is now ready for the final step—exporting the video with hardcoded subtitles.
Step 7: Export the Final Video with Hardcoded Subtitles
After adjusting the subtitle position and timing, it’s time to export the final video with hardcoded subtitles. Exporting the video will create a new file that incorporates the subtitles directly into the video, making them permanently visible without the need for separate subtitle files. Follow these steps to export the final video with hardcoded subtitles:
1. Select the export option: Locate the export or render option within your video editing software. The exact location may vary depending on the software you are using. Look for an option that allows you to export/render the video.
2. Choose the output format: Select the desired output format for your video. Consider the requirements of the platform or device where you intend to share or upload the video. Popular formats include MP4, AVI, and MOV.
3. Set the quality and settings: Adjust the export settings such as video resolution, bitrate, and quality. Ensure that the settings match your preferences and the requirements of the intended viewing platform.
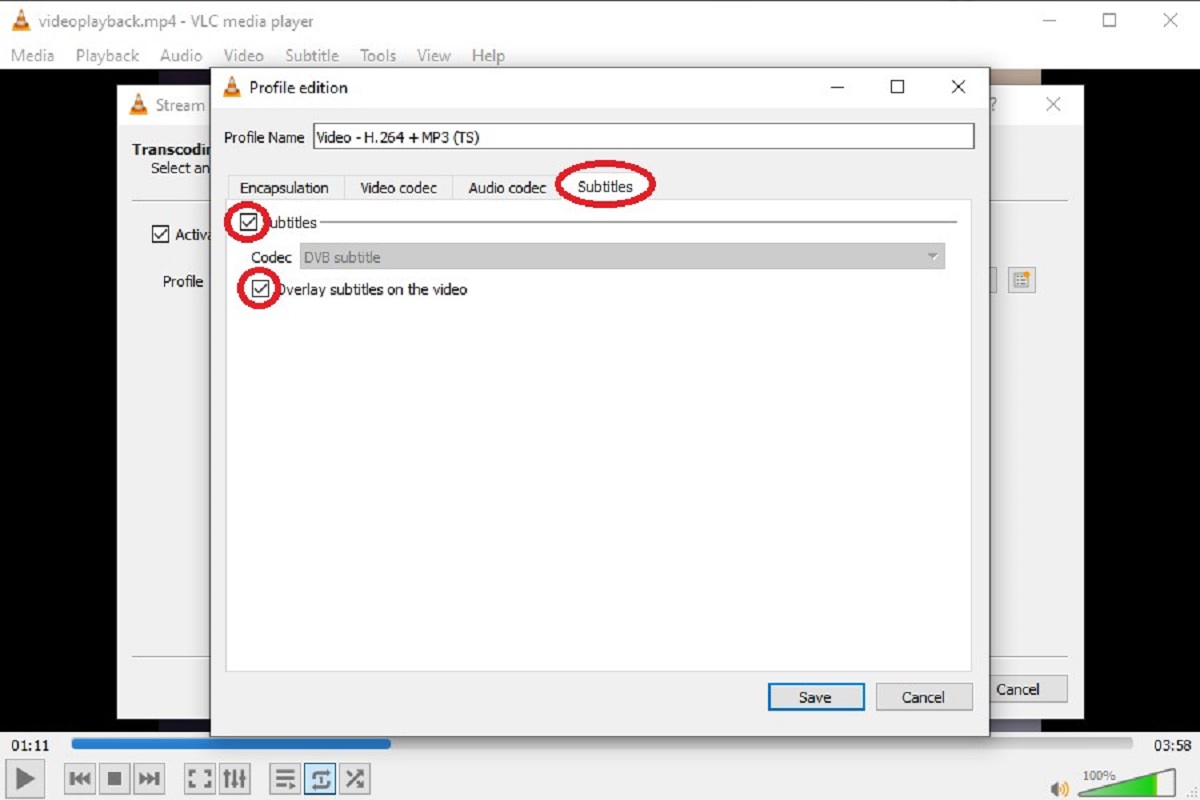
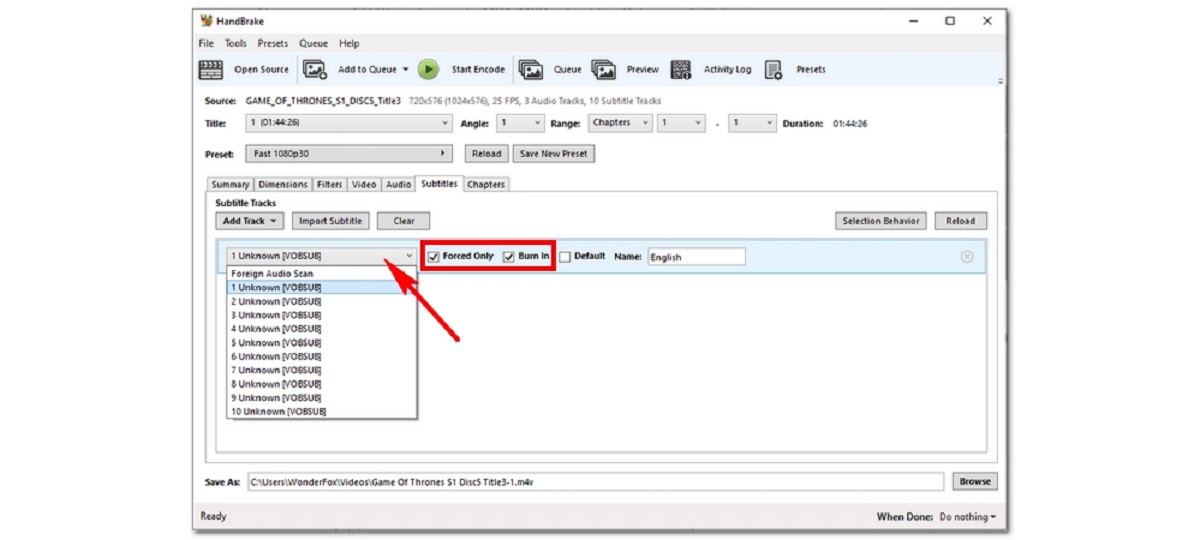
4. Include subtitles: Enable the option to include or “burn in” the subtitles during export. This will ensure that the subtitles are permanently embedded into the video and cannot be disabled or removed by viewers.
5. Preview the export: Some video editing software allows you to preview the export settings before initiating the final export process. Take advantage of this feature to check the video quality and ensure the subtitles appear as intended.
6. Choose the destination and save: Select the folder or location on your computer where you want to save the exported video with hardcoded subtitles. Choose a location that is easily accessible and organized for future use.
7. Initiate the export: Click on the export, render, or save button to begin the export process. This may take some time, depending on the length and complexity of the video. Be patient and allow the software to complete the export process.
8. Verify the exported video: After the export is complete, open the exported video file using a media player to ensure that the hardcoded subtitles are visible and properly aligned with the video content. Check for any discrepancies or issues that may have occurred during the export process.
By exporting the final video with hardcoded subtitles, you create a self-contained file that can be shared, uploaded, or distributed without the need for additional subtitle files. Your video is now ready to be enjoyed by a wider audience, providing increased accessibility and inclusivity to viewers.
Conclusion
Hardcoding subtitles into a movie is a valuable skill that can greatly enhance accessibility and reach a wider audience. By following the step-by-step process outlined in this article, you can successfully add subtitles to your videos and create a seamless viewing experience.
We started by preparing the subtitles, reviewing and editing them to ensure accuracy. Then, we converted the subtitles to a compatible format that can be easily integrated into the video editing software.
Creating a new video file allowed us to import both the video and subtitle files into the software, providing a foundation for adding hardcoded subtitles. We discussed the importance of selecting the appropriate output format and settings to ensure compatibility with various platforms and devices.
With the video and subtitles imported, we learned how to position and time the subtitles accurately, fine-tuning their appearance for readability and synchronization with the video’s content. Adjustments were made to ensure the subtitles did not obstruct important visuals and were visually appealing.
Finally, we reached the last step—exporting the final video with hardcoded subtitles. By choosing the appropriate settings and enabling the inclusion of subtitles during the export process, we created a self-contained video file that can be shared and distributed without the need for separate subtitle files.
Adding hardcoded subtitles to your movies opens up a world of possibilities, making your content more accessible to a global audience and accommodating viewers with hearing impairments. Whether you’re creating educational videos, films, or online content, the impact of including hardcoded subtitles cannot be overstated.
Remember to choose a video editing software that suits your needs and supports subtitle integration. Practice adjusting the subtitles’ position and timing to achieve optimal results. And most importantly, continue to create engaging and inclusive video content that resonates with your audience.
With the knowledge and skills gained from this article, you can confidently embark on the journey of hardcoding subtitles into your movies and unlock the potential for greater reach and impact in your video projects.