Introduction
Welcome to the ultimate guide on how to fix issues with your WiFi adapter. In today’s increasingly connected world, a stable and reliable internet connection is vital for both work and leisure activities. However, it can be frustrating when your WiFi adapter starts experiencing problems, causing slow or inconsistent connections.
In this guide, we will explore common issues that can arise with WiFi adapters and provide step-by-step instructions on how to troubleshoot and fix these problems. Whether you are using a desktop computer, laptop, or mobile device, these troubleshooting techniques can help you get your WiFi adapter back up and running smoothly.
Before we dive into the troubleshooting steps, let’s first discuss some of the common issues that you may encounter with your WiFi adapter. Knowing what to look for can help you identify the root cause of the problem and find a suitable solution.
Some of the most common issues with WiFi adapters include:
- Slow or inconsistent internet connection
- Inability to connect to the WiFi network
- Frequent disconnects from the WiFi network
- Limited connectivity or no internet access
- Hardware or software conflicts
If you have been experiencing any of these issues, don’t worry! We’ve got you covered. By following the troubleshooting steps outlined in this guide, you will be able to diagnose and fix most WiFi adapter problems on your own, saving you time and frustration.
So, without further ado, let’s jump right into the troubleshooting techniques that will help you get your WiFi adapter back on track!
Common Issues with Wifi Adapter
WiFi adapters are essential components for connecting devices to wireless networks. However, they can encounter a range of issues that can disrupt your internet connection. Understanding these common issues can help you diagnose and resolve problems with your WiFi adapter. Let’s explore some of the most frequently encountered issues:
1. Slow or Inconsistent Internet Connection: One of the most frustrating problems with a WiFi adapter is a slow or unreliable internet connection. This can manifest as sluggish webpage loading, buffering while streaming media, or frequent pauses during online activities. Factors such as distance from the router, signal interference, or outdated firmware can contribute to this issue.
2. Inability to Connect to the WiFi Network: Being unable to connect to your WiFi network can render your adapter practically useless. This issue can occur due to incorrect network settings, wrong security key input, or outdated drivers. It can prevent you from accessing the internet and utilizing online services.
3. Frequent Disconnects from the WiFi Network: WiFi adapters that frequently disconnect can disrupt your online activities and cause frustration. This problem may occur due to signal interference, outdated drivers, or power-saving settings that turn off the adapter after a period of inactivity.
4. Limited Connectivity or No Internet Access: Another common issue is limited or no internet access. This typically manifests as a yellow exclamation mark on the network icon or a message indicating limited connectivity. This issue can be caused by misconfigured network settings, incorrect IP address assignments, or outdated drivers.
5. Hardware or Software Conflicts: WiFi adapters may also encounter conflicts with other hardware components or software programs installed on your device. These conflicts can result in connectivity issues, driver errors, or device malfunctions. Identifying and resolving these conflicts is essential for restoring normal WiFi adapter functionality.
Now that we have identified the most common issues with WiFi adapters, it’s time to delve into troubleshooting methods that can help you resolve these problems effectively.
Restart Your Device
When encountering issues with your WiFi adapter, one of the simplest and often overlooked solutions is to restart your device. Many connectivity problems can be resolved by simply rebooting your computer, laptop, or mobile device. Here’s how:
1. Close all applications and save your work: Before restarting your device, make sure to close all open applications and save any unsaved work. This ensures that you don’t lose any important data during the restart process.
2. Shut down your device: Once you have closed all applications, navigate to the “Shut down” or “Restart” option in your device’s operating system. Click on it to begin the shutdown process.
3. Wait for a few seconds: After your device has completely shut down, wait for at least 10-15 seconds. This allows any residual power to dissipate from the components, ensuring a clean restart.
4. Power on your device: Press the power button on your device to turn it back on. Wait for your operating system to fully load before attempting to connect to your WiFi network.
5. Reconnect to your WiFi network: Once your device has restarted, locate the WiFi icon in the system tray or menu bar. Click on it to view available WiFi networks and select your preferred network. Enter the network password if prompted, and ensure that your device successfully connects to the network.
Restarting your device can help resolve temporary glitches or conflicts that may be affecting your WiFi adapter. It allows your device’s operating system and network settings to start fresh, potentially resolving any connectivity issues.
If restarting your device does not solve the WiFi adapter problem, don’t worry – there are several more troubleshooting steps to try. Let’s move on to the next method: updating your WiFi adapter driver.
Update WiFi Adapter Driver
An outdated or corrupted WiFi adapter driver can often be the cause of connectivity issues. Updating your WiFi adapter driver to the latest version can help resolve these problems. Here’s how you can update your WiFi adapter driver:
1. Identify the WiFi adapter model: Before updating the driver, you need to know the model of your WiFi adapter. You can find this information in the device manager or by checking the manufacturer’s website or documentation.
2. Download the latest driver: Visit the manufacturer’s website or the official website of your device’s manufacturer and search for the latest driver for your WiFi adapter model. Locate the appropriate driver for your operating system and download it to your device.
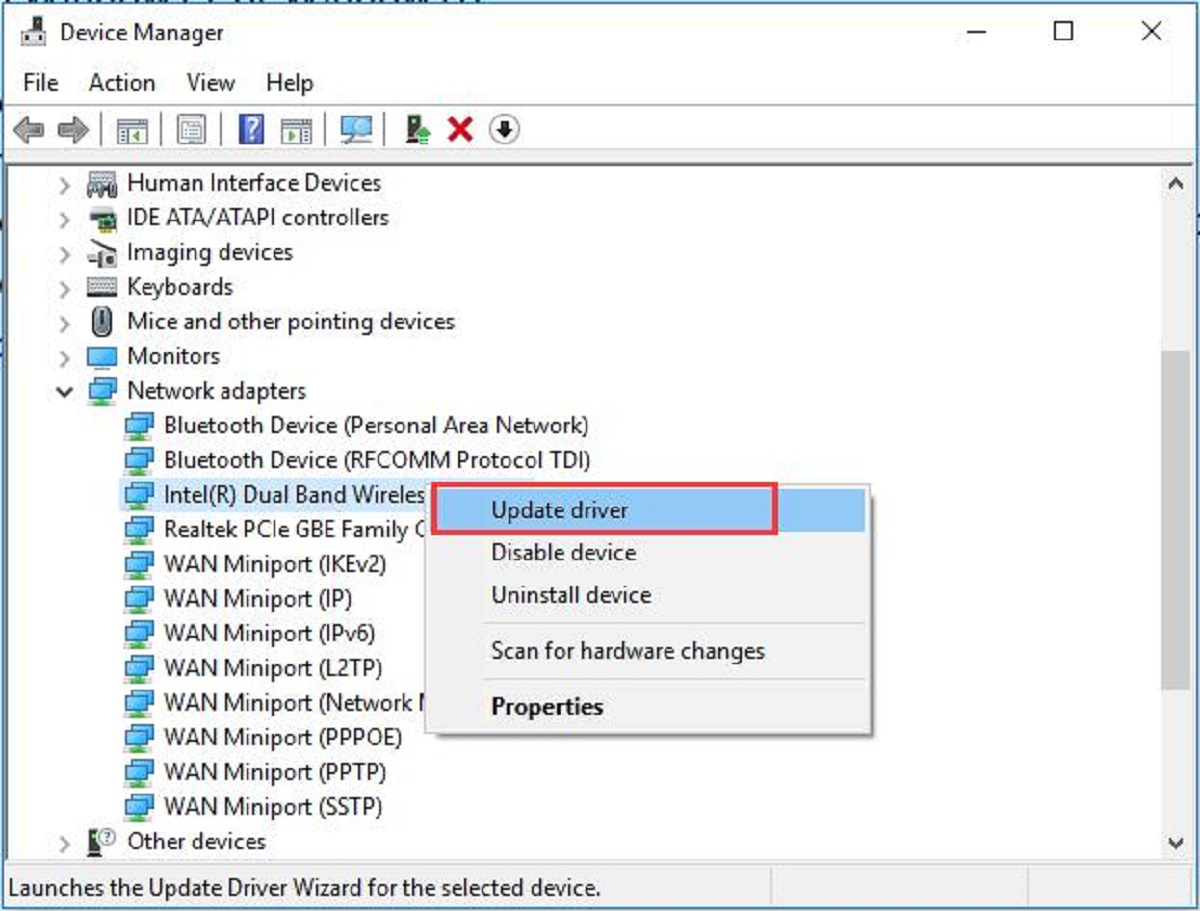
3. Uninstall the current driver: Open the Device Manager by right-clicking on the Start menu and selecting “Device Manager.” Expand the “Network adapters” category and find your WiFi adapter. Right-click on it and select “Uninstall device.” Follow the prompts to uninstall the driver from your device.
4. Install the new driver: Navigate to the location where you saved the downloaded driver file. Double-click on it to run the installation process. Follow the on-screen instructions to install the new driver. Once the installation is complete, restart your device.
5. Verify the driver update: After restarting your device, open the Device Manager again and navigate to the “Network adapters” section. Find your WiFi adapter and double-click on it. Go to the “Driver” tab and check the driver version. If it matches the version you downloaded, then the update was successful.
Updating your WiFi adapter driver can improve compatibility, fix bugs, and enhance performance, resolving connectivity issues you may be experiencing. If updating the driver doesn’t solve the problem, there are other troubleshooting methods to explore. Next, we’ll discuss how to disable and enable your WiFi adapter.
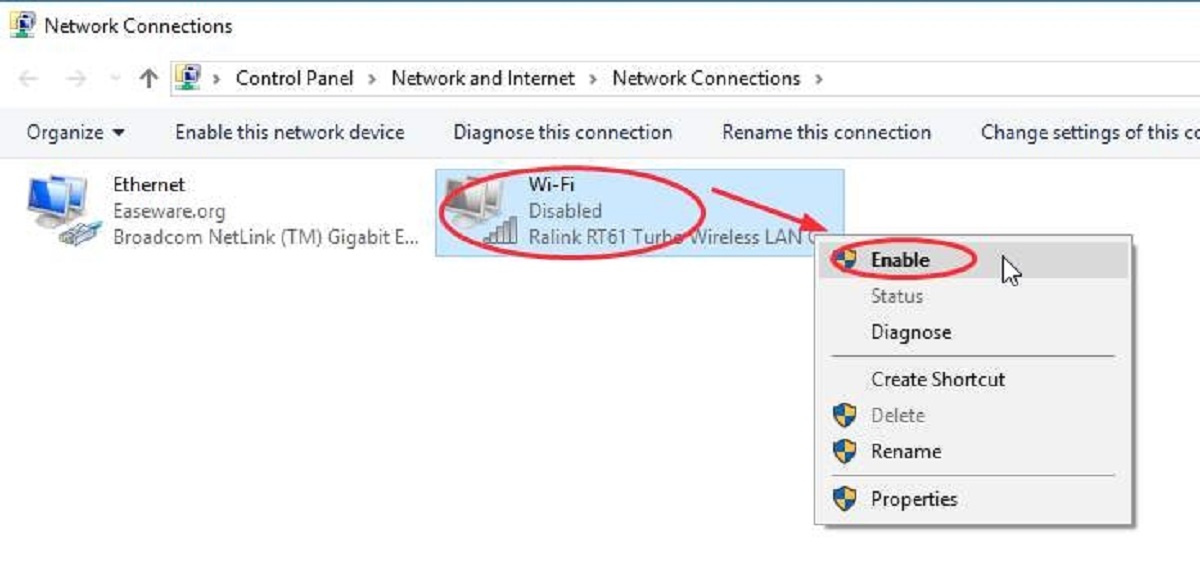
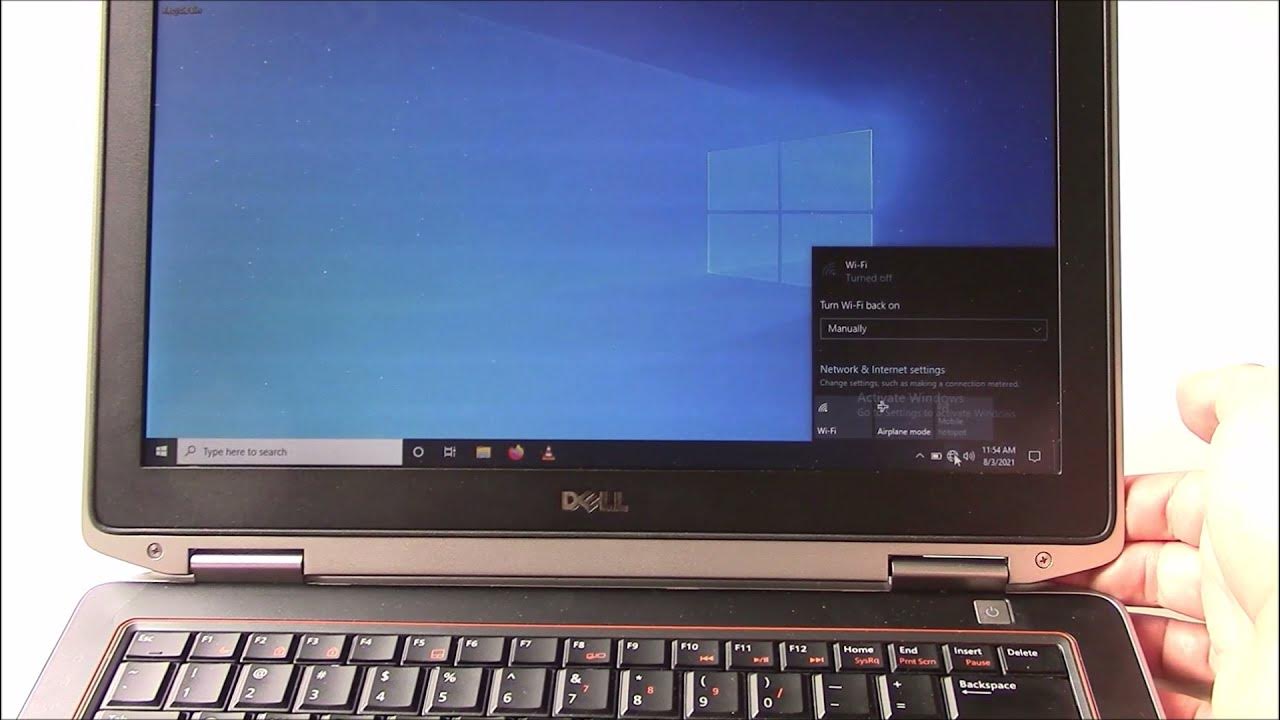
Disable and Enable WiFi Adapter
If you are facing persistent connectivity issues with your WiFi adapter, disabling and enabling the adapter can help reset its settings and establish a fresh connection. Here’s how you can disable and enable your WiFi adapter:
1. Open the Device Manager: Right-click on the Start menu and select “Device Manager.” Alternatively, you can press the Windows key + R, type “devmgmt.msc,” and press Enter.
2. Locate the WiFi adapter: Expand the “Network adapters” category in the Device Manager. You will find your WiFi adapter listed here. It may be labeled as “Wireless Adapter,” “WiFi Adapter,” or with the specific brand or model name.
3. Disable the WiFi adapter: Right-click on the WiFi adapter and select “Disable” from the context menu. This will turn off the adapter and disconnect it from any active WiFi networks.
4. Wait for a few seconds: After disabling the WiFi adapter, wait for about 10-15 seconds. This allows any residual power to drain and ensures a complete shutdown of the adapter.
5. Enable the WiFi adapter: Right-click on the disabled WiFi adapter and select “Enable” from the context menu. This will restart the adapter and attempt to establish a new connection to the WiFi network.
6. Reconnect to the WiFi network: After enabling the WiFi adapter, locate the WiFi icon in the system tray or menu bar. Click on it to view available networks and select your desired network. Enter the network password if prompted, and check if your device successfully connects to the WiFi network.
Disabling and enabling your WiFi adapter can help resolve temporary glitches and reestablish a stable connection. This process essentially resets the adapter’s settings and can fix issues stemming from configuration conflicts or software errors.
If disabling and enabling the WiFi adapter doesn’t resolve the problem, don’t worry. There are additional troubleshooting steps you can take. Next, we’ll discuss how to check the physical connections of your WiFi adapter.
Check Physical Connections
When facing connectivity issues with your WiFi adapter, it’s essential to check the physical connections to ensure everything is properly connected. Loose or faulty connections can cause intermittent or no internet access. Here are the steps to check the physical connections of your WiFi adapter:
1. Power off your device: Before checking the physical connections, power off your device and unplug it from the power source. This minimizes the risk of electrical shock and protects your device.
2. Locate the WiFi adapter: Identify the WiFi adapter on your device. It may be an internal component or an external USB dongle. Take note of its location for easier access during the physical connection check.
3. External WiFi adapters: If you are using an external WiFi adapter, make sure it is securely plugged into a USB port. Try connecting it to a different USB port to rule out any issues with the specific port you were using.
4. Internal WiFi adapters: Internal WiFi adapters are connected to the motherboard of your device. To access the internal WiFi adapter, you may need to open your device’s casing or remove a specific cover. Refer to the manufacturer’s instructions or consult a professional if you are unsure how to access the internal WiFi adapter.
5. Check for loose connections: Once you have access to the WiFi adapter, gently wiggle any cables or connectors attached to it. Check if there are any loose connections or if the cables are not securely plugged in. If you find loose connections, carefully reconnect them and ensure they are firmly seated.
6. Inspect for physical damage: While examining the physical connections, look for any signs of physical damage such as frayed cables, bent pins, or damaged connectors. If you notice any damage, you may need to replace the affected components or seek professional assistance.
7. Power on your device: After checking and securing the physical connections, power on your device and wait for it to boot up completely. Then, try connecting to your WiFi network and check if the issue has been resolved.
By checking the physical connections, you can ensure that your WiFi adapter is properly connected and eliminate any issues caused by loose or damaged cables. If the physical connections are secure, but the issue persists, there are more troubleshooting steps to explore. Next, we’ll discuss how to reset network settings.
Reset Network Settings
Resetting the network settings on your device can help resolve connectivity issues with your WiFi adapter. This process essentially restores the network settings to their default configuration, eliminating any misconfigurations that may be causing the problem. Here’s how you can reset network settings:
1. Power off your device: Before resetting the network settings, power off your device and unplug it from the power source. This ensures a clean reset and protects your device.
2. Open the Network settings: On your device, go to the “Settings” menu and locate the “Network & Internet” or “Network” option. Click on it to access the network settings.
3. Choose the network reset option: In the network settings, look for an option labeled “Reset Network,” “Reset WiFi,” or similar. The exact wording may vary depending on your device and operating system. Click on this option to proceed.
4. Confirm the network reset: A confirmation prompt will appear, informing you about the consequences of resetting the network settings. Read the prompt carefully and click on “Confirm” or “Reset” to proceed with the network reset.
5. Wait for the reset process to complete: The device will now reset the network settings. This process may take a few moments. It will remove saved WiFi networks, forget network passwords, and restore the network settings to their default configuration.
6. Reconnect to your WiFi network: After the network reset is complete, power on your device and navigate back to the network settings. Locate your WiFi network and reconnect to it. Enter the network password if prompted, and check if your device successfully connects to the WiFi network.
Resetting the network settings can help resolve issues caused by misconfigured network settings or conflicting network configurations. It provides a fresh start and allows your device to establish a new connection to the WiFi network.
If resetting the network settings doesn’t resolve the problem, don’t worry. There are still further troubleshooting steps to explore. Next, we’ll discuss how to use the built-in troubleshooter tool to diagnose and fix WiFi adapter issues.
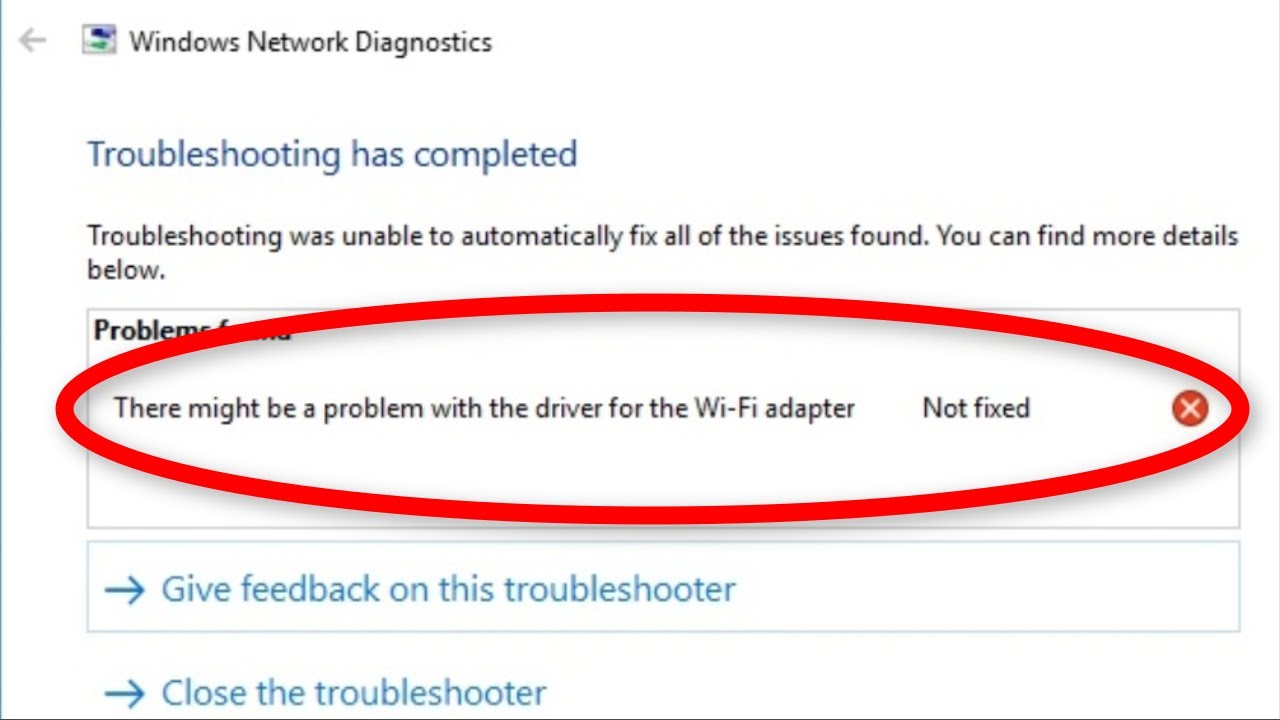
Use Troubleshooter Tool
When encountering issues with your WiFi adapter, utilizing the built-in troubleshooter tool can help diagnose and fix the problem. Most operating systems provide a troubleshooting tool specifically designed to identify and resolve connectivity issues. Here’s how you can use the troubleshooter tool:
1. Open the network settings: Go to the “Settings” menu on your device and navigate to the “Network & Internet” or “Network” section. This is where you can access the troubleshooting tool.
2. Find the troubleshooting option: Look for an option labeled “Troubleshoot,” “Network Troubleshooter,” or similar. Click on it to launch the troubleshooting tool.
3. Run the troubleshooter: Once the troubleshooter tool opens, it will scan your device and network for any potential issues. Follow the on-screen prompts and instructions to run the troubleshooter and diagnose the problem.
4. Review the troubleshooter results: After the troubleshooting process is complete, the tool will provide a summary of the issues it detected, if any. It may also offer recommended solutions or actions to resolve the problem.
5. Implement the recommended fixes: Based on the troubleshooter’s results, follow the recommended solutions or actions provided. These may involve changing network settings, resetting your network adapter, or updating drivers. Carry out the suggested fixes and perform any necessary restarts or reconfigurations.
6. Test the WiFi connection: After implementing the recommended fixes, reconnect to your WiFi network and test the internet connection. Check if the connectivity issues with your WiFi adapter have been resolved.
The troubleshooter tool is designed to identify and rectify common WiFi adapter problems. It provides a convenient and automated way to diagnose and fix issues, even for users with limited technical expertise.
If the troubleshooter tool fails to resolve the issue, don’t worry. There are still additional troubleshooting steps to explore. Next, we’ll discuss how to remove and reinstall your WiFi adapter.
Remove and Reinstall WiFi Adapter
If you’re experiencing persistent connectivity issues with your WiFi adapter, removing and reinstalling the adapter can help resolve driver conflicts or software-related problems. Follow these steps to remove and reinstall your WiFi adapter:
1. Power off your device: Before removing the WiFi adapter, power off your device and unplug it from the power source. This ensures a safe and clean removal process.
2. Locate the WiFi adapter: Identify the WiFi adapter on your device. It may be an internal component or an external USB dongle. Take note of its location for easier access during the removal process.
3. Remove the external WiFi adapter: If you’re using an external WiFi adapter, simply unplug it from the USB port. Gently pull it out while ensuring you don’t damage the USB port or the adapter itself.
4. Open the Device Manager: On your device, right-click on the Start menu and select “Device Manager.” Alternatively, you can press the Windows key + R, type “devmgmt.msc,” and press Enter to open the Device Manager.
5. Uninstall the WiFi adapter: In the Device Manager window, expand the “Network adapters” category. Right-click on your WiFi adapter and select “Uninstall device” from the context menu. Confirm the uninstallation, if prompted, and follow the on-screen instructions to complete the process.
6. Restart your device: After uninstalling the WiFi adapter, restart your device. This allows the device to refresh its system files and prepare for the reinstallation of the WiFi adapter.
7. Reinstall the WiFi adapter: Once your device has restarted, it will automatically detect the missing WiFi adapter. If you’re using an external WiFi adapter, plug it back into the USB port. For internal adapters, your device will reinstall the WiFi adapter during the boot-up process. Follow any on-screen prompts, if necessary.
8. Update the WiFi adapter driver: After reinstalling the WiFi adapter, it’s essential to update the driver to the latest version. Follow the steps outlined in the “Update WiFi Adapter Driver” section of this guide to download and install the latest driver.
Removing and reinstalling your WiFi adapter can help resolve issues related to conflicts, outdated drivers, or software glitches. After reinstalling the adapter and updating the driver, reconnect to your WiFi network and check if the connectivity issues have been resolved.
If the problem persists, don’t worry. There are still more troubleshooting steps to explore. Next, we’ll discuss when it’s appropriate to contact technical support for assistance.
Contact Technical Support
If you’ve tried all the troubleshooting methods outlined in this guide and are still experiencing connectivity issues with your WiFi adapter, it may be time to reach out to technical support for further assistance. Technical support teams are trained to handle complex issues and can provide expert guidance to resolve your problem. Here’s what you can do:
1. Gather relevant information: Before contacting technical support, gather relevant information about your WiFi adapter, device, and the issues you’re facing. This may include the WiFi adapter model, operating system version, error messages you’ve encountered, and any troubleshooting steps you’ve already performed.
2. Check manufacturer support: Visit the manufacturer’s website or support portal to see if they provide any support resources specific to your WiFi adapter. They may have troubleshooting guides, driver updates, or a knowledge base that can help you find a solution.
3. Contact customer support: If the manufacturer’s support resources do not solve your problem, reach out to their customer support team. This can typically be done through their website, email, or phone. Describe your issue clearly, providing all relevant details, and ask for their guidance in resolving the connectivity problem.
4. Seek help from your device manufacturer: If the issue is not specific to the WiFi adapter, but rather to your device as a whole, consider contacting the technical support team of your device manufacturer. They may be able to assist you in troubleshooting and resolving the connectivity issues.
5. Consult professional technicians: If the technical support provided by the manufacturer or device support team does not solve the issue, you may need to seek assistance from professional technicians who specialize in network troubleshooting. They can perform in-depth diagnostics and provide advanced solutions tailored to your specific situation.
Contacting technical support allows you to leverage the expertise of professionals who are knowledgeable about WiFi adapters and their associated issues. They can guide you through advanced troubleshooting steps, diagnose complex problems, and provide solutions that may be beyond the scope of this guide.
Remember to remain patient and cooperative throughout the technical support process. Sometimes, resolving WiFi adapter issues may require additional time and expertise. With the help of technical support, you can increase your chances of finding a satisfactory resolution and getting your WiFi adapter back to optimal functionality.
If you have exhausted all the troubleshooting options and still haven’t been able to resolve the problem, technical support will be your best resource to provide further assistance.
Conclusion
Dealing with connectivity issues can be frustrating, especially when it comes to your WiFi adapter. However, by following the troubleshooting steps outlined in this guide, you can effectively diagnose and resolve common problems that can arise with your WiFi adapter. Whether it’s a slow or inconsistent internet connection, inability to connect to the WiFi network, frequent disconnects, limited connectivity, or hardware/software conflicts, there are solutions available to get your WiFi adapter back up and running smoothly.
Throughout this guide, we discussed various troubleshooting techniques, including restarting your device, updating the WiFi adapter driver, disabling and enabling the adapter, checking physical connections, resetting network settings, using the troubleshooter tool, and removing and reinstalling the WiFi adapter. These steps provide a systematic approach to identifying and resolving issues with your WiFi adapter.
If you have tried all the troubleshooting steps and are still unable to resolve the connectivity problem, don’t hesitate to contact technical support. These professionals are specifically trained to handle complex issues and can provide further assistance tailored to your specific situation.
Remember, it’s important to stay calm and patient throughout the troubleshooting process. WiFi adapter issues can often be resolved with the right approach and a little bit of persistence. Whether it’s updating drivers, securing physical connections, or seeking technical support, you’re taking the right steps towards getting your WiFi adapter back in working order and enjoying a stable and reliable internet connection.