Introduction
Welcome to this troubleshooting guide on how to fix a tablet that won’t turn on. Whether you rely on your tablet for work or personal use, it can be incredibly frustrating when it refuses to power up. However, before you rush out to replace your tablet or seek professional help, there are several simple steps you can take to potentially resolve the issue on your own.
A tablet that won’t turn on can be caused by a variety of factors, including a drained battery, software glitches, or hardware issues. In this guide, we will walk you through a step-by-step process to diagnose and fix the problem, saving you time and money.
Please note that the troubleshooting steps mentioned here are general recommendations and may vary depending on the make and model of your tablet. It’s always a good idea to refer to the manufacturer’s instructions or contact their support for device-specific guidance.
The following sections will cover different possible solutions to get your tablet up and running again. We’ll start with some basic checks and then move on to more advanced troubleshooting methods. Just keep in mind that each step should be followed in sequence and only proceed to the next if the previous step doesn’t resolve the issue.
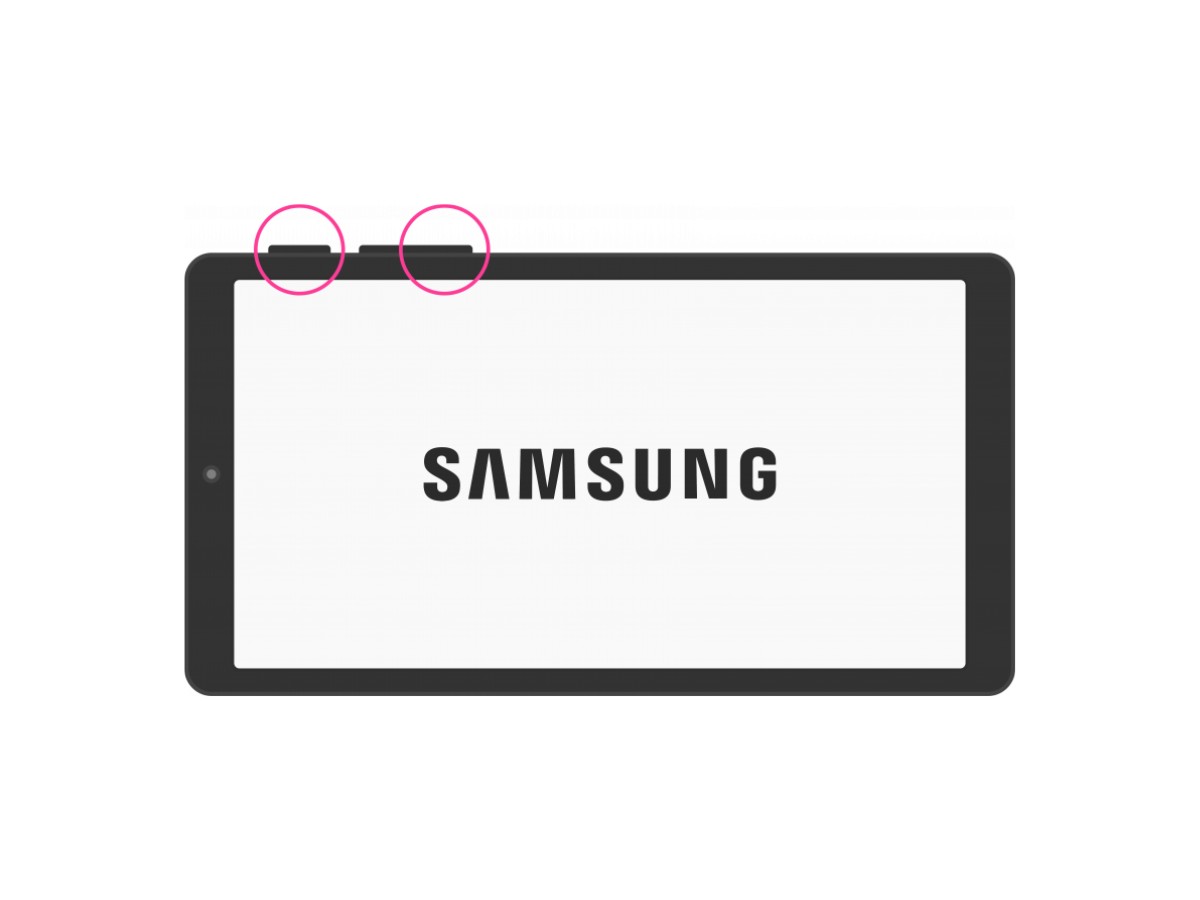
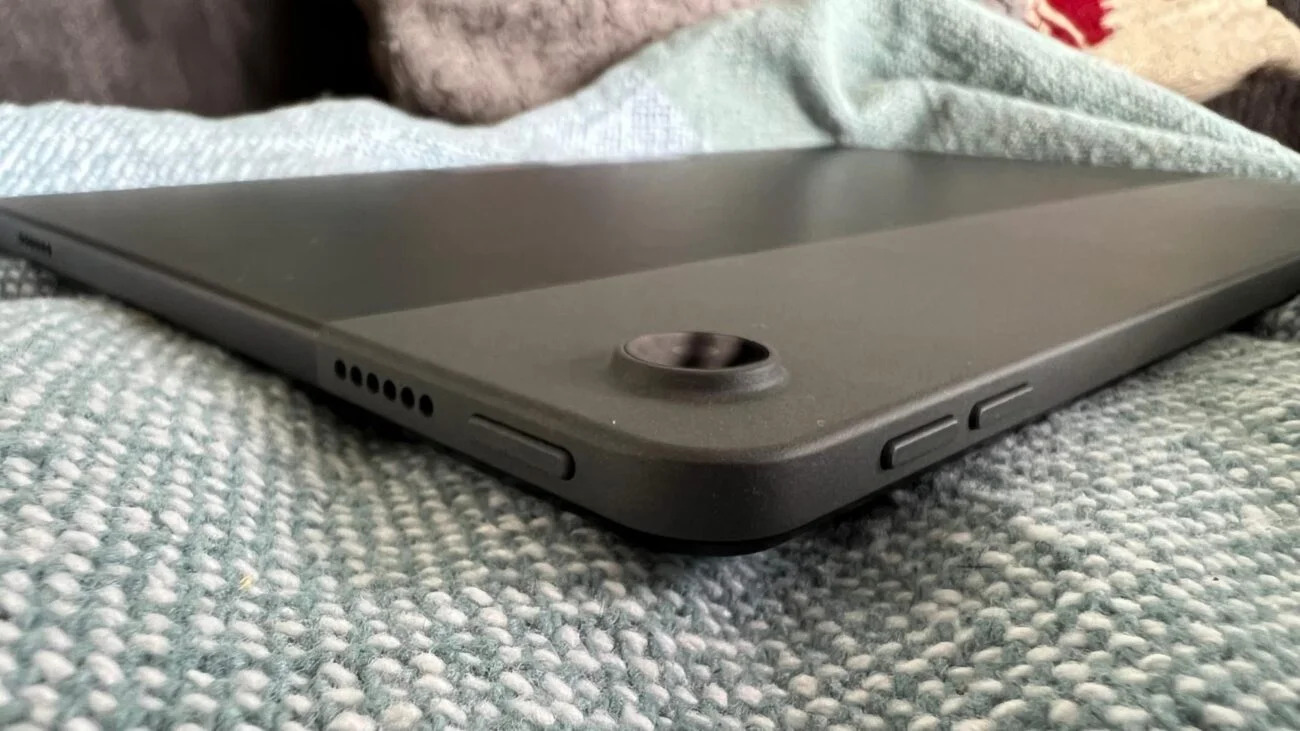
Check the Power Button
The first thing to check when your tablet fails to turn on is the power button. It may seem obvious, but sometimes the button can get stuck or become unresponsive, preventing the tablet from powering on. Here’s what you can do:
1. Press and hold the power button: Hold down the power button for at least 10-15 seconds. This might seem like a long time, but it can help to reset the device and force it to power on.
2. Inspect the power button: Carefully examine the power button for any physical damage, such as dirt, debris, or liquid residue. If you notice any issues, clean the button gently with a soft cloth and try again.
3. Try an alternate power button: Some tablets have multiple buttons that can be used to power on the device. Check if your tablet has an alternative power button, and give it a try.
4. Use a stylus or a pen: If the power button is not working properly, you can try using a stylus or a pen with a narrow tip to press the button more precisely.
If none of these steps work, it’s possible that the power button itself is defective or damaged. In this case, you may need to take your tablet to a professional technician or contact the manufacturer for further assistance.
Remember, the power button is the first thing to check, but it’s just one of many possible causes for a tablet that won’t turn on. If you still haven’t resolved the issue, proceed to the next section for more troubleshooting steps.
Connect to Power Source
Sometimes a tablet fails to turn on simply because it has run out of battery power. This may happen if you haven’t charged it for a while or if there was a sudden power drain. Here’s what you can do to ensure that your tablet is connected to a power source:
1. Check the charging cable: Make sure that the charging cable is securely connected to both the tablet and the power outlet or USB port. Sometimes a loose connection can prevent the tablet from receiving power.
2. Use a different charging cable or adapter: If the cable appears to be in good condition, try using a different charging cable or adapter to rule out any issues with the power source.
3. Verify the power outlet or USB port: Plug a different device into the same power outlet or USB port to check if it is providing power. If not, try a different outlet or port.
4. Check the charging indicator: Look for any charging indicator lights on your tablet. This can vary between different models, but typically there will be a light or icon that indicates the device is receiving power. If you don’t see any indication, it could indicate a problem with the charger or the tablet’s charging circuitry.
5. Let it charge for a while: Sometimes a tablet’s battery can be completely drained, which can take some time to recharge. Leave your tablet connected to the power source for at least 30 minutes to an hour, and then try turning it on again.
If your tablet still doesn’t turn on after following these steps, there may be other underlying issues. Proceed to the next section for additional troubleshooting methods.
Try a Forced Restart
If your tablet is still unresponsive even after connecting it to a power source, a forced restart might help resolve the issue. A forced restart can help reset the device’s system and clear any temporary glitches. Here’s how to perform a forced restart on different tablet models:
1. iPad or iPhone: Press and hold the Home button and the Power button simultaneously until the Apple logo appears on the screen. Release the buttons and wait for the device to restart.
2. Android Tablets: Depending on the make and model, the method for a forced restart may vary. Typically, you can press and hold the Power button and the Volume Down button simultaneously for about 10-15 seconds until the device vibrates or the manufacturer logo appears.
3. Windows Tablets: On Windows tablets, press and hold the Power button for at least 10-15 seconds until the device powers off. Wait for a few seconds, then press the Power button again to turn it back on.
4. Other Tablet Models: If you have a tablet from a different brand or model, refer to the manufacturer’s instructions or do an online search to find the specific method for a forced restart.
After performing a forced restart, wait for a few moments and then try turning on your tablet again. If it still won’t power on, continue to the next troubleshooting step.
Perform a Hard Reset
If a forced restart doesn’t resolve the issue, you can try performing a hard reset to troubleshoot further. A hard reset is a more extensive reset that clears the device’s memory and settings. However, please note that performing a hard reset will erase all data on your tablet, so it’s important to back up any important files beforehand. Here’s how to perform a hard reset on different tablet models:
1. iPad or iPhone: Press and hold the Home button and the Power button simultaneously for about 10 seconds, until you see the Apple logo. Release the buttons and wait for the device to restart. If you have an iPad without a Home button (such as the iPad Pro), press and quickly release the Volume Up button, press and quickly release the Volume Down button, and then press and hold the Power button until the device restarts.
2. Android Tablets: The process for a hard reset can vary depending on the tablet model. Typically, you need to turn off the tablet completely. Then, press and hold a combination of buttons, such as the Power button and Volume Up button, or the Power button and Volume Down button until you see the manufacturer logo or a recovery menu. Use the Volume buttons to navigate and the Power button to select the “Factory Reset” or “Wipe Data/Factory Reset” option. Confirm the reset and wait for the process to complete.
3. Windows Tablets: On Windows tablets, you can usually perform a hard reset by turning off the tablet completely. Then, press and hold the Power button and the Volume Up button (or Volume Down button) simultaneously for about 10-15 seconds until the device powers on and enters the recovery mode. Use the Volume buttons to navigate and the Power button to select the “Reset” or “Recover” option. Follow the on-screen prompts to initiate the hard reset.
Remember, a hard reset will erase all data on your tablet, so make sure to back up any important files before proceeding. If the tablet still won’t turn on after performing a hard reset, there may be other underlying issues. Continue to the next troubleshooting step for further solutions.
Check the Battery
If your tablet is still not powering on, it’s possible that the battery is the culprit. A faulty or drained battery can prevent the tablet from turning on. Here are a few steps you can take to check the battery:
1. Visual inspection: Check the battery for any visible signs of damage or swelling. A swollen or bloated battery is a clear indication of a problem and should be replaced immediately. If you notice any damage, it’s best to contact the manufacturer or a professional technician for assistance.
2. Remove and reinsert the battery (if possible): Some tablets allow for user-replaceable batteries. If your tablet has a removable battery, try removing it and reinserting it after a few seconds. This can help reset the battery and establish a solid connection.
3. Clean the battery contacts: Over time, dirt, dust, or corrosion can accumulate on the battery contacts, affecting the connection between the battery and the device. Use a soft cloth or cotton swab dipped in rubbing alcohol to gently clean the battery contacts. Ensure that they are free from any debris before reinserting the battery.
4. Test with a different battery: If you have access to a spare battery that is compatible with your tablet, try replacing the existing battery with the new one. This will help determine if the issue lies with the battery itself.
If none of these steps resolve the problem, it’s recommended to seek professional help or contact the manufacturer for further assistance. They will be able to provide you with specific instructions or guide you through the process of replacing the battery if necessary.
Remember, always exercise caution when handling batteries and follow the manufacturer’s instructions to ensure your safety and the proper functioning of your device.
Charge the Tablet
If your tablet is failing to turn on, it’s possible that the battery is completely drained. In this case, you need to charge the tablet to ensure it has enough power to start up. Here are some steps to follow:
1. Use the original charger: It’s important to use the charger that came with your tablet or a compatible charger recommended by the manufacturer. Other chargers may not provide the necessary power and could result in slower or ineffective charging.
2. Connect the charger properly: Ensure that the charging cable is securely plugged into both the tablet and a power source. Double-check that the connections are tight and not loose.
3. Wait for the charging indicator: Most tablets have a charging indicator light or an animated battery icon on the screen when plugged in. It may take a few minutes for the indicator to appear, so be patient. If you don’t see any indication, try a different power outlet or charger to rule out any charging-related issues.
4. Check the charging cable and port: Examine the charging cable for any signs of damage, such as frayed wires or bent pins. Also, inspect the charging port on the tablet for any debris, lint, or dirt that may be obstructing the connection. Clean the port gently with a soft brush or compressed air if necessary.
5. Charge for a sufficient time: Leave your tablet connected to the charger for at least 30 minutes to an hour, even if you don’t see immediate signs of charging. Sometimes, the battery may be completely drained and need time to accumulate enough power to turn on.
6. Attempt to turn on the tablet: After the charging time has elapsed, try turning on your tablet. If it still doesn’t power on, proceed to the next troubleshooting step.
Remember, the charging process may vary slightly depending on your tablet model. If you’re unsure about the charging procedure or facing any difficulties, refer to the manufacturer’s instructions or contact their support for device-specific guidance.
Check the Charging Cable and Port
If your tablet is not turning on, the issue could be with the charging cable or the charging port. It’s essential to examine both components to ensure they are functioning properly. Here’s what you can do:
1. Inspect the charging cable: Carefully examine the entire length of the charging cable, including the connectors at both ends. Look for any visible damage, such as frayed or exposed wires, bent pins, or loose connections. If you notice any issues, it’s best to replace the charging cable with a new one.
2. Try a different charging cable and adapter: If you have access to an alternate charging cable and adapter that are known to work correctly, try using them to charge your tablet. This will help determine if the problem lies with the original cable or adapter.
3. Clean the charging port: Over time, dust, lint, or debris can accumulate in the charging port of your tablet, preventing the charging cable from making a solid connection. Using a soft brush or compressed air, carefully clean the charging port to remove any obstructions. Avoid using sharp objects that may damage the port.
4. Test with different chargers: If possible, try using your tablet’s charging cable with a different charger, or use a different charging cable with your tablet’s original charger. This will help determine whether the issue lies with the cable, charger, or the tablet itself.
5. Check for compatibility issues: Some tablets have specific charging requirements, such as a particular voltage or amperage. Make sure that the charging cable and adapter you are using are compatible with your tablet model. Using incompatible accessories may result in slow or ineffective charging.
If, after performing these steps, your tablet still does not turn on or charge properly, there may be other underlying issues. Consider trying the troubleshooting steps in the following sections or contacting the manufacturer or technical support for further assistance.
Remember to handle the charging cable and port with care, and avoid applying excessive force or inserting foreign objects that may cause damage.
Replace the Charging Cable or Adapter
If you have checked the charging cable and determined that it is no longer working or damaged, or if you suspect the adapter is faulty, it may be necessary to replace them. Here’s what you can do:
1. Find a compatible charging cable and adapter: Ensure that you purchase a charging cable and adapter that are compatible with your tablet model. Refer to the manufacturer’s specifications or consult with their customer support if you are uncertain about the compatibility.
2. Look for quality accessories: While it can be tempting to opt for cheaper alternatives, investing in high-quality charging cables and adapters can make a significant difference. High-quality accessories are less likely to break or cause issues with charging, ensuring a reliable power supply for your tablet.
3. Read customer reviews: Before purchasing a new charging cable or adapter, take the time to read customer reviews and ratings. Look for feedback from other users who have experienced similar issues or have used the specific accessory you are considering. This will help you make an informed decision and find a reliable product.
4. Replace the charging cable: If you have determined that the cable is the issue, replace it with a new one. Connect the new cable securely to both the tablet and the power source, and try charging your tablet again. Check if the device powers on, indicating that the new cable is functioning correctly.
5. Replace the adapter: If you suspect the adapter is causing the problem, replace it with a new one of the same specifications. Ensure that it is compatible with your tablet and provides the recommended voltage and amperage. Connect the new adapter to a power source and use it with the new charging cable to see if your tablet charges properly.
By replacing the charging cable or adapter, you can eliminate any potential issues with these components and ensure a reliable power supply for your tablet. If the problem persists even with new accessories, proceed to the next troubleshooting step or contact the manufacturer or technical support for further assistance.
Perform a Software Update
If your tablet is experiencing power issues, it’s worth checking if there are any available software updates. Software updates often include bug fixes, performance improvements, and compatibility enhancements that can help resolve various issues. Here’s how to perform a software update:
1. Connect to Wi-Fi: Ensure that your tablet is connected to a stable Wi-Fi network. Software updates are typically downloaded and installed via an internet connection, so a reliable Wi-Fi connection is essential.
2. Check for updates: Go to the settings menu of your tablet and look for the “Software Update” or “System Update” option. This location might vary depending on your tablet’s make and model. Open the update section to check for any available updates.
3. Download and install updates: If there are updates available, follow the on-screen prompts to download and install them. The process may take some time, depending on the size of the update and your internet speed. Ensure that your tablet remains connected to power during the update process.
4. Restart your tablet: After the update is complete, restart your tablet to apply the changes. This step helps to ensure that the newly installed updates take effect and any underlying software issues are resolved.
Software updates can often fix bugs or glitches that may be causing power-related problems. It’s important to keep your tablet’s software up to date to benefit from these improvements and maintain optimal performance.
If the power issue persists even after performing a software update, proceed to the next troubleshooting step or contact the manufacturer or technical support for further assistance.
Note: It’s advisable to perform a backup of your important data before initiating a software update, as there is a slight chance of data loss or potential reconfiguration of certain settings during the update process.
Update or Reinstall Firmware
If your tablet is still not turning on, updating or reinstalling the firmware can help resolve issues related to the device’s operating system. Firmware is the software that controls the basic functions of your tablet, and updating it can fix bugs, improve stability, and enhance performance. Here’s what you can do:
1. Check for firmware updates: Visit the manufacturer’s website or refer to the tablet’s user manual to check if there are any firmware updates available for your specific model. If updates are available, follow the instructions provided by the manufacturer to download and install them.
2. Install firmware updates using the tablet: Some tablets have a built-in firmware update feature. Go to the settings menu and look for an option like “Software Update” or “Firmware Update”. Follow the on-screen instructions to update the firmware directly from the tablet.
3. Connect to a computer for firmware update: In certain cases, you may need to connect your tablet to a computer to update the firmware. Download the appropriate firmware update file from the manufacturer’s website and follow the instructions provided to install it onto your tablet using the computer.
4. Reinstall firmware: If the firmware update does not resolve the issue, you may need to reinstall the firmware from scratch. This involves downloading the firmware file from the manufacturer’s website, connecting the tablet to a computer, and using specific software (provided by the manufacturer) to reinstall the firmware.
Before updating or reinstalling the firmware, it’s essential to follow the manufacturer’s instructions carefully and ensure that you have a backup of your important data. Firmware updates and reinstallation can sometimes lead to data loss or device settings being reset to default.
If the issue persists even after updating or reinstalling the firmware, it’s recommended to contact the manufacturer’s support or seek professional assistance. They will be able to provide further guidance and help diagnose and solve the underlying problem.
Contact the Manufacturer or Technical Support
If all of the previous troubleshooting steps have not resolved the issue with your tablet’s power, it may be time to reach out to the manufacturer or technical support for further assistance. Here’s what you can do:
1. Check warranty and support options: Determine if your tablet is still under warranty. If it is, contact the manufacturer’s customer support or visit their website to explore warranty options. They may offer repair services or provide a replacement device, depending on the warranty terms.
2. Gather necessary information: Before reaching out to customer support, make sure to have the following information handy: the tablet’s make and model, serial number (if available), a description of the problem, and any troubleshooting steps you have already taken.
3. Contact customer support: Reach out to the manufacturer’s customer support through their provided channels. This can typically be done via phone, email, or online chat support. Explain the issue you’re facing and provide the necessary information. A customer support representative will guide you through the troubleshooting process or recommend the next steps.
4. Professional repair service: If your tablet is no longer covered by warranty or if the manufacturer recommends professional repair, they may provide you with information regarding authorized service centers or repair options. Consider following their guidance or taking your tablet to a professional technician for further diagnosis and repair.
Remember to remain patient and polite when dealing with customer support representatives. They are there to help you, and clear communication can facilitate a faster and more effective resolution to your tablet’s power issue.
If the manufacturer or technical support is unable to resolve the problem, consider seeking assistance from independent repair shops or contacting a qualified technician who specializes in tablet repairs.
By reaching out to the manufacturer or technical support, you can take advantage of their expertise and resources to properly diagnose and fix the underlying issue with your tablet’s power.