How to Fix a SSD
SSDs, or Solid State Drives, have become increasingly popular due to their high performance and reliability. However, like any storage device, SSDs can encounter issues that may affect their functionality. In this section, we will discuss some common SSD issues and provide step-by-step instructions on how to fix them.
1. SSD Not Detected: If your SSD is not being detected by your computer, the first thing you should do is check the connections. Ensure that the SATA cable is properly connected to both the SSD and the motherboard. If that doesn’t solve the issue, try connecting the SSD to a different SATA port or using a different cable. If the problem persists, you may need to update your motherboard’s firmware or consult a professional.
2. Slow Performance: If you notice that your SSD is performing slower than usual, there are a few steps you can take to improve its speed. First, make sure that the SSD is not nearly full, as a lack of free space can affect its performance. Next, update the SSD firmware to the latest version, as firmware updates often include performance improvements. Additionally, you can optimize the SSD by enabling TRIM and disabling unnecessary background processes.
3. Blue Screen of Death (BSOD) Errors: If you encounter frequent BSOD errors related to your SSD, it may be due to faulty drivers or firmware incompatibility. To fix this, update your SSD firmware to the latest version and ensure that your motherboard drivers are up to date. If the BSOD errors persist, you may need to uninstall any third-party software that interacts with your SSD, such as disk monitoring tools or antivirus programs.
4. File Corruption: If you are experiencing file corruption on your SSD, it could indicate a problem with the drive’s integrity. Run a disk check utility, such as chkdsk, to scan and repair any corrupt files. Additionally, make sure to regularly back up your important data to minimize the risk of permanent loss.
5. Overheating: Excessive heat can impact the performance and lifespan of your SSD. Ensure that your SSD is adequately cooled, either through proper ventilation in your computer case or by using additional cooling solutions such as heatsinks or fans. Avoid placing your computer in hot environments or on surfaces that block airflow.
6. Data Loss: If you have experienced data loss on your SSD, do not panic. There are specialized data recovery tools available that can help retrieve lost files. However, it is crucial to stop using the SSD immediately to prevent further damage and minimize the chances of overwriting the lost data.
By following these troubleshooting steps, you can resolve common issues with your SSD and restore its optimal performance. Remember to backup your data regularly and keep your SSD firmware up to date to prevent future problems. If you encounter persistent issues, it is recommended to seek professional assistance to avoid any further complications.
Introduction
As technology continues to advance at a rapid pace, solid state drives (SSDs) have emerged as a popular choice for storage due to their speed, reliability, and energy efficiency. Unlike traditional hard disk drives, SSDs use flash memory to store and retrieve data, resulting in faster boot-up times and improved performance. However, like any technology, SSDs can encounter issues that may hinder their functionality.
This article aims to provide guidance on how to fix common SSD issues. Whether you’re facing problems with SSD detection, slow performance, file corruption, or data loss, we’ll explore troubleshooting steps to help you resolve these issues. It’s important to note that while the steps mentioned here can address many common problems, some issues may require advanced technical knowledge or professional assistance.
In the following sections, we will delve into various SSD problems and guide you through the necessary steps to fix them. We’ll explain how to troubleshoot issues such as SSDs not being detected by your computer, slow performance, blue screen of death (BSOD) errors, file corruption, overheating, and data loss. By following these steps carefully, you’ll be able to regain the functionality of your SSD and optimize its performance.
In addition to troubleshooting steps, we’ll also provide tips on how to prevent SSD issues in the first place. By implementing proactive measures such as keeping your firmware up to date, optimizing the SSD, and taking appropriate precautions to avoid overheating, you can minimize the chances of encountering problems.
It’s important to remember that SSDs, like any electronic device, have a limited lifespan. Even with proper care and maintenance, they can eventually wear out over time. However, by understanding common SSD issues and knowing how to effectively resolve them, you can extend the life of your SSD and ensure optimal performance for as long as possible.
Now, let’s dive into the different sections of this article to learn how to fix common SSD issues and prevent future problems.
Section 1: Common SSD Issues
While SSDs are known for their reliability, they are not immune to issues that can arise over time. It’s essential to familiarize yourself with some common SSD problems so that you can identify and address them effectively. In this section, we’ll discuss the most common issues that SSD users encounter.
1. SSD Not Detected: One common issue is when your computer fails to detect the SSD. This can happen due to various reasons, such as loose cable connections, outdated drivers, or incompatible firmware. If your SSD is not being detected, ensure that the cables connecting the SSD to the motherboard are securely plugged in. If the connection is fine, try updating the motherboard drivers and SSD firmware. In some cases, you may need to check the BIOS settings and ensure that the SSD is enabled.
2. Slow Performance: Another frequently encountered problem is slow SSD performance. If you notice a decrease in speed or longer load times, it may be due to several factors. Insufficient free space, fragmented data, outdated firmware, or background processes consuming resources can all contribute to sluggish performance. To address this, ensure that you have enough free space on your SSD, regularly defragment your drive, update the firmware, and disable unnecessary background processes. These steps can help improve the overall speed and responsiveness of your SSD.
3. Blue Screen of Death (BSOD) Errors: SSD-related BSOD errors can be quite frustrating. These errors are often caused by faulty firmware, outdated drivers, or compatibility issues with certain software. To troubleshoot this issue, start by updating your SSD firmware to the latest version. Additionally, ensure that your motherboard drivers are up to date. If the problem persists, you may need to uninstall any third-party software that interacts with your SSD, such as disk monitoring tools or antivirus programs.
4. File Corruption: Data corruption is a significant concern for SSD users. Corrupted files can result in the loss of valuable data or render files unreadable. Some factors that contribute to file corruption include power outages, improper shutdowns, or even faulty SSD firmware. To fix file corruption on your SSD, you can run a disk check utility, such as chkdsk on Windows or fsck on macOS, to scan and repair any errors. It’s also crucial to establish a regular backup routine to mitigate the risk of data loss.
5. Overheating: SSDs generate heat during operation, and excessive heat can adversely affect their performance and lifespan. Insufficient airflow, improper installation, or high ambient temperatures can contribute to overheating. To resolve this issue, make sure that your SSD has proper ventilation in your computer case. Consider adding heatsinks or fans to keep the temperature within the recommended range. Placing your computer in a cool and well-ventilated area can also help prevent overheating.
6. Data Loss: Data loss can occur due to various reasons, including accidental deletion, formatting, or SSD failure. If you experience data loss on your SSD, stop using it immediately to prevent further damage. There are data recovery tools available that can help retrieve lost files, but it’s crucial to act quickly and seek professional assistance if needed.
By understanding these common SSD issues, you’ll be better equipped to identify and troubleshoot problems that may arise with your SSD. In the following sections, we’ll provide step-by-step instructions on how to fix and prevent these issues, allowing you to get the most out of your SSD while ensuring the safety of your data.
Section 2: Troubleshooting Steps
When you encounter issues with your SSD, it’s crucial to follow a systematic approach to troubleshooting. This section will provide step-by-step instructions on how to address common SSD problems.
1. Check Connections: Begin by checking the cables connecting your SSD to the motherboard. Ensure that they are securely plugged in. If the connections are loose, disconnect and reconnect them to ensure a proper connection. Additionally, try using a different SATA cable or connecting the SSD to a different SATA port to rule out any cable or port issues.
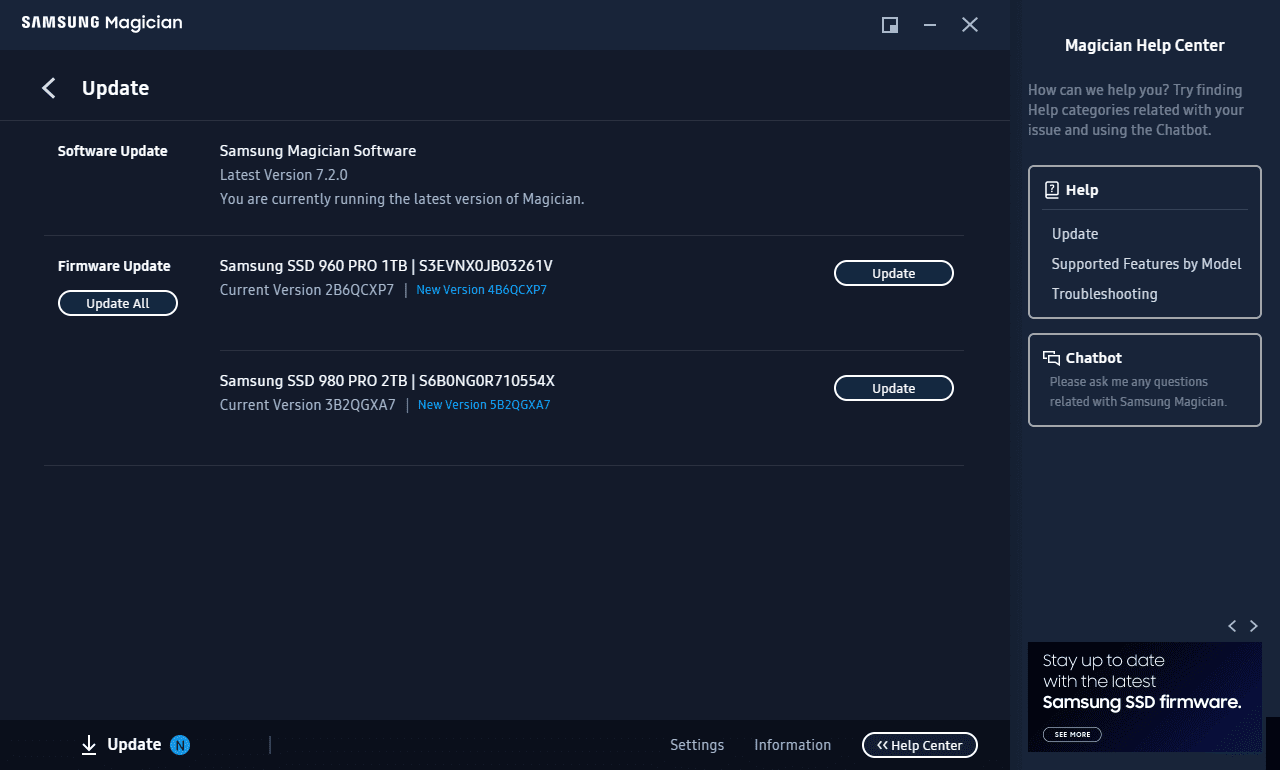
2. Update Firmware: Check if there are any firmware updates available for your SSD. Manufacturers often release firmware updates to address bugs and improve performance. Visit the manufacturer’s website and download the latest firmware for your specific SSD model. Follow the provided instructions carefully to update the firmware, as improper firmware updates can cause further issues.
3. Update Drivers: Ensure that your SSD’s drivers are up to date. Outdated drivers can lead to compatibility issues and performance problems. Visit your motherboard manufacturer’s website or the SSD manufacturer’s website to download and install the latest drivers for your SSD. Updating the drivers can help resolve compatibility issues and improve performance.
4. Run Diagnostic Tools: Many SSD manufacturers provide diagnostic software that can identify and fix SSD-related problems. These tools can scan your SSD for errors and provide recommendations for fixing them. Check the manufacturer’s website for any diagnostic tools related to your SSD and follow the instructions to run the tool and address any issues found.
5. Check for Incompatibility: Some SSDs may have compatibility issues with specific hardware configurations or software. If you recently upgraded or changed any hardware components, such as the motherboard or CPU, double-check if your SSD is compatible with the new components. Consider consulting the manufacturer’s documentation or support resources for any known compatibility issues or workarounds.
6. Reset BIOS Settings: If you’ve made changes to the BIOS settings and are experiencing issues with your SSD, resetting the BIOS to its default settings can help resolve the problem. Consult your motherboard’s manual or manufacturer’s website for instructions on how to reset the BIOS. Resetting the BIOS will revert any changes you made, ensuring that the SSD is properly recognized and configured.
7. Try on a Different Computer: If you’ve followed the above steps and are still experiencing issues with your SSD, try connecting it to a different computer. This will help determine if the problem lies with the SSD or with your computer’s configuration. If the SSD works properly on a different computer, it indicates that there may be an underlying issue with your computer’s hardware or software configuration that needs further investigation.
By following these troubleshooting steps, you’ll be able to address common SSD issues and determine the root cause of the problem. If the issue persists or you encounter more complex problems, it’s advisable to seek professional assistance or contact the manufacturer’s support for further guidance.
Section 3: Fixing Corrupted Files
Dealing with corrupted files on your SSD can be frustrating, but there are steps you can take to fix the issue. In this section, we will guide you through the process of repairing corrupted files on your SSD.
1. Run Disk Check Utility: The first step in fixing corrupted files is to run a disk check utility on your SSD. On Windows, you can use the built-in chkdsk command, while on macOS, you can use the fsck command in the Terminal. These utilities scan the drive for errors and repair any logical file system issues. Follow the instructions carefully and let the scan complete. Once the scan finishes, the utility will attempt to fix any identified issues.
2. Use File Recovery Software: If the disk check utility fails to repair the corrupted files or if you accidentally deleted files, you can use specialized file recovery software. There are several reliable software options available, such as Recuva for Windows or Disk Drill for macOS. These tools can scan your SSD for deleted or lost files and attempt to recover them. It’s important to note that the chances of successful recovery decrease if you continue using the SSD after data loss, as new data can overwrite the deleted files.
3. Restore Files from Backup: If you have a recent backup of your important files, restoring them from the backup is the most reliable and efficient solution. Regularly backing up your data ensures that you have a copy of your files in the event of data loss or corruption. Use the backup software or service you prefer to restore the affected files to their original locations on the SSD.
4. Format and Reinstall OS: If the corruption appears to be widespread or if previous methods have failed to resolve the issue, you may consider formatting the SSD and performing a clean installation of the operating system. This will erase all data on the SSD, so make sure to back up your files before proceeding. This method is a more drastic solution, but it can help resolve file corruption issues that other methods cannot fix. Remember to reinstall all necessary programs and drivers after the clean installation.
5. Contact Professional Data Recovery Services: If all else fails, and the corrupted files hold critical importance, you may want to consider seeking professional data recovery services. Professional data recovery specialists have specialized tools and expertise to recover data from damaged storage devices. However, professional data recovery services can be costly, so it’s essential to weigh the importance of the data against the potential cost.
Fixing corrupted files on your SSD requires a cautious approach. Ensure that you have a backup of your important files before attempting any repairs. It’s also important to note that prevention is key. Regularly backing up your data and maintaining the health of your SSD through firmware updates and regular scans can help prevent file corruption in the future.
By following these steps and using the appropriate tools, you can increase the chances of resolving file corruption issues and recovering your important data from your SSD.
Section 4: Repairing Bad Sectors
Bad sectors on an SSD can cause data loss, slow performance, and other issues. In this section, we will discuss how to identify and repair bad sectors on your SSD.
1. Check SMART Status: The first step in dealing with bad sectors is to check the SMART (Self-Monitoring, Analysis, and Reporting Technology) status of your SSD. Open the SMART monitoring tool specific to your SSD, which can typically be accessed through the SSD manufacturer’s software or third-party disk utility programs. Check the SMART attributes and look for any indications of bad sectors or disk errors. If the SMART report shows a significant number of reallocating or pending sectors, it’s likely that your SSD has bad sectors.
2. Backup Important Data: Before attempting to repair bad sectors, it’s crucial to back up any important data on your SSD. Repairing bad sectors can involve actions that could potentially lead to data loss. Creating a backup ensures that your data is safe in case of any unexpected issues during the repair process.
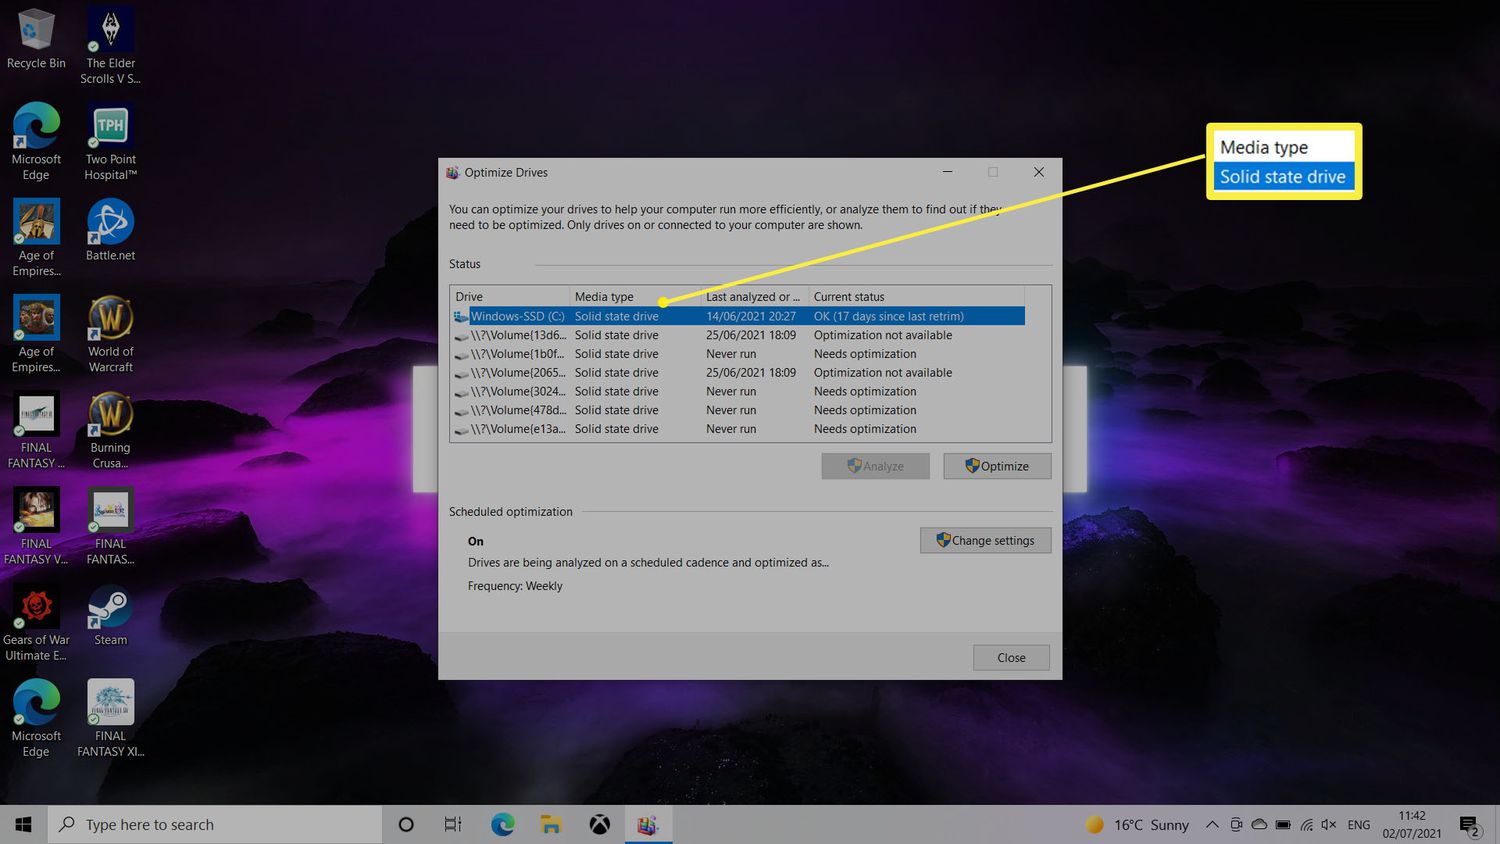
3. Perform a Full Format: A full format can help identify and isolate bad sectors on your SSD. Open the Disk Management utility on Windows or the Disk Utility on macOS. Locate your SSD, right-click on the partition, and select “Format.” Choose the full format option to scan and repair any bad sectors. Keep in mind that this process will erase all data on the SSD, so ensure that you have a backup before proceeding.
4. Use Third-Party Repair Tools: There are specialized third-party tools available that can help repair bad sectors on your SSD. These tools often have advanced algorithms to scan and attempt to repair the bad sectors. Research reputable options such as HDAT2, Victoria, or SpinRite and follow the instructions provided by the software. Keep in mind that while these tools can be effective, they may not be able to fix all bad sectors.
5. Contact Manufacturer Support: If you’re unable to repair bad sectors using the above methods, it’s recommended to contact the SSD manufacturer’s support. They may have specific tools or firmware updates designed to address bad sector issues. Provide them with detailed information about the problem and any steps you’ve taken to resolve it. They can guide you further and provide specific instructions based on your SSD model.
6. Consider Professional Data Recovery: If the bad sectors on your SSD are causing data loss or if you’re unable to repair them using the available tools, it may be necessary to seek professional data recovery services. Professional data recovery specialists have the expertise and tools to recover data from damaged storage devices. However, keep in mind that professional data recovery can be expensive, so evaluate the importance of the data against the cost.
Repairing bad sectors on your SSD is a challenging task that requires caution and understanding. Always make sure to back up your important data before attempting any repairs. It’s also important to note that prevention is key. Regularly backing up your data, performing regular disk scans, and ensuring your firmware is up to date can help prevent bad sectors from developing in the first place.
By following these steps and seeking professional help if needed, you can address bad sectors on your SSD and ensure the longevity and performance of your storage device.
Section 5: Updating SSD Firmware
Updating the firmware of your SSD is crucial for optimizing performance, fixing bugs, and improving compatibility with the latest hardware and software. In this section, we will explore the importance of updating SSD firmware and provide step-by-step instructions on how to do so.
1. Understand the Benefits: Updating your SSD firmware offers several benefits. It can enhance overall performance by improving read and write speeds and reducing latency. Firmware updates may also resolve compatibility issues, ensure proper functioning with the latest operating systems, and address known bugs or security vulnerabilities. Keeping your SSD firmware up to date is essential to get the most out of your storage device.
2. Check for Updates: Start by checking if there is a firmware update available for your SSD. Visit the manufacturer’s website and navigate to the support or downloads section. Locate your SSD model and check for firmware updates. Read the release notes accompanying the update to determine if it addresses any specific issues you may be experiencing or offers new features.
3. Backup Your Data: Before proceeding with the firmware update, it’s crucial to back up your important data. While updating firmware is a relatively safe process, there is always a small risk of data loss due to unforeseen issues during the update. Having a backup ensures that your data is protected in case of any unexpected problems.
4. Download and Install Firmware: Once you’ve confirmed the availability of a firmware update and backed up your data, download the firmware update tool provided by the manufacturer. Follow the instructions provided on their website or in the documentation to install the update. Make sure to carefully read and comply with any warnings or precautions mentioned during the installation process.
5. Perform the Firmware Update: After installing the firmware update tool, connect your SSD and launch the tool. The tool should recognize the connected SSD and display an option to update the firmware. Select the appropriate firmware update for your SSD and start the update process. Avoid interrupting the update, as it can potentially cause issues with the SSD. Once the update is complete, the tool will notify you, and you can safely disconnect and restart your system.
6. Verify the Firmware Update: After updating the firmware, it’s vital to verify that the update was successful. Reconnect your SSD and ensure that the system recognizes it. Check the SSD’s firmware version in the software provided by the manufacturer or in your operating system’s device manager. Confirm that it matches the latest firmware version mentioned on the manufacturer’s website.
Regularly updating your SSD firmware ensures optimal performance, compatibility, and reliability. It’s recommended to periodically check for firmware updates, especially after major operating system updates or changes in hardware. Keeping your SSD firmware up to date maximizes the lifespan and functionality of your SSD.
Remember, firmware updates are specific to each SSD model, so ensure that you download the correct firmware for your SSD. If you encounter any issues during the firmware update process or have questions, consult the manufacturer’s website or contact their support for further assistance.
Section 6: Tips for Preventing SSD Issues
Prevention is key when it comes to maintaining the health and performance of your SSD. In this section, we will provide you with some essential tips to help prevent common SSD issues and ensure the longevity of your storage device.
1. Regularly Update Firmware: Keeping your SSD firmware up to date is essential for optimal performance and compatibility. Regularly check for firmware updates on the manufacturer’s website and install them when available. Firmware updates often include bug fixes, performance improvements, and compatibility enhancements.
2. Enable TRIM: TRIM is a feature that helps maintain SSD performance over time. It allows the operating system to inform the SSD which blocks of data are no longer in use, allowing the drive to optimize its performance and lifespan. Ensure that TRIM is enabled on your SSD by verifying the settings in your operating system. TRIM is usually enabled by default, but it’s good practice to double-check.
3. Optimize SSD Settings: Make sure that you have optimized your SSD settings for performance. Disable any power-saving or sleep modes specific to your SSD in your operating system’s settings. These modes can cause delays in data retrieval and impact SSD performance.
4. Avoid Full Capacity Usage: Keeping your SSD from reaching its maximum capacity is important for maintaining performance. When an SSD is near full capacity, it has less room for background operations like garbage collection and wear leveling, which can negatively affect performance. Aim to keep your SSD usage below 80% of its total capacity.
5. Keep Your System Cool: Heat can impact the performance and lifespan of your SSD. Ensure that your system and SSD are adequately cooled. Proper ventilation in your computer case, additional cooling solutions like heatsinks or fans, and avoiding placing your computer in hot environments can all help prevent overheating of the SSD.
6. Avoid Power Surges and Sudden Power Loss: Power surges and sudden power loss can result in data corruption or damage to the SSD. Use a reliable surge protector to protect your computer system from power fluctuations, and consider investing in an uninterruptible power supply (UPS) to provide backup to your computer during power outages.
7. Perform Regular Data Backups: Regularly backing up your important data is crucial to prevent data loss in case of SSD failure or other issues. Utilize reliable backup solutions, such as external hard drives, network-attached storage (NAS), or cloud-based backup services, to ensure that your data is safely stored.
8. Handle Your SSD with Care: SSDs are sensitive to physical shocks and static electricity. Handle your SSD with care and avoid dropping or subjecting it to excessive impact. When installing or removing the SSD, make sure to ground yourself properly to prevent static discharge that can damage the drive.
By following these preventative measures, you can minimize the chances of encountering SSD issues and ensure the longevity and optimal performance of your storage device. Regular software and firmware updates, proper cooling, cautious handling, and data backups are essential practices to keep your SSD running smoothly for years to come.
Conclusion
SSDs have revolutionized the storage industry with their speed, reliability, and energy efficiency. However, even these advanced storage devices are not immune to issues that can impact their functionality. In this article, we have discussed common SSD issues and provided step-by-step instructions on how to address them.
We began by introducing the different problems that SSD users may encounter, including SSD detection issues, slow performance, BSOD errors, file corruption, overheating, and data loss. We then provided troubleshooting steps to help identify and resolve these issues, emphasizing the importance of checking connections, updating firmware and drivers, running diagnostic tools, checking for incompatibility, and seeking professional assistance if needed.
We also explored techniques for repairing corrupted files and dealing with bad sectors on an SSD. We discussed the significance of running disk check utilities, using file recovery software, restoring files from backup, and formatting the SSD. We explained how to update the SSD firmware to optimize performance, fix bugs, and improve compatibility with the latest hardware and software. Additionally, we provided tips for preventing SSD issues, including regularly updating firmware, enabling TRIM, optimizing SSD settings, avoiding full capacity usage, keeping the system cool, protecting against power surges, performing regular data backups, and handling the SSD with care.
By following the recommendations in this article, you can effectively troubleshoot common SSD issues, prevent potential problems, and ensure the longevity and optimal performance of your SSD. However, it’s essential to remember that each SSD is unique, and some issues may require advanced technical knowledge or professional assistance. In such cases, don’t hesitate to reach out to the manufacturer’s support or consult with experts in the field.
Remember, proactive measures like keeping firmware up to date, performing regular backups, and maintaining proper SSD care can go a long way in avoiding complications. A well-maintained SSD will provide you with reliable and high-performance storage for years to come.