Introduction
Welcome to this guide on how to factory reset your Whoop Tablet. If you’re experiencing issues with your tablet or simply want to start fresh, a factory reset can help resolve software glitches and restore your device to its original settings. In this article, we will walk you through the steps required to perform a factory reset on your Whoop Tablet.
Before proceeding with a factory reset, it’s important to understand that this process erases all data and settings on your tablet. Therefore, it’s crucial to back up any important files, such as photos, videos, and documents, before initiating the reset. Additionally, make sure you have the necessary login information for any accounts or services connected to your tablet, as you will need to sign in again after the reset.
Performing a factory reset on your Whoop Tablet can help address various issues, such as unresponsive apps, frequent crashes, or sluggish performance. It essentially reverts your device back to its original state when you first purchased it, eliminating any software conflicts or corrupted data that may be causing problems.
In the following sections, we will guide you step-by-step through the factory reset process. We will also provide troubleshooting tips for common issues that may arise during the reset. So, let’s get started and learn how to factory reset your Whoop Tablet.
Why should you factory reset your Whoop Tablet?
There are several reasons why you might consider performing a factory reset on your Whoop Tablet. Let’s explore some of the key benefits of this process:
1. Resolving Software Issues: Over time, your tablet’s software may encounter various glitches or conflicts that can impact its performance. These issues can lead to slow responsiveness, app crashes, and other frustrating experiences. By performing a factory reset, you can eliminate these software problems and start fresh with a clean slate.
2. Removing Unwanted Files and Apps: As you use your tablet, it’s common for unnecessary files, cached data, and unused apps to accumulate on your device. These files take up valuable storage space and can cause your tablet to slow down. A factory reset allows you to clear out all these unwanted files, providing you with more storage and a faster, more efficient tablet.
3. Enhancing Security: If you plan to sell or give away your Whoop Tablet, performing a factory reset is essential to protect your personal information. The reset erases all data, including your accounts, passwords, and personal files, ensuring that none of your private data is accessible to others.
4. Starting Fresh: Sometimes, you may find that your tablet is cluttered with unnecessary settings, customizations, or changes that you no longer want or need. A factory reset allows you to return your tablet to its original settings and configuration, providing you with a fresh start to customize and set up your device as per your preferences.
5. Troubleshooting Persistent Issues: If you have tried other troubleshooting methods and your tablet still experiences persistent problems, performing a factory reset can be a last resort. It eliminates any software conflicts, incompatible settings, or corrupt data that may be causing the issues, giving you a chance to start again with a clean operating system.
By understanding the reasons to factory reset your Whoop Tablet, you can make an informed decision on whether this process is necessary for your device. Remember to back up your data and consider the potential impacts before proceeding with the reset. Now, let’s move on to the next section and prepare for the factory reset process.
Before you start: Important things to consider
Before proceeding with a factory reset on your Whoop Tablet, it’s crucial to take a few important factors into consideration. By preparing in advance, you can ensure a smooth and hassle-free reset process. Here are some key things to keep in mind:
1. Backup Your Data: As mentioned earlier, performing a factory reset erases all data on your tablet. It’s crucial to back up any important files, such as photos, videos, documents, and app data, to prevent permanent loss. You can use cloud storage services, an external hard drive, or transfer files to another device to create a backup. Double-check that you have successfully backed up all critical data before proceeding.
2. Disconnect from Accounts and Services: Before initiating the factory reset, make sure to disconnect your Whoop Tablet from all accounts and services. This includes accounts like Google, email, social media, and any other services tied to your tablet. Sign out from these accounts and consider removing any associated data from your tablet to ensure a clean reset.
3. Note Down Important Information: Take note of any login credentials for accounts or services that are linked to your Whoop Tablet. These can include usernames, passwords, and any account recovery information. Having this information readily available will make it easier to set up your tablet again after the reset.
4. Prepare for App and Data Reinstallation: After performing a factory reset, all installed apps and their associated data will be removed from your tablet. Make a list of the apps you want to reinstall and note down any settings or customization preferences that you may need to reconfigure. This will help you quickly restore your tablet’s functionality and personalize it to your liking.
5. Ensure Sufficient Battery and Stable Connection: It’s important to ensure that your Whoop Tablet has sufficient battery power before starting the factory reset. A low battery can interrupt the reset process and potentially cause issues. Additionally, connect your tablet to a stable Wi-Fi network for a faster and smoother reset process.
By considering these important factors beforehand, you can be well-prepared for the factory reset process on your Whoop Tablet. Once you have completed these preparations, you can proceed to the next section and begin the reset process.
Step 1: Back up your data
Before you initiate the factory reset on your Whoop Tablet, it’s crucial to back up all your important data. This will ensure that you don’t lose any valuable information during the reset process. Here’s how you can back up your data:
1. Photos and Videos: If you have important photos or videos saved on your tablet, consider transferring them to an external storage device such as a computer, hard drive, or cloud storage service. You can connect your tablet to your computer using a USB cable and copy the files to a desired location. Alternatively, you can use cloud storage apps or services to upload and sync your media files.
2. Documents and Files: Similarly, if you have important documents or files stored on your tablet, make sure to create a backup. You can either transfer them to your computer or upload them to a cloud storage service like Google Drive, Dropbox, or Microsoft OneDrive. This will ensure that you can access these files from any device even after the factory reset.
3. App Data and Settings: Some apps store data and settings locally on your tablet. If you want to preserve your app data and settings, check if the app provides an option to backup or sync data to the cloud. For example, many email apps allow you to sync your emails, contacts, and calendar to your account, so you can easily set them up again after the reset. Take note of any important app-specific settings or configurations that you may want to restore later.
4. Check Google Backup Settings: If your Whoop Tablet is connected to a Google account, ensure that you have enabled the backup and sync settings for your device. This will automatically backup important data like contacts, app data, Wi-Fi passwords, and more to your Google account. To check these settings, go to “Settings” > “Backup & restore” on your tablet and verify that the appropriate options are enabled.
It’s important to note that some app data and settings may not be fully backed up depending on the app and its compatibility with the backup services. To ensure a complete backup, consider exploring third-party backup apps that allow you to backup and restore your entire tablet’s data.
Once you have successfully backed up your data, you can proceed to the next step of disconnecting from accounts and services before initiating the factory reset process.
Step 2: Disconnect from all accounts and services
Before you proceed with the factory reset on your Whoop Tablet, it’s important to disconnect from all accounts and services associated with your device. This step ensures that your personal information and data are not accessible to others and prepares your tablet for a fresh start. Follow these steps to disconnect from accounts and services:
1. Google Account: If your tablet is connected to a Google account, navigate to the Settings app and tap on “Accounts” or “Users & accounts”. Select your Google account and tap on “Remove account” or “Sign out” to disconnect your device from the account. This will sign you out from all Google services and remove the account from your tablet.
2. Email and Social Media Accounts: For any email or social media accounts that are configured on your Whoop Tablet, open the respective apps and sign out from your account. Look for the account settings or profile section within the app and select the option to sign out or remove the account.
3. Other Accounts and Services: Consider any other accounts or services that are linked to your tablet, such as messaging apps, cloud storage services, or online shopping accounts. Open the respective apps and sign out or remove the account from the settings or account management section.
4. Remove Personal Data: Before the factory reset, take a moment to delete any personal data stored within certain apps or services. For example, clear browser history and cache, delete saved passwords, and remove any stored payment information. This ensures that no personal information is left on the tablet after the reset.
By disconnecting from all accounts and services, you are ensuring that your tablet is not tied to any personal information or data. It’s important to note that after performing the factory reset, you will need to sign in again to your accounts and services to regain access. So, make sure to have the necessary login credentials handy for an easy setup process.
Once you have disconnected from all accounts and services, you are ready to proceed to the next step, where we will locate the Factory Reset option on your Whoop Tablet.
Step 3: Locate the Factory Reset option
Now that you have backed up your data and disconnected from all accounts and services, it’s time to locate the Factory Reset option on your Whoop Tablet. The location of this option may vary depending on the specific model and operating system version of your tablet. Follow these general steps to find the Factory Reset option:
1. Open the Settings App: From your tablet’s home screen, swipe down from the top to access the notification panel, and tap on the gear-shaped icon or look for the Settings app in your app drawer. Alternatively, you may find the Settings app directly on your home screen.
2. Navigate to System or General Management: Within the Settings app, look for either “System” or “General Management” (or a similar option) and tap on it. This is where you will find system-related settings and options.
3. Look for Reset Options: Within the System or General Management menu, you should find an option named “Reset” or “Reset Options.” Tap on it to proceed.
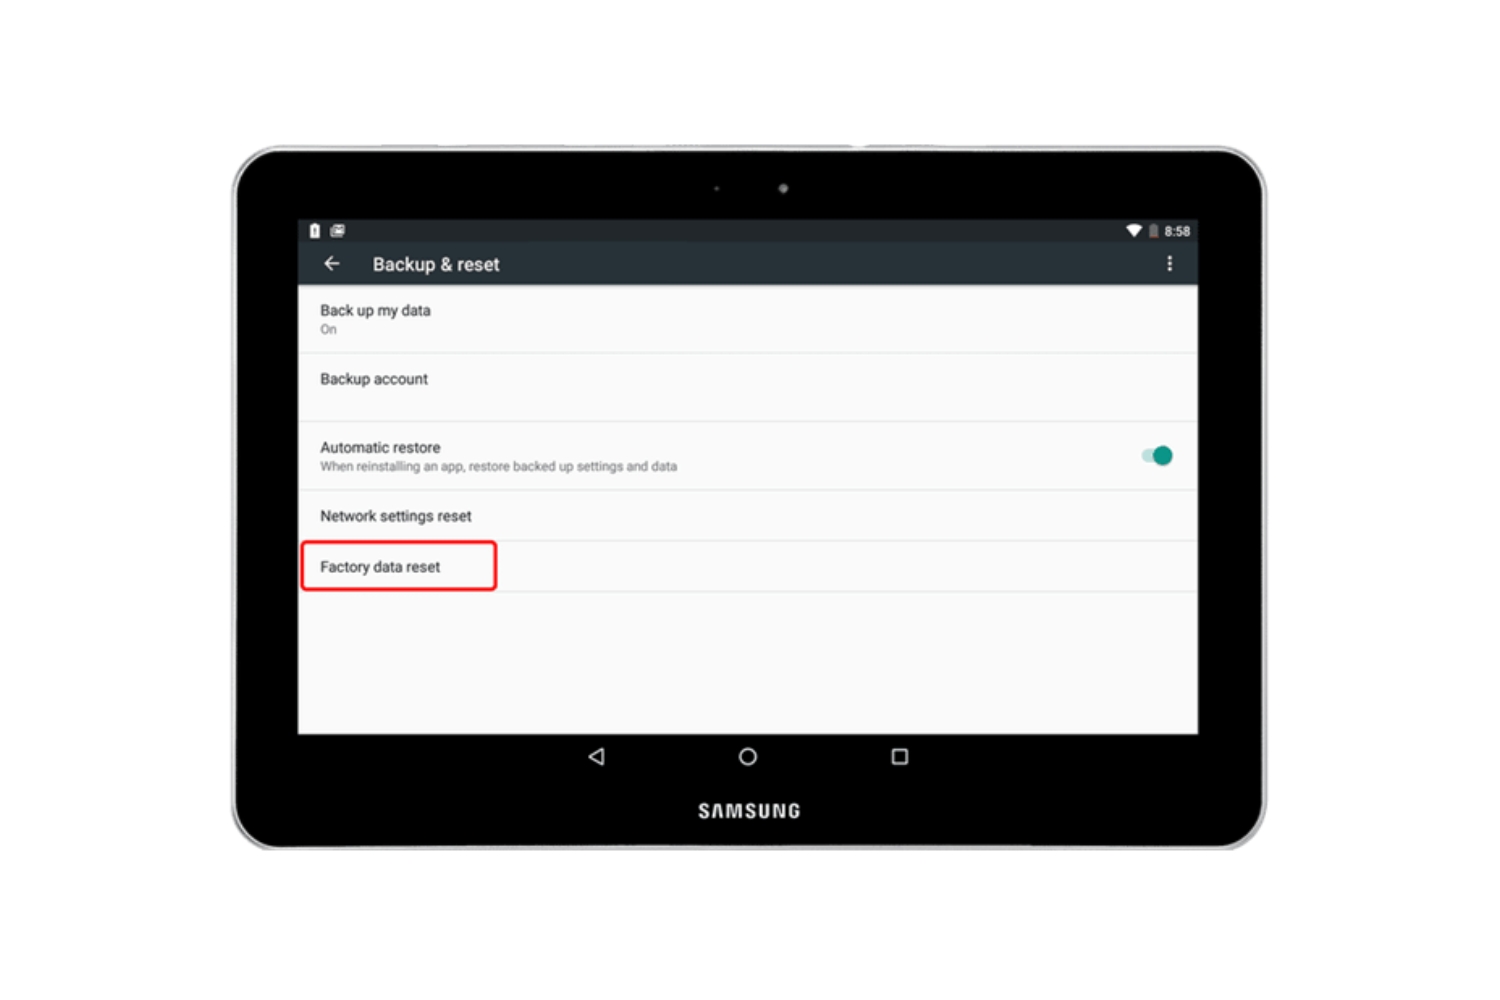
4. Find Factory Reset: In the Reset Options menu, look for an option called “Factory Reset” or “System Reset.” This is the option you need to select to initiate the factory reset process.
It’s important to note that the precise wording and location of these options may vary. If you’re having trouble finding the Factory Reset option, refer to the user manual or instructions specific to your Whoop Tablet model for assistance.
Remember that performing a factory reset will erase all data on your tablet, so double-check that you have backed up any important files before proceeding. Take a moment to ensure that you have followed the necessary steps to disconnect from accounts and services as well.
Once you have located the Factory Reset option, you are ready to proceed to the next step and initiate the factory reset process on your Whoop Tablet.
Step 4: Begin the Factory Reset process
After locating the Factory Reset option on your Whoop Tablet, it’s time to initiate the reset process. This step will erase all data and settings on your tablet, so ensure that you have backed up any important files and disconnected from all accounts and services. Follow these steps to begin the Factory Reset process:
1. Tap on Factory Reset Option: Within the Reset Options menu, tap on the option that corresponds to Factory Reset or System Reset. This will open the confirmation screen for the reset process.
2. Read and Confirm the Warning: On the confirmation screen, you will see a warning message informing you that all data on your tablet will be erased. Make sure to read the warning carefully and understand the implications of the reset. Tap on the “Confirm” or “Reset” button to proceed.
3. Enter Security Credentials: To confirm the Factory Reset, your tablet may require you to enter a PIN, pattern, or password that you had set up previously. Enter the security credentials correctly, and then tap on “Reset” or “Erase Everything.”
4. Wait for the Reset Process: The Factory Reset process will now begin. Your tablet may display a progress bar or a series of messages indicating that it is erasing and resetting the device. The duration of the reset process will depend on the model and the amount of data on your tablet. Be patient and avoid interrupting the process.
5. Complete the Factory Reset: Once the reset process is complete, your Whoop Tablet will restart. You will be taken to the initial device setup screen as if you are setting up a new tablet.
It’s important to note that the exact steps and options may vary depending on your specific Whoop Tablet model and the version of the operating system it is running. If you encounter any difficulties or have trouble finding the necessary options, refer to the user manual or consult the official support resources provided by Whoop.
With the Factory Reset process initiated, you have effectively erased all data and settings on your Whoop Tablet. In the next step, we will cover how to confirm the reset and wait for the process to complete.
Step 5: Confirm the reset
After initiating the Factory Reset process on your Whoop Tablet, the next step is to confirm the reset and ensure that you are ready to proceed. This step is crucial as it finalizes the reset and begins the erasure of all data on your tablet. Follow these steps to confirm the reset:
1. Read the Confirmation Message: Once you have initiated the Factory Reset, your tablet will display a confirmation message informing you that all data and settings will be deleted. Take a moment to carefully read this message and understand that the reset is irreversible. Pay attention to any additional information or warnings provided.
2. Confirm the Reset: To proceed with the Factory Reset, you will need to confirm your decision. This is typically done by tapping on the “Confirm,” “Reset,” or “Erase Everything” button on the confirmation screen. Make sure you are confident in your choice to proceed with the reset before confirming.
3. Verify Security Credentials: In some cases, your tablet may require you to verify your security credentials, such as entering your PIN, pattern, or password, to confirm the reset. This additional step is in place as an added security measure to ensure that the reset is authorized by the device owner.
4. Wait for the Reset to Begin: Once you have confirmed the reset, your tablet will begin the process of erasing all data and restoring it to its factory settings. This may take some time, depending on the model and the amount of data on your tablet. It’s important to be patient and avoid interrupting the process.
5. Follow any Additional Prompts: During the reset process, you may encounter additional prompts or messages that require your attention. These prompts could be related to granting permissions, confirming settings, or accepting terms and conditions. Make sure to read and respond to these prompts accordingly to ensure a successful reset.
By confirming the reset, you are giving your consent to erase all data and settings on your Whoop Tablet. It’s crucial to have a backup of any important files and ensure that you have disconnected from accounts and services before proceeding. Once the reset is confirmed, you will need to wait for the process to complete, which leads us to the next step: waiting for the reset to finish.
Step 6: Wait for the reset to complete
After confirming the Factory Reset on your Whoop Tablet, it’s time to wait for the reset process to complete. This step is crucial as it ensures that all data and settings are erased, and the device is restored to its factory condition. Here are some important points to keep in mind while waiting for the reset to finish:
1. Be Patient: The reset process may take some time, depending on the model and the amount of data on your tablet. It is essential to be patient and avoid interrupting the process. Trying to restart, power off, or interfere with the reset can lead to incomplete or unsuccessful reset, potentially causing further issues with your tablet.
2. Avoid Using the Tablet: While the reset is in progress, it is advisable to avoid using your tablet for other tasks. This can help ensure that the reset process proceeds smoothly without any interruptions. It’s best to set aside some dedicated time for the reset and refrain from launching any apps or performing any actions that could interfere with the process.
3. Keep the Tablet Plugged In: To ensure that your tablet does not run out of battery during the reset process, it is recommended to keep it connected to a power source. Plugging the tablet into a wall outlet or connecting it to a charger will help prevent any unexpected power loss that could interrupt the reset.
4. Monitor the Progress: Some tablets may display a progress indicator or messages showing the status of the reset process. Monitor these indicators if available to get an idea of how long the process is expected to take. However, keep in mind that the actual time may vary depending on the specific model and the amount of data on your tablet.
5. Be Prepared for Set-Up: Once the reset process is complete, your tablet will reboot and present the initial set-up screen. This is similar to the setup process you went through when you first acquired the tablet. Be ready to configure language preferences, Wi-Fi connection, sign in to your accounts, and install apps as needed to set up your device anew.
By patiently waiting for the reset to complete and following the recommended guidelines, you can ensure a successful factory reset of your Whoop Tablet. Once the reset finishes, you will be ready to move on to the final step: setting up your tablet again.
Step 7: Set up your Whoop Tablet again
After the factory reset process on your Whoop Tablet is complete, it’s time to set up your device again. This step allows you to customize your tablet’s settings, restore your backed-up data, and reinstall any necessary apps. Follow these steps to set up your Whoop Tablet:
1. Choose Your Language: On the initial setup screen, you will be prompted to select your preferred language. Tap on the appropriate language to proceed.
2. Connect to Wi-Fi: Next, you will need to connect your tablet to a Wi-Fi network. Tap on the network you want to connect to and enter the Wi-Fi password if required.
3. Sign in to Your Google Account: If you previously associated a Google account with your tablet, you will be prompted to sign in or set up an account. Enter your account credentials or follow the on-screen instructions to create a new Google account if needed.
4. Restore Data and Settings: If you have backed up your data and settings, you can choose to restore them during this setup process. Your tablet may offer an option to restore from a backup or sync your data from your Google account. Follow the prompts to restore your backed-up data.
5. Install Apps: Depending on your preferences, you can choose to reinstall your previously installed apps or start fresh with a clean slate. You can use the Google Play Store or other app stores to search for and install the apps you need. Take this opportunity to only reinstall the apps that are essential to you, which can improve performance and minimize clutter on your tablet.
6. Complete the Setup: After configuring your desired settings, restoring data, and installing apps, follow any additional prompts or instructions until you reach the home screen of your Whoop Tablet. You have now successfully set up your tablet again.
Take this opportunity to explore the settings and customize your tablet according to your preferences. Adjust display settings, security preferences, notifications, and any other options as desired to optimize your tablet experience.
It’s worth mentioning that setting up your tablet may also involve accepting terms and conditions, configuring app permissions, and setting up additional accounts or services. Follow the on-screen instructions and prompts to complete the setup process.
With your Whoop Tablet set up again, you can now enjoy a fresh start with your device, free from any previous issues or clutter. Take the time to personalize your tablet and tailor it to your specific needs and preferences.
Troubleshooting common issues during the Factory Reset process
While performing a factory reset on your Whoop Tablet is a relatively straightforward process, you may encounter some common issues or challenges along the way. Here are a few troubleshooting tips to help you overcome potential hurdles:
1. Device Not Powering On: If your tablet does not power on after the reset, ensure that it is charged. Connect it to a power source and wait for a few minutes before attempting to power it on again. If the issue persists, try performing a hard reset by holding down the power button and volume down button simultaneously for about 10 seconds. This will force the tablet to reboot.
2. Stuck on Boot Loop: In some cases, the tablet may get stuck in a boot loop, continuously rebooting without progressing to the setup screen. Try performing a hard reset as mentioned above. If that doesn’t work, you may need to reach out to the Whoop support team or consult the user manual for further assistance.
3. Wi-Fi Connection Issues: If you are experiencing difficulties connecting to Wi-Fi during the setup process, ensure that you are within the range of a stable and working Wi-Fi network. Double-check that you have entered the correct password and that your Wi-Fi router is functioning properly. If needed, restart your router and try again. If the issue persists, you can try connecting to a different Wi-Fi network or use a mobile hotspot temporarily.
4. Inability to Sign In to Google Account: If you are unable to sign in to your Google account during the setup process, double-check your username and password for accuracy. If you’ve forgotten your password, you can initiate a password reset from another device. Also, ensure that you have a stable internet connection or try signing in with a different Google account if you have one.
5. Missing Backed-Up Data: If you have restored your data from a backup but notice that some files or settings are missing, ensure that the backup was performed successfully and that you are using the correct backup file. Double-check your cloud storage account or external storage device to ensure that your files are intact. If necessary, you can attempt the restore process again.
6. Apps Not Compatible or Not Restoring: After the factory reset, you may find that some previously installed apps are no longer compatible with your tablet or are not restoring properly. This can occur if the apps are outdated or if they require a specific version of the operating system. Check the Google Play Store for updates or alternative apps that may be compatible with your tablet’s current software version.
If you encounter any other specific issues or challenges during the factory reset process on your Whoop Tablet, refer to the user manual or reach out to the Whoop support team for further assistance. They will be able to provide you with tailored solutions or guide you through troubleshooting steps specific to your device model.
By following these troubleshooting tips, you can overcome common issues that may arise during the Factory Reset process and ensure a successful reset without any major setbacks.
Conclusion
In conclusion, performing a factory reset on your Whoop Tablet can be a valuable solution to address various issues and start fresh with a clean slate. Throughout this guide, we have covered the step-by-step process to factory reset your tablet, including the importance of backing up your data, disconnecting from accounts and services, locating the Factory Reset option, confirming the reset, waiting for the reset to complete, and setting up your tablet again.
We discussed the reasons why you might consider a factory reset, such as resolving software issues, removing unwanted files and apps, enhancing security, starting fresh, and troubleshooting persistent issues. It’s essential to understand the implications of a factory reset, including the irreversible deletion of all data and settings on your tablet.
We emphasized the importance of backing up your data before initiating the reset process to prevent permanent loss and disconnecting from accounts and services to protect your privacy and ensure a clean reset. Additionally, we provided troubleshooting tips for common issues that may arise during the factory reset process.
Remember, every Whoop Tablet model and operating system version may have slight differences in terms of menu options and steps. It’s crucial to consult the user manual or official support resources specific to your device for accurate instructions and guidance.
By following the guidelines outlined in this guide, you can successfully perform a factory reset on your Whoop Tablet, resolve software issues, free up storage space, and start fresh with a device that is optimized for your needs.
Always remember to back up your data regularly, keep your tablet updated with the latest software versions, and practice good digital hygiene to maintain the performance and longevity of your Whoop Tablet.
Now that you are familiar with the factory reset process and have the necessary knowledge to proceed, you can confidently take the necessary steps to reset your Whoop Tablet and enjoy a revitalized device experience.