Introduction
Discord has become one of the most popular platforms for communication among various communities, including gamers, artists, professionals, and more. It provides a seamless combination of text, voice, and video chat features, making it an ideal tool for both casual talk and organized collaboration.
Whether you’re looking to connect with like-minded individuals, join a gaming community, or engage in a professional network, Discord offers a user-friendly interface and a range of features that make communication effortless and enjoyable.
In this comprehensive guide, we will take you through the process of getting started on Discord. From creating an account to joining servers and navigating the interface, we’ll cover all the essential steps you need to know.
You don’t need to be a tech whiz to use Discord. Even if you’re new to the world of online communication platforms, this guide will provide you with clear and easy-to-follow instructions. By the end of it, you’ll be able to navigate Discord with confidence, participate in conversations, and customize your settings to suit your preferences.
So, if you’re ready to embark on your Discord journey, let’s dive in and learn how to enter the exciting world of Discord!
Step 1: Creating a Discord Account
Before you can start using Discord, you’ll need to create an account. Follow the steps below to get started:
- Open your preferred web browser and navigate to the Discord website.
- Click on the “Login” button located at the top right-hand corner of the page.
- On the next page, click on the “Create an account” button.
- Choose a unique username for your Discord account. You can also add an optional avatar to personalize your profile.
- Enter a valid email address and create a secure password. It’s important to choose a strong password to protect your account.
- Complete the reCAPTCHA verification to ensure you’re not a bot.
- Optionally, you can invite friends to join Discord by clicking on the “Invite your friends” button and sending them an email invitation.
- Review the Discord Terms of Service and Privacy Policy, then click on the “Continue” button.
- Congratulations! Your Discord account has been created. You can now choose to download the Discord app or continue using Discord in your web browser.
Once you’ve successfully created your Discord account, you’ll have access to a range of features and functionalities. These include joining servers, connecting with communities, participating in chats, and much more.
Now that you have your account set up, it’s time to move on to the next step: downloading and installing the Discord app.
Step 2: Downloading and Installing the Discord App
To get the most out of Discord, it’s recommended to download and install the Discord app on your computer or mobile device. Follow these steps to get started:
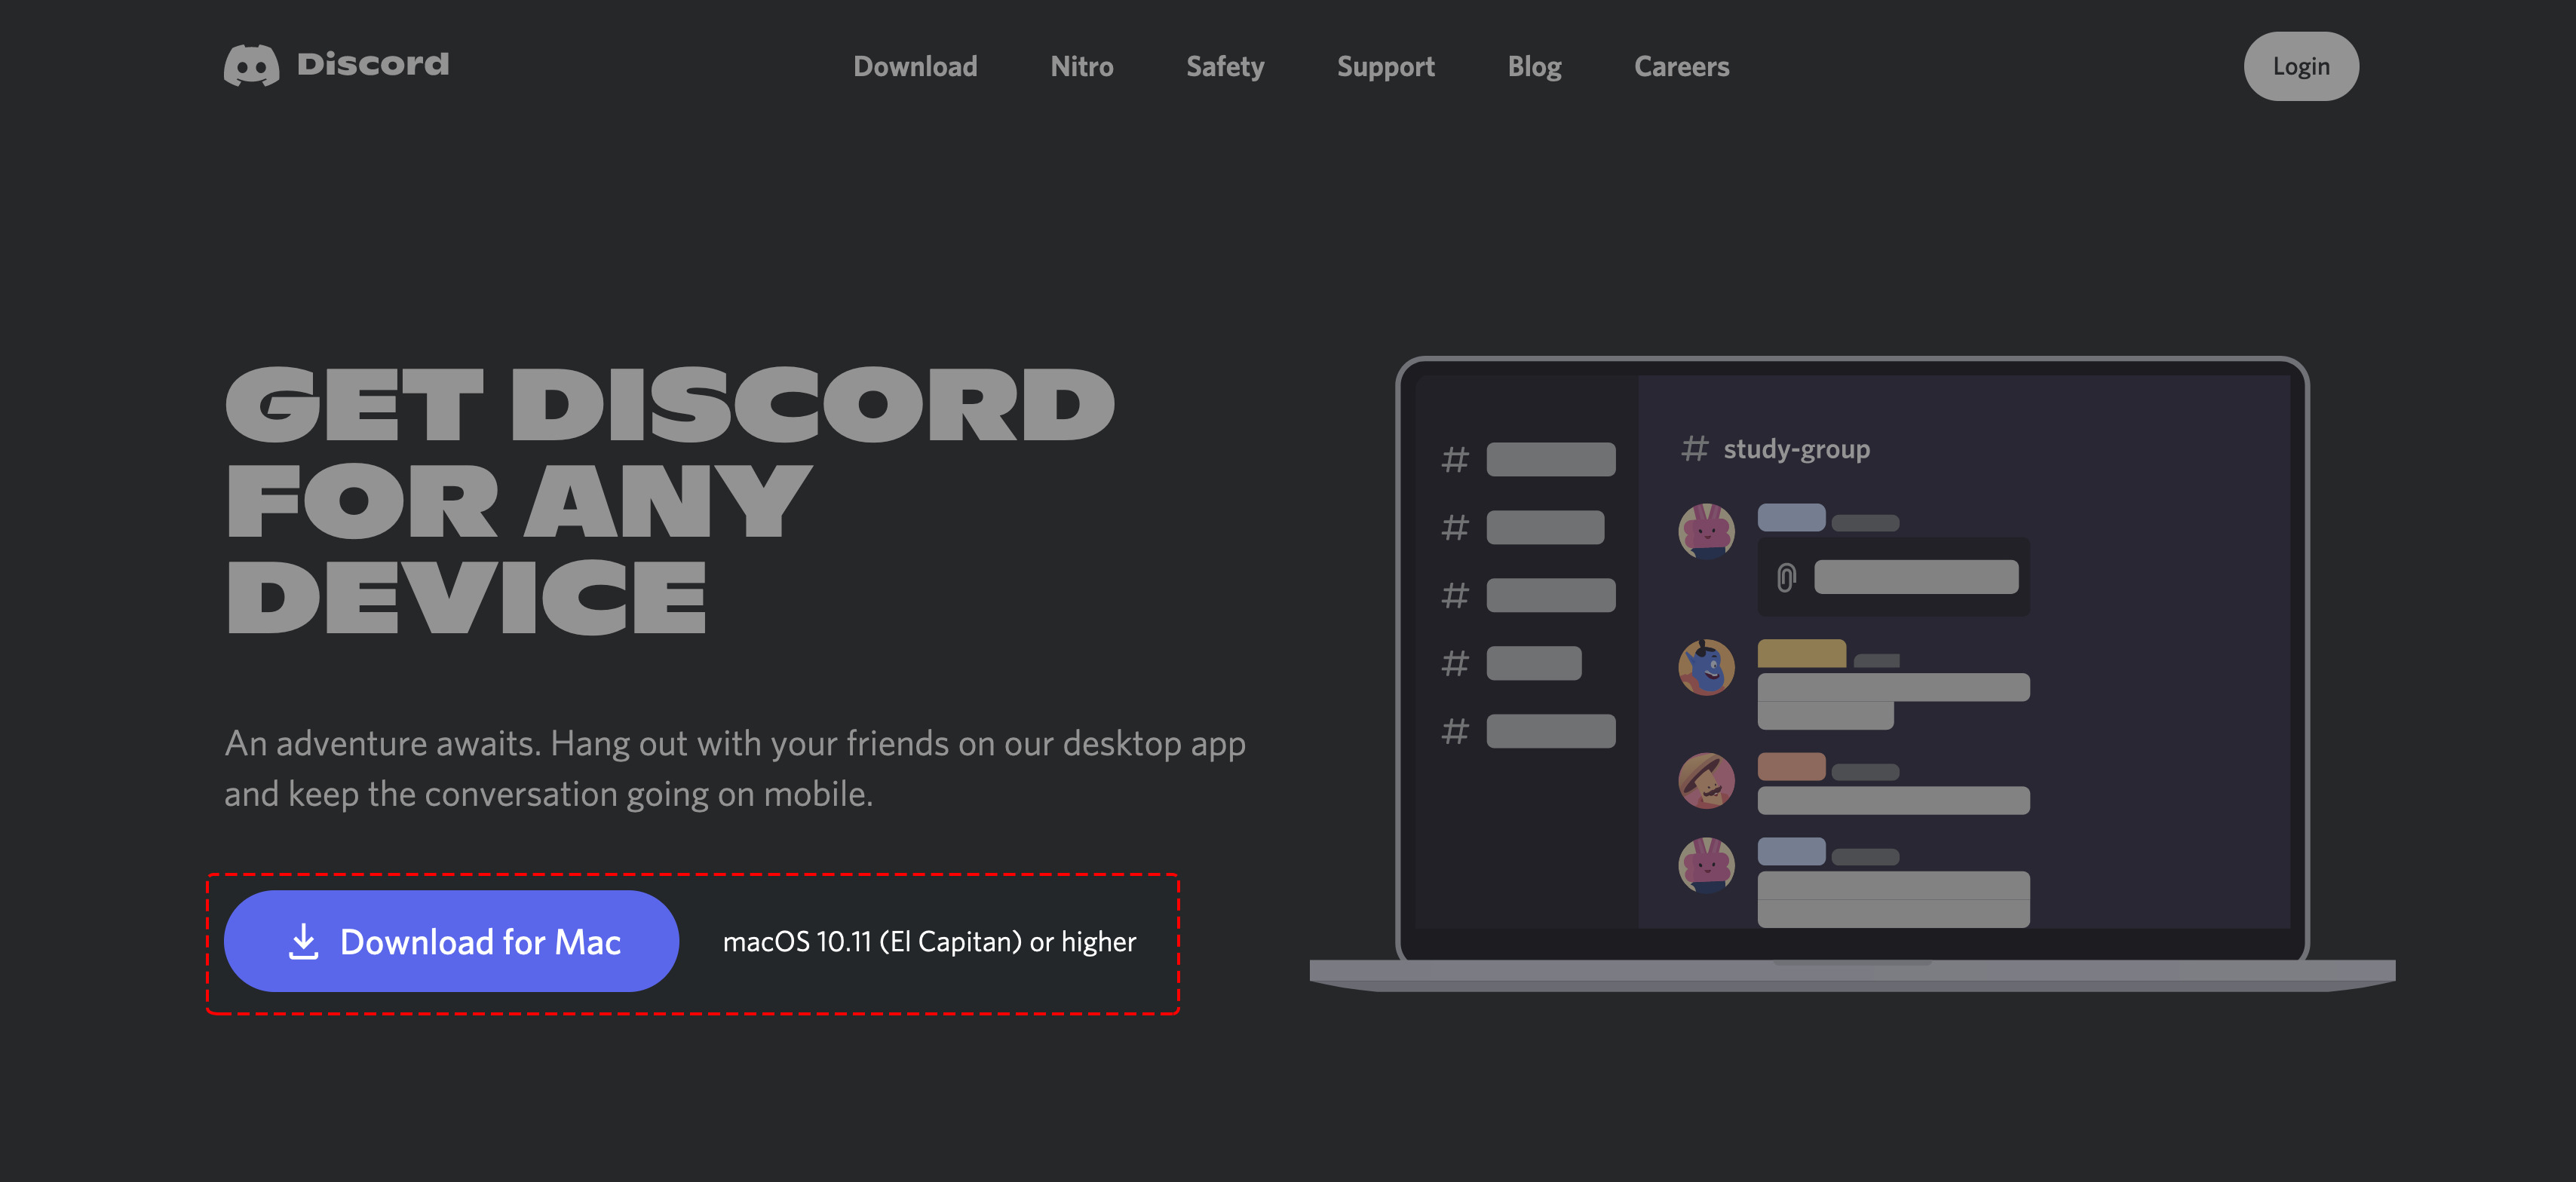
- Visit the Discord website and click on the “Download for Windows” or “Download for Mac” button, depending on your operating system. If you’re using a mobile device, you can download the Discord app from the App Store or Google Play Store.
- Once the download is complete, locate the installation file on your computer or open the app on your mobile device.
- Start the installation process by following the on-screen prompts. For Windows, simply double-click the downloaded file and follow the installation wizard. For Mac, drag and drop the Discord icon into your Applications folder.
- Once the installation is complete, launch the Discord app by double-clicking the desktop icon or tapping on the app icon on your mobile device.
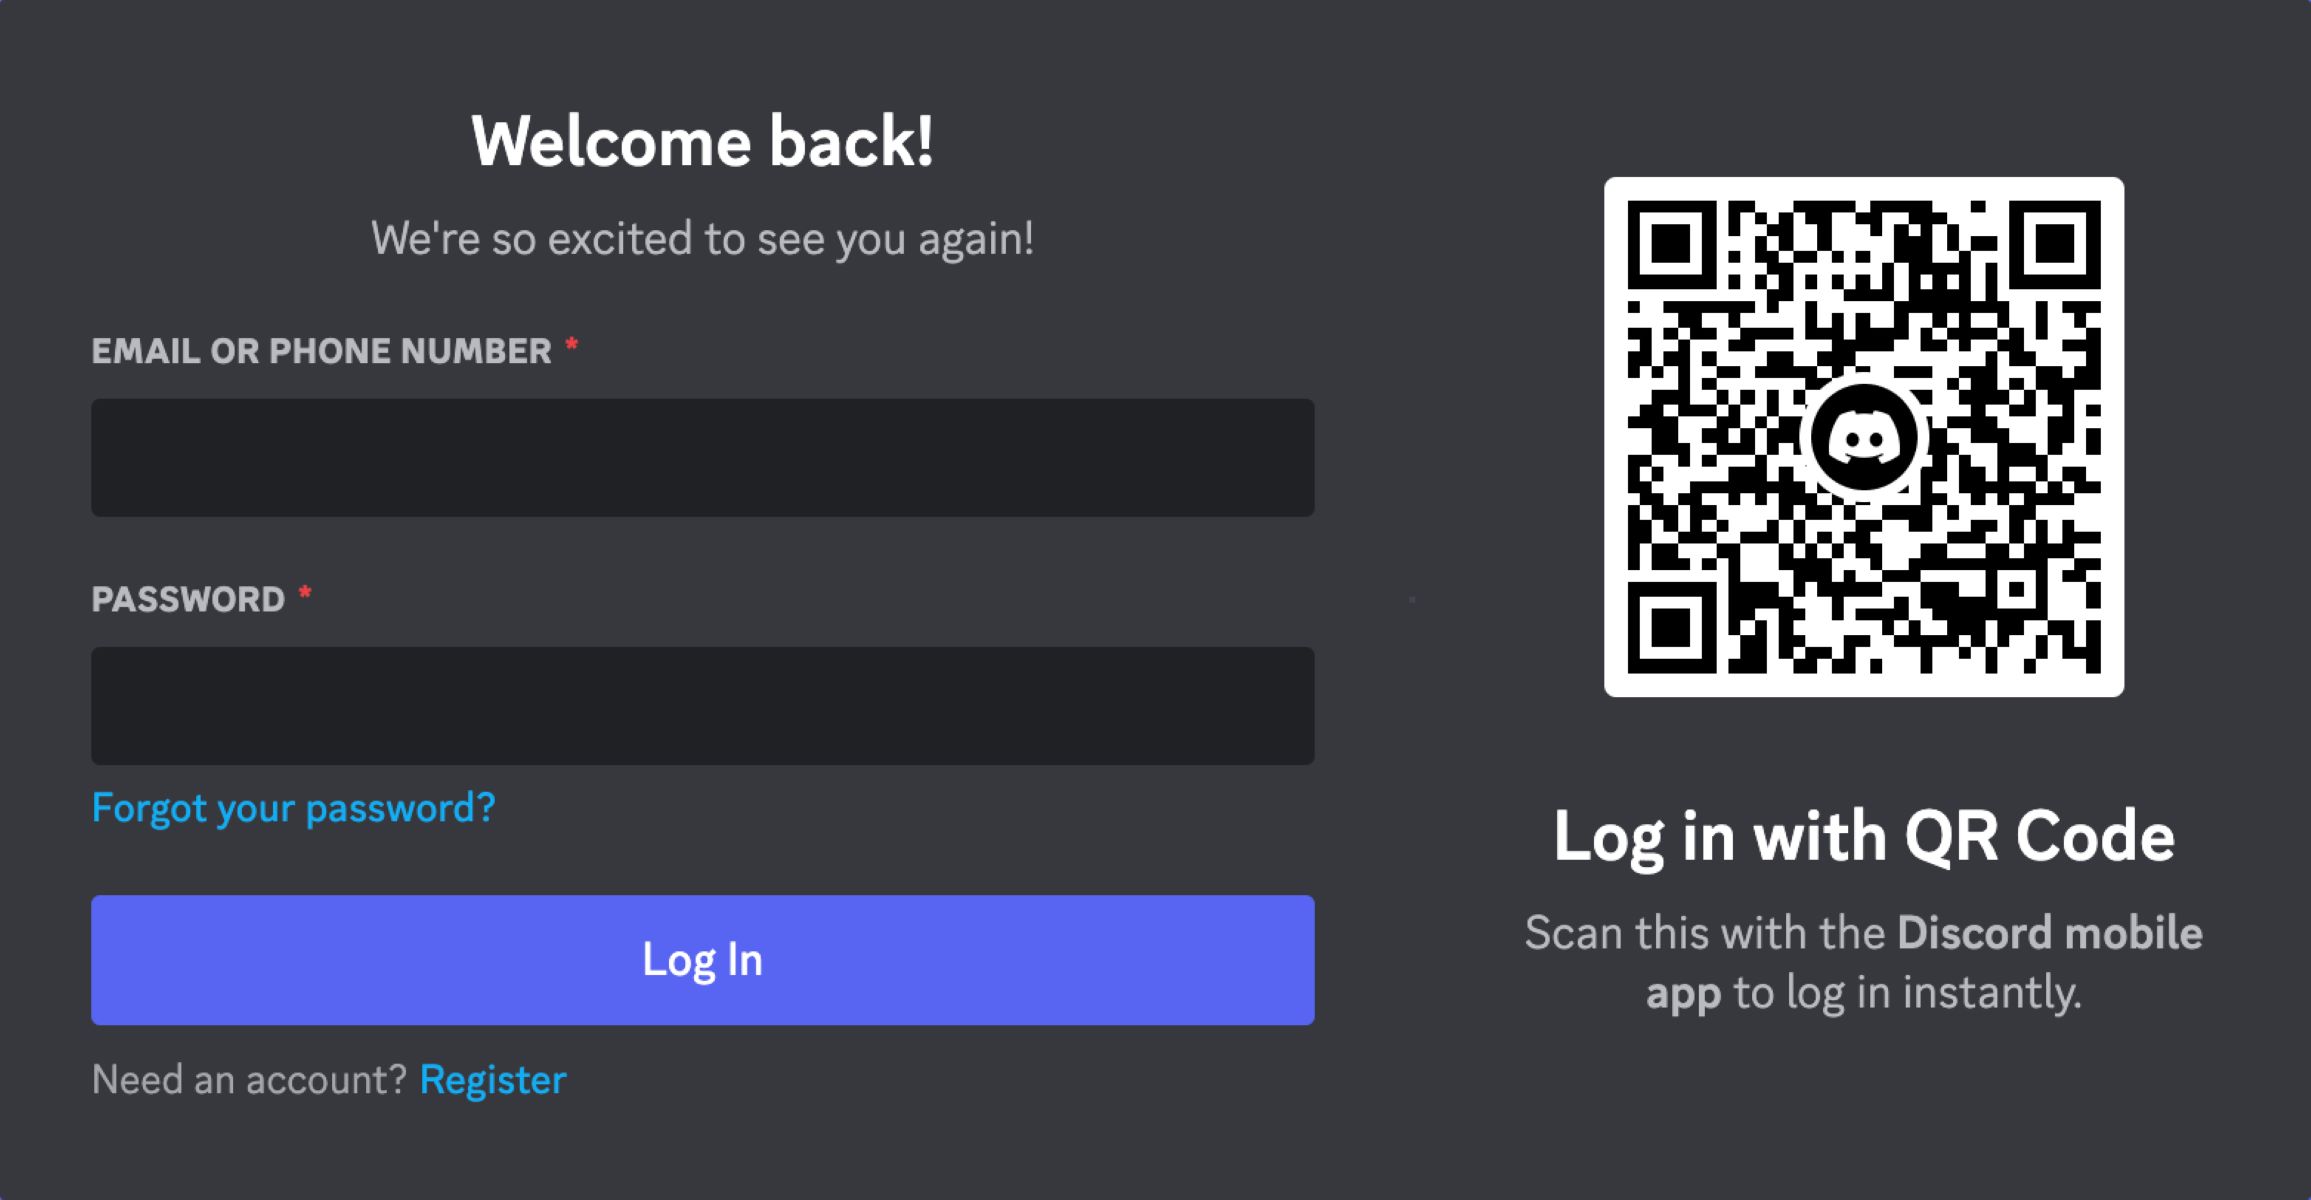
- On the login screen, enter your Discord account credentials that you created in the previous step: your email address and password.
- Click on the “Login” button, and you’ll be granted access to your Discord account through the app.
By using the Discord app, you’ll have access to all the features and functionality that Discord offers in a more streamlined and user-friendly format. The app ensures a smoother communication experience by providing real-time notifications and easy access to your communities and chats.
With the Discord app installed, you’re now ready to move on to the next step: joining a Discord server.
Step 3: Joining a Discord Server
Now that you have your Discord account and the app installed, it’s time to join a Discord server. Servers on Discord are communities or groups dedicated to specific topics, games, hobbies, or interests. Here’s how you can join a server:
- Launch the Discord app on your computer or mobile device.
- On the left-hand side of the screen, you’ll find the server menu. Click on the plus sign (+) next to “Servers” to open the “Create a server” or “Join a server” options.
- If you already have an invite link provided by someone, click “Join a server” and enter the server’s invite link in the designated field. Alternatively, click “Create a server” if you wish to create your own server.
- If you’re joining a server, Discord will ask you to confirm your decision. Click “Join” to proceed.
- Once you’ve joined a server, it will appear in the server menu on the left-hand side of the app. Click on the server’s name to access its channels and interact with its members.
- Explore the different channels within the server to join various discussions or activities. You can find channels dedicated to specific topics, general chats, voice channels for audio communication, and more.
- Feel free to introduce yourself or ask questions in the designated channels to start engaging with the community.
Joining a server allows you to become part of a community and interact with like-minded individuals. Whether it’s a gaming server, an art community, or a professional network, Discord offers endless possibilities for connecting and sharing your passions.
Now that you’ve successfully joined a server, it’s time to familiarize yourself with the Discord interface and learn how to navigate it effectively.
Step 4: Navigating the Discord Interface
Once you’ve joined a Discord server, it’s essential to familiarize yourself with the Discord interface to make the most of your Discord experience. Here’s a breakdown of the different elements and features:
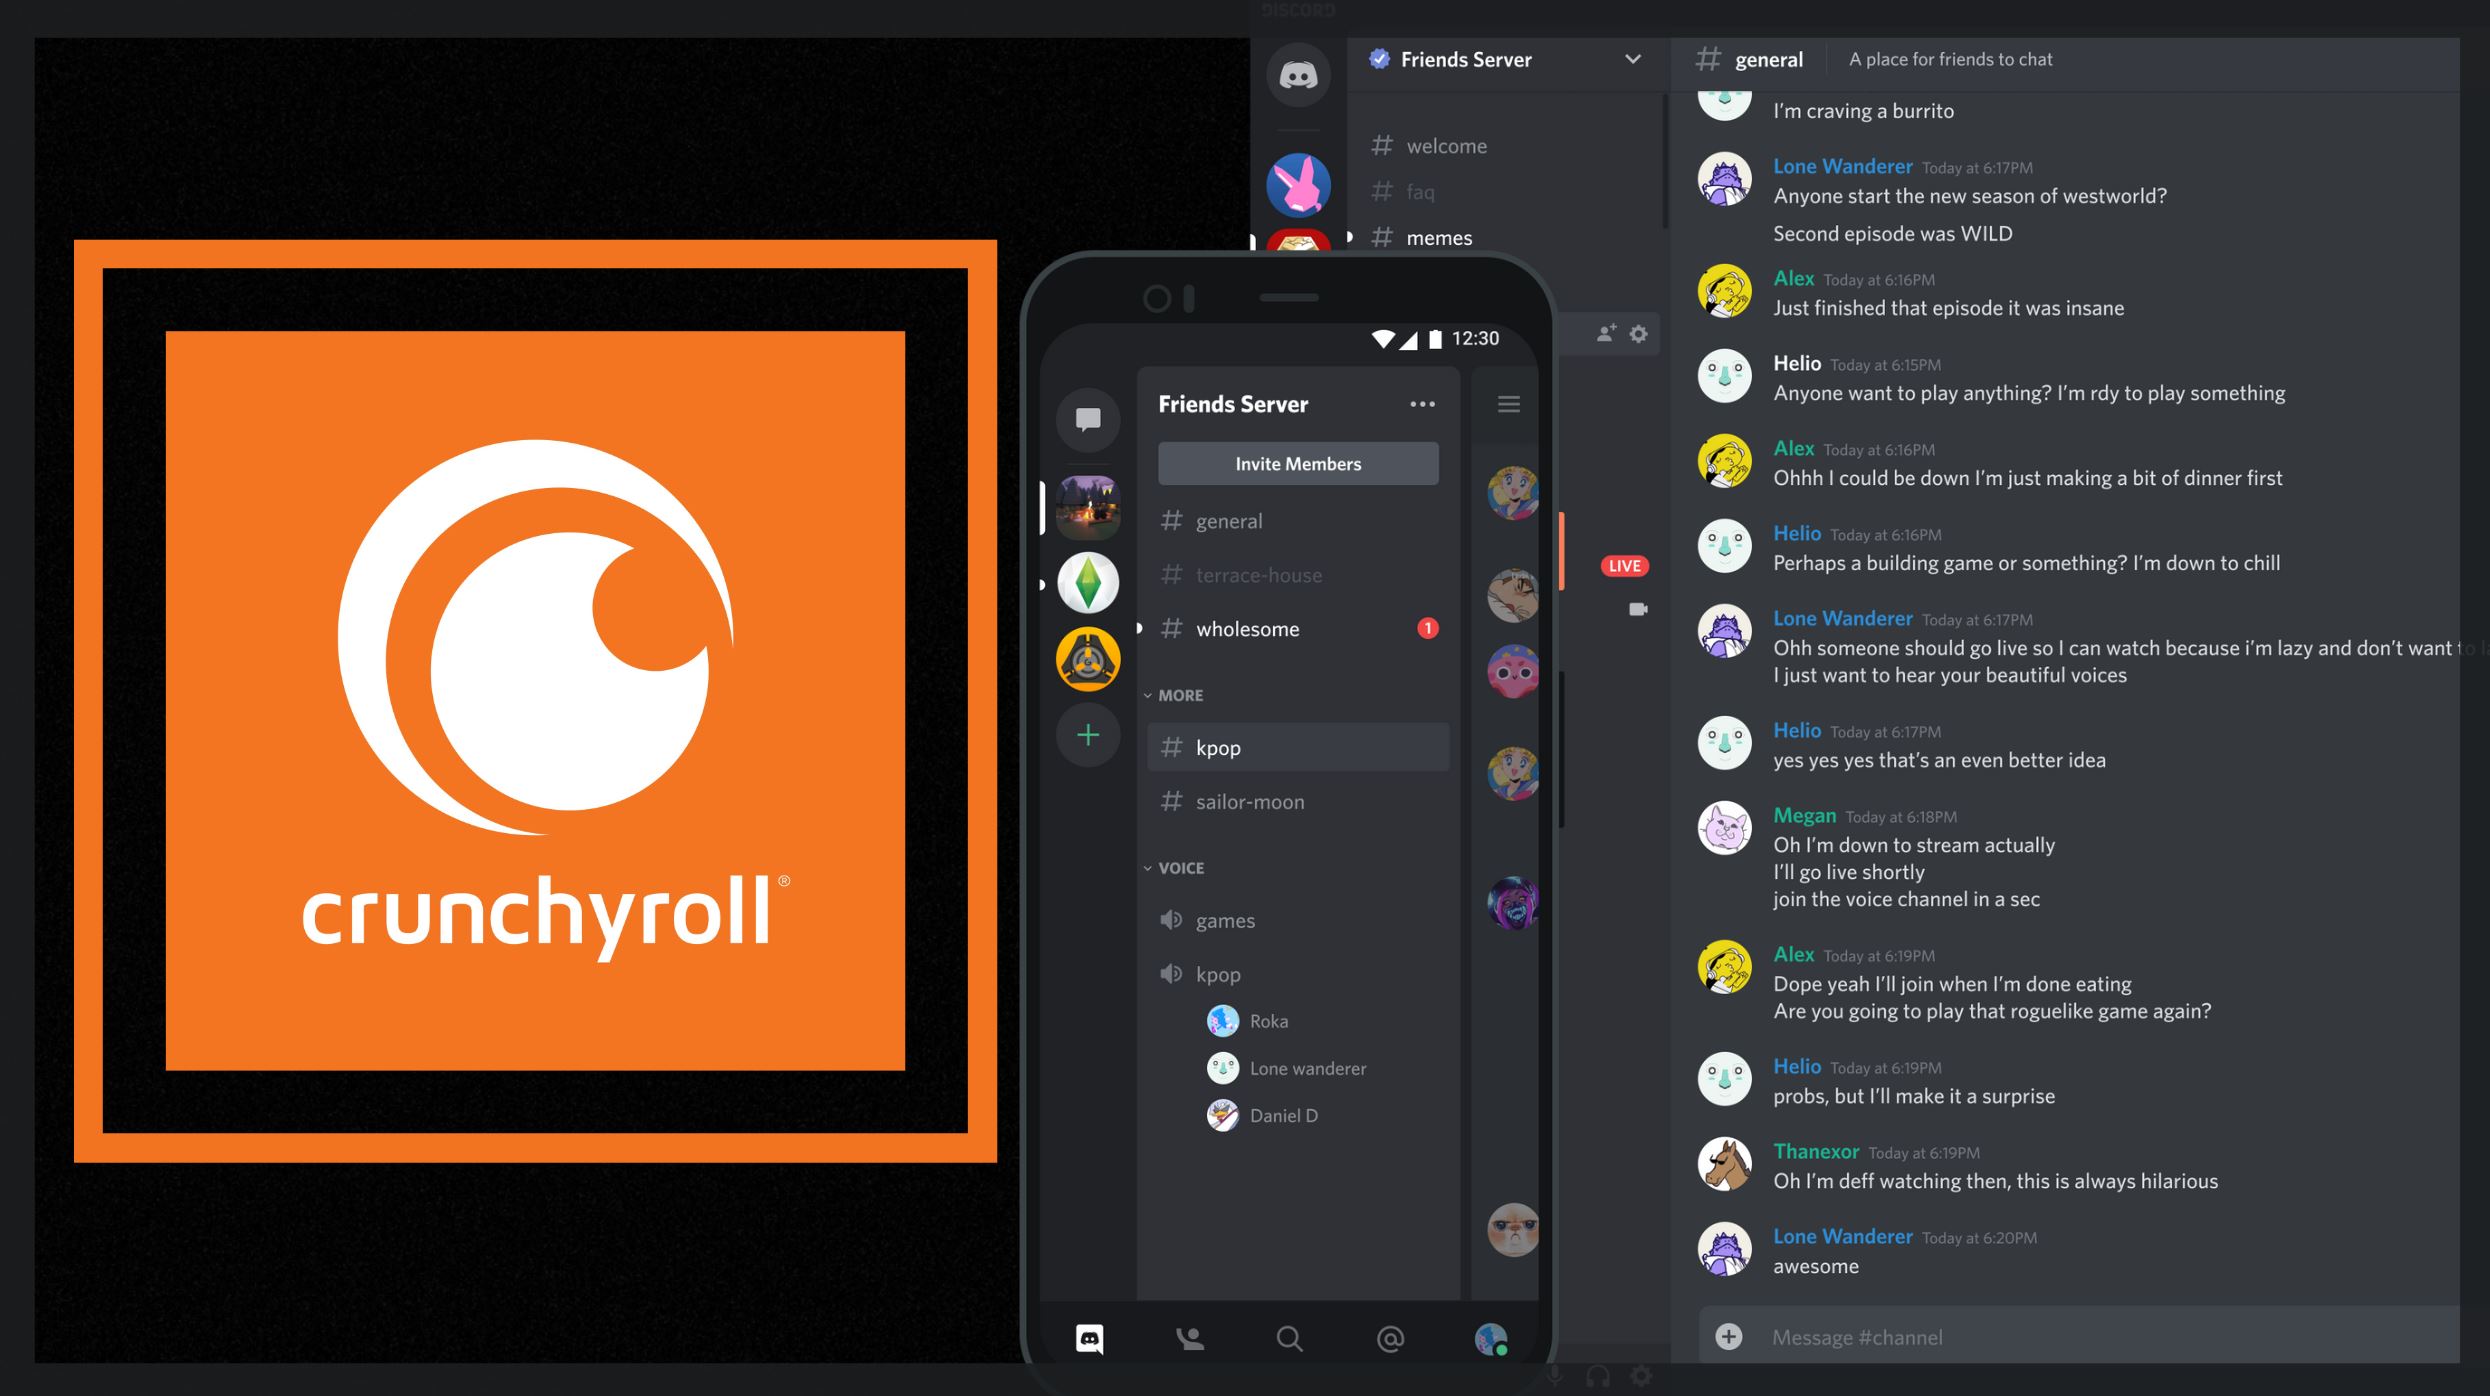
- Server Menu: Located on the left-hand side of the Discord app, the server menu displays a list of servers you’re a member of. Click on a server to access its channels and communicate with other members.
- Channel List: Within each server, you’ll find a list of channels. These channels are organized based on different topics or purposes. Click on a channel’s name to enter and view the messages and conversations happening in that channel.
- Messages: In the main content area of the Discord app, you’ll see the messages within a selected channel. Messages are displayed in chronological order, with the latest message at the bottom. Scroll up to view older messages.
- User and Member List: On the right-hand side of the app, you’ll find a list of users and members currently active in the server. This list displays their usernames, avatars, and online status.
- Text Input Box: At the bottom of the app, you’ll find a text input box. This is where you can type and send messages to the selected channel. You can also use the text input box to search for specific messages or users within a channel.
- Toolbar: The toolbar located at the top of the app provides various options and features. It includes tools such as direct messages, voice channels, server settings, and more.
- Notifications: Discord provides real-time notifications to keep you updated on new messages, mentions, and server activity. You can customize your notification settings to suit your preferences.
Take some time to explore and navigate through the different elements of the Discord interface. Familiarize yourself with how messages are organized, how to join voice channels, and how to interact with other members in the server.
Now that you’re comfortable with navigating the Discord interface, let’s move on to the next step: participating in Discord channels and chatting with other users.
Step 5: Participating in Discord Channels and Chatting
One of the key aspects of using Discord is participating in channels and engaging in conversations with other users. Here’s how you can start participating in Discord channels and make the most of your chat experience:
- Select a channel from the channel list within the server you’re in. Channels are dedicated to different topics or purposes.
- Once you’re in a channel, you can view the existing messages and conversations. Take some time to read through the previous messages to get an idea of the ongoing discussion.
- To send a message, type your text in the text input box located at the bottom of the app. Press Enter or click the “Send” button to post your message.
- You can @mention specific users in a message by typing “@” followed by their username. This will send them a notification and highlight your message for them.
- Take part in the conversation by replying to other users’ messages or sharing your thoughts and ideas. Discord allows for a wide range of text formatting options, including bold, italics, underlines, and more.
- Use emojis to add flair and express your emotions. Discord provides a variety of emojis that you can use in your messages.
- If you want to share an image or file, simply drag and drop it into the chat window. Discord will automatically upload and display the image or file for others to view.
- Engage with the community by asking questions, providing helpful information, or sharing relevant resources. Remember to be respectful and adhere to the server’s guidelines and rules.
- If you find an interesting message or conversation, you can react to it by clicking the reaction emoji next to the message. This allows you to convey your feelings or indicate agreement without sending a separate message.
Remember, Discord is all about fostering a sense of community and facilitating discussions. Don’t be afraid to actively participate and initiate conversations in the channels you’re interested in.
Now that you’re comfortable with participating in Discord channels and chatting with other users, let’s move on to the next step: voice chatting on Discord.
Step 6: Voice Chatting on Discord
Discord offers a robust voice chat feature that allows you to engage in real-time conversations with other users. Whether it’s for gaming sessions, team collaboration, or simply hanging out with friends, here’s how you can start voice chatting on Discord:
- Join a voice channel within the server you’re in. Voice channels are specifically designated for audio communication.
- To join a voice channel, simply click on its name in the channel list. You’ll be instantly connected to the channel and can start voice chatting.
- By default, your microphone will be automatically activated, allowing you to speak and be heard by others in the voice channel.
- Speak clearly into your microphone to ensure that others can hear you properly. Adjust your microphone settings if needed.
- In the voice channel, you can see the other users who are currently connected and speaking. Their avatars will light up to indicate that they are actively using their microphones.
- Participate in the conversation by speaking into your microphone. Discord offers excellent voice quality and minimal latency, ensuring a smooth communication experience.
- Use push-to-talk if you prefer not to have your microphone activated all the time. This feature allows you to push a specific key to transmit your voice during conversations.
- Engage with others in the voice channel by responding to their comments, providing insights, or coordinating activities.
- If you’re experiencing any audio issues, Discord provides various settings and options to troubleshoot and fine-tune your audio setup. You can adjust your input and output devices, as well as enable noise suppression, echo cancellation, and more.
Voice chatting on Discord adds a new dimension to your communication experience. It allows for more interactive and dynamic conversations, making it perfect for multiplayer gaming, virtual meetings, or social gatherings with friends.
Now that you’re familiar with voice chatting on Discord, let’s move on to the next step: adjusting Discord settings for a personalized experience.
Step 7: Adjusting Discord settings for a personalized experience
Discord provides a range of settings and options that you can customize to tailor your experience to your preferences. Here’s how you can adjust Discord settings for a personalized experience:
- Click on the gear icon located at the bottom-left corner of the Discord app to open the User Settings.
- Explore the different categories within the User Settings menu to access various settings related to your account, appearance, notifications, privacy, and more.
- Under the “My Account” section, you can modify your username, email address, and password. You can also upload or change your profile picture or avatar.
- In the “Appearance” section, you can choose your preferred theme and customize the app’s appearance by adjusting the accent color, message display, and compact mode.
- Under the “Notifications” category, you can control the notification settings for different events, such as new messages, mentions, or server updates. You can choose to receive notifications via sound, desktop alerts, or push notifications on your mobile device.
- Explore other settings, such as privacy options, keybinds, game integration, and more, to fine-tune your Discord experience.
- Don’t forget to save your changes by clicking the “Save” or “Apply” button at the bottom of each settings page.
Adjusting Discord settings allows you to personalize your experience and optimize it to your liking. Whether you prefer a specific look, sound, or level of privacy, Discord provides the flexibility to customize the app to suit your needs.
Now that you’ve adjusted Discord settings for a personalized experience, let’s move on to the final step: troubleshooting common issues on Discord.
Step 8: Troubleshooting common issues on Discord
While Discord generally provides a seamless communication experience, you may encounter some common issues from time to time. Here are some troubleshooting steps to help resolve these issues:
- If you’re experiencing connectivity issues, first check your internet connection to ensure it’s stable. If you’re using a mobile device, switch between Wi-Fi and mobile data to see if that resolves the problem.
- Try restarting the Discord app or refreshing the web page if you’re using Discord in a browser. This can help resolve temporary glitches or loading issues.
- Ensure that you’re using the latest version of the Discord app. Check for updates and install them if available. Outdated versions can sometimes lead to compatibility issues.
- If you’re encountering an issue with voice chat, check your microphone and speaker settings. Make sure your microphone is properly connected and selected as the input device in Discord settings. Similarly, ensure that your speakers or headphones are selected as the output device.
- If you’re unable to hear others in voice chat, check if they have been accidentally muted or if their microphone is not working. Encourage them to check their settings and ensure their microphone is properly connected.
- If you’re experiencing audio quality problems, enable Discord’s noise suppression and echo cancellation features. These can help reduce background noise and echo, resulting in clearer voice chat.
- If you’re encountering issues with notifications, check your notification settings in Discord and confirm that they are enabled for the desired events. Additionally, ensure that Discord has the necessary permissions to send notifications on your device.
- If you’re having trouble accessing a specific server or channel, it’s possible that you’ve been banned or don’t have the appropriate permissions. Contact the server administrator or moderators for assistance.
- If none of the troubleshooting steps resolve the issue, consider reaching out to Discord Support for further assistance. They can provide guidance and additional troubleshooting steps specific to your situation.
By following these troubleshooting steps, you can overcome common issues and enjoy a smooth Discord experience. Remember, Discord strives to provide excellent user support, so don’t hesitate to seek help if needed.
Now that you’re equipped with troubleshooting knowledge, you’re ready to fully immerse yourself in Discord’s vibrant community and enjoy seamless communication.
Conclusion
Congratulations! You’ve reached the end of our guide on how to enter and navigate the world of Discord. We’ve covered all the essential steps, from creating an account to troubleshooting common issues. Now, you have the knowledge and skills to make the most out of this powerful communication platform.
Discord offers a wealth of opportunities to connect with like-minded individuals, join communities, and engage in conversations on various topics. Whether you’re a gamer looking to team up with others, an artist seeking inspiration, or a professional wanting to collaborate, Discord provides a seamless and enjoyable communication experience.
Remember to personalize your Discord settings to suit your preferences, adjust notifications, and explore the extensive features it has to offer. With voice chat capabilities, easy-to-use interface, and a range of customization options, Discord is the perfect platform to foster online connections and build strong communities.
Should you encounter any challenges along the way, don’t hesitate to refer back to this guide or reach out to Discord Support for assistance. They’re there to help you navigate through any technical issues you may face.
So, what are you waiting for? Dive into Discord, join exciting communities, have meaningful conversations, and enjoy the vibrant world of online communication!