Introduction
Nowadays, tablets have become an essential device for many individuals. They offer a portable and convenient way to browse the internet, watch videos, play games, and stay connected with friends and family. While most tablets are primarily designed for internet connectivity via Wi-Fi, some Samsung tablets can also support SMS (Short Message Service) functionality.
In this article, we will explore how to enable SMS on your Samsung tablet. By activating this feature, you can not only send and receive text messages but also enjoy the benefits of having a phone-like experience on your tablet.
Enabling SMS on your Samsung tablet can open up a world of possibilities. Whether you want to stay in touch with loved ones, receive important notifications, or even use two phone numbers on a single device, having SMS functionality on your tablet can be incredibly convenient. So, if you ever find yourself in a situation where you need to use your tablet to send or receive text messages, this guide is for you.
Before we delve into the steps on how to enable SMS on your Samsung tablet, it’s important to note that not all Samsung tablets support SMS functionality. So, the first step is to confirm whether your tablet is SMS-compatible.
So, let’s get started and find out how to enable SMS on your Samsung tablet!
Why Enable SMS on Samsung Tablet?
Enabling SMS functionality on your Samsung tablet can provide several advantages and convenience. Here are some reasons why you might consider enabling SMS on your Samsung tablet:
- Seamless Communication: By enabling SMS on your tablet, you can send and receive text messages just like you would on a smartphone. This means you can stay connected with friends, family, and colleagues even when you don’t have access to your phone.
- One Device, Multiple Functions: With SMS functionality, your Samsung tablet becomes more versatile. It not only serves as a productivity and entertainment device but also allows you to handle all your communication needs without the need for an additional device.
- Convenience: Having SMS capabilities on your tablet can be incredibly convenient, especially in situations where you may not have your phone readily available. You can quickly check and respond to text messages without having to switch between devices.
- Multi-SIM Support: Some Samsung tablets support multiple SIM card slots. By enabling SMS, you can use your tablet with two different phone numbers, making it ideal for managing personal and work contacts.
- Enhanced Productivity: By enabling SMS on your tablet, you can easily exchange important messages, receive notifications, and stay connected to your professional network. This can enhance your productivity, especially when you’re on the go.
These are just a few reasons why enabling SMS on your Samsung tablet can be advantageous. Whether you need to stay connected, manage multiple phone numbers, or streamline your communication, enabling SMS functionality on your tablet can provide the perfect solution.
Step 1: Check for SMS Support
The first step in enabling SMS on your Samsung tablet is to check if your tablet supports SMS functionality. Not all Samsung tablets have this feature, so it’s important to verify before proceeding with the setup.
To check for SMS support, follow these steps:
- Go to the Settings app on your Samsung tablet. You can usually find it in the app drawer or by swiping down from the top of the screen and selecting the gear icon.
- Scroll down and tap on “Connections” or “Network & Internet,” depending on your tablet model.
- Look for an option called “SIM card manager” or “Dual SIM settings.” If you see this option, it indicates that your tablet has the capability to support SMS.
- If you don’t see the “SIM card manager” or “Dual SIM settings” option, it means that your tablet doesn’t support SMS functionality. In that case, you may need to consider alternative methods for sending and receiving text messages on your tablet, such as using messaging apps that don’t rely on your cellular network.
Once you have confirmed that your Samsung tablet supports SMS, you can proceed with the rest of the setup process. This involves inserting a SIM card, activating it, configuring the default messaging app, and setting up your phone number. By following the subsequent steps, you’ll be able to enjoy the convenience of sending and receiving text messages on your Samsung tablet.
Step 2: Insert SIM Card
After confirming that your Samsung tablet supports SMS functionality, the next step is to insert a SIM card into your tablet. The SIM card is a small, rectangular chip that stores your subscriber information and allows your tablet to connect to a cellular network.
To insert a SIM card into your Samsung tablet, follow these steps:
- Locate the SIM card slot on your tablet. The location of the slot may vary depending on the tablet model, but it is usually located on the side or at the back of the device.
- Using the SIM eject tool provided with your tablet or a small paperclip, gently insert it into the small hole near the SIM card slot to release the tray.
- Once the tray is released, carefully pull it out using your fingers.
- Place the SIM card into the tray, making sure that the gold contacts on the SIM card are facing downwards.
- Slide the tray back into the SIM card slot until it clicks into place.
It’s important to note that some Samsung tablets may have a separate slot for the SIM card and the microSD card. In such cases, make sure to insert the SIM card into the correct slot to avoid any issues.
Now that you have inserted the SIM card, it’s time to move on to the next step: activating the SIM card on your Samsung tablet.
Step 3: Activate SIM Card
Once you have successfully inserted the SIM card into your Samsung tablet, the next step is to activate it. Activating the SIM card allows your tablet to connect to a cellular network and make use of SMS functionality. The activation process may vary depending on your service provider, but here are the general steps to activate a SIM card:
- Ensure that your tablet is powered on and has a stable internet connection, preferably through Wi-Fi.
- Open the default messaging app on your tablet or go to the “Settings” app and navigate to the “SIM card manager” or “Mobile networks” section.
- Select the option to activate your SIM card or to set up your cellular network. This might involve entering your service provider’s activation code, updating your APN settings, or following any prompts provided by your service provider.
- Follow the instructions provided and provide any necessary information, such as your phone number, personal details, and account information.
- Wait for the activation process to complete. This may take a few minutes, and your tablet may need to reboot.
After completing the activation process, your Samsung tablet should be successfully connected to a cellular network, and the SIM card should be activated for SMS usage. You can now move on to the next step of setting up the default messaging app.
If you encounter any issues during the activation process, such as error messages or difficulties with network connectivity, it is recommended to contact your service provider for assistance. They will be able to provide specific instructions based on your tablet model and service plan.
Step 4: Configure Default Messaging App
After successfully activating the SIM card on your Samsung tablet, it’s time to configure the default messaging app. The default messaging app is the pre-installed app that allows you to send, receive, and manage your SMS messages on your tablet.
To configure the default messaging app on your Samsung tablet, follow these steps:
- Open the Settings app on your tablet.
- Navigate to the “Apps” or “Applications” section.
- Find and select the default messaging app. This app may be named “Messages,” “Messaging,” or something similar.
- In the app settings, you will find various options to customize your messaging experience. These options may include notification settings, message storage settings, and advanced features such as read receipts or message encryption.
- Adjust the settings according to your preferences. You can choose to enable or disable notifications, change the message alert sound, or even personalize the appearance of the app.
- Take some time to explore the settings and familiarize yourself with the features and options available in the messaging app.
Configuring the default messaging app allows you to customize your SMS experience on your Samsung tablet. You can tailor it to suit your preferences and ensure that you receive timely notifications for incoming messages.
It’s worth noting that you can also download and install other messaging apps from the Google Play Store if you prefer a different messaging app than the default one. However, for SMS functionality, the default messaging app should be properly configured to ensure seamless communication.
Once you have configured the default messaging app, it’s time to proceed to the next step: setting up your phone number on your Samsung tablet.
Step 5: Set Up Your Phone Number
After configuring the default messaging app on your Samsung tablet, the next step is to set up your phone number. Setting up your phone number ensures that the SMS messages you send from your tablet will display your correct phone number as the sender.
To set up your phone number on your Samsung tablet, follow these steps:
- Open the default messaging app on your tablet.
- Navigate to the app settings or preferences.
- Look for an option that allows you to add or edit your phone number.
- Select the “Add Phone Number” or “Edit Phone Number” option.
- Enter your phone number, including the country code and area code, in the provided field.
- Save the changes and exit the settings.
By setting up your phone number, your Samsung tablet will associate your number with the messaging app, ensuring that the messages you send display your correct phone number.
It’s important to note that the availability of the “Set Up Phone Number” option may vary depending on your tablet model and the messaging app you are using. If you don’t see this option in the messaging app settings, refer to the app’s documentation or contact the app developer for guidance on how to set up your phone number.
Once you have successfully set up your phone number, you are now ready to send and receive SMS messages on your Samsung tablet.
Continue to the next step to learn how to send and receive SMS messages on your Samsung tablet.
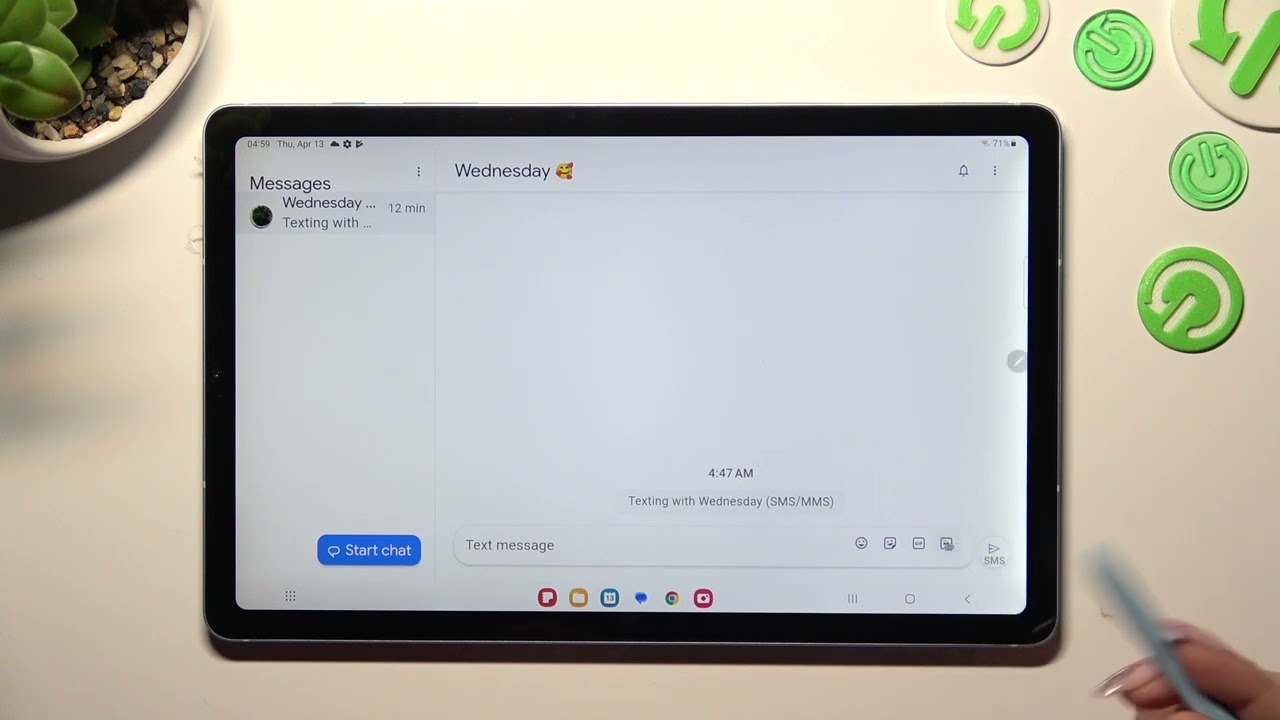
Step 6: Send and Receive SMS on Your Samsung Tablet
Now that you have completed the previous steps to enable SMS on your Samsung tablet, it’s time to start sending and receiving text messages. With the setup process complete, you can enjoy the convenience of SMS functionality on your tablet.
To send and receive SMS messages on your Samsung tablet, follow these steps:
- Open the default messaging app on your tablet.
- Tap on the “New Message” or “Compose” button, usually represented by a pencil or a speech bubble icon.
- In the “To” field, enter the phone number or the contact name of the recipient. You can also select recipients from your contacts list.
- Type your message in the text input field.
- Tap the “Send” button to send the message.
- To view incoming messages, simply wait for them to appear in the messaging app’s inbox. You will receive notifications for new messages, and you can navigate to the inbox to read and reply to the messages.
Remember, when sending SMS messages from your tablet, the recipient will view your messages and your phone number as the sender. It’s important to keep this in mind, as you’d want the recipient to recognize your number and receive your messages without confusion.
Additionally, you can use the messaging app’s features, such as attaching media files or using emojis, to enhance your messaging experience on your Samsung tablet. You can also make use of any advanced features available in the messaging app to further personalize your SMS communication.
Congratulations! You have now successfully enabled SMS on your Samsung tablet and can seamlessly send and receive text messages. Enjoy the convenience and communication capabilities that your tablet now offers.
Conclusion
Enabling SMS functionality on your Samsung tablet can greatly enhance your communication capabilities and provide you with a more versatile device. With the ability to send and receive text messages on your tablet, you can stay connected, manage multiple phone numbers, and enjoy the convenience of a phone-like experience on a larger screen.
In this article, we explored the step-by-step process of enabling SMS on your Samsung tablet. We started by confirming the SMS support on your tablet and then went on to insert and activate the SIM card. We then configured the default messaging app, set up our phone number, and learned how to send and receive SMS messages.
It’s important to note that the process may vary slightly depending on your tablet model and service provider. Always refer to your tablet’s user manual or contact customer support for specific instructions related to your device.
By following the steps outlined in this guide, you can unlock the SMS functionality on your Samsung tablet and enjoy the benefits of seamless messaging on a larger device.
Whether you need to stay connected with loved ones, manage multiple phone numbers, or enhance your productivity, enabling SMS on your Samsung tablet can provide the perfect solution.
So, go ahead and give it a try. Experience the convenience and flexibility that SMS functionality brings to your Samsung tablet. Stay connected, communicate effectively, and make the most out of your device.