Introduction
Welcome to our guide on how to edit a task template in Asana! Asana is a popular project management tool that allows teams to effectively organize their tasks and collaborate on projects. Task templates in Asana serve as pre-defined sets of tasks that can be reused across multiple projects, saving you time and effort in setting up recurring tasks or standard processes.
Editing a task template in Asana is a straightforward process that allows you to customize the template according to your specific needs. Whether you want to modify the template name, update the task descriptions, add or remove sections, or reorder tasks within the template, this guide will walk you through each step in detail.
By learning how to edit task templates in Asana, you’ll have the flexibility to adapt your templates to changing project requirements and ensure that your team is working efficiently and collaboratively. So, let’s dive in and explore the various ways you can modify and personalize task templates in Asana!
Step 1: Accessing the Task Template
The first step in editing a task template in Asana is to access the template you want to modify. Here’s how you can do it:
- Open Asana on your preferred web browser and log in to your account.
- Once you’re logged in, navigate to the project where the task template is located.
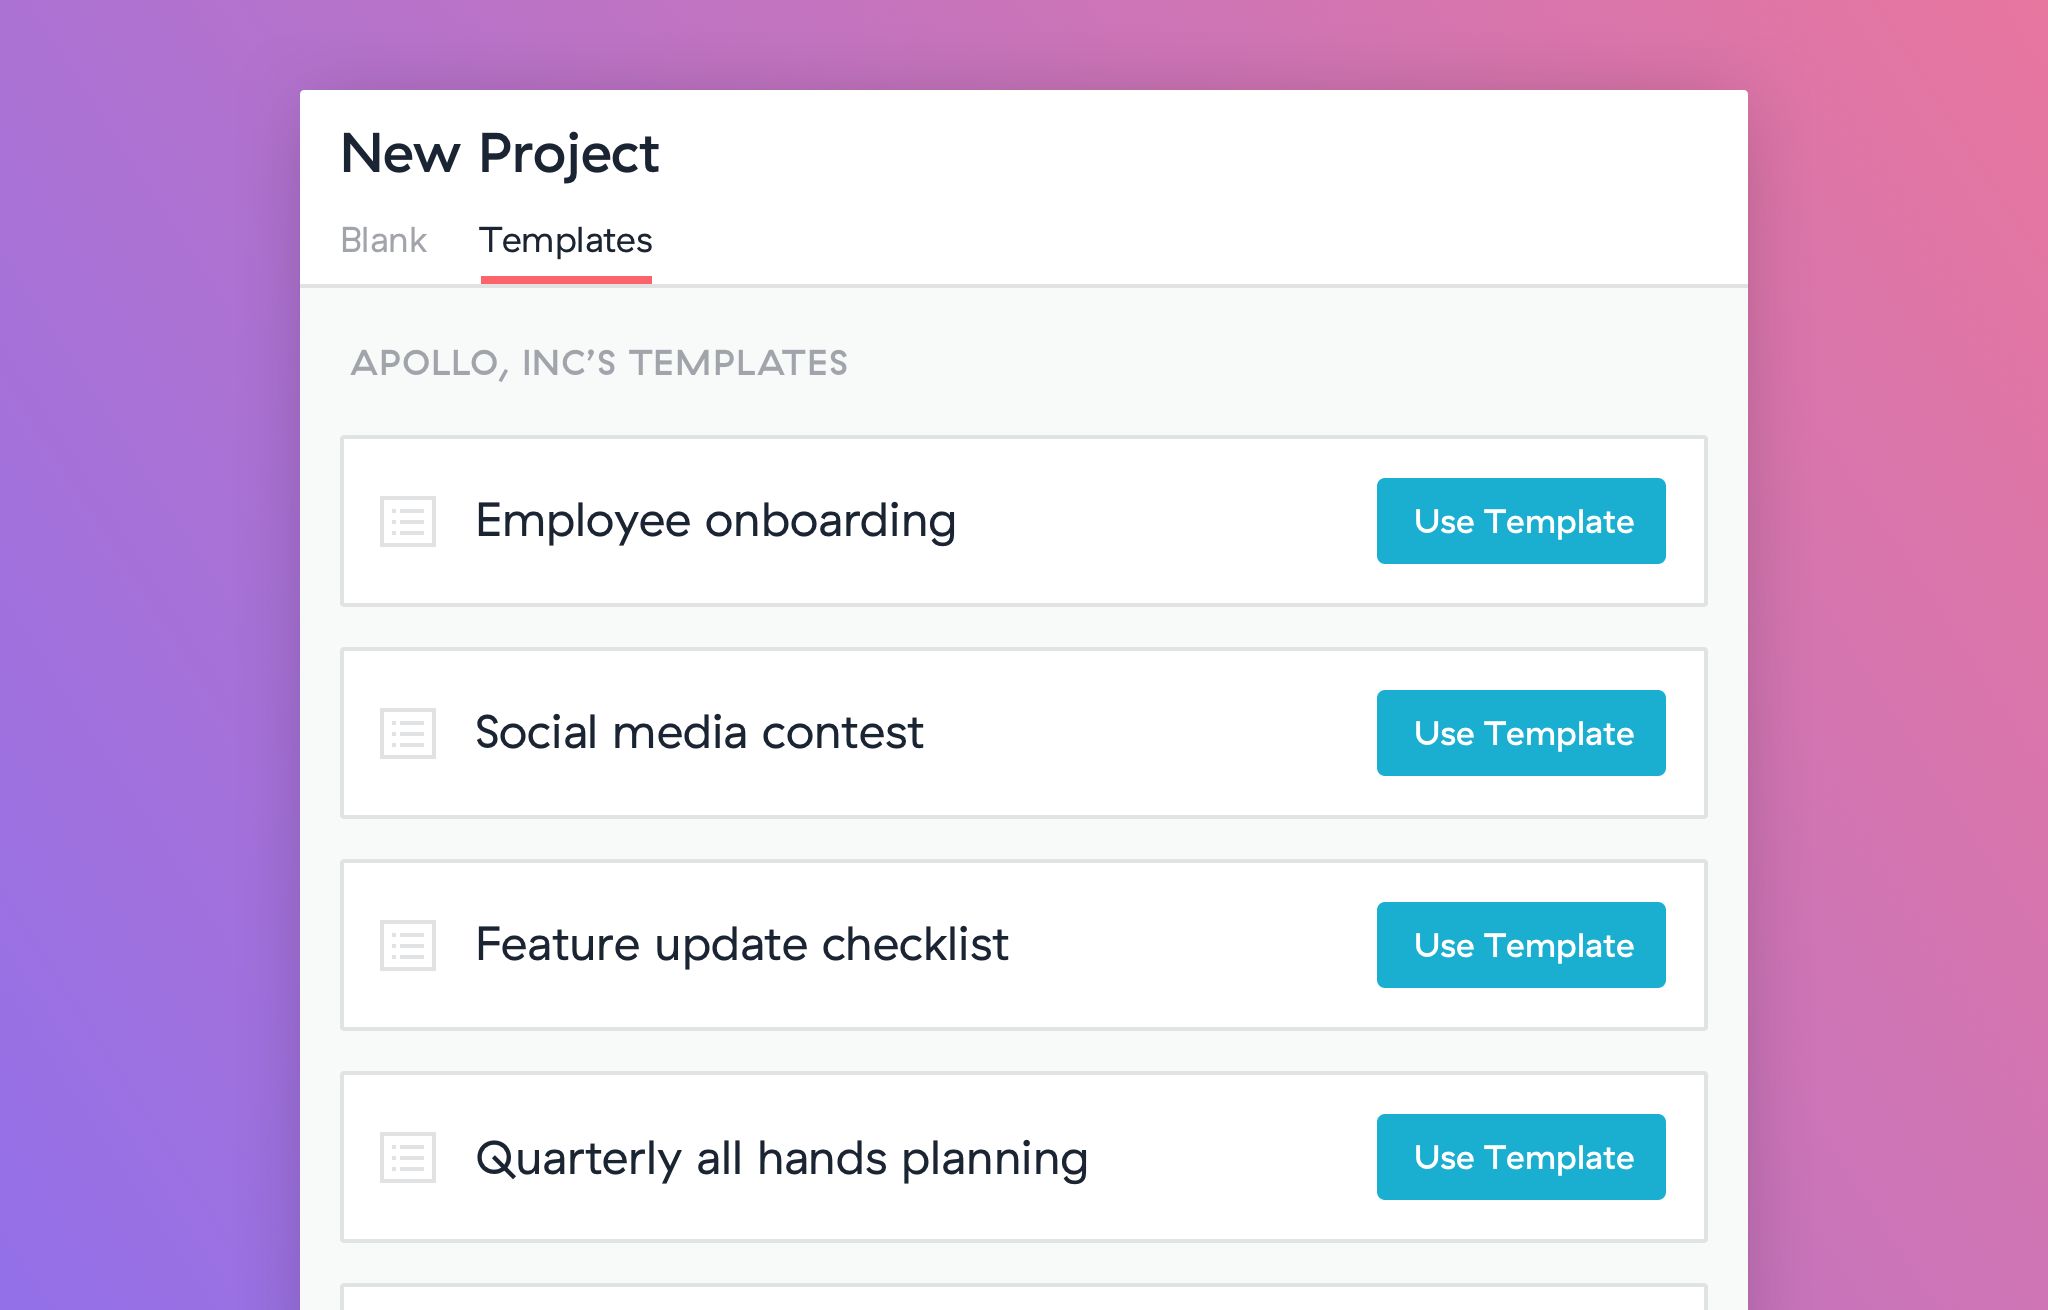
- In the project, click on the “Templates” tab located at the top of the page. This tab will display all the task templates associated with the project.
- Scroll through the list of templates or use the search bar to find the specific template you want to edit.
- Once you’ve located the template, click on its name to open it.
By following these steps, you will be able to access the task template that you wish to edit. It’s important to note that you can only edit templates in projects where you have the necessary permissions. If you’re not able to access or edit a template, reach out to your project administrator or an Asana workspace admin to verify your permissions.
Now that you know how to access the task template, let’s move on to the next step of understanding the template information.
Step 2: Understanding the Template Information
Before making any edits to the task template, it’s essential to understand the information and structure of the template. This step will give you a clear overview of the template’s components and enable you to make informed edits later on.
When you open a task template in Asana, you will see various details and elements that make up the template:
- Template Name: The name of the template that is displayed at the top of the page.
- Description: A brief description of the template’s purpose and any additional instructions or details.
- Sections: Task sections serve as categories or groups within the template. They help organize the tasks and provide a logical structure to follow.
- Tasks: The individual tasks that are part of each section. Tasks can be assigned to specific team members, have due dates, and contain descriptions or attachments.
Take some time to review the existing information in the template and understand how it is organized. This will help you identify which areas you need to modify or update to suit your specific needs.
Additionally, it’s a good practice to familiarize yourself with the intended purpose of the template. Understand the goals, objectives, or recurring tasks that the template is designed to address. This will ensure that your edits align with the template’s original purpose and maintain its effectiveness.
Now that you have a clear understanding of the template’s information and structure, you can proceed to the next step: editing the task template name.
Step 3: Editing the Task Template Name
One of the first modifications you might want to make to a task template in Asana is changing its name. Editing the template name allows you to give it a more descriptive or relevant title that aligns with your project or workflow.
To edit the task template name, follow these steps:
- Open the task template you want to edit in Asana by following the steps mentioned earlier.
- Click on the current template name at the top of the page to enable the editing mode.
- Replace the existing name with the new name you want to assign to the template.
- Press Enter or click outside the name field to save the changes.
By following these steps, you can easily update the task template name to better reflect its purpose or content.
When choosing a new name for the template, consider using something descriptive and specific. This will help team members easily identify the template and understand its intended use. Avoid generic or vague names that may cause confusion or make it challenging to differentiate between multiple templates.
Remember, the template name is one of the primary ways users navigate and locate templates, so make sure it is clear and relevant to the project or task it represents.
Now that you’ve successfully edited the task template name, let’s move on to the next step of modifying the task template description.
Step 4: Modifying the Task Template Description
The task template description provides additional context, instructions, or important details about the template. Modifying the description allows you to update or clarify the information to better guide users who utilize the template.
To modify the task template description, follow these steps:
- Open the task template you want to edit in Asana as mentioned in previous steps.
- Locate the description box below the template name.
- Click inside the description box to enable editing mode.
- Update the existing text or add new information to the description box.
- Save the changes by clicking outside the description box.
When modifying the task template description, consider the following best practices:
- Provide clear instructions: Explain how the template should be used, what steps need to be followed, and any specific requirements or considerations.
- Include relevant links or resources: If there are any external references, documents, or additional resources that can assist users, include them in the description.
- Highlight important details: Use bullet points or bold text to emphasize critical information or key points that users should be aware of.
By modifying the task template description, you can ensure that users have all the necessary information and guidance to effectively utilize the template in their projects.
Next, we’ll explore how to add or remove sections in the task template to further customize it according to your needs.
Step 5: Adding or Removing Sections in the Task Template
Sections in a task template help organize tasks into logical groups or categories. Depending on the evolving needs of your project, you may need to add or remove sections within the task template to accommodate new requirements or streamline the workflow.
To add or remove sections in the task template, follow these steps:
- Open the task template in Asana that you want to edit.
- To add a section, scroll to the bottom of the existing sections and click on the “+ Add Section” button.
- Enter a name for the new section and press Enter to create it.
- To remove a section, hover over the section name and click on the three dots icon that appears on the right side.
- Select “Delete” from the options presented to remove the section.
When adding or removing sections, consider the overall structure and organization of the template. Make sure the sections are clear and coherent, grouping related tasks together.
Adding new sections can help categorize tasks and make them easier to navigate, especially in complex projects or templates with numerous tasks. Conversely, removing sections that are no longer necessary can simplify the template and reduce clutter.
Remember, if you add or remove sections in a task template, you may also need to adjust the order of the tasks within those sections. We’ll cover how to reorder tasks in the next steps.
Now that you know how to add or remove sections, let’s move on to adding or removing tasks within a section.
Step 6: Adding or Removing Tasks in a Section
Within each section of a task template, you have the flexibility to add or remove individual tasks. This allows you to customize the template according to the specific tasks required for your project.
To add or remove tasks within a section, follow these steps:
- Open the task template in Asana and navigate to the section where you want to add or remove tasks.
- To add a task, click on the “+ Add Task” button below the section.
- Enter the task name and press Enter to create it.
- To remove a task, hover over the task name and click on the “X” icon that appears on the right side.
When adding or removing tasks, consider the following guidelines:
- Task names should be descriptive: Clearly indicate what each task entails to provide clarity to team members.
- Assign tasks to the appropriate team members: Use the assignee feature to assign the tasks to specific individuals responsible for completing them.
- Set due dates, dependencies, and other details: Customize each task with relevant due dates, dependencies on other tasks, and any additional details or attachments.
By adding or removing tasks within a section, you can tailor the template to match the specific requirements of your project or workflow.
Now that you understand how to add or remove tasks within a section, let’s move on to assigning the task template to a project.
Step 7: Assigning the Task Template to a Project
Assigning the task template to a project ensures that it is readily accessible for your team members and can be easily applied to new projects or existing ones.
To assign the task template to a project, follow these steps:
- Open the task template in Asana that you want to assign to a project.
- In the top-right corner of the template, click on the “Assign Project” button.
- A pop-up window will appear with a list of projects in your workspace. Select the project where you want to assign the task template.
- Click “Assign” to complete the process.
When assigning the task template to a project, make sure to select the appropriate project that aligns with the template’s purpose and intended use. This ensures that the template will be available to the right team members and can be easily utilized in the context of the project.
Assigning the task template to a project streamlines the process of creating new tasks or projects by allowing you to quickly apply the template’s structure and predefined tasks. It saves valuable time and helps maintain consistency across projects.
Now that you know how to assign the task template to a project, let’s move on to reordering sections or tasks within the template.
Step 8: Reordering Sections or Tasks in the Task Template
Reordering sections or tasks within a task template allows you to customize the flow and sequence of tasks to better align with your project’s needs or preferred workflow.
To reorder sections or tasks in the task template, follow these steps:
- Open the task template in Asana that you want to modify.
- Hover over the section or task name that you want to move.
- Click and hold the drag handle (represented by three stacked lines) that appears on the left side of the name.
- Drag the section or task to the desired position within the template.
- Release the mouse button to drop the section or task in the new position.
When reordering sections or tasks, consider the logical flow of tasks and the dependencies between them. Ensure that the order makes sense and aligns with your project’s requirements or standard operational processes.
Reordering sections or tasks within a task template gives you the flexibility to customize the template’s structure to match your team’s workflow preferences and optimize efficiency.
Now that you understand how to reorder sections or tasks within the task template, let’s move on to the final step: deleting a task template.
Step 9: Deleting a Task Template
If you no longer need a task template or want to declutter your project, you have the option to delete it from Asana.
To delete a task template, follow these steps:
- Open the task template in Asana that you want to delete.
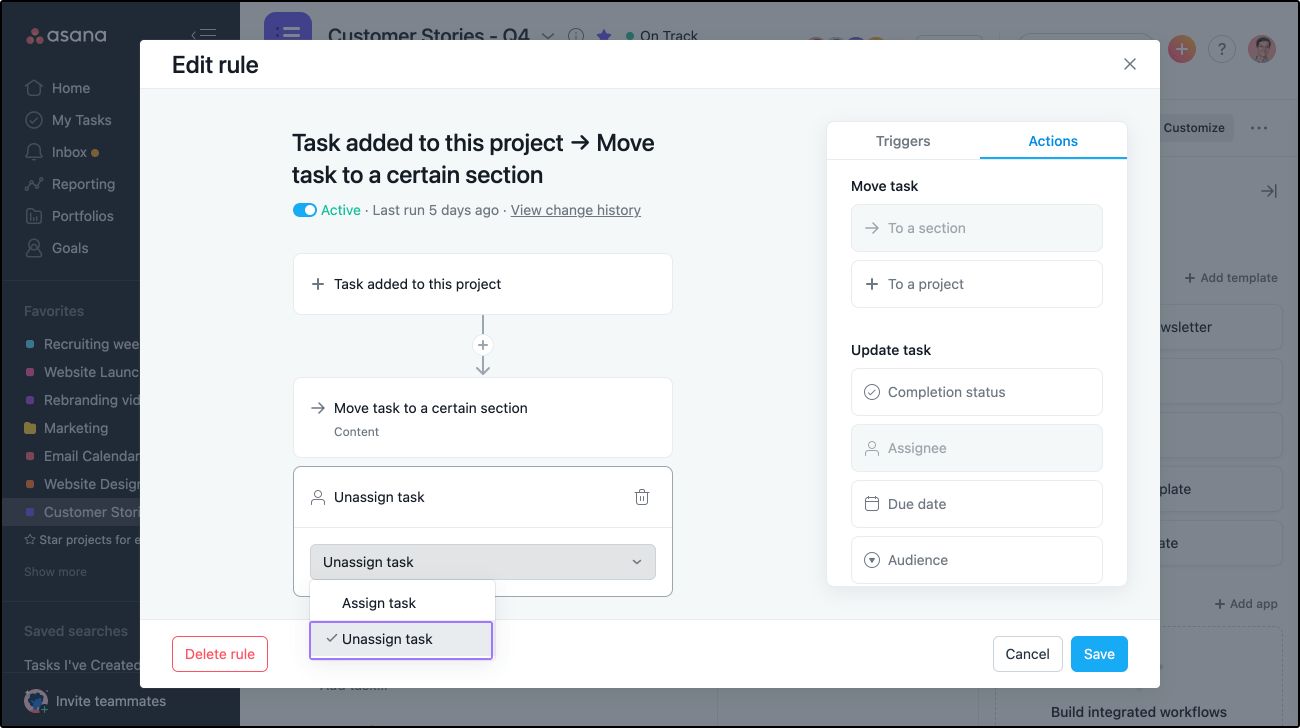
- Click on the three dots menu icon (…) located on the top-right corner of the template.
- Select “Delete” from the dropdown menu.
- A confirmation prompt will appear asking if you are sure you want to delete the template. Click “Delete” to confirm.
Deleting a task template is permanent, so make sure to double-check if you no longer need the template or want to save its structure for future use.
It’s important to note that deleting a task template will not delete any tasks or projects associated with it. Only the template itself will be removed.
By regularly reviewing and deleting unnecessary task templates, you can keep your workspace clean and ensure that your team can easily find and utilize the most relevant and up-to-date templates.
Congratulations! You’ve reached the end of our guide on how to edit a task template in Asana. By following these steps, you can modify and customize your task templates to fit your project’s unique requirements. Remember to regularly review and update your templates as your projects evolve.
Conclusion
Editing task templates in Asana gives you the power to tailor your project management process to the specific needs of your team and projects. By following the steps outlined in this guide, you have learned how to efficiently modify task templates in Asana to enhance productivity and collaboration.
We started by accessing the task template and understanding its structure and information. Then, we delved into editing the template name and description, allowing you to provide clear and relevant details for your team members.
You also learned how to add or remove sections and tasks within the template, enabling you to customize the template according to your project’s requirements. By assigning the task template to a project, you made it readily available for your team members to use and apply in their daily workflow.
Additionally, you discovered how to reorder sections and tasks, ensuring that the template’s sequence aligns with your team’s preferred workflow. Lastly, we covered the process of deleting a task template when it is no longer needed.
By mastering the art of editing task templates in Asana, you have empowered your team to work more efficiently and effectively by streamlining task management and fostering collaboration.
Remember, task templates are not set in stone. Continuously review and refine your templates as your projects evolve, ensuring that they remain relevant and optimized for success.
Now go ahead and put your newfound knowledge into action. Edit your task templates in Asana and witness the positive impact it has on your project management process!