Introduction
Welcome to the world of Minecraft 1.12.2, where creativity and exploration reign supreme! As a passionate Minecraft player, you know that the game requires a significant amount of memory (RAM) to run smoothly and handle the complex worlds you create. In this guide, we will delve into the topic of allocating more RAM to your Minecraft 1.12.2 game, enabling you to enhance your gaming experience without the frustration of lag or crashing.
By allocating more RAM to Minecraft, you can boost performance, reduce load times, and handle larger worlds and modpacks. However, before diving into the technical details, it’s important to have a basic understanding of how RAM allocation works in Minecraft 1.12.2.
Minecraft is a Java-based game that runs on the Java Virtual Machine (JVM), which allows it to be cross-platform compatible. The JVM uses the allocated RAM to store various data and game assets, such as textures, object information, and player data. By default, Minecraft 1.12.2 allocates a certain amount of RAM based on your system’s capabilities, but sometimes this allocation may not be enough for resource-intensive gameplay.
Allocating more RAM to Minecraft can be done through the Minecraft Launcher or via the Minecraft server if you are playing on a multiplayer server. In this guide, we will explore both methods and provide step-by-step instructions to help you increase the RAM allocated to your Minecraft 1.12.2 game.
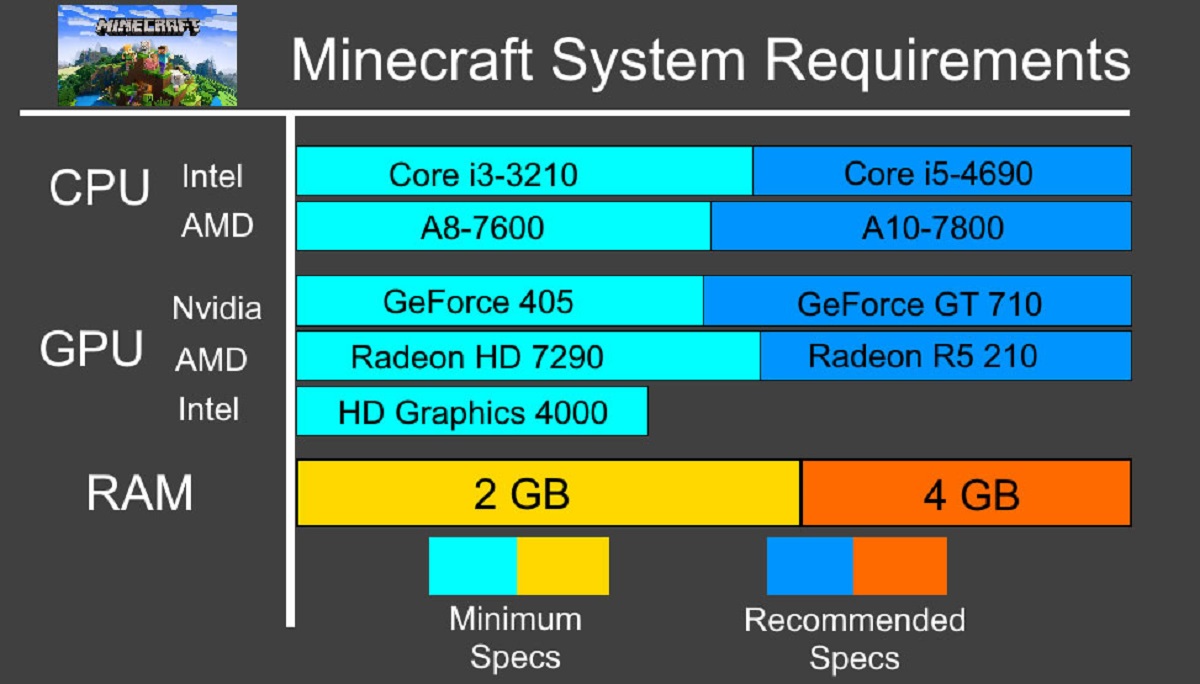
Before proceeding, it’s essential to note that allocating more RAM to Minecraft requires a computer with sufficient hardware capabilities. If your system has limited RAM or is already running resource-intensive programs, allocating too much RAM to Minecraft may cause performance issues or other conflicts.
Now that you have a basic understanding of the importance of RAM allocation in Minecraft 1.12.2, let’s move on to the next section, where we will check your current RAM allocation to determine if any adjustments are needed.
Understanding RAM Allocation in Minecraft 1.12.2
RAM (Random Access Memory) is a crucial component for running any software or game, including Minecraft 1.12.2. It acts as a temporary storage space that stores and retrieves data quickly, allowing for smooth gameplay and efficient resource management.
In Minecraft 1.12.2, RAM allocation refers to the amount of memory that the game is allowed to use while running on your computer. By allocating more RAM to Minecraft, you provide it with the necessary resources to handle complex worlds, modpacks, and other resource-intensive activities.
The default RAM allocation for Minecraft 1.12.2 varies depending on your system’s specifications. On most systems, Minecraft typically allocates around 1 GB of RAM. However, this may not be sufficient for demanding gameplay, especially if you are using high-resolution textures, running multiple mods, or exploring extensive worlds.
Increasing the RAM allocation allows Minecraft to store more game assets and information in memory, reducing the need for constant loading from the hard drive. This helps to improve performance, reduce lag, and prevent crashes, particularly when dealing with large-scale projects or complex mods that require additional resources.
It’s important to note that allocating too much RAM to Minecraft can also have negative consequences. When a game is allocated more RAM than necessary, it may lead to increased processing time, longer load times, and potential conflicts with other software running on your system. Therefore, finding the optimal RAM allocation for your specific setup is crucial.
Now that you have a clear understanding of RAM allocation in Minecraft 1.12.2, let’s move on to the next section, where we will check your current RAM allocation to assess whether any adjustments are required.
Checking Your Current RAM Allocation
Before adjusting the RAM allocation for Minecraft 1.12.2, it’s essential to determine how much RAM is currently being allocated to the game. By performing this check, you can assess if any modifications are necessary to enhance your gaming experience.
There are several methods to check your current RAM allocation:
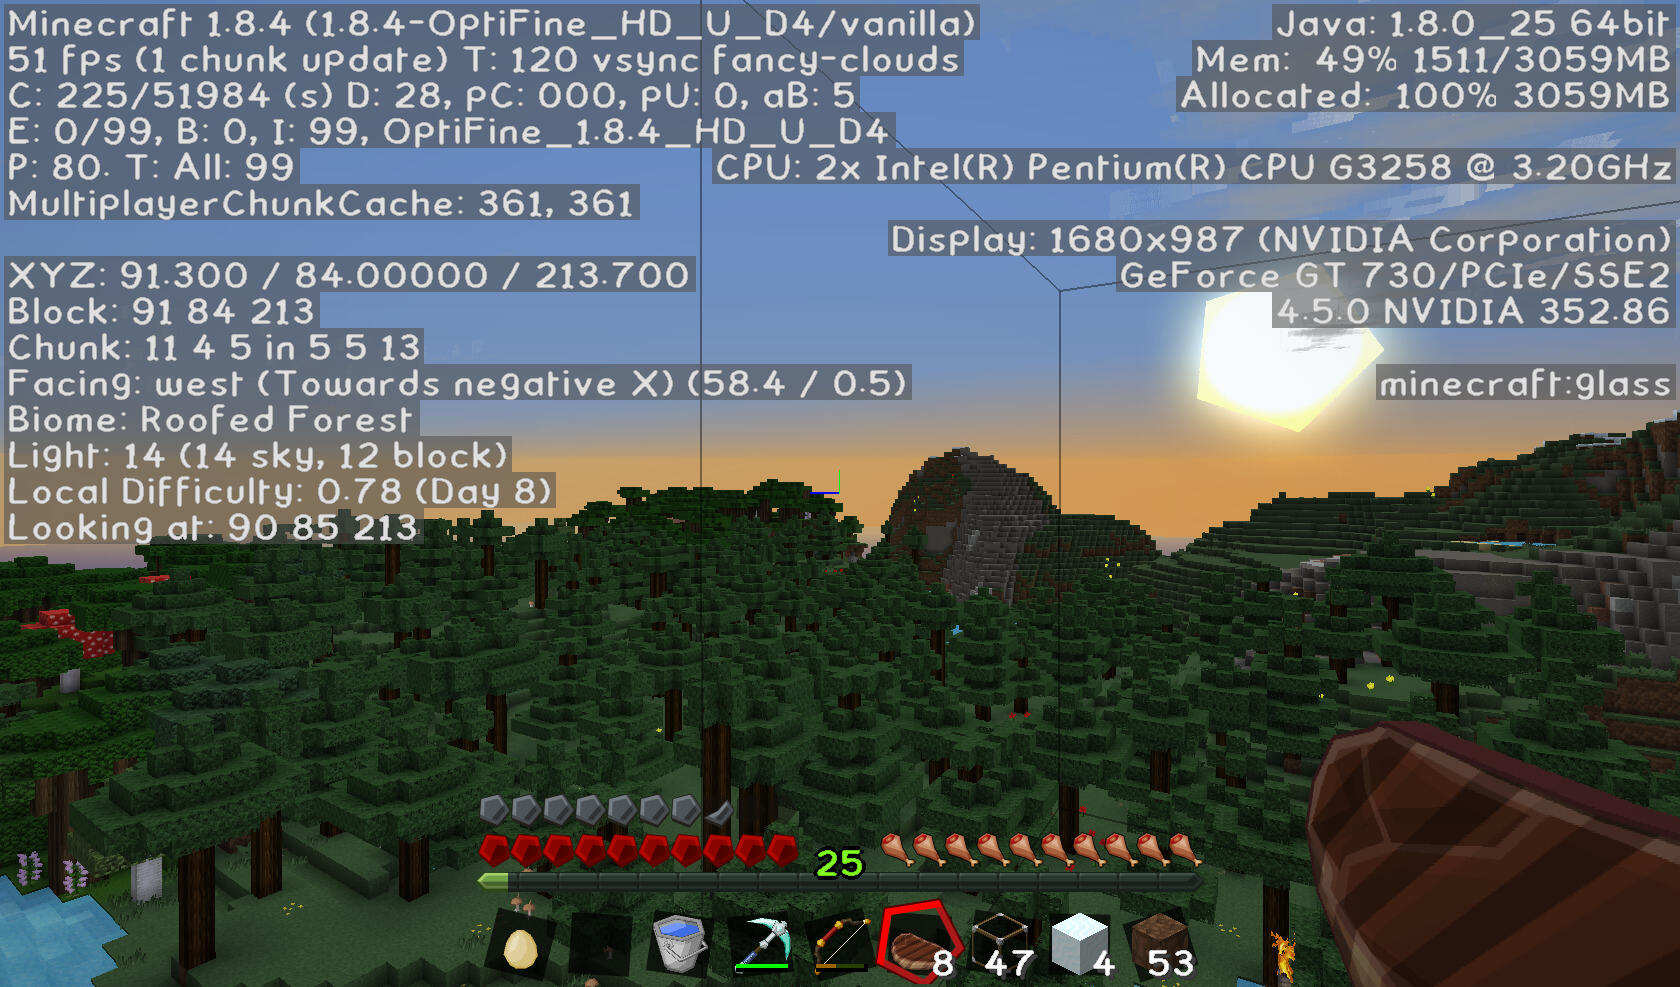
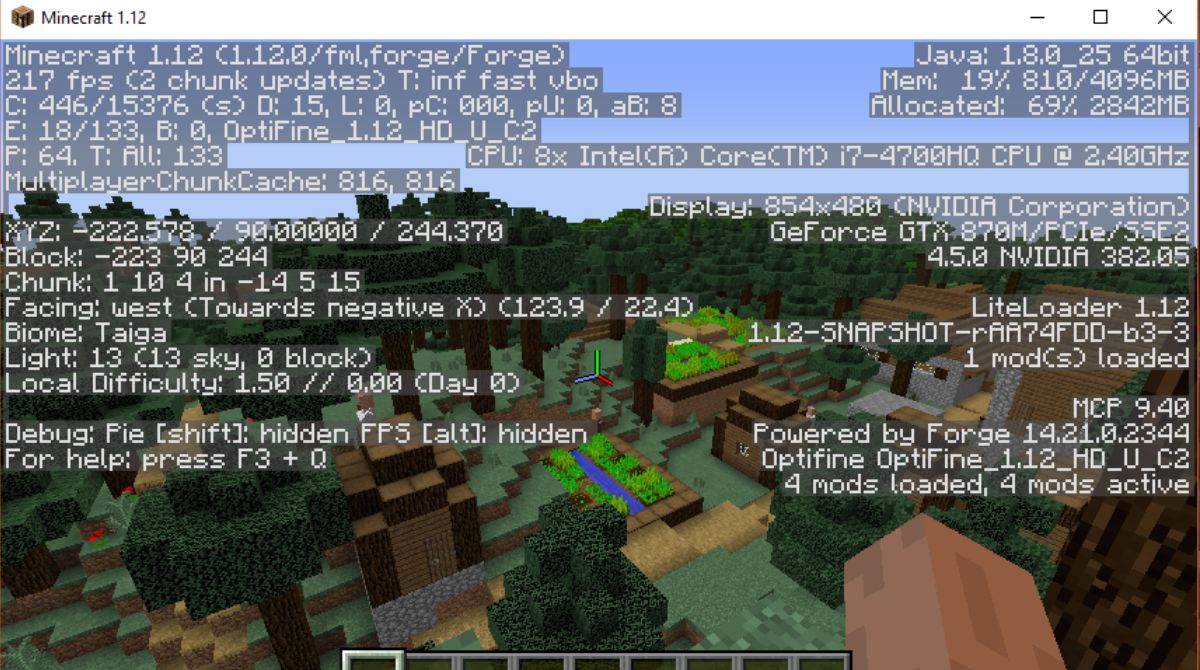
- Minecraft F3 Debug Screen: Launch Minecraft and load into a world. Press the F3 key on your keyboard to open the debug screen. Look for the line that says “Mem: X/Y MB,” where X indicates the current RAM being used by Minecraft and Y represents the total RAM allocated.
- Task Manager (Windows): If you’re using a Windows operating system, you can open the Task Manager by pressing Ctrl + Shift + Esc. Navigate to the “Processes” or “Details” tab and locate the “Java(TM) Platform SE Binary” process. The “Memory (Private Working Set)” column displays the RAM usage for Minecraft.
- Activity Monitor (Mac): For Mac users, open the “Applications” folder, go to the “Utilities” folder, and launch the “Activity Monitor.” In the “Memory” tab, locate the “Java” or “Java Application” process and check the “Memory” column to view the RAM allocation for Minecraft.
Once you have determined your current RAM allocation, consider the following factors:
- Total System RAM: Take note of the total amount of RAM available on your computer. Allocating more RAM than your system can handle may lead to performance issues.
- Available RAM: Check how much unused RAM is available when Minecraft is running. If your system has limited available RAM, allocating too much to Minecraft could negatively impact other applications.
- In-Game Performance: Assess the game’s performance while playing. If you experience frequent lag, long loading times, or crashes, it may be an indication of insufficient RAM allocation.
By considering these factors and checking your current RAM allocation, you will have a better understanding of whether increasing the allocation is necessary. In the next section, we will explore how to adjust RAM allocation through the Minecraft Launcher.
Adjusting RAM Allocation in the Minecraft Launcher
To allocate more RAM to Minecraft 1.12.2, you can make adjustments directly through the Minecraft Launcher. The launcher provides a simple and user-friendly method to modify the RAM allocation for the game.
Follow these steps to adjust the RAM allocation:
- Launch the Minecraft Launcher: Open the Minecraft Launcher on your computer by double-clicking the desktop icon or searching for it in your program files.
- Select “Installations”: Once the launcher is open, click on the “Installations” tab at the top of the window. This section allows you to manage different Minecraft versions and profiles.
- Edit the Game Installation: Find the version of Minecraft 1.12.2 that you want to allocate more RAM to and click the three dots (…) on the right side of the version. Then, select “Edit” from the drop-down menu.
- Modify RAM Allocation: In the installation settings, locate the “More Options” section. Here you will see a field labeled “JVM Arguments”. This is where you can modify the RAM allocation for Minecraft.
- Allocate More RAM: To increase the RAM allocation, add the following line of text before the existing JVM arguments: “-Xmx4G” (without quotes), where “4G” represents the desired amount of RAM to allocate. For example, if you want to allocate 4GB of RAM, the line should read “-Xmx4G”.
- Save and Launch: Once you have made the modifications, click the “Save” button to save the changes. Then, select the Minecraft 1.12.2 version you edited and click the “Play” button to launch the game with the new RAM allocation.
It’s important to note that the RAM allocation should be adjusted based on your system’s capabilities and the amount of available RAM. Allocating too much RAM can lead to performance issues or conflicts with other programs running on your computer. Start with a conservative increase and monitor the game’s performance before making further adjustments.
With the RAM allocation adjusted in the Minecraft Launcher, you can now enjoy smoother gameplay and handle more resource-intensive activities in Minecraft 1.12.2. In the next section, we will explore an alternative method of allocating RAM through the Minecraft server for multiplayer gameplay.
Alternative Method: Allocating RAM through the Minecraft Server
If you are playing Minecraft 1.12.2 on a multiplayer server, you can allocate more RAM to the game through the Minecraft server settings. This method allows you to adjust the RAM allocation specifically for multiplayer gameplay, ensuring a smoother experience for you and other players.
Follow these steps to allocate more RAM through the Minecraft server:
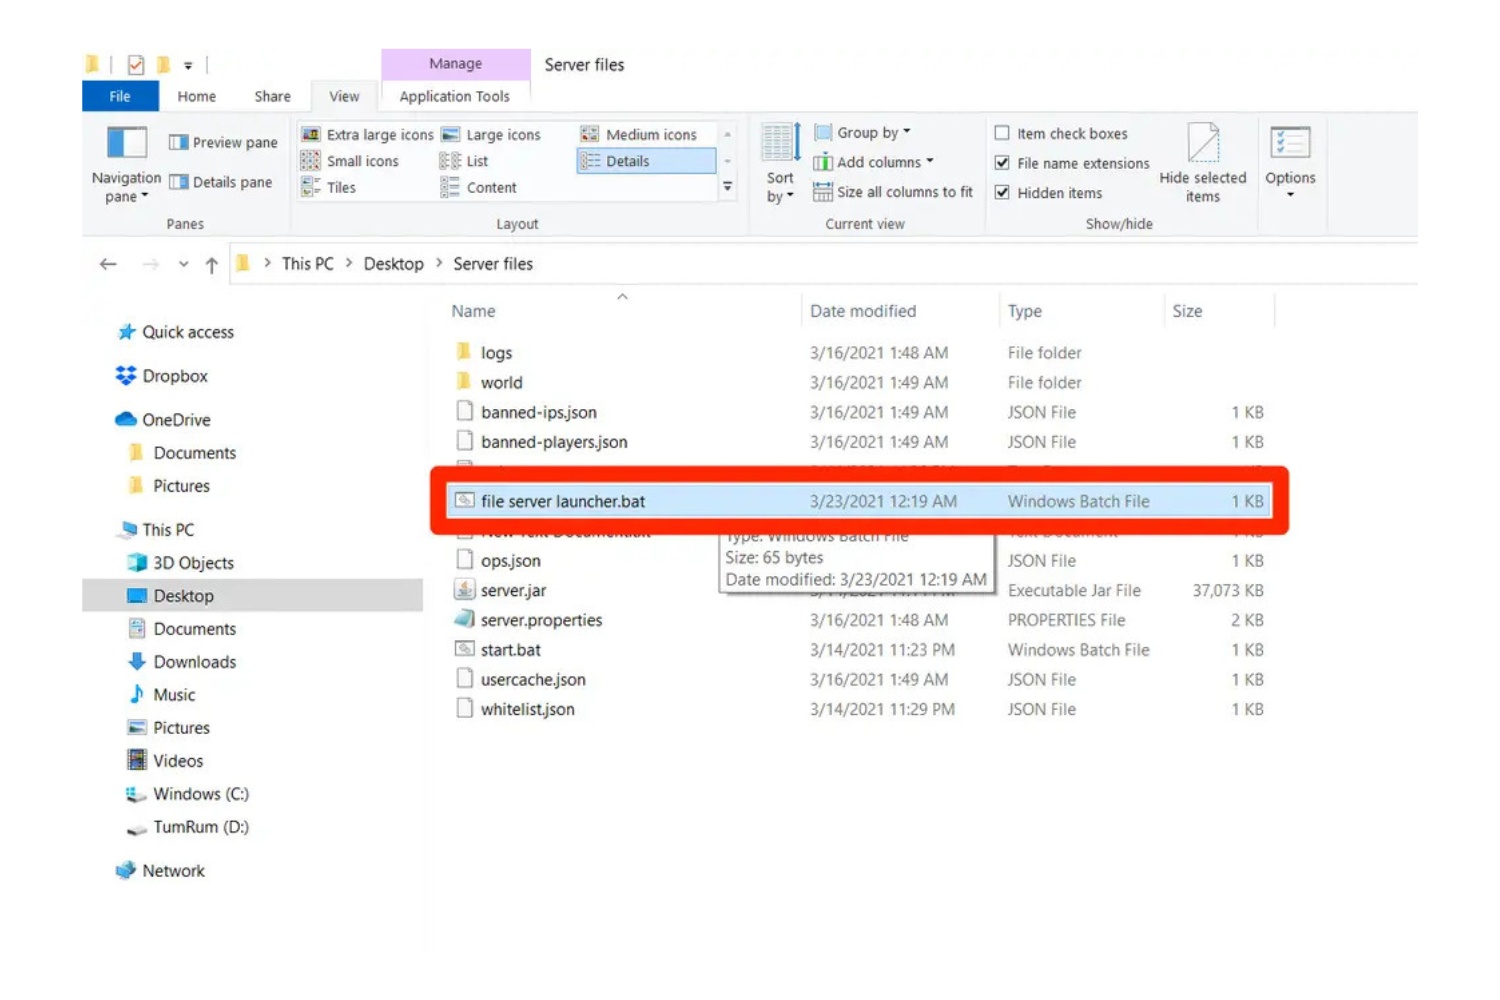
- Access the Server Directory: Locate the directory on your computer where the Minecraft server files are stored. This is usually the folder where you initially set up the server.
- Edit the Server Launch Command: Open the server.properties file using a text editor. Look for a line that starts with “java -Xmx” or “java -Xms”. These lines specify the minimum (-Xms) and maximum (-Xmx) RAM allocation for the server.
- Adjust the RAM Allocation: Modify the values for -Xmx and -Xms to increase the RAM allocation. For example, if the line reads “java -Xmx2G -Xms1G”, you can change it to “java -Xmx4G -Xms2G” to allocate 4GB of RAM maximum and 2GB of RAM minimum.
- Save and Restart the Server: Save the server.properties file after making the modifications. Then, restart the Minecraft server to apply the changes and allocate the new amount of RAM.
Remember to allocate an amount of RAM that aligns with your computer’s capabilities and the available system resources. Allocating too much RAM can lead to performance issues or conflicts with other programs.
Using this method, you can ensure that the Minecraft server has sufficient resources to handle multiplayer gameplay, reduce lag, and prevent crashes due to insufficient RAM allocation. Make sure to communicate with the server administrator and other players to confirm the optimal RAM allocation for a smooth and enjoyable multiplayer experience.
Now that you are familiar with the alternative method of allocating RAM through the Minecraft server, you have the knowledge and tools to enhance your multiplayer gameplay in Minecraft 1.12.2. In the next section, we will address common troubleshooting issues that may arise in the process of adjusting RAM allocation.
Troubleshooting and Common Issues
While adjusting the RAM allocation in Minecraft 1.12.2 can significantly improve your gaming experience, there are several common issues and troubleshooting steps you may encounter along the way. Here are some solutions to help you resolve any problems you may encounter:
1. Insufficient System Resources: If you experience performance issues or conflicts with other programs after allocating more RAM to Minecraft, it may be due to insufficient system resources. Consider closing unnecessary programs or upgrading your computer’s hardware, such as adding more RAM.
2. Intermittent Crashes or Freezes: If Minecraft consistently crashes or freezes after adjusting the RAM allocation, try reducing the allocated amount. Excessive RAM allocation can cause instability, especially if other system resources are limited.
3. Third-Party Mods or Plugins: Some mods or plugins may have specific memory requirements or configurations. Ensure that your mods and plugins are compatible with the desired RAM allocation by checking their documentation or consulting with their developers.
4. Incorrect Syntax: When modifying RAM allocation through the Minecraft Launcher or server, be cautious of any syntax errors. One mistake in the command line or configuration file can prevent the game from launching or cause unexpected behavior.
5. Outdated Java Version: Make sure you are using the latest version of Java for optimal performance and compatibility with Minecraft 1.12.2. Outdated Java versions may not recognize or utilize the increased RAM allocation effectively.
6. Conflicting Java Arguments: If you have previously added any Java arguments or modifications to the Minecraft launcher or server, they may conflict with the new RAM allocation. Remove or review any existing Java arguments to avoid compatibility issues.
7. Backup and Reinstall: If all else fails and you are still experiencing significant issues, consider backing up your Minecraft worlds and save files, then reinstalling the game. This can help clear any lingering conflicts and restore default settings.
Remember to document any changes or modifications you make during the troubleshooting process. This will ensure that you can easily revert to previous configurations if necessary.
By utilizing these troubleshooting steps and addressing common issues, you can optimize the RAM allocation in Minecraft 1.12.2 and enjoy a smoother and more enjoyable gaming experience.
Conclusion
Allocating more RAM to Minecraft 1.12.2 is essential for enhancing performance, reducing lag, and improving gameplay experiences. By understanding how RAM allocation works in Minecraft, checking your current allocation, and adjusting it through the Minecraft Launcher or server, you can optimize your gaming experience.
In this guide, we explored the concept of RAM allocation, its importance in Minecraft 1.12.2, and the methods for adjusting it. Through the Minecraft Launcher, you can modify the RAM allocation for single-player gameplay, while the Minecraft server allows you to allocate more RAM for multiplayer experiences.
We also covered common troubleshooting and issues that may arise when adjusting RAM allocation, such as insufficient system resources, crashes, conflicting Java arguments, and outdated Java versions. By following the provided troubleshooting steps, you can address these issues and ensure smooth gameplay.
Remember that allocating the right amount of RAM is crucial for optimal performance. Allocating too much can strain your system, while allocating too little can lead to performance issues in Minecraft.
By utilizing the knowledge and techniques outlined in this guide, you can fine-tune your Minecraft 1.12.2 gaming experience and unlock its full potential. Enjoy exploring vast worlds, experimenting with mods, and building remarkable creations with improved performance and reduced lag!